background image

12

Spiral spot cleaning mode, it moves in spiral around 
within 1.5m radius. But once it can not keep moving 
in spiral, return to auto mode. 

22

33

44

55

11

 Usa
ge of

 r

obot c

leaner

Cleaning

mode

User can set the cleaning mode with 

Mode

 button on the main body 

or remote control. 
(But, cleaning mode can be changed when the robot cleaner is stopped)

Auto

mode

Mopping

mode

Spot

mode

Climb

mode

Install microfiber wet mop then start mopping mode.

- Dust bin and main brush must be separated from 
the main body to install wet mop before use. (Refer to page 8)

- It is set not to go over the carpet or barriers 
  with more than 5mm.

Timer

cleaning

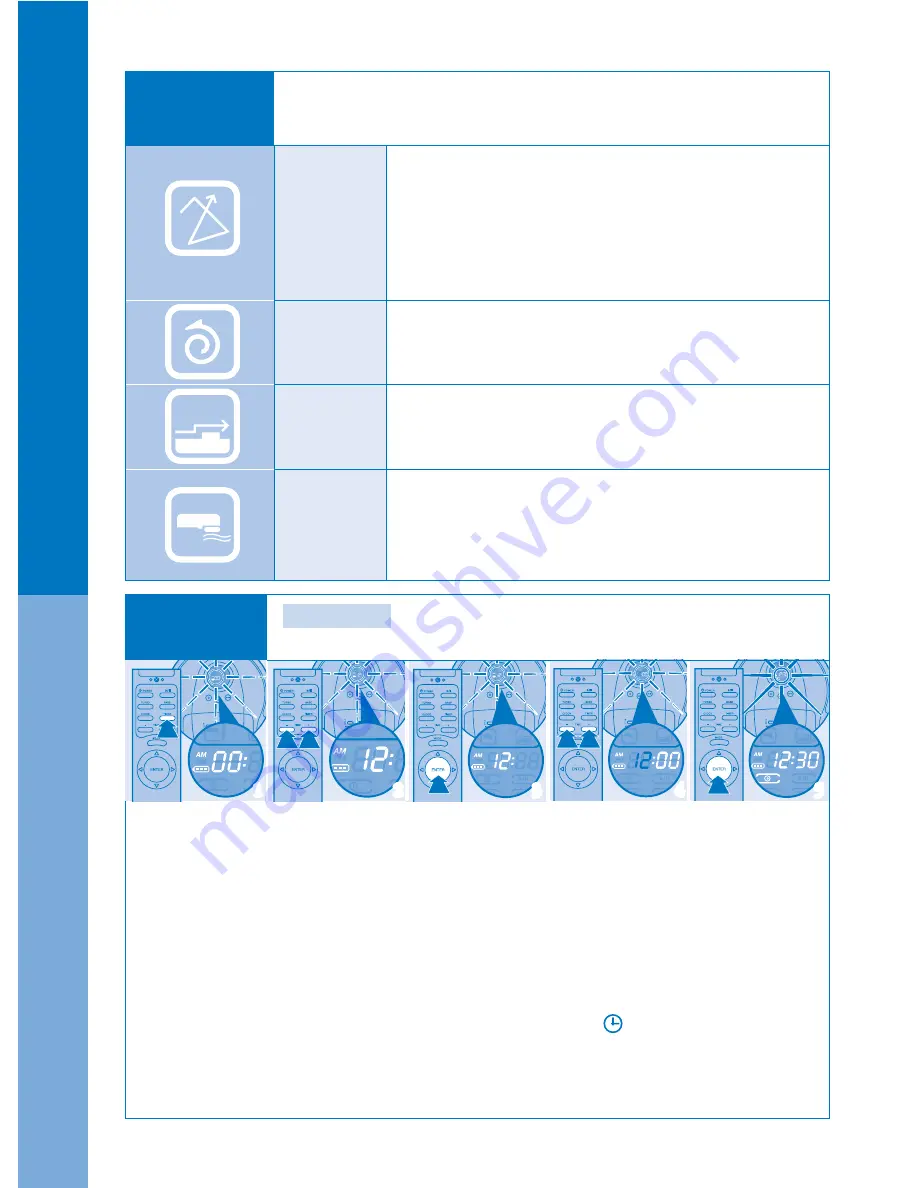
Timer setting

  Robot cleaner will operate automatically on the set time 

even the user is out. 

[Note]

 Current time must be set to use timer cleaning.

1. Press 

Timer 

button of the remote control. 

    Time display will flash on the display screen. 
    

[Note] 

If the time was set already, it will show the previous setting. 

              Press the button again to set the timer.
2. Set the “

Hour

” with 

TIME

 (+), (-) button to desired time.

3. Press 

Enter

 button to confirm. Display screen will show the set time.

4. Set the “

Minute

” with 

TIME

 (+), (-) button. Display screen will show the set minute.

5. Press 

Enter

 button after setting the desired time. 

    Display screen will show the timer time and the timer icon(     ) will appear.
    Robot cleaner will start cleaning on the set time.
6. To cancel the timer, press 

Timer 

button then press 

Enter

 button when the time display flickers 

    on the display screen.

※Refer to page 10 for setting the current time.

As a normal cleaning mode, it moves in zig-zag, random, 

along the edge of area to clean.

- In case the battery is short during cleaning, 

  it will charge first then return to its charging station.

- It is set not to go over the carpet or barriers 

  with more than 5mm.

※ If you want the robot cleaner to climb over around 

    5mm high barriers, change the mode to 

CLIMB.


It can climb around 13mm high threshold and cleans.
The cleaning patten of the robot cleaner is the same with 

AUTO MODE.


Содержание YCR-M04-02

Страница 1: ...0 Gasan dong Guemcheon gu Seoul Corea TEL 82 2 2026 1430 FAX 82 2 2026 1440 www iclebo com english www yujinrobot com english Model Name Color Size Weight Speed Charging time Using time Battery Noise Level Energy consumption Battery 4S1P Iclebo home Black pearl D 35cm H 10cm 3 9kg 30cm sec About 2 hours Maximum 90 minutes Lithium Ion 60dB Charging 41 8 Watt Standby 1 Watt under ...

Страница 2: ...rush Assemble ultra microfiber mop Remove protection film Insert remote control battery Check list before cleaning Install Charging station Charging Time setting Cleaning space preparation Using the robot cleaner Start stop cleaning Using move charge turbo function Cleaning mode Auto mode Spot mode Climb mode Mopping mode Timer cleaning Empty dust bin Filter cleaning Change antibacterial filter Ul...

Страница 3: ...e outlet It may cause electric shock or fire In case the water went inside the product you must contact service center for check up even the product was dried thoroughly Do not put or pull the power plug consecutively It may cause electric shock or fire In case of direct charging with adapter connect the adapter to the charging socket of robot cleaner properly It may cause electric shock or fire U...

Страница 4: ...re operating the robot cleaner Suctioning function may not perform well if dust bin is full Check the main components such as antibacterial filter brush and dust bin are assembled properly before cleaning In case you operate the robot cleaner without the main components such as antibacterial filter or brush it won t clean and it may cause breakdown Do not operate robot cleaner when children or pet...

Страница 5: ...In case foreign substance is stuck on the sensor part it may malfunction Please clean the sensor regularly In case of cleaning the foreign substance turn OFF the power switch then use cleaning brush to remove If the robot cleaner operates all of the sudden it may cause injury or serious damage to the product In case the robot cleaner or components are destroyed contact the manufacturer or service ...

Страница 6: ...microfiber wet mop User Manual MOD E Top of the robot cleaner Bottom of the robot cleaner Lid Power button Mode button Start Stop button Bumper Barrier sensor Manual charging jack Motor protection filter Floor detection sensor Side brush Charging terminal Fixed pin for side brush Floor detection sensor Lithium ion battery Front wheel fixed cover Front wheel Front wheel position On Offswitch On Off...

Страница 7: ...op button Turbo mode button Charge button Timer button Cleaning time setting button Mode button Direction button Enter button Details for best cleaning Please follow the instructions below for high cleaning efficiency Empty the dust bin after using the robot cleaner Close the door to separate the areas for cleaning Remove all the non fixed objects such as toys magazines or shoes before cleaning Do...

Страница 8: ...fer to Product control and maintenance p 13 Using remote control It is more convenient when you operate the robot cleaner with remote control Press the power button of the remote control to start robot cleaner Press power button to stop the operation of the robot cleaner when it s cleaning User can choose one from four modes with Mode select button Select Auto mode for general cleaning For wet mop...

Страница 9: ...h the R shaped side brush into semicircle R shaped display Ultra microfiber wet mop Mop plate Example of wrong assembly Example of proper assembly 1 Open the dust bin cover of the robot cleaner to separate the dust bin 2 Turn the robot cleaner over to separate main brush cover and side brush 3 Assemble the mop board to the fixing part on the bottom of the robot cleaner Insert the mop carrier the f...

Страница 10: ...e Fix the station with the sticker on the bottom for safer use 3 No barriers should exist within left right 0 5meters front 1 5meters from the charging station 4 Wind the power cord shown as 5 Connect the power cord and adapter as the picture above Status display lamp will appear red on the charging station Charging with power off 1 In case the robot cleaner was not used for a long period or the p...

Страница 11: ...me setting Cleaning space preparation Auto charge during use 4 If the battery is not enough when the robot cleaner is operating it will return to charging station for re charge Note If you want to charge the robot cleaner while cleaning press Base button on the remote control Robot cleaner will move to charging station for re charge 5 Once the robot cleaner is properly placed to the charging stati...

Страница 12: ...creen and start cleaning Press Direction button to move the robot cleaner to your wanted direction Also user can change the direction when the power is on but not suctioning Base message will appear on the display screen then robot cleaner will move to the charging station and start charging To return to normal suction status press Turbo button again 2 Press the power button of the robot cleaner o...

Страница 13: ...already it will show the previous setting Press the button again to set the timer 2 Set the Hour with TIME button to desired time 3 Press Enter button to confirm Display screen will show the set time 4 Set the Minute with TIME button Display screen will show the set minute 5 Press Enter button after setting the desired time Display screen will show the timer time and the timer icon will appear Rob...

Страница 14: ...sert it to the main body 4 Shake the dust bin left right to remove the waste inside Clean the inner part of the dust bin using cleaning brush 3 Divide the filtering device from dust bin as shown in the picture then separate the filter 2 Hold the dust bin holder and lift up then separate it from the main body 1 Lift up the dust bin cover to separate from the main body 2 Hold the dust bin holder and...

Страница 15: ...eparate the dust bin from the main body then divide the filter of the dust bin 2 Change the used antibacterial filter to new one after dividing the filter The white side of the antibacterial filter to the filter case then assemble 3 Insert the dust bin with new antibacterial filter to the main body Change antibacterial filter 1 Separate the microfiber mop from the mop board 2 Dry it thoroughly aft...

Страница 16: ...hair or foreign substance stuck on the main brush using the cleaning brush Use scissors or knife along the main brush to remove the hair easily 5 After cleaning put the square shaped bump on the left side of the main brush to the square shaped part Main brush cleaning Furrow 1 Wipe the sensor of the robot cleaner using cotton buds 2 Wipe the sensor on the bottom of the robot cleaner using cotton b...

Страница 17: ... re assemble as the method above Side brush cleaning 1 Separate the side brush with both hands 2 Clean dust and foreign substance using the cleaning brush 1 Wipe the robot cleaner with lightly wet mop Do not use polishing product or acetone Power must be turned off before mending the robot cleaner If the robot cleaner operates all of the sudden it may cause injury Mend the robot cleaner 1 Pull out...

Страница 18: ...eaner is not used for a long period turn off the power switch on the bottom of the main body 2 Keep the robot cleaner away from direct sunlight and well ventilated place 3 Separate the batteries from the robot cleaner in case not using the product for a month ...

Страница 19: ...tery of remote control is out Infrared sensor beam part of the remote control is blocked or dirty Remote control is too near to the charging station Check the power switch on the bottom of the main body Re charge the robot cleaner Insert the battery of robot cleaner properly Change the battery of the remote control Wipe the infrared sensor beam part of the remote control with soft cloth Keep a dis...

Страница 20: ...rea E 3 Dust bin error Dust bin is not properly assembled See Product control maintenance and install properly E 4 Wheel motor overload Check if foreign substance such as hair or lint exists on the wheel See Product control maintenance and remove the foreign substance E 5 Brush motor overload Check if foreign substance such as hair or lint exists on the main brush or side brush See Product control...

Страница 21: ...ir Warranty of this product is for 1 year and the battery is for 6 months Paid repair Collect the equivalent amount of paid repair service then exchange product Exchange product Exchange product or refund Exchange product or refund Loss occurred during delivery or installation upon the purchase of the product Same problem occurred for the 4th time or breakdown for the 5th time with different defec...

Отзывы: