background image

Granular Ice                                                                                                                                 Technical Service Manual


32 

                                                                                                                                                                                                             COD: IQ02_404MTIN.DOC 


9) Disconnect machine, remove plug, open faucet and let water run for 2 to 3 minutes. 

10) Close faucet, place plug, open faucet and connect the machine. 

     **At this point sanitary cleaning starts 

11) Slowly add bleach to water trough for at least 5 minutes. Allow machine to make ice for at 

least 15 minutes. 

WARNING:** Discard ice produced during cleaning procedure. 

12)  Disconnect  unit,  place  cover  and  check  for  water  leaks.  Change  seal  in  water  plug  if 

necessary. 

13) Replace filters if necessary. (Machines provided with 5mm wire gauze filters). 

14) Reconnect machine. 


Cleaning the water inlet filters 

These round wire gauze filters placed on either end of the water hose to mains, often become 

blocked  in  the  first  few  days  of  use,  especially  when  the  plumbing  installation  is  new.  Clean 

them under a jet of water. 


Checking for water leaks


This  must  be  done  whenever  maintenance  is  carried  out  on  the  machine:  check  all  water 

connections,  braces,  tubes  and  hoses  in  order  to  eliminate  leaks  and  prevent  breakages  and 

flooding. Check that the valve closes tightly on models with an automatic cleaning system. 

NOTE:  You  will  observe  that  after  a  certain  period  of  functioning  (the  running-in  period),  low-

pressure pressostats may need to be adjusted. This second adjustment will be final. 


RUNNING-IN CHECK 

It is essential to service the machine after about 10 working days, or earlier if any incident has 

occurred. 


CHECK: 

  Water level 

  Minimum high pressure (fan should stop at 35-37ºC, equivalent to 5.25 bar, 67.5 psi) 

  By-pass opening at  -21ºC ± 0,5ºC during the first few minutes after start-up 

  Ice dispersion cone is spreading ice uniformly inside the bin. 

  Refrigerant  charge  (when  fan  switches  off,  bubbles  should  appear  at  the  sight  glass,  and 

Содержание CD 50

Страница 1: ...ULAR ICE MACHINES MODELS ICETECH CD 50 ICETECH CD 90 ICETECH GR140 ICETECH GR 220 ICETECH GR 400 ICETECH GR 560 ICETECH GR 560 SPLIT CAREFULLY READ THE INSTRUCTIONS CONTAINED IN THIS MANUAL SINCE THEY...

Страница 2: ...commended placement of unit 19 4 2 Water and Drainage 20 4 3 Connecting unit to water source water cooler units 20 4 4 Connecting unit to drain water cooled models 20 4 5 Electrical connection 21 4 6...

Страница 3: ...ne should not be placed outdoors or exposed to rain Connect to drinking water mains This appliance is not intended for use by young children or infirm persons without supervision Young children should...

Страница 4: ...f the evaporator and floods it to the same height as in the water trough Water freezes upon contact with evaporator wall and is scraped off as ice by the vertical rotating auger Ice is carried upward...

Страница 5: ...Granular Ice Technical Service Manual 5 COD IQ02_404MTIN DOC 1 4 Electric diagrams ICETECH CD 90...

Страница 6: ...Granular Ice Technical Service Manual 6 COD IQ02_404MTIN DOC ICETECH GR 560 TRIFASIC...

Страница 7: ...Granular Ice Technical Service Manual 7 COD IQ02_404MTIN DOC ICETECH GR 560 SPLIT...

Страница 8: ...Granular Ice Technical Service Manual 8 COD IQ02_404MTIN DOC ICETECH CD 50...

Страница 9: ...Granular Ice Technical Service Manual 9 COD IQ02_404MTIN DOC ICETECH GR 400 560...

Страница 10: ...alto KG Ancho x fondo x alto KG ICETECH 50 405x515x750 36 480x575x900 41 ICETECH 90 465x595x795 58 535x685x850 63 MODELO Producci n Consumo agua fabricaci n Consumo agua cond Watios Amp Volt Hz Kg 24...

Страница 11: ...RIGERANT CHARGE HIGH PRESURE LOW PRESURE TOTAL AMPS FUSE RATING COMPRESSO R POWER TOTAL POWER MINIMUM MAXIMUM AVERAGE 2 1 2 gr Kg cm 2 Psi Kg cm 2 Psi Kg cm 2 Psi A A W W GR 140 A 500 16 228 17 242 2...

Страница 12: ...tion diagrams for inlet outlet tubes and dimensions 2 2 Consumption data weights crated dimensions and volumes PANEL ICETECH CD 50 Green led Shows that the machine is activated The machine might be st...

Страница 13: ...rvice Manual 13 COD IQ02_404MTIN DOC PANEL ICETECH CD 90 Green button Starts the machine It is indicated with the led on Red led Shows that the machine is stopped by the security element Orange led Sh...

Страница 14: ...900 115 0 39 GR 560 W 177 25 93 750x650x900 113 0 39 MODEL CARG A HIGH PRESSURE LOW INTENS TOTA L FUSE POWER POWER REFRI PRESSURE SECURITY COMPRES SOR TOTAL ABSORBED 404 M NIMUM M XIMUM MEDIUM 2 1 2 G...

Страница 15: ...by a thermostatic valve MODELO CARG A HIGH PRESSURE LOW INTENS TOTA L FUSE POWER POWER REFRI PRESSURE SECURITY COMPRES SOR TOTAL ABSORBED 404 M NIMUM M XIMUM MEDIUM 2 1 2 GR Kg cm2 Psi Kg cm2 Psi Kg...

Страница 16: ...5 210 206 202 191 187 174 167 20 213 209 205 201 190 186 173 15 221 211 208 205 200 190 185 10 224 220 211 208 204 198 188 5 10 15 20 25 30 35 45 330 325 310 300 280 251 232 40 352 342 334 324 306 275...

Страница 17: ...NY HEAT SOURCE THIS WILL AFFECT ICE PRODUCTION AND QUALITY Ambient temperature should be taken 4cm away from the centre of the front grille Water temperature should be taken inside the water trough Ch...

Страница 18: ...according to the European Directives on management of Packaging and Waste Disposal Be sure to include model name and serial number on all claims Serial number is located in the following three places...

Страница 19: ...recommended temperatures you can expect shorter compressor life and decreased production Air cooled units receive air input via front of machine and expel air through rear grille IMPORTANT If front a...

Страница 20: ...ses the filter which is included in the machine should be sufficient However if mains water smells or tastes of bleach this indicates an excess of chlorine which may eventually corrode the stainless s...

Страница 21: ...0 can cause problems or prevent machine from starting Line to base of plug must have a minimum section 2 5 mm2 for models up to GR 220 and 4 mm2 for other models Be sure voltage indicated on rating pl...

Страница 22: ...TURE MAXIMUM 43 C 35 C MINIMUM 5 C 5 C e Is water pressure adequate MAXIMUM 0 7 Kg cm2 MINIMUM 6 Kg cm2 ATENTION Check that voltage and mains frequency is the same as in the rating plate 5 2 Starting...

Страница 23: ...machine is operating Should this happen with a pressure higher than 1Kg cm2 and filters in good condition INCREASE LEVEL by bending the float arm upwards 2 Turn machine off and wait for flotation val...

Страница 24: ...e evaporator A water level sensor has been incorporated to shut off unit until required minimum water level is achieved The optimal water level is indicated in diagram below Pressure controlled Valve...

Страница 25: ...pressure is controlled by starting and stopping fan which provides airflow through condenser Differential is fixed 1Kg cm2 or 14 Psi Cut off pressure should be 16 Kg cm2 228 Psi Low pressure values i...

Страница 26: ...S TIMER ONLY WORKS WHEN MACHINE IS WARM Safety devices Overload protection device will trip if maximum current intensity A is exceeded hence preventing the motor from overheating due to current peaks...

Страница 27: ...5 Remove side screw that holds bearing with a 5 mm Allen key 6 Introduce M8 50 mm screw in drain plug hole Bearing will come out as you tighten screw 7 Check for wear inside bearing and replace if mo...

Страница 28: ...d flange 3 Remover gearbox using extractor Assembly 1 Lubricate motor axle with grease 2 Place gearbox face up 3 Screw in screw place washer and lower gearbox by tightening nut WARNING Do not hammer 1...

Страница 29: ...damaging them 1 Replace the three evaporator plate screws 2 Replace brackets 3 Reassemble gearbox see previous section 7 4 Upper bearing depending on the model Materials needed Extractor PHILLIPS N 2...

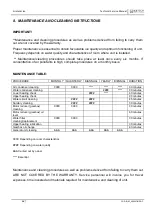
Страница 30: ...BIANNUAL YEARLY BIENNIAL DURATION Air condenser cleaning 0000 0000 30 minutes Water condenser cleaning 90 minutes Lower bearing check 60 minutes Upper bearing check 90 minutes Water circuit cleaning...

Страница 31: ...ing a vacuum cleaner soft brush and or low pressure air Evaporator Water Trough 1 Disconnect machine 2 Remove drain plug situated in lower bearing of evaporator Use a container to collect water 3 Allo...

Страница 32: ...y when the plumbing installation is new Clean them under a jet of water Checking for water leaks This must be done whenever maintenance is carried out on the machine check all water connections braces...

Страница 33: ...H OFF THE MACHINE DUE TO ONE OF THE FOLLOWING Ambient temperature is below 5 C Water temperature is below 5 C Evaporation temperature is below 20 C Cooling temperature below 30 C Refrigerant charge sl...

Страница 34: ...3 component gases separate Always use the liquid phase valve at the end of condenser or accumulator for refills and purges When replacing a compressor wash inside of circuit with a suitable solvent p...

Страница 35: ...ulty compressor B Replace compressor C valvula de expansion cerrada o estropeada or capillary obstructed C Open or Replace valve or capillary and dehydrating filter D Water humidity in refrigerating s...

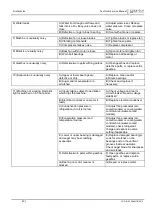
Страница 36: ...place if necessary 5 Ice is too wet A Room temperature too high over 35 C A Relocate unit to a cooler place B Water temperature too high over 30 C B Ensure that filter and inlet tube are away from hea...

Страница 37: ...r evaporator are scratched B Check and replace if necessary 11 Machine not working Red pilot light is switched on in front panel A Input voltage subject to oscillation which trips the machine A Check...

Отзывы: