background image

ICE RS26, powered by Brain OS  

|

  Gen2, v1.1217 – Content Subject to Change


Brain Corporation 

15

INSTALLING BATTERIES 

(if applicable)

WARNING


Batteries emit hydrogen gas. Explosion or fire can result from hydrogen gas. Keep 

sparks and open flames away! Keep battery compartment open when charging. Use 

the proper personnel protective equipment when handling and maintaining batteries.

CONNECTING THE BATTERIES

 (if installed and shipped) 

Lift seat exposing battery compartment. Remove tape from the two red battery connectors. 

Attach batteries as shown in the picture.

RECOMMENDED BATTERY SPEC:

•  (4) 6 V, Trojan J305 WET LEAD ACID OR EQUIVALENT

•  (4) 6 V, FullRiver DC335-6 Deep Cycle MAINTENANCE FREE AGM BATTERY OR EQUIVALENT

MAX. BATTERIES DIMENSIONS:

11.8 in (L) X 7in (W) X 11.4 in (H) (300mm X 180mm X 290mm)

1.  Turn off the momentary 

key/ignition switch

2.  Remove the operator seat and the 

battery box from the scrubber.

3.  Carefully place batteries 

into compartment as 
shown in fi gure above.

NOTE: 

Do not drop the batteries into the compartment!

4.  Connect battery cables to posts in order as shown in fi gure above. Ensure all battery cable boots are installed and 

properly seated.

5.  Install the battery box and seat. Use caution when installing the seat to prevent damage to the components surrounding 

the battery compartment.

NOTE: 

RED to POSITIVE


and 

BLACK to NEGATIVE.

Brain Corporation recommends that only trained field technicians or maintenance staff install or replace batteries.

Содержание RS26 GEN2

Страница 1: ...OPERATIONAL MANUAL ROBOTIC SCRUBBER ICE RS26 GEn2 Powered by BrainOS...

Страница 2: ......

Страница 3: ...ng Brushes or Pads Mounting Side And Rear Squeegee Assemblies Filling the Solution Tank Filling Detergent Bottle 18 CONTROLS OVERVIEW Manual Functions Right Side Control Panel One Touch Button Vacuum...

Страница 4: ...tion Codes 25 PRE OPERATION CHECKS 26 MANUAL MODE Start Up Brake Device Emergency Stop Buttons 27 AUTONOMOUS MODE Home Location Codes Establishing Home Locations Selecting Locations for the Home Locat...

Страница 5: ...embly Adjusting Side Skirt Height Removing Side Skirt Brake Release Removing the On Board Charger Removing Scrubber Brushes Inserting New Brush 39 BEST PRACTICES Tips for successful operation Establis...

Страница 6: ...s Machine should only be used by trained operators in controlled restricted environments approved by Brain Corp Brain Corp may provide additional training as to the intended use of the machine and the...

Страница 7: ...ith reduced physical sensory or mental capabilities or lack of experience and knowledge Please see the ASA and EULA for further uses and restrictions If the machine operates autonomously in an area wh...

Страница 8: ...may impair safety and potentially damage the machine The Machine is not designed or intended for use in environments requiring fail safe performance including without limitation any application in wh...

Страница 9: ...e in accordance with your local environmental regulations Do not use on surfaces having a gradient exceeding 3 AUTONOMOUS or 3 MANUAL All doors and covers are to be positioned as indicated in the inst...

Страница 10: ...G PATH WIDTH 26 IN 650 MM PRODUCTIVITY RATE IN THEORY 14 107 SQ FT HR TRAVEL SPEED MANUAL TRANSPORT 4 MPH 6 5 KM HR MINIMUM AISLE TURN 60 IN 1524 MM PAD BRUSH PRESSURE 77 LBS 121 LBS 165 LBS 35 KG 55...

Страница 11: ...5 Scrub head assembly 6 Side squeegee assembly 7 Brake pedal 8 Accelerator pedal 9 Front drive wheel 10 Operator seat 11 Steering wheel 12 Adjusting handle seat 13 On board battery charger receptacle...

Страница 12: ...Warning light 21 Recovery tank cover 22 Recovery tank 23 Cup holder 24 Cap 25 Detergent bottle 26 Battery box 27 Drain hose recovery tank 28 Drain hose solution tank 29 Vacuum hose 30 Blue autonomy b...

Страница 13: ...n 33 Emergency stop 34 Battery indicator 35 General alert indicator 36 Detergent level indicator and control 37 Water level indicator and control 38 Scrubber depth indicator 39 Horn 40 One touch butto...

Страница 14: ...reverse drive off the ramp 2 For US Domestic customers your batteries are installed prior to crating OUS Install batteries if applicable See INSTALLING BATTERIES 3 Turn on momentary key ignition switc...

Страница 15: ...6 V FullRiver DC335 6 Deep Cycle MAINTENANCE FREE AGM BATTERY OR EQUIVALENT MAX BATTERIES DIMENSIONS 11 8 in L X 7in W X 11 4 in H 300mm X 180mm X 290mm 1 Turn off the momentary key ignition switch 2...

Страница 16: ...remove the pad driver or brush ensure machine is off and scrub head is in the raised position Remove the side squeegee assembly Machine Components 6 and push the edge of the brush downward MOUNTING SI...

Страница 17: ...t your janitorial supply distributor for recommendations regarding proper chemicals CAUTION Before using any cleaning chemicals The Safety Data Sheet SDS for the chemical shall be reviewed by the work...

Страница 18: ...bber The vacuum will also be engaged when this button is pressed The machine is now ready to scrub This button lowers the squeegee located at the rear of the machine The vacuum will also be initiated...

Страница 19: ...r s surface Only the scrub deck is engaged while double scrubbing The squeegee is not in operation allowing solution to remain on the floor for increased cleaning solution dwell time WARNING Double sc...

Страница 20: ...bled scrubber in reverse the squeegee will raise automatically In addition the vacuum motor turns off after a short delay This prevents damaging squeegee The Brain enabled scrubber is equipped with tw...

Страница 21: ...ry settings DETERGENT LEVELS INDICATOR AND CONTROL WATER LEVEL INDICATOR AND CONTROL SCRUBBER PRESSURE CONTROL If any of the warning indicators outlined above appear cease operating machine and correc...

Страница 22: ...e ROC See section on ROC for further details USER INTERFACE LCD TOUCHSCREEN The user interface LCD screen displays various menus that control a variety of functions and options of the Brain enabled sc...

Страница 23: ...to drive the machine Removing pressure from the pedal stops travel The park brake engages after short delay Removing pressure from propel accelerator pedal stops travel The park brake engages after a...

Страница 24: ...cation Codes In addition the following key terms and definitions must be understood to successfully operate the Brain enabled scrubber ROUTE TEACH A NEW CLEANING ROUTE This is the course your ICE RS26...

Страница 25: ...let filter clean them if necessary 3 Check the vacuum hose for debris or blockage Check the squeegees for damage wear and for deflection adjustment 4 Check whether the pad brush is installed properly...

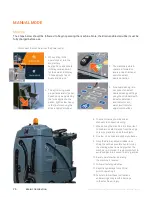
Страница 26: ...anual cleaning is to be conducted select desired cleaning settings using the scrubber depth indicator detergent level indicator and water level indicator adjustment buttons 6 The machine may now be dr...

Страница 27: ...one in the rear of the machine The machine is also equipped with a brake pedal that can be used to control the machine if quicker stopping is needed or when operating on an incline Pushing this butto...

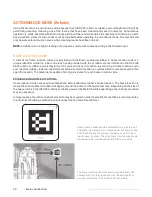
Страница 28: ...on code your robotic scrubber is able to identify the machine s current location as well as which routes are saved to that specific location The machine is capable of storing six routes for each home...

Страница 29: ...t around the home location code 5 If the home location code is visible within the live video camera view and the Brain enabled scrubber is within the appropriate distance from the code the machine wil...

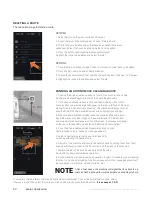
Страница 30: ...not scan the code if the Brain enabled scrubber is not properly positioned 3 When the Brain enabled scrubber sees the home location code it will be visible via the live video image on the user interfa...

Страница 31: ...LAR SERVICE IS NEEDED FOR THE MACHINE TO CONNECT TO THE ROC The ROC Indicator is located on the user interface LCD screen in the status bar When the ROC Indicator is illuminated orange the Brain enabl...

Страница 32: ...tank of all fluid 8 Drain the recovery tank of all fluid clean the recovery tank and flush the drain hose empty and clean and the yellow debris strainer basket at the top of the recovery tank DRAININ...

Страница 33: ...lts NOTE The machine cannot operate when charging ON BOARD BATTERY CHARGER The ICE RS26 powered by Brain OS robotic scrubber has an on board charger position below the seat above the foot plate 1 Plac...

Страница 34: ...urfaces being cleaned Replace when the items are worn MONTHLY MAINTENANCE 1 Clean the battery tops to prevent corrosion 2 Check for loose battery cable connections 3 Inspect and clean recovery tank co...

Страница 35: ...tank check vacuum fan inlet filter clean if necessary 3 Check vacuum hose for debris or blockage Check squeegees for damage wear and for deflection adjustment 4 Check whether pad brush is installed pr...

Страница 36: ...tion For best cleaning performance the side skirt should be adjusted such that the blade flares outward slightly when the deck is lowered Check the adjustment by operating the machine and verifying th...

Страница 37: ...re required to move the machine once the brake is released one person to steer and one to push Check for and clean up any residual water or liquids on the ground before performing the brake release pr...

Страница 38: ...the brush out from underneath the machine The machine is now ready for placement of new brushes INSERTING NEW BRUSH Slide the new brush underneath the machine and push it upwards into the sprocket unt...

Страница 39: ...are clean and free of smudges Clean any dirt and dust off using the microfiber cloth provided Do not apply water to the sensors OR cloth Inspect Pads Brushes Squeegees As brushes wear down the scrub...

Страница 40: ...ate must be at least five feet wide Any u turn with the ICE RS26 robotic scrubber powered by Brain OS requires at least 10 ft for a u turn MANUAL AND AUTONOMOUS MODE When using the Brain enabled scrub...

Страница 41: ...k is empty and that the strainer basket and filter are both clean 3 Fill water and cleaning solution tanks 4 Inspect squeegees and brushes pads for wear damage and proper installation 5 Inspect and cl...

Страница 42: ...to pair your phone each day you use the machine This is to ensure only an on site operator will receive the notifications Once you turn the machine off or if another operator connects you will no lon...

Страница 43: ...ator will blink continuously in conjunction with an audible alarm When a fault occurs discontinue operating the machine until the fault is eliminated Turn off the machine and resolve the fault The fau...

Страница 44: ...e If The Fault Continues Contact Service Center F6 Brush Overload Brush motor overload Turn Off The Machine Wait A Moment Restart Machine If The Fault Continues Contact Service Center F7 Propel Error...

Страница 45: ...M MOTOR DOES NOT RUN OR RUNS SLOWLY Recovery Tank Full Drain Recovery Tank Recovery Tank Float System Dirty Clean Float System Circuit Breaker Tripped Reset Circuit Breaker Loose Connection Check Moto...

Страница 46: ...Clean Connections Faulty Main Contactor Replace Contactor Faulty Key Switch Replace Switch LITTLE OR NO PROPEL Low Battery Charge Charge Batteries Wheels Spin Decrease Brush Pressure Controller Overhe...

Страница 47: ...ubject to Change Brain Corporation 47 WHERE TO GET MAINTENANCE AND SUPPORT CUSTOMER SUPPORT 1 888 834 9948 servicebraincorp triadservice com If you see this error on the display please reboot the mach...

Страница 48: ...roBotiC sCruBBer iCe rs26 gen2 poWered By Brainos V1 1217 CONTENT SUBJECT TO CHANGE...

Отзывы: