Icare
TONOVET
Plus tonometer instruction manual
ENGLISH
Icare
TONOVET
Plus tonometer instruction manual
ENGLISH
www.tonovet.com
6
www.tonovet.com
7
STEP 5.
Following the performance of the entire measurement, a new measurement series can be begun by pressing the Measure button. The tonometer will
then reactivate the probe and be ready for the next measurement series with the Play symbol on the display. The measurement sequence can be aborted by
pressing the Select button. Place the probe base plug back to cover the probe base when the tonometer is not in use.
STEP 3.
You may perform the measurement in single or series mode.
Single mode: Press the Measure button lightly to perform the measurement, taking care not to shake the tonometer. The tip of the probe
should make contact with the central cornea. Six measurements should be made consecutively, green segments will be lit after every
successful measurement. After each successful measurement, you will hear a short beep.
Series mode: Keep the Measure button down to obtain the sequence of six measurements, green segments will be lit after every successful
measurement.
To obtain the final reading, six measurements are required. The measurement values displayed before the final result are average values for all previous
measurements (1.-5.). Single measurement values are not shown.
If there is an erroneous measurement, the tonometer will beep twice and display an error message. Press the Measure button to clear the
error message. If several erroneous measurements appear, see error messages segment for additional information.
STEP 4.
Once the six measurements have been performed, you will hear a long beep. The final IOP will be shown on the display rounded by green (succesfull) or yellow
(some variation) segments. If variation is too big, red segments will be displayed. Yellow Repeat symbol will be dispayed in case of external distubance (eg. EMC) during
the measurement.
The displayed result is an average of four measurements as the highest and the lowest
reading are discarded before the average calculation.
The colors green, yellow and red indication are related to the standard deviation (SD) of
the probe’s motion parameters of the four remaining measurements. When red
segments are displayed; the measurement should be repeated.
NOTE High IOP may cause high fluctuation, which may cause higher standard deviation.
MEASUREMENT
NOTE
If you do not use the tonometer, it will switch off automatically after 3 minutes.
NOTE
No anesthetic is required when performing measurements.
NOTE
Avoid excessive restraining, as it may alter the IOP. Patient’s head should be held as lightly as possible; be careful not to put pressure on the neck or the eye ball.
If a collar is worn; make sure it is not too tight or remove it for the measurement.
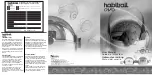
STEP 1.
Bring the
tonometer near the
patient’s eye.
*Badouin C, Gastaud P. Influence of topical anesthesia on tonometeric values of intraocular pressure. Ophthalmologica 1994;208:309-313.
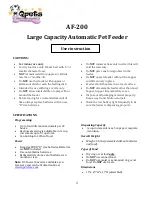
Correct alignment of the tonometer and green probe base light indication.
Incorrect alignment of the tonometer and red probe base light indication.
Correct head and eye position.
Incorrect head and eye position.
STEP 2.
The probe should be in a horizontal position. Keep the probe horizontal and pointing perpendicularly to the center of the cornea. The distance from the tip
of the probe to the patient’s cornea (see picture) should be 4-8 mm (5/32 - 5/16 inch).
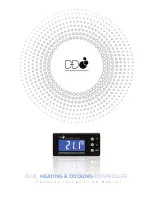
If probe base light indication is set OFF
green arrows on display will indicate the
correct alignment of the tonometer.
If probe base light indication is set OFF red
arrows on display will indicate the incorrect
alignment of the tonometer.