background image

CAUTION:
Never remove the cover on a power supply or any part that has the following
label attached.

Hazardous voltage, current, and energy levels are present inside any
component that has this label attached. There are no serviceable parts inside
these components. If you suspect a problem with one of these parts, contact
a service technician.

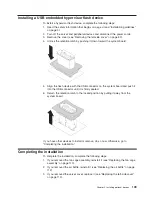
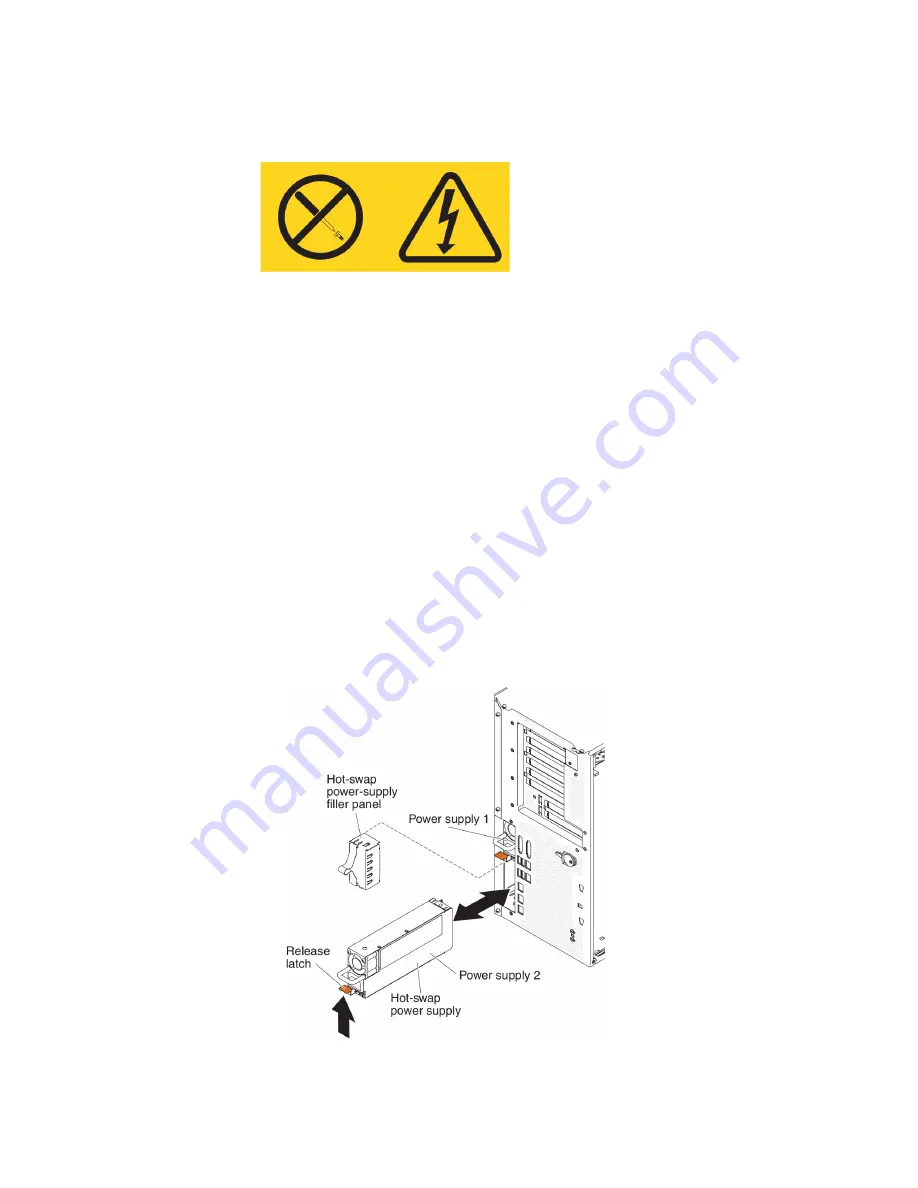
To install a hot-swap ac power supply, complete the following steps:

Note:

You must install the fan cage assembly before removing or installing the
power supply.

1. Read the safety information that begins vii and “Installation guidelines” on page

37.

Attention:

Static electricity that is released to internal server components

when the server is powered-on might cause the server to halt, which might
result in the loss of data. To avoid this potential problem, always use an
electrostatic-discharge wrist strap or other grounding system when you work
inside the server with the power on.

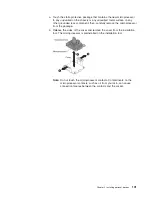
2. Touch the static-protective package that contains the hot-swap power supply to

any unpainted metal surface on the server; then, remove the power supply from
the package and place it on a static-protective surface.

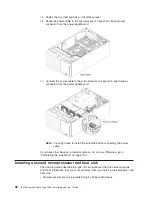
3. Remove the power-supply filler panel from the power bay, if one is installed.

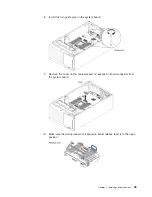
4. Install the power supply and push it in until it locks into place.

Chapter 2. Installing optional devices

107

Содержание System x3500 M4

Страница 1: ...IBM System x3500 M4 Type 7383 Installation and User s Guide ...

Страница 2: ......

Страница 3: ...IBM System x3500 M4 Type 7383 Installation and User s Guide ...

Страница 4: ...tices and User Guide documents on the IBM Documentation CD and the Warranty Information document The most recent version of this document is available at http www ibm com supportportal Third Edition September 2012 Copyright IBM Corporation 2012 US Government Users Restricted Rights Use duplication or disclosure restricted by GSA ADP Schedule Contract with IBM Corp ...

Страница 5: ... drive backplane connectors 35 Installation guidelines 37 System reliability guidelines 38 Working inside the server with the power on 39 Handling static sensitive devices 39 Internal cable routing and connectors 40 Power cable connection 41 Operator information panel cable connection 41 Light path diagnostics panel cable connection 42 Tape drive cable connection 43 DVD drive cable connection 45 H...

Страница 6: ...Guide 120 Using the Setup utility 120 Starting the Setup utility 121 Setup utility menu choices 121 Passwords 124 Using the Boot Manager program 126 Starting the backup server firmware 126 Using the Integrated Management Module II 126 Obtaining the IP address for the IMM2 128 Logging on to the web interface 128 Using the remote presence capability and blue screen capture 128 Using the embedded hyp...

Страница 7: ...n d Industrie Canada 140 Australia and New Zealand Class A statement 140 European Union EMC Directive conformance statement 141 Germany Class A statement 141 VCCI Class A statement 142 Japan Electronics and Information Technology Industries Association JEITA statement 142 Korea Communications Commission KCC statement 142 Russia Electromagnetic Interference EMI Class A statement 143 People s Republ...

Страница 8: ...vi IBM System x3500 M4 Type 7383 Installation and User s Guide ...

Страница 9: ...fety Information Avant d installer ce produit lisez les consignes de sécurité Vor der Installation dieses Produkts die Sicherheitshinweise lesen Prima di installare questo prodotto leggere le Informazioni sulla Sicurezza Les sikkerhetsinformasjonen Safety Information før du installerer dette produktet Antes de instalar este produto leia as Informações sobre Segurança Antes de instalar este product...

Страница 10: ...nformation document For example if a caution statement is labeled Statement 1 translations for that caution statement are in the Safety Information document under Statement 1 Be sure to read all caution and danger statements in this document before you perform the procedures Read any additional safety information that comes with the server or optional device before you install the device viii IBM ...

Страница 11: ...disconnect signal cables v Never turn on any equipment when there is evidence of fire water or structural damage v Disconnect the attached power cords telecommunications systems networks and modems before you open the device covers unless instructed otherwise in the installation and configuration procedures v Connect and disconnect cables as described in the following table when installing moving ...

Страница 12: ...ium battery replace it only with the same module type made by the same manufacturer The battery contains lithium and can explode if not properly used handled or disposed of Do not v Throw or immerse into water v Heat to more than 100 C 212 F v Repair or disassemble Dispose of the battery as required by local ordinances or regulations x IBM System x3500 M4 Type 7383 Installation and User s Guide ...

Страница 13: ...r radiation There are no serviceable parts inside the device v Use of controls or adjustments or performance of procedures other than those specified herein might result in hazardous radiation exposure DANGER Some laser products contain an embedded Class 3A or Class 3B laser diode Note the following Laser radiation when open Do not stare into the beam do not view directly with optical instruments ...

Страница 14: ...trical current supplied to the device The device also might have more than one power cord To remove all electrical current from the device ensure that all power cords are disconnected from the power source Statement 6 CAUTION Do not place any objects on top of a rack mounted device unless that rack mounted device is intended for use as a shelf Statement 8 xii IBM System x3500 M4 Type 7383 Installa...

Страница 15: ...rvice technician Statement 11 CAUTION The following label indicates sharp edges corners or joints nearby Statement 12 CAUTION The following label indicates a hot surface nearby Statement 13 DANGER Overloading a branch circuit is potentially a fire hazard and a shock hazard under certain conditions To avoid these hazards ensure that your system electrical requirements do not exceed branch circuit p...

Страница 16: ...r unit is extended Statement 17 CAUTION The following label indicates moving parts nearby Statement 26 CAUTION Do not place any object on top of rack mounted devices Statement 27 CAUTION Hazardous moving parts are nearby Statement 35 xiv IBM System x3500 M4 Type 7383 Installation and User s Guide ...

Страница 17: ...ght cause heating when shorted with metal which might result in splattered metall burns or both Attention This server is suitable for use on an IT power distribution system whose maximum phase to phase voltage is 240 V under any distribution fault condition Safety xv ...

Страница 18: ...xvi IBM System x3500 M4 Type 7383 Installation and User s Guide ...

Страница 19: ...rranty see the Warranty Information document that comes with the server The server contains IBM X Architecture technologies which help increase performance and reliability For more information see What your server offers on page 8 and Reliability availability and serviceability on page 11 You can obtain up to date information about the server and other IBM server products at http www ibm com syste...

Страница 20: ...your hardware You can download an IBM ServerGuide Setup and Installation CD to help you configure the hardware install device drivers and install the operating system For a list of supported optional devices for the server see http www ibm com servers eserver serverproven compat us See the Rack Installation Instructions document on the IBM System x Documentation CD for complete rack installation a...

Страница 21: ...e Open field type e win32 bat where e is the drive letter of the CD or DVD drive and click OK If you are using Red Hat Linux insert the CD into the CD or DVD drive then run the following command from the mnt cdrom directory sh runlinux sh Select the server from the Product menu The Available Topics list displays all the documents for the server Some documents might be in folders A plus sign indica...

Страница 22: ... has a number that you can use to locate the corresponding statement in your language in the Safety Information document The System x and xSeries Tools Center is an online information center that contains information about tools for updating managing and deploying firmware device drivers and operating systems The System x and BladeCenter Tools Center is at http publib boulder ibm com infocenter to...

Страница 23: ...ght occur v Caution These statements indicate situations that can be potentially hazardous to you A caution statement is placed just before the description of a potentially hazardous procedure step or situation v Danger These statements indicate situations that can be potentially lethal or extremely hazardous to you A danger statement is placed just before the description of a potentially lethal o...

Страница 24: ...press 2 0 x8 support optional PCI X interposer card Slot 2 PCI Express 3 0 x8 Slot 3 PCI Express 3 0 x8 Slot 4 PCI Express 3 0 x8 Slot 5 PCI Express 3 0 x16 support 225W GPU Slot 6 PCI Express 3 0 x8 v Two PCI expansion slots on the microprocessor 2 expansion board Slot 7 PCI Express 3 0 x16 support 225W GPU Slot 8 PCI Express 3 0 x16 v PCI X interposer card optional One PCI X 64 bit 133 MHz Video...

Страница 25: ...nal FoD RAID 6 60 and SED upgrade RAID 5 50 512 MB Flash with optional FoD RAID 6 60 and SED upgrade RAID 5 50 1 GB Flash with optional FoD RAID 6 60 and SED upgrade RAID 5 50 and SED Zero Cache Acoustical noise emissions v Sound power idling 6 0 bels v Sound power operating 6 0 bels Environment v Air temperature Server on 10 C to 35 C 50 0 F to 95 0 F altitude 0 to 914 4 m 3000 ft Server on 10 C ...

Страница 26: ... output system BIOS compatibility support UEFI replaces the BIOS and defines a standard interface between the operating system platform firmware and external devices UEFI compliant System x servers are capable of booting UEFI compliant operating systems BIOS based operating systems and BIOS based adapters as well as UEFI compliant adapters Note The server does not support DOS Disk Operating System...

Страница 27: ...cates and stores data on two pairs of DIMMs within two channels simultaneously If a failure occurs the memory controller switches from the primary pair of memory DIMMs to the backup pair of DIMMs For more information about installing DIMMs for memory mirrored channel see Installing a memory module on page 77 Large system memory capacity The memory bus supports up to 384 GB of system memory when re...

Страница 28: ...Express or PCI X adapters through an optional PCI X interposer card See Installing an adapter on page 86 for detailed information v Active Energy Manager The IBM Active Energy Manager solution is an IBM Systems Director plug in that measures and reports server power consumption as it occurs This enables you to monitor power consumption in correlation to specific software application programs and h...

Страница 29: ...e the server to use a dedicated systems management network or a shared network Reliability availability and serviceability Three important computer design features are reliability availability and serviceability RAS The RAS features help to ensure the integrity of the data that is stored in the server the availability of the server when you need it and the ease with which you can diagnose and corr...

Страница 30: ...Systems management monitoring through the Inter Integrated Circuit IC protocol bus v Upgradeable POST Unified Extensible Firmware Interface UEFI diagnostics IMM2 firmware and read only memory ROM resident code locally or over the LAN v Vital product data VPD on microprocessors system board power supplies and SAS SATA hot swap hard disk drive backplane v Wake on LAN capability IBM Systems Director ...

Страница 31: ...out IBM Systems Director see the IBM Systems Director Information Center at http publib boulder ibm com infocenter director v6r1x index jsp topic director_6 1 fqm0_main html and the Systems Management web page at http www ibm com systems management which presents an overview of IBM Systems Management and IBM Systems Director The UpdateXpress System Packs The UpdateXpress System Pack Installer dete...

Страница 32: ...t the DVD drive is in use v DVD eject button Press this button to release a DVD or CD from the DVD drive v Light path diagnostics panel Light path diagnostics is a system of LEDs on various external and internal components of the server When an error occurs LEDs are lit throughout the server By viewing the LEDs in a particular order you can often identify the source of the error See Light path dia...

Страница 33: ...power control button to turn on the server Lit The server is turned on v Ethernet activity LEDs When any of these LEDs is flashing they indicate that the server is transmitting to or receiving signals from the Ethernet LAN that is connected to the Ethernet port that corresponds to that LED v System locator LED Use this blue LED to visually locate the server among other servers You can use IBM Syst...

Страница 34: ...and clear the log afterwards Light path diagnostics panel The following illustration shows the front LEDs on the light path diagnostics panel The light path diagnostic panel can be seen from the front bezel Note The light path diagnostics LEDs remain lit only while the server is connected to power For more information about the LEDs on the light path diagnostics panel see Light path diagnostics LE...

Страница 35: ...he hard disk drive backplane c Replace the SAS controller d Replace the ServeRAID controller 6 If the problem remains go to http www ibm com systems support supportsite wss docdisplay brandind 5000008 lndocid SERV CALL Fan A fan has failed is operating too slowly or has been removed The TEMP LED might also be lit 1 Open the fan cage cover to reseat the failing fan with lit LED 2 Replace the failin...

Страница 36: ...nd heat sink on page 98 3 If the failure remains go to http www ibm com systems support supportsite wss docdisplay brandind 5000008 lndocid SERV CALL Microprocessor Configuration When both the Microprocessor and Configuration LEDs are lit the microprocessor configuration is invalid If the Configuration LED and the Microprocessor LED are lit the system issues an invalid microprocessor configuration...

Страница 37: ...ervice Guide for more information Configuration Power supply A hardware configuration error has occurred If the Configuration LED and the Power supply LED are lit the system issues an invalid power configuration error Make sure that both power supplies installed in the server are of the same rating or wattage Memory When only the Memory LED is lit a memory error has occurred Note Each time you ins...

Страница 38: ... is invalid If the PS LED and the CONFIG LED are lit the system issues an invalid power configuration error Make sure that both power supplies installed in the server are of the same rating or wattage Over spec The power supplies are using more power than their maximum rating If the Over spec LED on the light path diagnostics panel is lit complete the following steps in order until the problem is ...

Страница 39: ...t due to any of the following reasons v Battery v Microprocessor 2 expansion board v Power paddle card v Trained technician only System board 2 Check the system event logs for information about the error 3 Replace the failing component v Battery v Microprocessor 2 expansion board v Power paddle card v Trained technician only System board Rear view The following illustration shows the connectors on...

Страница 40: ...solution is 1600 x 1200 at 75 Hz v Serial connector Connect a 9 pin serial device to this connector The serial port is shared with the integrated management module II IMM2 The IMM2 can take control of the shared serial port to redirect serial traffic using Serial over LAN SOL v USB connectors Connect a USB device such as a USB mouse or keyboard to any of these connectors v Systems management Ether...

Страница 41: ...power LED is lit For any other combination of LEDs see the Problem Determination and Service Guide on the IBM System x Documentation CD v DC power LED Each hot swap power supply has a dc power LED and an ac power LED When the dc power LED is lit it indicates that the power supply is supplying adequate dc power to the system During typical operation both the ac and dc power LEDs are lit For any oth...

Страница 42: ...n shows the location of the power supply LEDs on the rear of the server See the Problem Determination and Service Guide for additional information about solving power supply problems 24 IBM System x3500 M4 Type 7383 Installation and User s Guide ...

Страница 43: ...ent Off Off On Faulty power supply 1 Make sure that the power cord is connected to a functioning power source 2 Replace the power supply This happens only when a second power supply is providing power to the server Off On Off Faulty power supply Replace the power supply Off On On Faulty power supply Replace the power supply On Off Off Power supply not fully seated faulty system board or faulty pow...

Страница 44: ...ton to power on the server 4 If this LED does not blink within 30 seconds of connecting a power source to the server trained technician only Replace the system board Server power features When the server is connected to an ac power source but is not turned on the operating system does not run and all core logic except for the integrated management module II IMM2 is shut down however the server can...

Страница 45: ...sor such as a remote request to turn on the server While the server remains connected to power one or more fans might continue to run To remove all power from the server you must disconnect it from the power source Some operating systems require an orderly shutdown before you turn off the server See your operating system documentation for information about shutting down the operating system Statem...

Страница 46: ...Express assembly and the PCI X assembly Otherwise the active power management event signal will be disabled by the system board logic and the Wake on LAN feature might not work However after the server is powered on locally the active power management event signal will be enabled by the system board logic v The integrated management module II IMM2 can turn off the server as an automatic response t...

Страница 47: ...ly with the newly installed devices 3 Save the DSA log as a file and send it to IBM For information about transferring data and logs see http publib boulder ibm com infocenter toolsctr v1r0 index jsp topic dsa dsa_main html 4 To ship the server repackage it in the original undamaged packing material and observe IBM procedures for shipping Support information for IBM Business Partners is available ...

Страница 48: ...onents The following illustration shows the major components in the server The illustrations in this document might differ slightly from your hardware 30 IBM System x3500 M4 Type 7383 Installation and User s Guide ...

Страница 49: ...onnectors The following illustration shows the internal connectors on the system board The following illustration shows the internal connectors on the microprocessor 2 expansion board Chapter 2 Installing optional devices 31 ...

Страница 50: ...g illustration shows the location and description of the switches and jumpers Note If there is a clear protective sticker on the top of the switch blocks you must remove and discard it to access the switches The following table describes the functions of the SW4 switch block on the system board 32 IBM System x3500 M4 Type 7383 Installation and User s Guide ...

Страница 51: ...de Off Bypasses the power on password check the next time the server is turned on and starts the Setup utility so that you can change or delete the power on password when on Notes 1 You do not have to move the switch back to the default position after the power on password in overridden 2 Changing the position of this switch does not affect the administrator password check if an administrator pass...

Страница 52: ...ac power has been removed from the system board tray power remains available to these LEDs for up to 90 seconds To view the error LEDs press and hold the light path button on the system board to light the error LEDs The error LEDs that were lit while the system board tray was running will be lit again while the button is pressed The following illustration shows the LEDs and controls on the system ...

Страница 53: ... board Hard disk drive backplane connectors The following illustrations show the connectors on the 2 5 inch and 3 5 inch hard disk drive backplanes and the backplate assembly Figure 1 Connectors on the 3 5 inch hard disk drive backplane Chapter 2 Installing optional devices 35 ...

Страница 54: ...Figure 2 Connectors on the 3 5 inch hard disk drive backplate assembly Figure 3 Connectors on the 2 5 inch hard disk drive backplane 36 IBM System x3500 M4 Type 7383 Installation and User s Guide ...

Страница 55: ...most recent firmware updates This step will help to ensure that any known issues are addressed and that your server is ready to function at maximum levels of performance To download firmware updates for your server go to http www ibm com support fixcentral Important Some cluster solutions require specific code levels or coordinated code updates If the device is part of a cluster solution verify th...

Страница 56: ...ver before you perform any steps that involve removing or installing a riser card v Blue on a component indicates touch points where you can grip the component to remove it from or install it in the server open or close a latch and so on v Orange on a component or an orange label on or near a component indicates that the component can be hot swapped which means that if the server and operating sys...

Страница 57: ...nding system when you work inside the server with the power on The server supports hot plug hot add and hot swap devices and is designed to operate safely while it is turned on and the server cover is removed Follow these guidelines when you work inside a server that is turned on Note In order to work inside the server with the power on you have to disable the power cut off switch before removing ...

Страница 58: ...etting down the device If it is necessary to set down the device put it back into its static protective package Do not place the device on the server cover or on a metal surface v Take additional care when handling devices during cold weather Heating reduces indoor humidity and increases static electricity Internal cable routing and connectors The server uses cables to connect SATA attached hot sw...

Страница 59: ...rom the power paddle card to the system board and the microprocessor 2 expansion board Operator information panel cable connection The following illustration shows the internal cable routing and connectors from the operator information panel to the system board Chapter 2 Installing optional devices 41 ...

Страница 60: ...cs panel cable connection The following illustration shows the internal cable routing and connectors from the light path diagnostics panel to the system board 42 IBM System x3500 M4 Type 7383 Installation and User s Guide ...

Страница 61: ...either a USB or SATA tape drive in the server The following illustration shows the internal cable routing and connectors for the USB tape drive It also shows the internal power cable for the optical drives Chapter 2 Installing optional devices 43 ...

Страница 62: ...llowing illustrations show the cable routing and connectors for the SATA tape drive It also shows the internal power cable for the optical drives 44 IBM System x3500 M4 Type 7383 Installation and User s Guide ...

Страница 63: ...DVD drive cable connection The following illustration shows the internal SATA and power cable routing and the connectors from the DVD drive to the system board Chapter 2 Installing optional devices 45 ...

Страница 64: ...cting power and signal cables to internal drives 1 The following illustrations show the connectors on the 2 5 inch and 3 5 inch hard disk drive backplanes Figure 5 Connectors on the 3 5 inch hard disk drive backplane 46 IBM System x3500 M4 Type 7383 Installation and User s Guide ...

Страница 65: ...configure your disk arrays after you install drives See the ServeRAID adapter documentation for additional information about RAID operation and complete instructions for using the ServeRAID adapter Figure 6 Connectors on the 2 5 inch hard disk drive backplane Chapter 2 Installing optional devices 47 ...

Страница 66: ...view the following information before connecting cables to the backplanes 1 For server models with sixteen 2 5 inch hot swap hard disk drives 48 IBM System x3500 M4 Type 7383 Installation and User s Guide ...

Страница 67: ...2 For server models with sixteen 2 5 inch hot swap hard disk drives and two ServeRAID adapters Chapter 2 Installing optional devices 49 ...

Страница 68: ...3 For server models with twenty four 2 5 inch hot swap hard disk drives 50 IBM System x3500 M4 Type 7383 Installation and User s Guide ...

Страница 69: ...4 For server models with twenty four 2 5 inch hot swap hard disk drives and two ServeRAID adapters Chapter 2 Installing optional devices 51 ...

Страница 70: ...5 For server models with thirty two 2 5 inch hot swap hard disk drives 52 IBM System x3500 M4 Type 7383 Installation and User s Guide ...

Страница 71: ...6 For server models with thirty two 2 5 inch hot swap hard disk drives and two ServeRAID adapters Chapter 2 Installing optional devices 53 ...

Страница 72: ...7 For server models with eight 3 5 inch hot swap hard disk drives 54 IBM System x3500 M4 Type 7383 Installation and User s Guide ...

Страница 73: ...8 For server models with eight 2 5 inch hot swap hard disk drives and eight 3 5 inch hot swap hard disk drives Chapter 2 Installing optional devices 55 ...

Страница 74: ...9 For server models with eight 3 5 inch simple swap hard disk drives 56 IBM System x3500 M4 Type 7383 Installation and User s Guide ...

Страница 75: ...2 5 inch simple swap hard disk drives Fan cage power cable connection The following illustration shows the internal cable routing and connectors from the fan cage assembly to the system board Chapter 2 Installing optional devices 57 ...

Страница 76: ... Read the safety information that begins on page vii and Installation guidelines on page 37 2 Check the status of the media door icon If the icon on the side of the bezel is in the unlocked position open the bezel media door directly 3 Unlock the left side cover Note You must unlock the left side cover to open or remove the bezel When you lock the left side cover it locks both the cover and the be...

Страница 77: ...server 5 From inside of the top section of the bezel door slide the blue tab up to unlock the bezel media door then grasp the depressed area on the media door and pull the door open 6 When the media door is unlocked the icon on the side of the bezel will be in the unlocked position Chapter 2 Installing optional devices 59 ...

Страница 78: ...disconnect the power cords and all external cables if necessary 3 Unlock the left side cover using the key that comes with the server 4 Pull the cover release latch down while you rotate the top edge of the cover away from the server then lift the cover off the server Removing the air baffle Note When you install the second microprocessor you must also install fan 2 and the air baffle that come wi...

Страница 79: ...Installation guidelines on page 37 2 Turn off the server and peripheral devices and disconnect the power cords and all external cables 3 Carefully turn the server on its side so that it is lying flat with the cover facing up Attention Do not allow the server to fall over 4 Unlock and remove the left side cover see Removing the left side cover on page 60 5 Remove the air baffle see Removing the air...

Страница 80: ...h 9 Rotate the fan cage release latch to the open position The fan cage will lift up slightly when the release latch is fully open 10 Grasp the fan cage assembly and lift it out of the server 62 IBM System x3500 M4 Type 7383 Installation and User s Guide ...

Страница 81: ... components when the server is powered on might cause the server to halt which might result in the loss of data To avoid this potential problem always use an electrostatic discharge wrist strap or other grounding system when you work inside the server with the power on 2 Turn off the server and peripheral devices and disconnect the power cords and all external cables 3 Touch the static protective ...

Страница 82: ...the replacement fan 8 Insert the fan into the socket and close the handle to the locked position 9 Close the fan cage cover 10 Install and lock the left side cover see Replacing the left side cover on page 113 64 IBM System x3500 M4 Type 7383 Installation and User s Guide ...

Страница 83: ...ng on the model Note If the server is configured for RAID operation using a ServeRAID adapter you might have to reconfigure your disk arrays after you install drives See the ServeRAID adapter documentation for additional information about RAID operation and complete instructions for using the ServeRAID adapter The following illustrations show the location of the drive bays in the 2 5 inch hot swap...

Страница 84: ...Figure 8 Server with sixteen 2 5 inch hard disk drives 66 IBM System x3500 M4 Type 7383 Installation and User s Guide ...

Страница 85: ...Figure 9 server with twenty four 2 5 inch hard disk drives Chapter 2 Installing optional devices 67 ...

Страница 86: ...Figure 10 Server with thirty two 2 5 inch hard disk drives 68 IBM System x3500 M4 Type 7383 Installation and User s Guide ...

Страница 87: ...lustrations show the location of the drive bays in the 3 5 inch hot swap SAS or hot swap SATA hard disk drive server models Figure 11 Server with eight 3 5 inch hard disk drives Chapter 2 Installing optional devices 69 ...

Страница 88: ...removable media drives only in bays 1 and 2 on models with eight 3 5 inch eight sixteen twenty four and thirty two 2 5 inch hard disk drives v The electromagnetic interference EMI integrity and cooling of the server are protected by having all bays and PCI slots covered or occupied When you install a drive or PCI adapter save the EMC shield and filler panel from the bay or the PCI adapter slot cov...

Страница 89: ... server when you perform any steps that involve installing or removing cables To install a hot swap hard disk drive complete the following steps 1 Read the safety information that begins on page vii and Installation guidelines on page 37 Attention Static electricity that is released to internal server components when the server is powered on might cause the server to halt which might result in the...

Страница 90: ...5 inch hot swap hard disk drive Before installing a 3 5 inch hot swap hard disk drive read the following information v Inspect the drive tray for signs of damage v To maintain proper system cooling do not operate the server for more than 10 minutes without either a drive or a filler panel installed in each drive bay v You do not have to turn off the server to install hot swap drives in the hot swa...

Страница 91: ...remains lit during the rebuild process If the yellow LED remains lit see the Problem Determination and Service Guide for more information Note You might have to reconfigure the disk arrays after you install hard disk drives See the RAID documentation on the IBM website at http www ibm com systems support for information about RAID adapters If you have other devices to install or remove do so now O...

Страница 92: ... guide rails in the bay 8 Gently push the drive into the bay until the drive stops If you have other devices to install or remove do so now Otherwise go to Completing the installation on page 109 Installing a DVD drive To install the DVD drive complete the following steps 1 If you are replacing a drive make sure that v You have all the cables and other equipment that are specified in the documenta...

Страница 93: ...nstruments and avoid direct exposure to the beam 2 Read the safety information that begins on page vii and Installation guidelines on page 37 3 Turn off the server and peripheral devices and disconnect the power cords and all external cables 4 Unlock and remove the left side cover see Removing the left side cover on page 60 5 Open the bezel see Opening the bezel media door on page 58 6 Remove the ...

Страница 94: ...37 2 Turn off the server and peripheral devices and disconnect the power cords and all external cables 3 Turn off the server and peripheral devices and disconnect the power cords and all external cables 4 Unlock and remove the left side cover see Removing the left side cover on page 60 5 Open the bezel see Opening the bezel media door on page 58 6 Remove the air baffle if installed see Removing th...

Страница 95: ...ndicates that the memory configuration has changed v The server supports only industry standard double data rate 3 DDR3 800 1066 1333 or 1600 MHz PC3 6400 PC3 8500 PC3 10600 or PC3 12800 registered or unbuffered synchronous dynamic random access memory SDRAM dual inline memory modules DIMMs with error correcting code ECC See http www ibm com servers eserver serverproven compat us for a list of sup...

Страница 96: ...mation on the label is in the format xxxxx nRxxx PC3v xxxxxx xx xx xxx The numeral in the sixth numerical position indicates whether the DIMM is single rank n 1 dual rank n 2 or quad rank n 4 v The following rules apply to DDR3 RDIMM speed as it relates to the number of RDIMMs in a channel When you install 1 RDIMM per channel the memory runs at 1600 MHz When you install 2 RDIMMs per channel the me...

Страница 97: ...sing LRDIMMs Note The amount of usable memory is reduced depending on the system configuration A certain amount of memory must be reserved for system resources To view the total amount of installed memory and the amount of configured memory run the Setup utility For additional information see Chapter 3 Configuring the server on page 117 v A minimum of one DIMM must be installed for each microproce...

Страница 98: ...al all three channels on the memory interface for each microprocessor can be populated in any order and have no matching requirements Table 6 Independent mode DIMM installation sequence Number of installed microprocessor DIMM connector population sequence One microprocessor installed 1 4 9 12 2 5 8 11 10 7 6 3 Two microprocessors installed 1 13 4 16 9 21 12 24 2 14 5 17 8 20 11 23 22 10 19 7 18 6 ...

Страница 99: ...ailable memory is reduced to half of the installed memory when memory mirrored is enabled For example if you install 64 GB of memory using RDIMMs only 32 GB of addressable memory is available when you use memory mirrored channel The following diagram lists the DIMM connectors on each memory channel Note You can install DIMMs for microprocessor 2 as soon as you install microprocessor 2 you do not h...

Страница 100: ...hannel can be used to copy the contents of a failing rank on that channel You can enable rank sparing memory in the Setup utility select System Settings Memory For more information see Using the Setup utility on page 120 The following diagram lists the DIMM connectors on each memory channel You can install DIMMs for the microprocessor 2 once the microprocessor 2 is installed You do not need to wai...

Страница 101: ...external cables if necessary 3 Unlock and remove the left side cover see Removing the left side cover on page 60 4 Remove the air baffle if installed see Removing the air baffle on page 60 5 Open the retaining clip on each end of the DIMM connector Attention To avoid breaking the retaining clips or damaging the DIMM connectors open and close the clips gently 6 Touch the static protective package t...

Страница 102: ...following steps 1 Read the safety information that begins on page vii and the Installation guidelines on page 37 2 Turn off the server and peripheral devices and disconnect the power cords and all external cables 3 Carefully turn the server on its side so that it is lying flat with the cover facing up Attention Do not allow the server to fall over 4 Unlock and remove the left side cover see Removi...

Страница 103: ...se 9 Press the PCI X bracket firmly into PCI slot 1 Attention Incomplete insertion might cause damage to the system board or the adapter 10 Make sure the latch on the side of the PCI X bracket is secured to the rear of the server chassis Chapter 2 Installing optional devices 85 ...

Страница 104: ...ers serverproven compat us v Locate the documentation that comes with the adapter and follow those instructions in addition to the instructions in this section v Do not set the maximum digital video adapter resolution above 1600 x 1200 at 75 Hz for an LCD monitor This is the highest resolution that is supported for any add on video adapter that you install in the server v Avoid touching the compon...

Страница 105: ...al server components when the server is powered on might cause the server to stop which might result in the loss of data To avoid this potential problem always use an electrostatic discharge wrist strap or other grounding system when working inside the server with the power on To install an adapter complete the following steps 1 Read the safety information that begins on page vii and the Installat...

Страница 106: ...9 Remove the PCI slot filler if installed Keep the filler in a safe place for potential future use 88 IBM System x3500 M4 Type 7383 Installation and User s Guide ...

Страница 107: ...he cover facing up Attention Do not allow the server to fall over 4 Unlock and remove the server cover see Removing the left side cover on page 60 5 See the documentation that comes with the adapter for any cabling instructions and information about jumper or switch settings It might be easier for you to route cables before you install the adapter 6 Touch the static protective package that contain...

Страница 108: ...mory module To install an optional ServeRAID adapter memory module complete the following steps 1 Read the safety information that begins on page vii and Installation guidelines on page 37 2 Turn off the server and peripheral devices and disconnect the power cords 3 Remove the cover see Removing the left side cover on page 60 4 Locate the ServeRAID adapter which you will install the memory module ...

Страница 109: ...prevent the batteries from overheating To install a RAID adapter battery in the server complete the following steps 1 Read the safety information that begins on page vii and Installation guidelines on page 37 2 Turn off the server and peripheral devices and disconnect all power cords and external devices 3 Remove the cover see Removing the left side cover on page 60 4 Install the ServeRAID adapter...

Страница 110: ...ny components on the system board 7 Install the battery a Align the battery cable connector with the slot on the battery holder Place the battery into the battery holder and make sure that the battery holder engages the battery securely 92 IBM System x3500 M4 Type 7383 Installation and User s Guide ...

Страница 111: ...tion that begins on page vii and Installation guidelines on page 37 2 Turn off the server and all attached devices then disconnect all power cords and external cables 3 Carefully turn the server on its side so that it is lying flat with the cover facing up Attention Do not allow the server to fall over 4 Unlock and remove the left side cover see Removing the left side cover on page 60 5 Remove the...

Страница 112: ...e holes on the chassis and install the side bracket on the system board b Slide the side bracket toward the rear of the server c Fasten the thumbscrew on the side bracket 94 IBM System x3500 M4 Type 7383 Installation and User s Guide ...

Страница 113: ...he system board 9 Remove the cover on the microprocessor 2 expansion board connector from the system board 10 Make sure the microprocessor 2 expansion board release lever is in the open position Chapter 2 Installing optional devices 95 ...

Страница 114: ...he bottom of the chassis and the side bracket 12 Align the holes on the microprocessor 2 expansion board to the guide pins on the system board Install the microprocessor 2 expansion board on the system board 96 IBM System x3500 M4 Type 7383 Installation and User s Guide ...

Страница 115: ...ways use an electrostatic discharge wrist strap or other grounding system when you work inside the server with the power on b Make sure that none of the server cables are caught under the microprocessor 2 expansion board 14 Rotate the release lever toward the front of the server to secure the microprocessor 2 expansion board in place Note Press the microprocessor 2 expansion board connector to mak...

Страница 116: ...r baffle before connecting the power cable If you have other devices to install or remove do so now Otherwise go to Completing the installation on page 109 Installing a second microprocessor and heat sink The following notes describe the type of microprocessor that the server supports and other information that you must consider when you install a microprocessor and heat sink v Microprocessors are...

Страница 117: ...frequency power segment internal cache size and type v Mixing microprocessors of different stepping levels within the same server model is supported v When mixing microprocessors with different stepping levels within the same server model you do not have to install the microprocessor with lowest stepping level and features in microprocessor socket 1 v Read the documentation that comes with the mic...

Страница 118: ...k and remove the left side cover see Removing the left side cover on page 60 5 Locate microprocessor socket 2 on the microprocessor 2 expansion board 6 Rotate the heat sink retention module release lever to the open position 7 Open the microprocessor socket release levers and retainer a Identify which release lever is labeled as the first release lever to open and open it b Open the second release...

Страница 119: ...he microprocessor from the package b Release the sides of the cover and remove the cover from the installation tool The microprocessor is preinstalled on the installation tool Note Do not touch the microprocessor contacts Contaminants on the microprocessor contacts such as oil from your skin can cause connection failures between the contacts and the socket Chapter 2 Installing optional devices 101...

Страница 120: ... is installed correctly The microprocessor rests flush on the socket only if properly installed Attention v Do not press the microprocessor into the socket v Make sure that the microprocessor is oriented and aligned correctly in the socket before you try to close the microprocessor retainer v Do not touch the thermal material on the bottom of the heat sink or on top of the microprocessor Touching ...

Страница 121: ...amage from static electricity For details about handling these devices see Handling static sensitive devices on page 39 10 Close the microprocessor socket release levers and retainer a Close the microprocessor retainer on the microprocessor socket b Identify which release lever is labeled as the first release lever to close and close it c Close the second release lever on the microprocessor socket...

Страница 122: ...ion the heat sink over the microprocessor The heat sink is keyed to assist with proper alignment c Align and place the heat sink on top of the microprocessor in the retention bracket thermal material side down d Press firmly on the heat sink e Rotate the heat sink retention module release lever to the closed position and hook it underneath the lock tab 12 If you installed the second microprocessor...

Страница 123: ...idelines on page 37 v Read Handling static sensitive devices on page 39 To replace damaged or contaminated thermal grease on the microprocessor and heat sink complete the following steps 1 Place the heat sink on a clean work surface 2 Remove the cleaning pad from its package and unfold it completely 3 Use the cleaning pad to wipe the thermal grease from the bottom of the heat sink Note Make sure t...

Страница 124: ... com systems bladecenter resources powerconfig html v The server comes with one hot swap 12 volt output power supply that connects to power supply bay 1 The input voltage is 110 V ac or 220 V ac auto sensing v Power supplies in the server must be with the same power rating or wattage to ensure that the server will operate correctly v Power supply 1 is the default primary power supply If power supp...

Страница 125: ...n guidelines on page 37 Attention Static electricity that is released to internal server components when the server is powered on might cause the server to halt which might result in the loss of data To avoid this potential problem always use an electrostatic discharge wrist strap or other grounding system when you work inside the server with the power on 2 Touch the static protective package that...

Страница 126: ...pproximately 3 minutes after you connect the server power cord to an electrical outlet before the power control button becomes active 7 Make sure that the ac power LED and the dc power LED on the ac power supply are lit indicating that the power supply is operating correctly The two green LEDs are to the right of the power cord connector 8 If you are replacing a power supply with one of a differen...

Страница 127: ...e system board and push it into the USB connector until it is firmly seated 6 Return the retention latch to the locked position by pulling it away from the system board If you have other devices to install or remove do so now Otherwise go to Completing the installation Completing the installation To complete the installation complete the following steps 1 If you removed the fan cage assembly reins...

Страница 128: ...lacing the fan cage assembly To replace the fan cage assembly complete the following steps Attention Make sure that all wires and cables inside the server are routed correctly before you install the fan cage assembly Wiring that is not properly routed might be damaged or might prevent the fan cage assembly from seating properly in the server 1 Read the safety information that begins on page vii an...

Страница 129: ...Chapter 2 Installing optional devices 111 ...

Страница 130: ...he air baffle that come with the second microprocessor upgrade kit To replace the air baffle two microprocessors installed complete the following steps 1 Read the safety information that begins on page vii and Installation guidelines on page 37 2 Slide the air baffle down into the server until the positioning pins fit into the locating holes then press down on the air baffle until the pinch tab cl...

Страница 131: ...ide the server Also make sure that all internal cables are correctly routed Important Before you slide the cover forward make sure that all the tabs on the front rear and side of the cover engage the chassis correctly If all the tabs do not engage the chassis correctly it will be very difficult to remove the cover later 2 Set the bottom edge of the left side cover on the bottom ledge of the server...

Страница 132: ...licks into place 4 Lock the cover using the key that comes with the server Connecting the cables The following illustrations show the locations of the input and output connectors on the front of the server Figure 15 Front of server 114 IBM System x3500 M4 Type 7383 Installation and User s Guide ...

Страница 133: ...receive a message that the configuration has changed The Setup utility starts automatically so that you can save the new configuration settings Some optional devices have device drivers that you must install For information about installing device drivers see the documentation that comes with each device If the server has an optional RAID adapter and you have installed or removed a hard disk drive...

Страница 134: ...116 IBM System x3500 M4 Type 7383 Installation and User s Guide ...

Страница 135: ...FRU data and to remotely manage a network For information about using the IMM2 see Using the Integrated Management Module II on page 126 v VMware ESXi embedded hypervisor The VMware ESXi embedded hypervisor is available on the server models that come with an installed USB embedded hypervisor flash device The USB flash device is installed in the USB connector on the system board Hypervisor is virtu...

Страница 136: ...veRAID M5120 SAS SATA adapter in slot 4 7 and 8 for proper cooling Using the ServerGuide Setup and Installation CD The ServerGuide Setup and Installation CD provides software setup tools and installation tools that are designed for your server The ServerGuide program detects the server model and hardware options that are installed and uses that information during setup to configure the hardware Us...

Страница 137: ... the following tasks v Sets system date and time v Detects the RAID adapter or controller and runs the SAS SATA RAID configuration program v Checks the microcode firmware levels of a ServeRAID adapter and determines whether a later level is available from the CD v Detects installed hardware options and provides updated device drivers for most adapters and devices v Provides diskette free installat...

Страница 138: ... the installation program for the operating system takes control to complete the installation Installing your operating system without using ServerGuide If you have already configured the server hardware and you are not using the ServerGuide program to install your operating system complete the following steps to download the latest operating system installation instructions from the IBM website N...

Страница 139: ...nfiguration information including the ID speed and cache size of the microprocessors machine type and model of the server the serial number the system UUID and the amount of installed memory When you make configuration changes through other options in the Setup utility the changes are reflected in the system summary you cannot change settings directly in the system summary Product Data Select this...

Страница 140: ... POST loader watchdog timer value Reboot System on NMI Enable or disable restarting the system whenever a nonmaskable interrupt NMI occurs Disabled is the default Commands on USB Interface Preference Select this choice to enable or disable the Ethernet over USB interface on IMM2 Network Configuration Select this choice to view the system management network interface port the IMM2 MAC address the c...

Страница 141: ... the System Event Manager where you can view the error messages in the system event logs You can use the arrow keys to move between pages in the error log The system event logs contain all event and error messages that have been generated during POST by the systems management interface handler and by the system service processor Run the diagnostic programs to get more information about error codes...

Страница 142: ...hoice you can set change and delete a power on password and an administrator password The User Security choice is on the full Setup utility menu only If you set only a power on password you must type the power on password to complete the system startup and to have access to the full Setup utility menu An administrator password is intended to be used by a system administrator it limits access to th...

Страница 143: ... switch enable switch 3 of the system board switch block SW4 to bypass the password check see System board switches and jumpers on page 32 for more information Attention Before you change any switch settings or move any jumpers turn off the server then disconnect all power cords and external cables See the safety information that begins on page vii Do not change settings or move jumpers on any sys...

Страница 144: ...ing the process of updating the server firmware If the primary copy of the server firmware becomes damaged use this backup copy To force the server to start from the backup copy turn off the server then place the JP2 jumper in the backup position pins 2 and 3 Use the backup copy of the server firmware until the primary copy is restored After the primary copy is restored turn off the server then mo...

Страница 145: ...and the operating system watchdog timer times out The IMM2 might be configured to watch for the operating system watchdog timer and reboot the system after a timeout if the ASR feature is enabled Otherwise the IMM2 allows the administrator to generate a nonmaskable interrupt NMI by pressing an NMI button on the system board for an operating system memory dump ASR is supported by IPMI v Intelligent...

Страница 146: ...o the web interface to use the remote presence functions complete the following steps 1 Open a web browser on a computer that connects to the server and in the address or URL field type the IP address or host name of the IMM to which you want to connect Note The IMM2 defaults to DHCP If a DHCP host is not available the IMM2 assigns a static IP address of 192 168 70 125 2 On the Login page type the...

Страница 147: ... a virtual drive The blue screen capture feature captures the video display contents before the IMM restarts the server when the IMM detects an operating system hang condition A system administrator can use the blue screen capture to assist in determining the cause of the hang condition Enabling the remote presence feature To enable the remote presence feature complete the following steps 1 Instal...

Страница 148: ...Gbps network and provide full duplex FDX capability which enables simultaneous transmission and reception of data on the network If the Ethernet ports in the server support auto negotiation the controllers detect the data transfer rate 10BASE T 100BASE TX or 1000BASE T and duplex mode full duplex or half duplex of the network and automatically operate at that rate and mode You do not have to set a...

Страница 149: ...tive to the Setup utility for modifying UEFI settings Use the ASU program online or out of band to modify UEFI settings from the command line without the need to restart the system to access the Setup utility You can also use the ASU program to configure the optional remote presence features or other IMM2 settings The remote presence features provide enhanced systems management capabilities In add...

Страница 150: ... http www ibm com support fixcentral 3 From the Product family list select IBM Systems Director 4 From the Product list select IBM Systems Director 5 From the Installed version list select the latest version and click Continue 6 Download the available updates 7 Copy the downloaded files to the management server 8 On the management server on the Welcome page of the IBM Systems Director web interfac...

Страница 151: ...erproven compat us to make sure that the hardware and software is supported by your IBM product v Go to http www ibm com supportportal to check for information to help you solve the problem v Gather the following information to provide to IBM Support This data will help IBM Support quickly provide a solution to your problem and ensure that you receive the level of service for which you might have ...

Страница 152: ...nter information is http www ibm com systems bladecenter The address for IBM IntelliStation information is http www ibm com systems intellistation How to send Dynamic System Analysis data to IBM Use the IBM Enhanced Customer Data Repository to send diagnostic data to IBM Before you send diagnostic data to IBM read the terms of use at http www ibm com de support ecurep terms html You can use any of...

Страница 153: ...tp www ibm com partnerworld and click Find Business Partners on the right side of the page For IBM support telephone numbers see http www ibm com planetwide In the U S and Canada call 1 800 IBM SERV 1 800 426 7378 In the U S and Canada hardware service and support is available 24 hours a day 7 days a week In the U K these services are available Monday through Friday from 9 a m to 6 p m IBM Taiwan ...

Страница 154: ...136 IBM System x3500 M4 Type 7383 Installation and User s Guide ...

Страница 155: ...SS FOR A PARTICULAR PURPOSE Some states do not allow disclaimer of express or implied warranties in certain transactions therefore this statement may not apply to you This information could include technical inaccuracies or typographical errors Changes are periodically made to the information herein these changes will be incorporated in new editions of the publication IBM may make improvements and...

Страница 156: ...annel volume KB stands for 1024 bytes MB stands for 1 048 576 bytes and GB stands for 1 073 741 824 bytes When referring to hard disk drive capacity or communications volume MB stands for 1 000 000 bytes and GB stands for 1 000 000 000 bytes Total user accessible capacity can vary depending on operating environments Maximum internal hard disk drive capacities assume the replacement of any standard...

Страница 157: ... Limits Particulate v The room air must be continuously filtered with 40 atmospheric dust spot efficiency MERV 9 according to ASHRAE Standard 52 21 v Air that enters a data center must be filtered to 99 97 efficiency or greater using high efficiency particulate air HEPA filters that meet MIL STD 282 v The deliquescent relative humidity of the particulate contamination must be more than 60 2 v The ...

Страница 158: ...rence to radio communications Operation of this equipment in a residential area is likely to cause harmful interference in which case the user will be required to correct the interference at his own expense Properly shielded and grounded cables and connectors must be used in order to meet FCC emission limits IBM is not responsible for any radio or television interference caused by using other than...

Страница 159: ...s Produkt entspricht den Schutzanforderungen der EU Richtlinie 2004 108 EG zur Angleichung der Rechtsvorschriften über die elektromagnetische Verträglichkeit in den EU Mitgliedsstaaten und hält die Grenzwerte der EN 55022 Klasse A ein Um dieses sicherzustellen sind die Geräte wie in den Handbüchern beschrieben zu installieren und zu betreiben Des Weiteren dürfen auch nur von der IBM empfohlene Kab...

Страница 160: ...9 Ehningen Germany Telephone 49 7032 15 2941 Email lugi de ibm com Generelle Informationen Das Gerät erfüllt die Schutzanforderungen nach EN 55024 und EN 55022 Klasse A VCCI Class A statement This is a Class A product based on the standard of the Voluntary Control Council for Interference VCCI If this equipment is used in a domestic environment radio interference may occur in which case the user m...

Страница 161: ...pe A Sellers and users need to pay attention to it This is for any areas other than home Russia Electromagnetic Interference EMI Class A statement People s Republic of China Class A electronic emission statement Taiwan Class A compliance statement Appendix B Notices 143 ...

Страница 162: ...144 IBM System x3500 M4 Type 7383 Installation and User s Guide ...

Страница 163: ...9 configuring the server 117 connecting cable 114 connector USB 15 connectors Ethernet 22 Ethernet systems management 22 external 32 front of server 13 hard disk drive backplane 35 internal 31 internal cable routing 40 light path diagnostic panel 16 power supply 22 serial 22 USB 22 video rear 22 contamination particulate and gaseous 7 139 controller configuring Ethernet 130 controls and LEDs opera...

Страница 164: ...tors 13 LED location 13 G gaseous contamination 7 139 getting help 133 gigabit Ethernet controller configuring 130 grease thermal 105 guidelines options installation 37 system reliability 38 H handling static sensitive devices 39 hard disk drive activity LED 14 backplane cabling 46 backplane connectors 35 installing 71 status LED 14 types 70 hard disk drives hot swap SAS or SATA installing 72 hard...

Страница 165: ...ystem board 34 left side cover removing 60 replacing 113 legacy operating system requirement 119 License Agreement for Machine Code 4 Licenses and Attributions Documents 4 light path diagnostics 10 light path diagnostics continued cable routing 42 LEDs 16 panel LEDs and connectors 16 light path diagnostics LEDs 16 light path diagnostics panel 14 Linux license agreement 4 local area network LAN 10 ...

Страница 166: ...ng 128 removing air baffle 60 cover 60 drives 65 removing continued fan cage assembly 61 left side cover 60 replacing air baffle 112 fan cage assembly 110 left side cover 113 reset button 15 RTMM heartbeat LED 26 S safety information Statement 13 xiii Statement 15 xiv SAS or SATA hot swap drives installing 72 SAS power cable routing 46 serial connector 22 serial number 2 server configuring 117 off...

Страница 167: ... the server 27 turning on the server 26 two DIMM per channel 2DPC requirement 78 U United States electronic emission Class A notice 140 United States FCC Class A notice 140 UpdateXpress 132 UpdateXpress System Packs 13 updating IBM Systems Director 131 server configuration 115 Systems Director IBM 131 USB connector 15 22 using boot manager program 126 embedded hypervisor 129 IMM2 126 integrated ma...

Страница 168: ...150 IBM System x3500 M4 Type 7383 Installation and User s Guide ...

Страница 169: ......

Страница 170: ... Part Number 00V9727 Printed in USA 1P P N 00V9727 ...

Отзывы: