2 of 7
I N S T A L L I N G T H E S e r v e R A I D M 5 0 0 0
S E R I E S B A T T E R Y K I T D I R E C T LY
Perform the following procedures to install the ServeRAID
M5000 Series Battery Kit directly to the controller and to
install the controller.
1.
Removing the Controller from the Computer
2.
Installing the M5000 Series Battery Kit on the Controller
3.
Reinstalling the Controller on the Motherboard
Removing the Controller from the Computer
If the controller is already installed in a system, follow these
steps to remove it before you install the battery kit:
Step 1
Turn off the computer, and unplug the power
cords.
Step 2
Ground yourself and make sure the system is
grounded.
Step 3
Remove the cover from the computer according
to the instructions in the system user’s manual so
you can access the controller.
Step 4
Unplug all cables from the controller, remove the
screw attaching the bracket to the computer
chassis, and carefully remove the controller from
the slot.
Step 5
Place the controller on a flat, clean, static-free
surface, and continue with the next procedure.
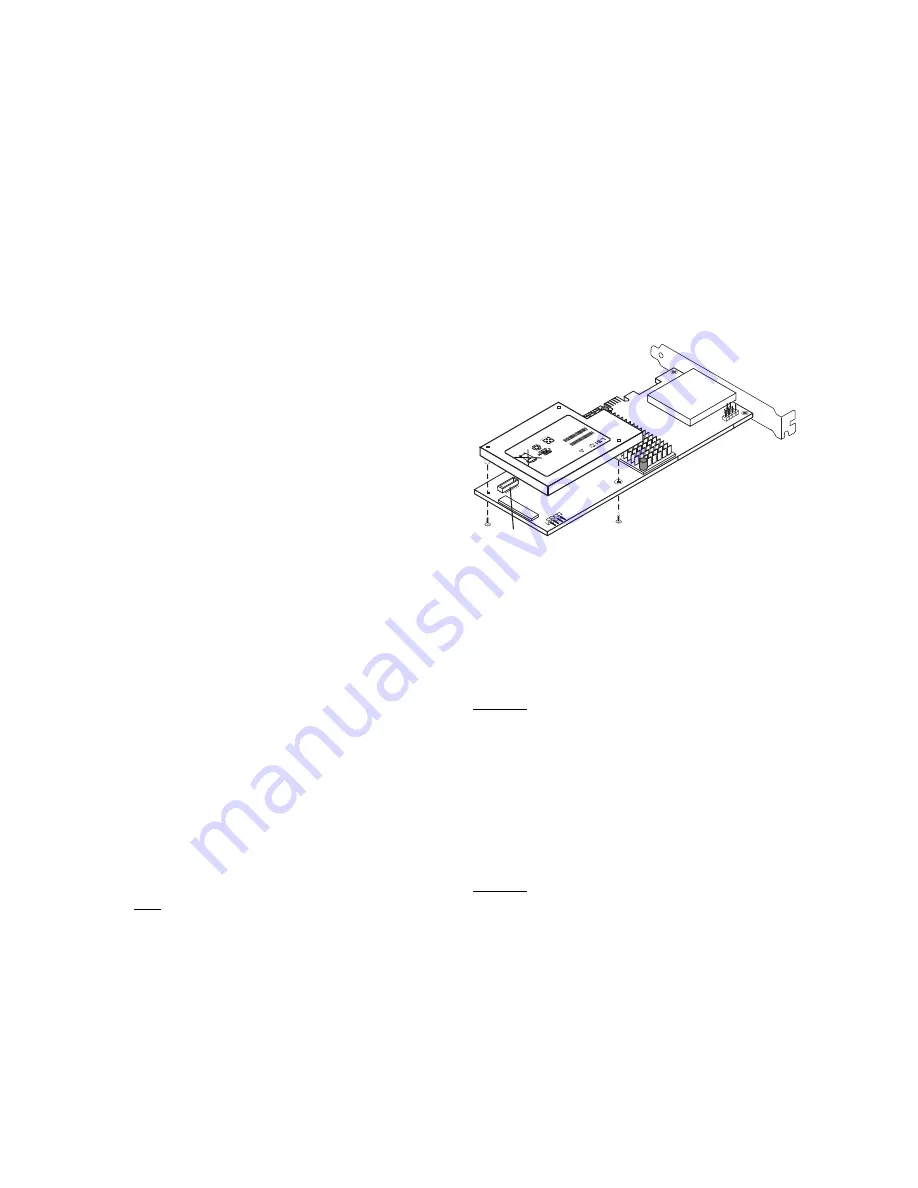
Installing the M5000 Series Battery Kit on the Controller
Follow these steps to mount the battery kit directly to the
controller using the daughtercard. (All components are
installed on the bottom of the card. The battery is installed
on the top. The maximum height of components installed on
the iBBU is 0.125”.)
This procedure shows how to install the battery kit on the
ServeRAID-M5025 SAS/SATA controller. You can install the
battery kit on the ServeRAID-M5014 SAS/SATA controller or
the ServeRAID-M5015 SAS/SATA controller in the same
way.
Note:
For information about the BBU connectors on
these controllers, see the user’s guide for each
controller.
Step 1
Ground yourself, and remove the battery kit from
the package.
Step 2
With the front side of the controller facing upward,
place the controller on a flat, clean, static-free
surface.
Step 3
Hold the battery kit so that the battery side is
facing upward and the J1 connector lines up with
the J6B1 BBU connector on the controller, as
shown in the following figure.
Figure 2 Installing the ServeRAID M5000 Series
Battery Kit on a ServeRAID SAS/SATA
Controller
Step 4
Carefully press the battery kit onto the controller
so that the two connectors are firmly joined.
Step 5
Secure the battery kit to the controller with the
screws and the standoffs in the three screwholes.
The standoffs are threaded at both ends, and a
screw goes into each end. The screw threads
from the back of the controller board into the
board-to-board standoffs on the bottom of the
battery kit.
Important:
Center the screwdriver carefully to avoid
stripping the screwhead. Do not over-tighten the
screws.
Reinstalling the Controller on the Motherboard
Follow these steps to install the controller in the computer.
Step 1
With the power to the chassis still turned off, and
the power cords unplugged, make sure the
chassis is grounded and has no AC power.
Step 2
Install the controller in the PCI Express slot, as
shown in the following figure.
Important:
Some PCI Express slots support only PCI
Express graphics cards; if a controller is installed
in one of these slots, it will not function. Refer to
your computer documentation for information
about the PCI Express slot.
Attention:
It is important to back up any data before a
change in system configuration is made. Failure
to do this could result in data loss.
Attention:
When handling static sensitive devices, take
precautions to avoid damage from static
electricity.
85065-01
J6B1
Model: BA
T1S1P
WARNING:
The battery
used
in
this
devic
e may
present
a risk
of fire or
chemical burn if mistreated.
DO NOT
dissemble, heat above
60C, crus
h or
puncture,
short
circuit external
contacts,
or dispose in fire or water
.
Con
tain
s:
Son
y U
S45
426
1A
8T
Cell
Rec
harg
eab
le L
i-P
oly
me
r
Batte
ry P
ack
Ratin
g:
3.7
V; 1
.59
Ah; 5
.9W
h
Fin
ishe
d in
C
hin
a
BBU
P
/N
: L4-25343
-04
BBU
S
/N
:S
Y027
00225SO
Li-ion


