background image

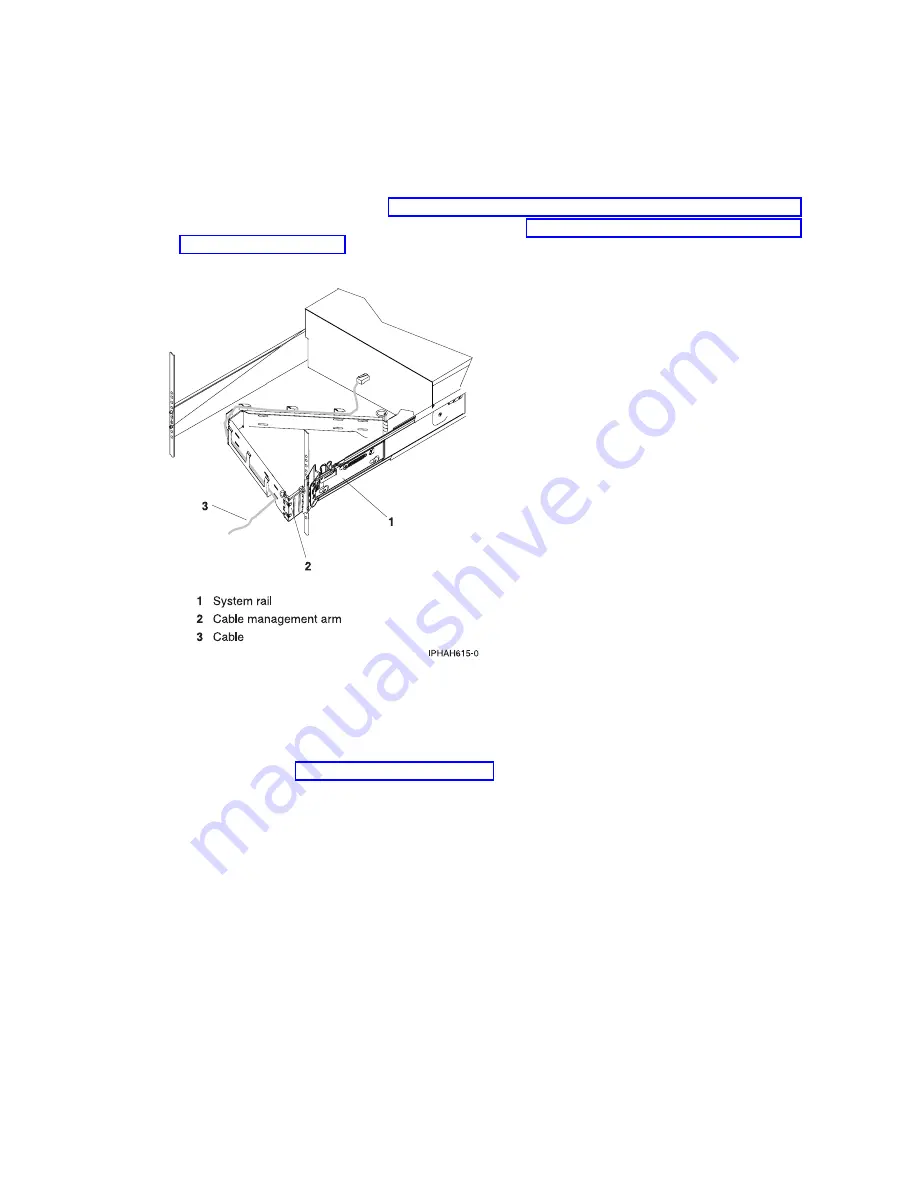
Routing


the


cables


through


the


cable-management


arm


__


Is


your


server


installed


in


a


rack?


v


No.


Proceed


to


the


next


section,


Starting


your


server.


v


Yes.


Do


the


following:


__


Put


the


system


into


the


service


position.


v


For


the


models


510


and


510Q,


see


Place


the


model


9110-510


or


OpenPower


710


in


the


service


position.


v


For


the


models


520,


520Q,


550,


550Q,


560Q,


and


570,


see


Place


the


rack-mounted


system


or


expansion


unit


in


the


service


position.


__


Route


the


cables


through


the


hooks


along


the


cable-management


arm


and


secure


them


with


the


straps


provided.


__


After


attaching


the


cables


to


the


cable-management


arm,


go


to


the


front


of


the


rack


and


move


the


system


drawer


in


and


out.


Observe


cables


and


cable-management-arm


movement


to


verify


that


the


cables


are


not


binding.


Starting


your


server


__


Power


the


system


on


(see


Powering


the


system


on


and


off).


Note:


Expect


a


delay


between


the


time


when


power


is


applied


to


the


server


or


workstation


and


when


an


initial


program


load


(IPL)


can


be


performed.


When


power


is


initially


applied


to


the


server


or


workstation,


the


service


processor


performs


a


self-check


and


will


leave


the


control


panel


blank


for


up


to


two


minutes.


Wait


until


the


C1XX


XXXX


progress


codes


are


completed


and


01


is


displayed


on


the


control


panel


before


you


perform


an


IPL


or


change


control


panel


functions.


Cabling


your


server


69

Содержание System p Series

Страница 1: ...System i and System p Cabling your server ...

Страница 2: ......

Страница 3: ...System i and System p Cabling your server ...

Страница 4: ...n page 179 and the manual IBM Systems Safety Information G229 9054 Tenth Edition August 2006 Copyright International Business Machines Corporation 2004 2006 All rights reserved US Government Users Restricted Rights Use duplication or disclosure restricted by GSA ADP Schedule Contract with IBM Corp ...

Страница 5: ...85 workstation 171 Back views of a model 9111 285 workstation 172 Back view of a model 9110 510 server 173 Back views of a model 9111 520 server 174 Back views of a model 9113 550 server 176 Back view of the OpenPower 710 server 176 Back views of the OpenPower 720 server 176 Cabling the Thin Console for System i5 177 Appendix Notices 179 Trademarks 180 Regulatory notices 181 Class A Notices 181 Cl...

Страница 6: ...iv System i and System p Cabling your server ...

Страница 7: ... and control either remotely or locally the server console and control panel functions Set up Operations Console if you plan to manage the i5 OS operating system in a partitioned environment or if you plan to manage a server with the i5 OS operating system in a nonpartitioned environment If you plan to manage a server with i5 OS in a nonpartitioned environment you must also set up access to the AS...

Страница 8: ...POWER servers v 7047 185 v 9111 285 IBM eServer OpenPower servers v OpenPower 710 v OpenPower 720 Cabling your model 9406 520 with a console For a graphical representation of the slots and connectors that are referred to in this topic see the back views of the model Cabling a model 9406 520 and an ASMI console Complete the following tasks to cable your server Before you begin __ If you have hardwa...

Страница 9: ...ss the ASMI when the system is in standby attach an ASCII terminal to a system port on the back of the server For views of the back of each server see References __ If you have an IBM System p5 or eServer p5 server and want to access the ASMI remotely when the system is in standby attach a modem to a system port on the back of the server For views of the back of each server see References __ If yo...

Страница 10: ...ck of the server See the following figure as an example __ If your server is equipped with a retention bracket route the power cord under the bracket before you plug it into the back of the server See the following figure as an example __ Plug the power cords into the system display and attached devices 4 System i and System p Cabling your server ...

Страница 11: ...ng the cables to the cable management arm go to the front of the rack and move the system drawer in and out Observe cables and cable management arm movement to verify that the cables are not binding Starting your server __ Power the system on see Powering the system on and off Note Expect a delay between the time when power is applied to the server or workstation and when an initial program load I...

Страница 12: ...s The cable hook can help manage the server cables in the back of the rack To install the cable hook slide it into the slots located on the back of the rack as shown in the following figure __ Return to your initial server setup checklist and complete the next step 6 System i and System p Cabling your server ...

Страница 13: ...rly wired outlets v When possible use one hand only to connect or disconnect signal cables v Never turn on any equipment when there is evidence of fire water or structural damage v Disconnect the attached power cords telecommunications systems networks and modems before you open the device covers unless instructed otherwise in the installation and configuration procedures v Connect and disconnect ...

Страница 14: ...5 or eServer p5 server the system ports on the back of the server are disabled when your server is connected to an HMC __ If you have an IBM System i5 or eServer i5 server and are connecting it to an uninterruptible power supply the serial uninterruptible power supply conversion cable is required See Serial uninterruptible power supply conversion cable on page 162 for instructions Do not plug the ...

Страница 15: ...68 3 147 instead of waiting for an address value from the HMC If you inadvertently connect your server to a power source the IP address value will be corrected in the HMC configuration portion of the installation Connecting the Hardware Management Console cables __ Cable the HMC see Cabling the HMC Routing the cables through the cable management arm __ Is your server installed in a rack v No Proce...

Страница 16: ...gement arm and secure them with the straps provided __ After attaching the cables to the cable management arm go to the front of the rack and move the system drawer in and out Observe cables and cable management arm movement to verify that the cables are not binding 10 System i and System p Cabling your server ...

Страница 17: ...the back of the rack as shown in the following figure __ Return to your initial server setup checklist and complete the next step Cabling the Operations Console attachment for model 9406 520 Learn how to connect the Operations Console power cords external cables and the optional electronic customer support cable cable the expansion units attach devices install the PCI Cryptographic Coprocessor car...

Страница 18: ...tion and configuration procedures v Connect and disconnect cables as described in the following procedures when installing moving or opening covers on this product or attached devices To Disconnect 1 Turn off everything unless instructed otherwise 2 Remove the power cords from the outlets 3 Remove the signal cables from the connectors 4 Remove all cables from the devices To Connect 1 Turn off ever...

Страница 19: ...telephone jack Cabling the expansion units __ Do you have an expansion unit v Yes To set up your expansion unit see Expansion units Note Do not plug the expansion unit power cord into the power outlet as directed by the directions in Expansion units until later in this checklist v No Proceed to the next section Attaching devices using the system ports Attaching devices by using the system ports __...

Страница 20: ...er the bracket before you plug it into the back of the server as shown here __ Are you installing an uninterruptible power supply __ No Connect the server power cords to the server Do not plug the power cord into the power outlet Do not start your server __ Yes To complete the installation of the uninterruptible power supply see the Powerware Web site www oem powerware com ibm ups Products 9910Sol...

Страница 21: ...ment arm __ Is your server installed in a rack v No Proceed to the next section v Yes Do the following __ Put the system into the service position See Place the rack mounted system or expansion unit in the service position __ Route the cables through the hooks that are located along the cable management arm and secure them with the straps that are provided as shown here __ After attaching the cabl...

Страница 22: ...ck as shown in the following figure __ Return to your initial server setup checklist and complete the next step Cabling a model 9405 520 or 9406 520 and a twinaxial console Learn how to connect the twinaxial cable power cords external cables and the optional electronic customer support cable cable the expansion units attach devices install the PCI Cryptographic Coprocessor card route the cables an...

Страница 23: ...or structural damage v Disconnect the attached power cords telecommunications systems networks and modems before you open the device covers unless instructed otherwise in the installation and configuration procedures v Connect and disconnect cables as described in the following procedures when installing moving or opening covers on this product or attached devices To Disconnect 1 Turn off everythi...

Страница 24: ... set up your expansion unit see Expansion units Note Do not plug the expansion unit power cord into the power outlet as directed by the directions in Expansion units until later in this checklist v No Proceed to the next section Attaching devices using the system ports Attaching devices by using the system ports __ If you have an IBM System i5 or eServer i5 server and you are connecting it to an u...

Страница 25: ...er cord under the bracket before you plug it into the back of the server as shown here __ Are you installing an uninterruptible power supply __ No Connect the server power cords to the server Do not plug the power cord into the power outlet Do not start your server __ Yes To complete the installation of the uninterruptible power supply see the Powerware Web site www oem powerware com ibm ups Produ...

Страница 26: ...e __ Plug in your server or uninterruptible power supply and attached expansion units __ Open the control panel door on the front of the server The control panel should be lit and display 01 N V F The server is not yet powered on Note 1 Expect a delay between the time when power is applied to the server or workstation and when an initial program load IPL can be performed When power is initially ap...

Страница 27: ...e following figure __ Return to your initial server setup checklist and complete the next step See the back views of the model to see the slots and connectors Cabling a model 9405 520 or 9406 520 and a Thin Console Learn how to connect the Thin Console power cords external cables and the optional electronic customer support cable cable the expansion units attach devices install the PCI Cryptograph...

Страница 28: ...ere is evidence of fire water or structural damage v Disconnect the attached power cords telecommunications systems networks and modems before you open the device covers unless instructed otherwise in the installation and configuration procedures v Connect and disconnect cables as described in the following procedures when installing moving or opening covers on this product or attached devices To ...

Страница 29: ...ncluded with your server to learn about electronic customer support or see the Support for iSeries family Web site www 1 ibm com servers eserver support iseries index html You can configure electronic customer support by using the iSeries Setup and Operations CD that came with your server For more information see Service and support __ Connect a telephone cable to the RJ11 connector of the adapter...

Страница 30: ...r is not supported Installing the PCI Cryptographic Coprocessor card __ Do you have a PCI Cryptographic Coprocessor card v Yes Install it now using the PCI X Cryptographic Coprocessor instructions This card was shipped in a separate box Return here after the card is installed v No Proceed to the next section Connecting the power cords Connecting the power cords __ You should route the power cords ...

Страница 31: ...ly see the Powerware Web site www oem powerware com ibm ups Products 9910Solutions ina asp Connecting the external cables __ Use the table in Cables and adapters on page 163 to connect the cables to the matching adapters on the back of your server Note If the cable did not come with your server you will have to supply it Routing the cables through the cable management arm __ Is your server install...

Страница 32: ... the server or workstation and when an initial program load IPL can be performed When power is initially applied to the server or workstation the service processor performs a self check and will leave the control panel blank for up to two minutes Wait until the C1XX XXXX progress codes are completed and 01 is displayed on the control panel before you perform an IPL or change control panel function...

Страница 33: ... next step See the back views of the model to see the connectors Cabling your model 9405 520 with a console For a graphical representation of the slots and connectors that are referred to in this topic see the back views of the model Cabling a model 9405 520 or 9406 520 and a twinaxial console Learn how to connect the twinaxial cable power cords external cables and the optional electronic customer...

Страница 34: ...al damage v Disconnect the attached power cords telecommunications systems networks and modems before you open the device covers unless instructed otherwise in the installation and configuration procedures v Connect and disconnect cables as described in the following procedures when installing moving or opening covers on this product or attached devices To Disconnect 1 Turn off everything unless i...

Страница 35: ...it v Yes To set up your expansion unit see Expansion units Note Do not plug the expansion unit power cord into the power outlet as directed by the directions in Expansion units until later in this checklist v No Proceed to the next section Attaching devices using the system ports Attaching devices by using the system ports __ If you have an IBM System i5 or eServer i5 server and you are connecting...

Страница 36: ...er the bracket before you plug it into the back of the server as shown here __ Are you installing an uninterruptible power supply __ No Connect the server power cords to the server Do not plug the power cord into the power outlet Do not start your server __ Yes To complete the installation of the uninterruptible power supply see the Powerware Web site www oem powerware com ibm ups Products 9910Sol...

Страница 37: ...your console __ Plug in your server or uninterruptible power supply and attached expansion units __ Open the control panel door on the front of the server The control panel should be lit and display 01 N V F The server is not yet powered on Note 1 Expect a delay between the time when power is applied to the server or workstation and when an initial program load IPL can be performed When power is i...

Страница 38: ... figure __ Return to your initial server setup checklist and complete the next step See the back views of the model to see the slots and connectors Cabling a model 9405 520 or 9406 520 and a Thin Console Learn how to connect the Thin Console power cords external cables and the optional electronic customer support cable cable the expansion units attach devices install the PCI Cryptographic Coproces...

Страница 39: ...ent when there is evidence of fire water or structural damage v Disconnect the attached power cords telecommunications systems networks and modems before you open the device covers unless instructed otherwise in the installation and configuration procedures v Connect and disconnect cables as described in the following procedures when installing moving or opening covers on this product or attached ...

Страница 40: ...h your server to learn about electronic customer support or see the Support for iSeries family Web site www 1 ibm com servers eserver support iseries index html You can configure electronic customer support by using the iSeries Setup and Operations CD that came with your server For more information see Service and support __ Connect a telephone cable to the RJ11 connector of the adapter into posit...

Страница 41: ...f the server is not supported Installing the PCI Cryptographic Coprocessor card __ Do you have a PCI Cryptographic Coprocessor card v Yes Install it now using the PCI X Cryptographic Coprocessor instructions This card was shipped in a separate box Return here after the card is installed v No Proceed to the next section Connecting the power cords Connecting the power cords __ You should route the p...

Страница 42: ...Powerware Web site www oem powerware com ibm ups Products 9910Solutions ina asp Connecting the external cables __ Use the table in Cables and adapters on page 163 to connect the cables to the matching adapters on the back of your server Note If the cable did not come with your server you will have to supply it Routing the cables through the cable management arm __ Is your server installed in a rac...

Страница 43: ... applied to the server or workstation and when an initial program load IPL can be performed When power is initially applied to the server or workstation the service processor performs a self check and will leave the control panel blank for up to two minutes Wait until the C1XX XXXX progress codes are completed and 01 is displayed on the control panel before you perform an IPL or change control pan...

Страница 44: ...see the connectors Cabling your model 7037 A50 server For a graphical representation of the slots and connectors that are referred to in this topic see the back view of the model Attention This product is equipped with a three wire power cable and plug for the user s safety Use this power cable with a properly grounded electrical outlet to avoid electrical shock Complete the following tasks to cab...

Страница 45: ...ort EIA 232 connect the cables to the appropriate adapter connectors in the PCI slots of your server See Adapters Devices and Cable Information for Multiple Bus Systems http publib16 boulder ibm com pseries en_US infocenter base hardware_docs pdf 380516 pdf for a description of cables and adapters that might be installed on your server Note If the cable did not come with your server you will have ...

Страница 46: ...when the system is in standby attach an ASCII terminal to a system port on the back of the server For views of the back of each server see References __ If you have an IBM System p5 or eServer p5 server and want to access the ASMI remotely when the system is in standby attach a modem to a system port on the back of the server For views of the back of each server see References __ If you have an IB...

Страница 47: ...into the back of the server See the following figure as an example __ If your server is equipped with a retention bracket route the power cord under the bracket before you plug it into the back of the server See the following figure as an example __ Plug the power cords into the system display and attached devices Cabling your server 41 ...

Страница 48: ...es to the cable management arm go to the front of the rack and move the system drawer in and out Observe cables and cable management arm movement to verify that the cables are not binding Starting your server __ Power the system on see Powering the system on and off Note Expect a delay between the time when power is applied to the server or workstation and when an initial program load IPL can be p...

Страница 49: ... item v Yes The cable hook can help manage the server cables in the back of the rack To install the cable hook slide it into the slots located on the back of the rack as shown in the following figure __ Return to your initial server setup checklist and complete the next step Cabling your server 43 ...

Страница 50: ...tlets v When possible use one hand only to connect or disconnect signal cables v Never turn on any equipment when there is evidence of fire water or structural damage v Disconnect the attached power cords telecommunications systems networks and modems before you open the device covers unless instructed otherwise in the installation and configuration procedures v Connect and disconnect cables as de...

Страница 51: ... IBM System p5 or eServer p5 server the system ports on the back of the server are disabled when your server is connected to an HMC __ If you have an IBM System i5 or eServer i5 server and are connecting it to an uninterruptible power supply the serial uninterruptible power supply conversion cable is required See Serial uninterruptible power supply conversion cable on page 162 for instructions Do ...

Страница 52: ...stead of waiting for an address value from the HMC If you inadvertently connect your server to a power source the IP address value will be corrected in the HMC configuration portion of the installation Connecting the Hardware Management Console cables __ Cable the HMC see Cabling the HMC Routing the cables through the cable management arm __ Is your server installed in a rack v No Proceed to the n...

Страница 53: ... cable management arm and secure them with the straps provided __ After attaching the cables to the cable management arm go to the front of the rack and move the system drawer in and out Observe cables and cable management arm movement to verify that the cables are not binding Cabling your server 47 ...

Страница 54: ...nsole For a graphical representation of the slots and connectors that are referred to in this topic see the back view of the model Cabling a 9115 505 and an ASMI console Complete the following tasks to cable your server Before you begin __ If you have hardware features that are not installed install them now See Installing features and replacing parts for instructions Connecting the Advanced Syste...

Страница 55: ... system port on the back of the server For views of the back of each server see References __ If you have an IBM System p5 or eServer p5 server and want to access the ASMI remotely when the system is in standby attach a modem to a system port on the back of the server For views of the back of each server see References __ If you have an IBM System p5 or eServer p5 server and are connecting it to a...

Страница 56: ...ck of the server See the following figure as an example __ If your server is equipped with a retention bracket route the power cord under the bracket before you plug it into the back of the server See the following figure as an example __ Plug the power cords into the system display and attached devices 50 System i and System p Cabling your server ...

Страница 57: ...ng the cables to the cable management arm go to the front of the rack and move the system drawer in and out Observe cables and cable management arm movement to verify that the cables are not binding Starting your server __ Power the system on see Powering the system on and off Note Expect a delay between the time when power is applied to the server or workstation and when an initial program load I...

Страница 58: ... The cable hook can help manage the server cables in the back of the rack To install the cable hook slide it into the slots located on the back of the rack as shown in the following figure __ Return to your initial server setup checklist and complete the next step 52 System i and System p Cabling your server ...

Страница 59: ...wired outlets v When possible use one hand only to connect or disconnect signal cables v Never turn on any equipment when there is evidence of fire water or structural damage v Disconnect the attached power cords telecommunications systems networks and modems before you open the device covers unless instructed otherwise in the installation and configuration procedures v Connect and disconnect cabl...

Страница 60: ...sing the system ports __ If you have an IBM System p5 or eServer p5 server the system ports on the back of the server are disabled when your server is connected to an HMC Note The attachment of high availability cluster multiprocessing HACMP cables to the system ports on the back of the server is not supported Connecting the power cords __ Power cords should be routed through the retention rings o...

Страница 61: ...68 3 147 instead of waiting for an address value from the HMC If you inadvertently connect your server to a power source the IP address value will be corrected in the HMC configuration portion of the installation Connecting the Hardware Management Console cables __ Cable the HMC see Cabling the HMC Routing the cables through the cable management arm __ Is your server installed in a rack v No Proce...

Страница 62: ...gement arm and secure them with the straps provided __ After attaching the cables to the cable management arm go to the front of the rack and move the system drawer in and out Observe cables and cable management arm movement to verify that the cables are not binding 56 System i and System p Cabling your server ...

Страница 63: ...r with a console For a graphical representation of the slots and connectors that are referred to in this topic see the back views of the model Cabling a model 9131 52A and an ASMI console Complete the following tasks to cable your server Before you begin __ If you have hardware features that are not installed install them now See Installing features and replacing parts for instructions Connecting ...

Страница 64: ...es using the system ports __ If you have an IBM System p5 or eServer p5 server and want to access the ASMI when the system is in standby attach an ASCII terminal to a system port on the back of the server For views of the back of each server see References __ If you have an IBM System p5 or eServer p5 server and want to access the ASMI remotely when the system is in standby attach a modem to a sys...

Страница 65: ...into the back of the server See the following figure as an example __ If your server is equipped with a retention bracket route the power cord under the bracket before you plug it into the back of the server See the following figure as an example __ Plug the power cords into the system display and attached devices Cabling your server 59 ...

Страница 66: ...es to the cable management arm go to the front of the rack and move the system drawer in and out Observe cables and cable management arm movement to verify that the cables are not binding Starting your server __ Power the system on see Powering the system on and off Note Expect a delay between the time when power is applied to the server or workstation and when an initial program load IPL can be p...

Страница 67: ... item v Yes The cable hook can help manage the server cables in the back of the rack To install the cable hook slide it into the slots located on the back of the rack as shown in the following figure __ Return to your initial server setup checklist and complete the next step Cabling your server 61 ...

Страница 68: ...tlets v When possible use one hand only to connect or disconnect signal cables v Never turn on any equipment when there is evidence of fire water or structural damage v Disconnect the attached power cords telecommunications systems networks and modems before you open the device covers unless instructed otherwise in the installation and configuration procedures v Connect and disconnect cables as de...

Страница 69: ...380516 pdf for a description of cables and adapters that might be installed on your server Note If the cable did not come with your server you will have to supply it Attaching devices using the system ports __ If you have an IBM System p5 or eServer p5 server the system ports on the back of the server are disabled when your server is connected to an HMC Note The attachment of high availability clu...

Страница 70: ...stead of waiting for an address value from the HMC If you inadvertently connect your server to a power source the IP address value will be corrected in the HMC configuration portion of the installation Connecting the Hardware Management Console cables __ Cable the HMC see Cabling the HMC Routing the cables through the cable management arm __ Is your server installed in a rack v No Proceed to the n...

Страница 71: ... cable management arm and secure them with the straps provided __ After attaching the cables to the cable management arm go to the front of the rack and move the system drawer in and out Observe cables and cable management arm movement to verify that the cables are not binding Cabling your server 65 ...

Страница 72: ...nsole For a graphical representation of the slots and connectors that are referred to in this topic see the back views of the model Cabling a model 9133 55A and an ASMI console Complete the following tasks to cable your server Before you begin __ If you have hardware features that are not installed install them now See Installing features and replacing parts for instructions Connecting the Advance...

Страница 73: ...ching devices using the system ports __ If you have an IBM System p5 or eServer p5 server and want to access the ASMI when the system is in standby attach an ASCII terminal to a system port on the back of the server For views of the back of each server see References __ If you have an IBM System p5 or eServer p5 server and want to access the ASMI remotely when the system is in standby attach a mod...

Страница 74: ...ck of the server See the following figure as an example __ If your server is equipped with a retention bracket route the power cord under the bracket before you plug it into the back of the server See the following figure as an example __ Plug the power cords into the system display and attached devices 68 System i and System p Cabling your server ...

Страница 75: ...ng the cables to the cable management arm go to the front of the rack and move the system drawer in and out Observe cables and cable management arm movement to verify that the cables are not binding Starting your server __ Power the system on see Powering the system on and off Note Expect a delay between the time when power is applied to the server or workstation and when an initial program load I...

Страница 76: ... The cable hook can help manage the server cables in the back of the rack To install the cable hook slide it into the slots located on the back of the rack as shown in the following figure __ Return to your initial server setup checklist and complete the next step 70 System i and System p Cabling your server ...

Страница 77: ...ly wired outlets v When possible use one hand only to connect or disconnect signal cables v Never turn on any equipment when there is evidence of fire water or structural damage v Disconnect the attached power cords telecommunications systems networks and modems before you open the device covers unless instructed otherwise in the installation and configuration procedures v Connect and disconnect c...

Страница 78: ...f for a description of cables and adapters that might be installed on your server Note If the cable did not come with your server you will have to supply it Attaching devices using the system ports __ If you have an IBM System p5 or eServer p5 server the system ports on the back of the server are disabled when your server is connected to an HMC Note The attachment of high availability cluster mult...

Страница 79: ...68 3 147 instead of waiting for an address value from the HMC If you inadvertently connect your server to a power source the IP address value will be corrected in the HMC configuration portion of the installation Connecting the Hardware Management Console cables __ Cable the HMC see Cabling the HMC Routing the cables through the cable management arm __ Is your server installed in a rack v No Proce...

Страница 80: ...gement arm and secure them with the straps provided __ After attaching the cables to the cable management arm go to the front of the rack and move the system drawer in and out Observe cables and cable management arm movement to verify that the cables are not binding 74 System i and System p Cabling your server ...

Страница 81: ...graphical representation of the slots and connectors that are referred to in this topic see the back view of the model Attention This product is equipped with a three wire power cable and plug for the user s safety Use this power cable with a properly grounded electrical outlet to avoid electrical shock Complete the following tasks to cable your system unit Before you begin __ If you have hardware...

Страница 82: ...ystems http publib16 boulder ibm com pseries en_US infocenter base hardware_docs pdf 380516 pdf for a description of cables and adapters that might be installed on your workstation Note If the cable did not come with your workstation you will have to supply it After you finish _ Return to your initial setup checklist and complete the next step Cabling your 9111 285 workstation with a console For a...

Страница 83: ...ely when the system is in standby attach a modem to a system port on the back of the server For views of the back of each server see References __ If you have an IBM System p5 or eServer p5 server and are connecting it to an uninterruptible power supply refer to the documentation that is included with your uninterruptible power supply You might need additional hardware Notes 1 For the IBM System p...

Страница 84: ...t a delay between the time when power is applied to the server or workstation and when an initial program load IPL can be performed When power is initially applied to the server or workstation the service processor performs a self check and will leave the control panel blank for up to two minutes Wait until the C1XX XXXX progress codes are completed and 01 is displayed on the control panel before ...

Страница 85: ...red outlets v When possible use one hand only to connect or disconnect signal cables v Never turn on any equipment when there is evidence of fire water or structural damage v Disconnect the attached power cords telecommunications systems networks and modems before you open the device covers unless instructed otherwise in the installation and configuration procedures v Connect and disconnect cables...

Страница 86: ... ports __ If you have an IBM System p5 or eServer p5 server the system ports on the back of the server are disabled when your server is connected to an HMC Note The attachment of high availability cluster multiprocessing IBM HACMP cables to the service processor communications ports on the back of the server is not supported Connecting the power cords __ Power cords should be routed through the re...

Страница 87: ... for an address value from the HMC If you inadvertently connect your workstation to a power source the IP address value will be corrected in the HMC configuration portion of the installation Connecting the Hardware Management Console cables __ Cable the HMC see Cabling the HMC After you finish _ Return to your initial setup checklist and complete the next step Cabling your model 9406 520 with a co...

Страница 88: ...when the system is in standby attach an ASCII terminal to a system port on the back of the server For views of the back of each server see References __ If you have an IBM System p5 or eServer p5 server and want to access the ASMI remotely when the system is in standby attach a modem to a system port on the back of the server For views of the back of each server see References __ If you have an IB...

Страница 89: ...into the back of the server See the following figure as an example __ If your server is equipped with a retention bracket route the power cord under the bracket before you plug it into the back of the server See the following figure as an example __ Plug the power cords into the system display and attached devices Cabling your server 83 ...

Страница 90: ...es to the cable management arm go to the front of the rack and move the system drawer in and out Observe cables and cable management arm movement to verify that the cables are not binding Starting your server __ Power the system on see Powering the system on and off Note Expect a delay between the time when power is applied to the server or workstation and when an initial program load IPL can be p...

Страница 91: ... item v Yes The cable hook can help manage the server cables in the back of the rack To install the cable hook slide it into the slots located on the back of the rack as shown in the following figure __ Return to your initial server setup checklist and complete the next step Cabling your server 85 ...

Страница 92: ...tlets v When possible use one hand only to connect or disconnect signal cables v Never turn on any equipment when there is evidence of fire water or structural damage v Disconnect the attached power cords telecommunications systems networks and modems before you open the device covers unless instructed otherwise in the installation and configuration procedures v Connect and disconnect cables as de...

Страница 93: ...BM System p5 or eServer p5 server the system ports on the back of the server are disabled when your server is connected to an HMC __ If you have an IBM System i5 or eServer i5 server and are connecting it to an uninterruptible power supply the serial uninterruptible power supply conversion cable is required See Serial uninterruptible power supply conversion cable on page 162 for instructions Do no...

Страница 94: ...stead of waiting for an address value from the HMC If you inadvertently connect your server to a power source the IP address value will be corrected in the HMC configuration portion of the installation Connecting the Hardware Management Console cables __ Cable the HMC see Cabling the HMC Routing the cables through the cable management arm __ Is your server installed in a rack v No Proceed to the n...

Страница 95: ... cable management arm and secure them with the straps provided __ After attaching the cables to the cable management arm go to the front of the rack and move the system drawer in and out Observe cables and cable management arm movement to verify that the cables are not binding Cabling your server 89 ...

Страница 96: ... the rack as shown in the following figure __ Return to your initial server setup checklist and complete the next step Cabling the Operations Console attachment for model 9406 520 Learn how to connect the Operations Console power cords external cables and the optional electronic customer support cable cable the expansion units attach devices install the PCI Cryptographic Coprocessor card and route...

Страница 97: ...he installation and configuration procedures v Connect and disconnect cables as described in the following procedures when installing moving or opening covers on this product or attached devices To Disconnect 1 Turn off everything unless instructed otherwise 2 Remove the power cords from the outlets 3 Remove the signal cables from the connectors 4 Remove all cables from the devices To Connect 1 Tu...

Страница 98: ...ack Cabling the expansion units __ Do you have an expansion unit v Yes To set up your expansion unit see Expansion units Note Do not plug the expansion unit power cord into the power outlet as directed by the directions in Expansion units until later in this checklist v No Proceed to the next section Attaching devices using the system ports Attaching devices by using the system ports __ If you hav...

Страница 99: ...er cord under the bracket before you plug it into the back of the server as shown here __ Are you installing an uninterruptible power supply __ No Connect the server power cords to the server Do not plug the power cord into the power outlet Do not start your server __ Yes To complete the installation of the uninterruptible power supply see the Powerware Web site www oem powerware com ibm ups Produ...

Страница 100: ... Is your server installed in a rack v No Proceed to the next section v Yes Do the following __ Put the system into the service position See Place the rack mounted system or expansion unit in the service position __ Route the cables through the hooks that are located along the cable management arm and secure them with the straps that are provided as shown here __ After attaching the cables to the c...

Страница 101: ...k of the rack as shown in the following figure __ Return to your initial server setup checklist and complete the next step Cabling a model 9405 520 or 9406 520 and a twinaxial console Learn how to connect the twinaxial cable power cords external cables and the optional electronic customer support cable cable the expansion units attach devices install the PCI Cryptographic Coprocessor card route th...

Страница 102: ...al damage v Disconnect the attached power cords telecommunications systems networks and modems before you open the device covers unless instructed otherwise in the installation and configuration procedures v Connect and disconnect cables as described in the following procedures when installing moving or opening covers on this product or attached devices To Disconnect 1 Turn off everything unless i...

Страница 103: ...it v Yes To set up your expansion unit see Expansion units Note Do not plug the expansion unit power cord into the power outlet as directed by the directions in Expansion units until later in this checklist v No Proceed to the next section Attaching devices using the system ports Attaching devices by using the system ports __ If you have an IBM System i5 or eServer i5 server and you are connecting...

Страница 104: ...er the bracket before you plug it into the back of the server as shown here __ Are you installing an uninterruptible power supply __ No Connect the server power cords to the server Do not plug the power cord into the power outlet Do not start your server __ Yes To complete the installation of the uninterruptible power supply see the Powerware Web site www oem powerware com ibm ups Products 9910Sol...

Страница 105: ...your console __ Plug in your server or uninterruptible power supply and attached expansion units __ Open the control panel door on the front of the server The control panel should be lit and display 01 N V F The server is not yet powered on Note 1 Expect a delay between the time when power is applied to the server or workstation and when an initial program load IPL can be performed When power is i...

Страница 106: ...figure __ Return to your initial server setup checklist and complete the next step See the back views of the model to see the slots and connectors Cabling a model 9405 520 or 9406 520 and a Thin Console Learn how to connect the Thin Console power cords external cables and the optional electronic customer support cable cable the expansion units attach devices install the PCI Cryptographic Coprocess...

Страница 107: ...nt when there is evidence of fire water or structural damage v Disconnect the attached power cords telecommunications systems networks and modems before you open the device covers unless instructed otherwise in the installation and configuration procedures v Connect and disconnect cables as described in the following procedures when installing moving or opening covers on this product or attached d...

Страница 108: ...h your server to learn about electronic customer support or see the Support for iSeries family Web site www 1 ibm com servers eserver support iseries index html You can configure electronic customer support by using the iSeries Setup and Operations CD that came with your server For more information see Service and support __ Connect a telephone cable to the RJ11 connector of the adapter into posit...

Страница 109: ...f the server is not supported Installing the PCI Cryptographic Coprocessor card __ Do you have a PCI Cryptographic Coprocessor card v Yes Install it now using the PCI X Cryptographic Coprocessor instructions This card was shipped in a separate box Return here after the card is installed v No Proceed to the next section Connecting the power cords Connecting the power cords __ You should route the p...

Страница 110: ...owerware Web site www oem powerware com ibm ups Products 9910Solutions ina asp Connecting the external cables __ Use the table in Cables and adapters on page 163 to connect the cables to the matching adapters on the back of your server Note If the cable did not come with your server you will have to supply it Routing the cables through the cable management arm __ Is your server installed in a rack...

Страница 111: ...applied to the server or workstation and when an initial program load IPL can be performed When power is initially applied to the server or workstation the service processor performs a self check and will leave the control panel blank for up to two minutes Wait until the C1XX XXXX progress codes are completed and 01 is displayed on the control panel before you perform an IPL or change control pane...

Страница 112: ...See the back views of the model to see the connectors Cabling your model 9405 520 with a console For a graphical representation of the slots and connectors that are referred to in this topic see the back views of the model Cabling a model 9405 520 or 9406 520 and a twinaxial console Learn how to connect the twinaxial cable power cords external cables and the optional electronic customer support ca...

Страница 113: ...r structural damage v Disconnect the attached power cords telecommunications systems networks and modems before you open the device covers unless instructed otherwise in the installation and configuration procedures v Connect and disconnect cables as described in the following procedures when installing moving or opening covers on this product or attached devices To Disconnect 1 Turn off everythin...

Страница 114: ... set up your expansion unit see Expansion units Note Do not plug the expansion unit power cord into the power outlet as directed by the directions in Expansion units until later in this checklist v No Proceed to the next section Attaching devices using the system ports Attaching devices by using the system ports __ If you have an IBM System i5 or eServer i5 server and you are connecting it to an u...

Страница 115: ...r cord under the bracket before you plug it into the back of the server as shown here __ Are you installing an uninterruptible power supply __ No Connect the server power cords to the server Do not plug the power cord into the power outlet Do not start your server __ Yes To complete the installation of the uninterruptible power supply see the Powerware Web site www oem powerware com ibm ups Produc...

Страница 116: ...e __ Plug in your server or uninterruptible power supply and attached expansion units __ Open the control panel door on the front of the server The control panel should be lit and display 01 N V F The server is not yet powered on Note 1 Expect a delay between the time when power is applied to the server or workstation and when an initial program load IPL can be performed When power is initially ap...

Страница 117: ... following figure __ Return to your initial server setup checklist and complete the next step See the back views of the model to see the slots and connectors Cabling a model 9405 520 or 9406 520 and a Thin Console Learn how to connect the Thin Console power cords external cables and the optional electronic customer support cable cable the expansion units attach devices install the PCI Cryptographi...

Страница 118: ...re is evidence of fire water or structural damage v Disconnect the attached power cords telecommunications systems networks and modems before you open the device covers unless instructed otherwise in the installation and configuration procedures v Connect and disconnect cables as described in the following procedures when installing moving or opening covers on this product or attached devices To D...

Страница 119: ...ncluded with your server to learn about electronic customer support or see the Support for iSeries family Web site www 1 ibm com servers eserver support iseries index html You can configure electronic customer support by using the iSeries Setup and Operations CD that came with your server For more information see Service and support __ Connect a telephone cable to the RJ11 connector of the adapter...

Страница 120: ...r is not supported Installing the PCI Cryptographic Coprocessor card __ Do you have a PCI Cryptographic Coprocessor card v Yes Install it now using the PCI X Cryptographic Coprocessor instructions This card was shipped in a separate box Return here after the card is installed v No Proceed to the next section Connecting the power cords Connecting the power cords __ You should route the power cords ...

Страница 121: ...y see the Powerware Web site www oem powerware com ibm ups Products 9910Solutions ina asp Connecting the external cables __ Use the table in Cables and adapters on page 163 to connect the cables to the matching adapters on the back of your server Note If the cable did not come with your server you will have to supply it Routing the cables through the cable management arm __ Is your server installe...

Страница 122: ...the server or workstation and when an initial program load IPL can be performed When power is initially applied to the server or workstation the service processor performs a self check and will leave the control panel blank for up to two minutes Wait until the C1XX XXXX progress codes are completed and 01 is displayed on the control panel before you perform an IPL or change control panel functions...

Страница 123: ... checklist and complete the next step See the back views of the model to see the connectors Cabling your model 9110 510 server with a console For a graphical representation of the slots and connectors that are referred to in this topic see the back view of the model Cabling a model 9110 510 and an ASMI console Complete the following tasks to cable your server Before you begin __ If you have hardwa...

Страница 124: ...when the system is in standby attach an ASCII terminal to a system port on the back of the server For views of the back of each server see References __ If you have an IBM System p5 or eServer p5 server and want to access the ASMI remotely when the system is in standby attach a modem to a system port on the back of the server For views of the back of each server see References __ If you have an IB...

Страница 125: ...nto the back of the server See the following figure as an example __ If your server is equipped with a retention bracket route the power cord under the bracket before you plug it into the back of the server See the following figure as an example __ Plug the power cords into the system display and attached devices Cabling your server 119 ...

Страница 126: ...s to the cable management arm go to the front of the rack and move the system drawer in and out Observe cables and cable management arm movement to verify that the cables are not binding Starting your server __ Power the system on see Powering the system on and off Note Expect a delay between the time when power is applied to the server or workstation and when an initial program load IPL can be pe...

Страница 127: ... item v Yes The cable hook can help manage the server cables in the back of the rack To install the cable hook slide it into the slots located on the back of the rack as shown in the following figure __ Return to your initial server setup checklist and complete the next step Cabling your server 121 ...

Страница 128: ...tlets v When possible use one hand only to connect or disconnect signal cables v Never turn on any equipment when there is evidence of fire water or structural damage v Disconnect the attached power cords telecommunications systems networks and modems before you open the device covers unless instructed otherwise in the installation and configuration procedures v Connect and disconnect cables as de...

Страница 129: ... IBM System p5 or eServer p5 server the system ports on the back of the server are disabled when your server is connected to an HMC __ If you have an IBM System i5 or eServer i5 server and are connecting it to an uninterruptible power supply the serial uninterruptible power supply conversion cable is required See Serial uninterruptible power supply conversion cable on page 162 for instructions Do ...

Страница 130: ...tead of waiting for an address value from the HMC If you inadvertently connect your server to a power source the IP address value will be corrected in the HMC configuration portion of the installation Connecting the Hardware Management Console cables __ Cable the HMC see Cabling the HMC Routing the cables through the cable management arm __ Is your server installed in a rack v No Proceed to the ne...

Страница 131: ... cable management arm and secure them with the straps provided __ After attaching the cables to the cable management arm go to the front of the rack and move the system drawer in and out Observe cables and cable management arm movement to verify that the cables are not binding Cabling your server 125 ...

Страница 132: ...nsole For a graphical representation of the slots and connectors that are referred to in this topic see the back views of the model Cabling a model 9111 520 and an ASMI console Complete the following tasks to cable your server Before you begin __ If you have hardware features that are not installed install them now See Installing features and replacing parts for instructions Connecting the Advance...

Страница 133: ... system port on the back of the server For views of the back of each server see References __ If you have an IBM System p5 or eServer p5 server and want to access the ASMI remotely when the system is in standby attach a modem to a system port on the back of the server For views of the back of each server see References __ If you have an IBM System p5 or eServer p5 server and are connecting it to a...

Страница 134: ...k of the server See the following figure as an example __ If your server is equipped with a retention bracket route the power cord under the bracket before you plug it into the back of the server See the following figure as an example __ Plug the power cords into the system display and attached devices 128 System i and System p Cabling your server ...

Страница 135: ...g the cables to the cable management arm go to the front of the rack and move the system drawer in and out Observe cables and cable management arm movement to verify that the cables are not binding Starting your server __ Power the system on see Powering the system on and off Note Expect a delay between the time when power is applied to the server or workstation and when an initial program load IP...

Страница 136: ... The cable hook can help manage the server cables in the back of the rack To install the cable hook slide it into the slots located on the back of the rack as shown in the following figure __ Return to your initial server setup checklist and complete the next step 130 System i and System p Cabling your server ...

Страница 137: ...ly wired outlets v When possible use one hand only to connect or disconnect signal cables v Never turn on any equipment when there is evidence of fire water or structural damage v Disconnect the attached power cords telecommunications systems networks and modems before you open the device covers unless instructed otherwise in the installation and configuration procedures v Connect and disconnect c...

Страница 138: ... or eServer p5 server the system ports on the back of the server are disabled when your server is connected to an HMC __ If you have an IBM System i5 or eServer i5 server and are connecting it to an uninterruptible power supply the serial uninterruptible power supply conversion cable is required See Serial uninterruptible power supply conversion cable on page 162 for instructions Do not plug the u...

Страница 139: ...8 3 147 instead of waiting for an address value from the HMC If you inadvertently connect your server to a power source the IP address value will be corrected in the HMC configuration portion of the installation Connecting the Hardware Management Console cables __ Cable the HMC see Cabling the HMC Routing the cables through the cable management arm __ Is your server installed in a rack v No Procee...

Страница 140: ...gement arm and secure them with the straps provided __ After attaching the cables to the cable management arm go to the front of the rack and move the system drawer in and out Observe cables and cable management arm movement to verify that the cables are not binding 134 System i and System p Cabling your server ...

Страница 141: ...r with a console For a graphical representation of the slots and connectors that are referred to in this topic see the back views of the model Cabling a model 9113 550 and an ASMI console Complete the following tasks to cable your server Before you begin __ If you have hardware features that are not installed install them now See Installing features and replacing parts for instructions Connecting ...

Страница 142: ...IBM System p5 or eServer p5 server and want to access the ASMI when the system is in standby attach an ASCII terminal to a system port on the back of the server For views of the back of each server see References __ If you have an IBM System p5 or eServer p5 server and want to access the ASMI remotely when the system is in standby attach a modem to a system port on the back of the server For views...

Страница 143: ...nto the back of the server See the following figure as an example __ If your server is equipped with a retention bracket route the power cord under the bracket before you plug it into the back of the server See the following figure as an example __ Plug the power cords into the system display and attached devices Cabling your server 137 ...

Страница 144: ...s to the cable management arm go to the front of the rack and move the system drawer in and out Observe cables and cable management arm movement to verify that the cables are not binding Starting your server __ Power the system on see Powering the system on and off Note Expect a delay between the time when power is applied to the server or workstation and when an initial program load IPL can be pe...

Страница 145: ... item v Yes The cable hook can help manage the server cables in the back of the rack To install the cable hook slide it into the slots located on the back of the rack as shown in the following figure __ Return to your initial server setup checklist and complete the next step Cabling your server 139 ...

Страница 146: ...tlets v When possible use one hand only to connect or disconnect signal cables v Never turn on any equipment when there is evidence of fire water or structural damage v Disconnect the attached power cords telecommunications systems networks and modems before you open the device covers unless instructed otherwise in the installation and configuration procedures v Connect and disconnect cables as de...

Страница 147: ...IBM System p5 or eServer p5 server the system ports on the back of the server are disabled when your server is connected to an HMC __ If you have an IBM System i5 or eServer i5 server and are connecting it to an uninterruptible power supply the serial uninterruptible power supply conversion cable is required See Serial uninterruptible power supply conversion cable on page 162 for instructions Do n...

Страница 148: ...tead of waiting for an address value from the HMC If you inadvertently connect your server to a power source the IP address value will be corrected in the HMC configuration portion of the installation Connecting the Hardware Management Console cables __ Cable the HMC see Cabling the HMC Routing the cables through the cable management arm __ Is your server installed in a rack v No Proceed to the ne...

Страница 149: ... cable management arm and secure them with the straps provided __ After attaching the cables to the cable management arm go to the front of the rack and move the system drawer in and out Observe cables and cable management arm movement to verify that the cables are not binding Cabling your server 143 ...

Страница 150: ...sole For a graphical representation of the slots and connectors that are referred to in this topic see the back view of the model Cabling the OpenPower 710 and an ASMI console Complete the following tasks to cable your server Before you begin __ If you have hardware features that are not installed install them now See Installing features and replacing parts for instructions Connecting the Advanced...

Страница 151: ...ports __ If you want to access the ASMI when the system is in standby attach an ASCII terminal to a system port on the back of the server For views of the back of each server see References __ If you want to access the ASMI remotely when the system is in standby attach a modem to a system port on the back of the server For views of the back of each server see References __ If you are connecting yo...

Страница 152: ...k of the server See the following figure as an example __ If your server is equipped with a retention bracket route the power cord under the bracket before you plug it into the back of the server See the following figure as an example __ Plug the power cords into the system display and attached devices 146 System i and System p Cabling your server ...

Страница 153: ... the cable management arm go to the front of the rack and move the system drawer in and out Observe cables and cable management arm movement to verify that the cables are not binding Starting your server __ Power the system on see Powering the system on and off Note Expect a delay between the time when power is applied to the server or workstation and when an initial program load IPL can be perfor...

Страница 154: ... The cable hook can help manage the server cables in the back of the rack To install the cable hook slide it into the slots located on the back of the rack as shown in the following figure __ Return to your initial server setup checklist and complete the next step 148 System i and System p Cabling your server ...

Страница 155: ...ly wired outlets v When possible use one hand only to connect or disconnect signal cables v Never turn on any equipment when there is evidence of fire water or structural damage v Disconnect the attached power cords telecommunications systems networks and modems before you open the device covers unless instructed otherwise in the installation and configuration procedures v Connect and disconnect c...

Страница 156: ...cable did not come with your server you will have to supply it Attaching devices using the system ports __ The system ports on the back of the server are disabled when your server is connected to an HMC Note The attachment of high availability cluster multiprocessing HACMP cables to the system ports on the back of the server is not supported Connecting the power cords __ Power cords should be rout...

Страница 157: ... HMC2 as 192 168 3 147 instead of waiting for an address value from the HMC If you inadvertently connect your server to a power source the IP address value will be corrected in the HMC configuration portion of the installation Connecting the Hardware Management Console cables __ Cable the HMC see Cabling the HMC Routing the cables through the cable management arm __ Is your server installed in a r...

Страница 158: ...gement arm and secure them with the straps provided __ After attaching the cables to the cable management arm go to the front of the rack and move the system drawer in and out Observe cables and cable management arm movement to verify that the cables are not binding 152 System i and System p Cabling your server ...

Страница 159: ... with a console For a graphical representation of the slots and connectors that are referred to in this topic see the back views of the model Cabling the OpenPower 720 and an ASMI console Complete the following tasks to cable your server Before you begin __ If you have hardware features that are not installed install them now See Installing features and replacing parts for instructions Connecting ...

Страница 160: ... you want to access the ASMI when the system is in standby attach an ASCII terminal to a system port on the back of the server For views of the back of each server see References __ If you want to access the ASMI remotely when the system is in standby attach a modem to a system port on the back of the server For views of the back of each server see References __ If you are connecting your server t...

Страница 161: ...nto the back of the server See the following figure as an example __ If your server is equipped with a retention bracket route the power cord under the bracket before you plug it into the back of the server See the following figure as an example __ Plug the power cords into the system display and attached devices Cabling your server 155 ...

Страница 162: ...management arm go to the front of the rack and move the system drawer in and out Observe cables and cable management arm movement to verify that the cables are not binding Starting your server __ Power the system on see Powering the system on and off Note Expect a delay between the time when power is applied to the server or workstation and when an initial program load IPL can be performed When po...

Страница 163: ... item v Yes The cable hook can help manage the server cables in the back of the rack To install the cable hook slide it into the slots located on the back of the rack as shown in the following figure __ Return to your initial server setup checklist and complete the next step Cabling your server 157 ...

Страница 164: ...tlets v When possible use one hand only to connect or disconnect signal cables v Never turn on any equipment when there is evidence of fire water or structural damage v Disconnect the attached power cords telecommunications systems networks and modems before you open the device covers unless instructed otherwise in the installation and configuration procedures v Connect and disconnect cables as de...

Страница 165: ...ote If the cable did not come with your server you will have to supply it Attaching devices using the system ports __ The system ports on the back of the server are disabled when your server is connected to an HMC Note The attachment of high availability cluster multiprocessing HACMP cables to the system ports on the back of the server is not supported Connecting the power cords __ Power cords sho...

Страница 166: ...2 168 3 147 instead of waiting for an address value from the HMC If you inadvertently connect your server to a power source the IP address value will be corrected in the HMC configuration portion of the installation Connecting the Hardware Management Console cables __ Cable the HMC see Cabling the HMC Routing the cables through the cable management arm __ Is your server installed in a rack v No Pr...

Страница 167: ... cable management arm and secure them with the straps provided __ After attaching the cables to the cable management arm go to the front of the rack and move the system drawer in and out Observe cables and cable management arm movement to verify that the cables are not binding Cabling your server 161 ...

Страница 168: ...ture code 1827 ensure that you have applied any prerequisite software For more information see the IBM eServer Prerequisite Web site http www 912 ibm com e_dir eServerPrereq nsf The serial uninterruptible power supply conversion cable changes signals to serial for use with the IBM System i5 or eServer i5 model or logical partition This cable is required if you are connecting the server to an unint...

Страница 169: ...l information that supports the instructions for cabling your system Cables and adapters Find some of the cables and adapters that might be installed on your model See Adapters Devices and Cable Information for Multiple Bus Systems http publib16 boulder ibm com pseries en_US infocenter base hardware_docs pdf 380516 pdf for a description of cables and adapters that might be installed on your IBM Sy...

Страница 170: ...put adapter PCI dual WAN Integrated modem 87G62xx 21H49xx or 75G38xx 2772 2773 PCI dual WAN with modem input output adapter PCI twinaxial Part number 12F5093 4746 9746 2746 PCI twinaxial workstation controller input output adapter PCI token ring RJ45 token ring Filter P75G5958 or 75G2865 6339098 2744 4959 PCI 4 16 100 Mbps token ring input output adapter PCI Quad 2805 2806 PCI Quad modem input out...

Страница 171: ... Gbps Ethernet SX input output adapter 5718 PCI 10 Gbps Ethernet input output adapter Server cards Part number 45H2433 44H8677 connects to cable 45H2433 Video extension cable 44H8676 2891 2892 IBM Netfinity Server Card 4810 9710 Integrated IBM xSeries server card 4821 9712 Integrated xSeries server card RAID disk unit controllers 2757 PCI Ultra RAID disk unit controller 2780 PCI X Ultra4 RAID disk...

Страница 172: ...rollers 5704 PCI X fibre channel tape unit controller 5702 5712 5715 PCI X U320 tape disk unit controller Bus adapters 2886 Optical bus adapter 2887 HSL 2 bus adapter 6417 28E7 HSL 2 RIO G bus adapter Back views of a model 9405 520 or 9406 520 View the ports and connections on the model 9405 520 or 9406 520 This diagram shows you the back view of a 9405 520 or 9406 520 Connections and ports are la...

Страница 173: ...Figure 8 Back views of a model 9405 520 or 9406 520 with the integrated HSL RIO ports T3 T4 Cabling your server 167 ...

Страница 174: ...37 A50 server Use the following diagram to help you cable a 7037 A50 server Connections and ports are labeled to facilitate the setup process Figure 9 Back views of a model 9405 520 or 9406 520 without the integrated HSL ports T3 T4 168 System i and System p Cabling your server ...

Страница 175: ... ports are labeled to facilitate the setup process Back view of a model 9115 505 View the ports and connections on the model 9115 505 Use the following diagram to help you cable a model 9115 505 Connections and ports are labeled to facilitate the setup process Figure 10 Back view of a 7037 A50 server Figure 11 Back view of a model 9110 51A server Cabling your server 169 ...

Страница 176: ...the following diagram to help you cable a model 9131 52A server Connections and ports are labeled to facilitate the setup process Figure 12 Back view of a model 9115 505 Figure 13 Back view of a model 9115 505 Figure 14 Back views of a model 9131 52A server 170 System i and System p Cabling your server ...

Страница 177: ... Connections and ports are labeled to facilitate the setup process Back view of a 7047 185 workstation View the ports and connections on the 7047 185 workstation Use the following diagram to help you cable a 7047 185 workstation Connections and ports are labeled to facilitate the setup process Figure 15 Back views of a model 9133 55A server Cabling your server 171 ...

Страница 178: ...onnections on the model 9111 285 workstation This diagram shows you the back view of a 9111 285 workstation Connections and ports are labeled to facilitate the setup process Figure 16 Back view of a 7047 185 workstation 172 System i and System p Cabling your server ...

Страница 179: ...nd connections on the model 9110 510 server Use the following diagram to help you cable a model 9110 510 server Connections and ports are labeled to facilitate the setup process Figure 17 Back views of a model 9111 285 workstation Cabling your server 173 ...

Страница 180: ... connections on the model 9111 520 server This diagram shows you the back view of a 9111 520 server Connections and ports are labeled to facilitate the setup process Figure 18 Back view of a model 9110 510 server 174 System i and System p Cabling your server ...

Страница 181: ...Figure 19 Back views of a model 9111 520 server with the integrated HSL RIO ports T3 T4 Cabling your server 175 ...

Страница 182: ...710 server Use the following diagram to help you cable the OpenPower 710 server Connections and ports are labeled to facilitate the setup process Back views of the OpenPower 720 server View the ports and connections on the OpenPower 720 server Use the following diagram to help you cable the OpenPower 720 server Connections and ports are labeled to facilitate the setup process Figure 20 Back views ...

Страница 183: ...Web site http w3 rchland ibm com projects WCII The Worldwide Customized Installation Instructions WCII Web site is intended for the exclusive use of IBM System Services Representatives SSRs also known as service providers offers instructions for SSRs to install new SSR installed systems and features Cabling the Thin Console for System i5 Learn how to connect the Thin Console to your server Use the...

Страница 184: ...er end of the Ethernet cable directly to the HMC port either HMC 1 or HMC 2 on the server Connections and ports are labeled in the following diagram to facilitate the setup process Note You cannot attach any other console device to the remaining HMC port Note If you are connecting the Thin Console to an existing server the DST Sign on window might display Figure 23 Back view of a Thin Console for ...

Страница 185: ...ed in new editions of the publication The manufacturer may make improvements and or changes in the product s and or the program s described in this publication at any time without notice Any references in this information to Web sites not owned by the manufacturer are provided for convenience only and do not in any manner serve as an endorsement of those Web sites The materials at those Web sites ...

Страница 186: ...that it is suitable for any other purpose The manufacturer s computer systems contain mechanisms designed to reduce the possibility of undetected data corruption or loss This risk however cannot be eliminated Users who experience unplanned outages system failures power fluctuations or outages or component failures must verify the accuracy of operations performed and data saved or transmitted by th...

Страница 187: ...f the FCC rules Operation is subject to the following two conditions 1 this device may not cause harmful interference and 2 this device must accept any interference received including interference that may cause undesired operation Industry Canada Compliance Statement This Class A digital apparatus meets the requirements of the Canadian Interference Causing Equipment Regulations Avis de conformité...

Страница 188: ...nvironment this product may cause radio interference in which case the user may need to perform practical action Electromagnetic Interference EMI Statement Taiwan The following is a summary of the EMI Taiwan statement above Warning This is a Class A product In a domestic environment this product may cause radio interference in which case the user will be required to take adequate measures Electrom...

Страница 189: ...erence to radio or television reception which can be determined by turning the equipment off and on the user is encouraged to try to correct the interference by one or more of the following measures v Reorient or relocate the receiving antenna v Increase the separation between the equipment and receiver v Connect the equipment into an outlet on a circuit different from that to which the receiver i...

Страница 190: ...nsibility for an interference caused by using other than recommended cables and connectors VCCI Statement Japan The following is a summary of the VCCI Japanese statement in the box above This is a Class B product based on the standard of the Voluntary Control Council for Interference by Information Technology Equipment VCCI If this equipment is used in a domestic environment radio disturbance may ...

Страница 191: ... detrimental to its interest or as determined by the manufacturer the above instructions are not being properly followed You may not download export or re export this information except in full compliance with all applicable laws and regulations including all United States export laws and regulations THE MANUFACTURER MAKES NO GUARANTEE ABOUT THE CONTENT OF THESE PUBLICATIONS THESE PUBLICATIONS ARE...

Страница 192: ...r manual or service manual for specific battery information The battery must be recycled or disposed of properly Recycling facilities may not be available in your area For information on disposal of batteries outside the United States go to http www ibm com ibm environment products batteryrecycle shtml or contact your local waste disposal facility In the United States IBM has established a return ...

Страница 193: ......

Страница 194: ... Printed in USA ...

Отзывы: