background image

Removing


the


microprocessor


fan


assembly


The


microprocessor


fan


assembly


consists


of


two


parts;


the


fan


housing,


which


is


mounted


to


the


front


of


the


computer


chassis


and


contains


the


fan,


and


the


air


baffle,


which


directs


the


airflow


to


the


microprocessor.


If


a


procedure


requires


the


removal


of


the


air


baffle


only,


complete


steps


1


through


6


of


the


following


procedure.


To


remove


the


microprocessor


fan


assembly,


complete


the


following


steps:


1.


Read


the


safety


information


that


begins


on


page


vii


and


“Installation


guidelines”


on


page


73.


2.


Turn


off


the


computer


and


all


attached


devices;


then,


disconnect


all


external


cables


and


power


cords.


3.


Remove


the


side


cover


(see


“Removing


the


side


cover”


on


page


75).


4.


Remove


the


hard


disk


drive


bracket,


if


one


is


installed


(see


“Removing


the


hard


disk


drive


bracket”


on


page


95).


5.


Remove


the


front


bezel


(see


“Removing


the


bezel”


on


page


77).


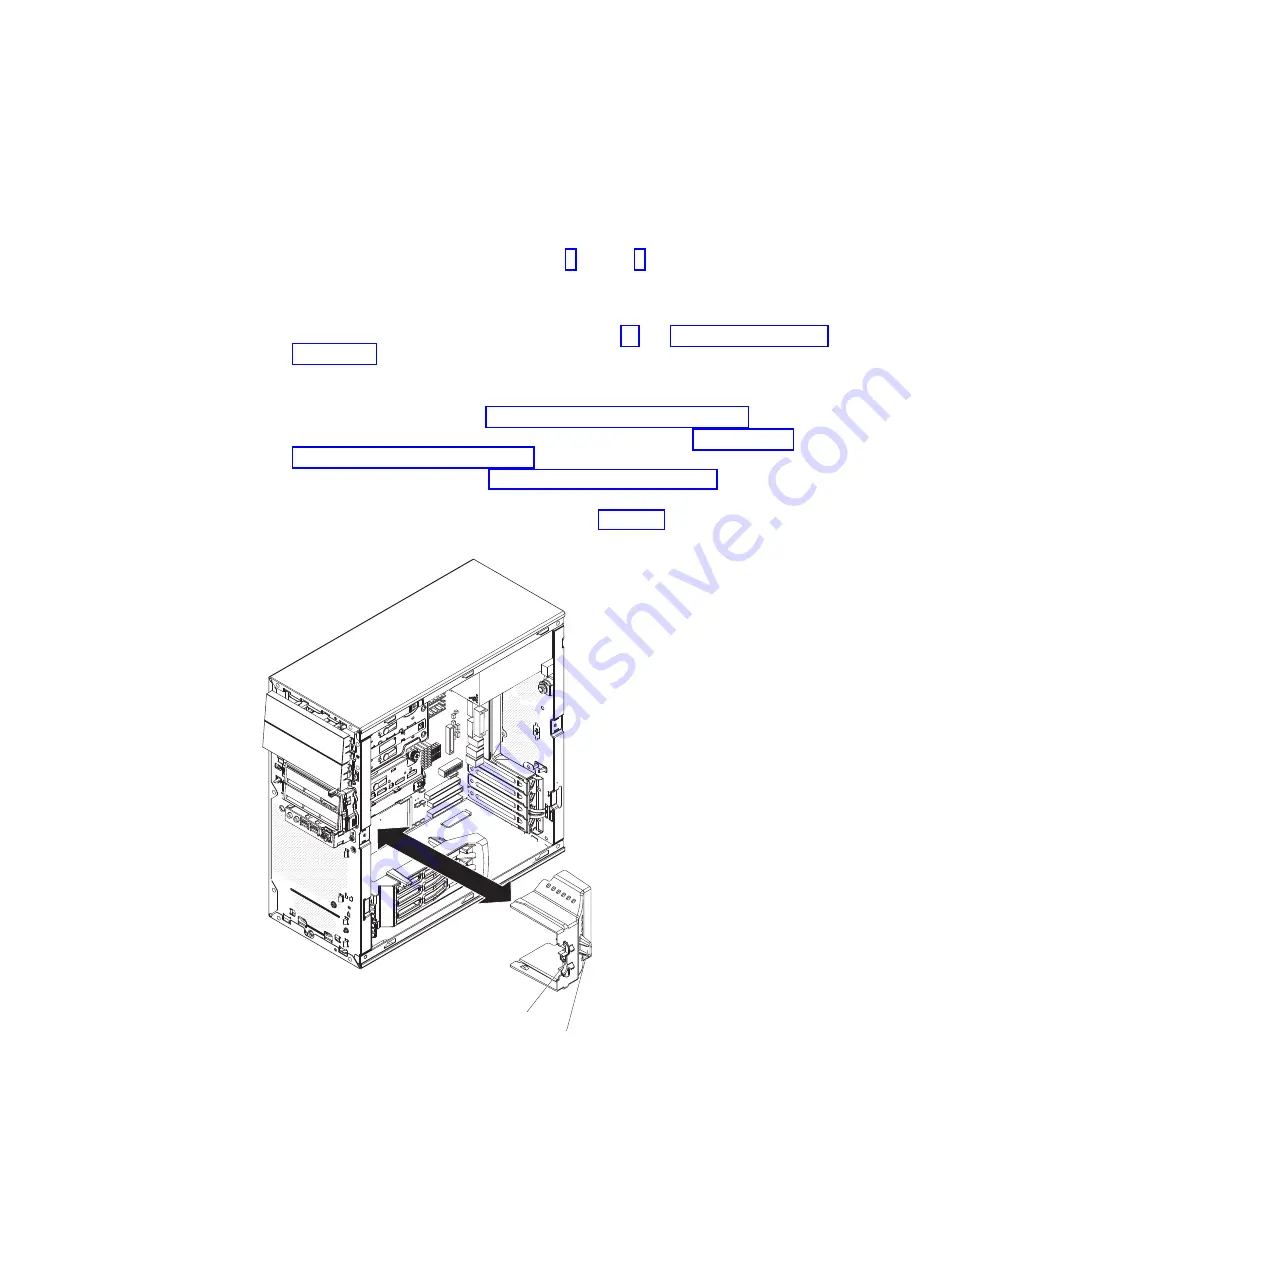
6.


Press


the


air-baffle


release


tab


toward


the


handle


and


pull


on


the


handle


to


remove


the


air


baffle


from


the


computer


(see


Figure


16).


Handle

Release tab


Figure


16.


Removing


the


air


baffle


Chapter


4.


Removing


and


replacing


computer


components


81

Содержание IntelliStation M Pro 6218

Страница 1: ...IBM IntelliStation M Pro Type 6218 and 9236 Problem Determination and Service Guide...

Страница 2: ......

Страница 3: ...IBM IntelliStation M Pro Type 6218 and 9236 Problem Determination and Service Guide...

Страница 4: ...eral information in Appendix B Notices on page 137 Fifth Edition June 2008 Copyright International Business Machines Corporation 2005 All rights reserved US Government Users Restricted Rights Use dupl...

Страница 5: ...blems 28 General problems 29 Hard disk drive problems 29 Intermittent problems 30 Keyboard mouse or pointing device problems 30 Memory problems 31 Microprocessor problems 31 Monitor or video problems...

Страница 6: ...Removing the bezel 77 Installing the bezel 78 Removing the front adapter retention bracket 79 Installing the front adapter retention bracket 80 Removing the microprocessor fan assembly 81 Installing...

Страница 7: ...l 135 Using the documentation 135 Getting help and information from the World Wide Web 136 Software service and support 136 Hardware service and support 136 Appendix B Notices 137 Edition notice 137 T...

Страница 8: ...vi IBM IntelliStation M Pro Type 6218 and 9236 Problem Determination and Service Guide...

Страница 9: ...tuotteen lue turvaohjeet kohdasta Safety Information Avant d installer ce produit lisez les consignes de s curit Vor der Installation dieses Produkts die Sicherheitshinweise lesen Prima di installare...

Страница 10: ...terior cover is not damaged loose or broken and observe any sharp edges 3 Check the power cord v Make sure that the third wire ground connector is in good condition Use a meter to measure third wire g...

Страница 11: ...ble to turn off the power if necessary When you are working with powered on electrical equipment use only one hand Keep the other hand in your pocket or behind your back to avoid creating a complete c...

Страница 12: ...e water or structural damage v Disconnect the attached power cords telecommunications systems networks and modems before you open the device covers unless instructed otherwise in the installation and...

Страница 13: ...ces or regulations Statement 3 CAUTION When laser products such as CD ROMs DVD drives fiber optic devices or transmitters are installed note the following v Do not remove the covers Removing the cover...

Страница 14: ...the power switch on the power supply do not turn off the electrical current supplied to the device The device also might have more than one power cord To remove all electrical current from the device...

Страница 15: ...ent inside any component that has this label attached There are no serviceable parts inside these components If you suspect a problem with one of these parts contact a service technician Important Thi...

Страница 16: ...xiv IBM IntelliStation M Pro Type 6218 and 9236 Problem Determination and Service Guide...

Страница 17: ...comes with the computer v Installation Guide This printed document contains instructions for setting up the computer This document is also in Portable Document Format PDF on the IBM IntelliStation Do...

Страница 18: ...in the Brand field select IntelliStation 4 In the Family field select IntelliStation M Pro 5 In the Type field select 6218 or 9236 6 Click Continue to display the documents that are available for the...

Страница 19: ...connector v Mouse connector v Audio connectors Line out front and rear Mic front Line in rear v Single channel IDE controller Video adapter depending on the model v NVIDIA Quadro NVS 280 DMS 59 PCI E...

Страница 20: ...D is on the rear of the computer Diskette drive activity LED When this LED is lit it indicates that the diskette drive is in use Diskette eject button Press this button to release a diskette from the...

Страница 21: ...it indicates that a system error has occurred An LED on the system board might also be lit to help isolate the error If the system board LED is not lit check the error log Hard disk drive activity LE...

Страница 22: ...ly from your hardware System board option connectors Figure 2 shows the option connectors on the system board Diskette drive optional DIMM 4 DIMM 3 DIMM 2 DIMM 1 Slot 1 PCI Express x1 Slot 2 PCI Expre...

Страница 23: ...nal speaker Ethernet activity LED front IDE drive System error LED front SATA drive 3 SATA drive 2 SATA drive 1 Main power Intrusion switch Microprocessor Microprocessor power Battery Microprocessor f...

Страница 24: ...mputer is restarted If the problem remains the LED will continue to be lit For information about how to correct the problems that are indicated by the error LEDs see System board error LEDs on page 49...

Страница 25: ...a default jumper on pins 1 and 2 v Clear CMOS data jumper on pins 2 and 3 with power cords removed from the computer see Erasing a lost or forgotten password clearing CMOS on page 62 for more informat...

Страница 26: ...10 IBM IntelliStation M Pro Type 6218 and 9236 Problem Determination and Service Guide...

Страница 27: ...sages and error codes on page 38 for more information POST When you turn on the computer it performs a series of tests to check the operation of computer components and some optional devices in the co...

Страница 28: ...2 Try another known good monitor or video adapter 1 1 3 CMOS write read test has failed 1 Reseat the battery 2 Replace the following components one at a time in the order shown restarting the compute...

Страница 29: ...est has failed 1 Reseat the keyboard cable 2 Replace the following components one at a time in the order shown restarting the computer each time a Keyboard b Trained service technician only System boa...

Страница 30: ...has failed Trained service technician only Replace the system board 3 2 2 Parallel port test has failed Trained service technician only Replace the system board 3 3 1 A memory size mismatch has occur...

Страница 31: ...configurations the 3 3 3 beep code might sound during POST followed by a blank display screen If this occurs and the Boot Fail Count feature in the Startup Option menu of the Configuration Setup Util...

Страница 32: ...be performed only by a trained service technician No beep symptom Description Action No beep during POST A system board failure occurred 1 See Solving undetermined problems on page 63 2 Trained servic...

Страница 33: ...corrected as POST continues Each system event error log entry appears on its own page To move from one entry to the next use the Up Arrow and Down Arrow keys When you are troubleshooting PCI or PCI Ex...

Страница 34: ...e following components a Battery b Trained service technician only Microprocessor 3 Replace the following components one at a time in the order shown restarting the computer each time a Battery b Trai...

Страница 35: ...Running the diagnostic programs on page 38 or Using the Enhanced Diagnostics diskette or CD on page 49 3 Run the Configuration Setup Utility program select Load Default Settings and save the settings...

Страница 36: ...Restart the computer 2 Update the BIOS code to set the serial number 3 Trained service technician only Replace the system board 189 An attempt has been made to access the computer with an incorrect pa...

Страница 37: ...nable keyboardless operation and prevent the POST error message from being displayed during startup 6 Run the diagnostic tests to isolate the computer component that failed 7 Replace the following com...

Страница 38: ...rrectly in the Configuration Setup Utility program 2 Reseat the hard disk drive cable 3 Replace the following components one at a time in the order shown restarting the computer each time a Hard disk...

Страница 39: ...me a Failing adapter b Trained service technician only System board 1803 A PCI adapter has requested memory above 1 MB 1 If the error code indicates a particular PCI or PCI Express slot or device remo...

Страница 40: ...1806 A PCI built in self test failure occurred 1 If the error code indicates a particular PCI or PCI Express slot or device remove that device 2 Reseat each adapter Note If an error LED is lit on an a...

Страница 41: ...ive you want to start from in the startup sequence Yes Exit from this screen then select Exit Setup to exit the Configuration Setup menu Go to step 2c No Follow the instructions on the screen to add t...

Страница 42: ...ost for a very brief period and then restored In this case turn off the computer for at least 5 seconds then turn it back on 1 Reseat the mouse pointing device cable and make sure that it is connected...

Страница 43: ...d replaceable units FRU v If an action step is preceded by Trained service technician only that step must be performed only by a trained service technician Symptom Action CD or DVD drive is not recogn...

Страница 44: ...able units CRU and which components are field replaceable units FRU v If an action step is preceded by Trained service technician only that step must be performed only by a trained service technician...

Страница 45: ...n step is preceded by Trained service technician only that step must be performed only by a trained service technician Symptom Action Not all drives are recognized by the hard disk drive diagnostic te...

Страница 46: ...ow the suggested actions in the order in which they are listed in the Action column until the problem is solved v See Chapter 3 Parts listing on page 65 to determine which components are customer repl...

Страница 47: ...v If the DIMM was disabled by the user or by POST run the Configuration Setup Utility program and enable the DIMM Save the settings and restart the computer 3 Replace the following components one at...

Страница 48: ...f one is installed c Trained service technician only System board Only the cursor appears See Solving undetermined problems on page 63 The monitor works when you turn on the computer but the screen go...

Страница 49: ...be performed only by a trained service technician Symptom Action An IBM optional device that was just installed does not work 1 Make sure that v The device is designed for the computer see the Server...

Страница 50: ...rking electrical outlet v The type of memory that is installed is correct 2 If you just installed an optional device remove it and restart the computer If the computer now starts you might have instal...

Страница 51: ...ctions in the order in which they are listed in the Action column until the problem is solved v See Chapter 3 Parts listing on page 65 to determine which components are customer replaceable units CRU...

Страница 52: ...he software for a description of the messages and suggested solutions to the problem 3 Contact the place where you purchased the software USB port problems v Follow the suggested actions in the order...

Страница 53: ...program 2 If a USB hub is in use disconnect the USB device from the hub and connect it directly to the computer 3 Replace the following components one at a time in the order shown restarting the comp...

Страница 54: ...ting is generally used when other methods are not accessible or have not been successful in isolating a problem that is suspected to be hardware related You can run the diagnostic programs through the...

Страница 55: ...be in a microprocessor or in a microprocessor socket See Microprocessor problems on page 31 for information about diagnosing microprocessor problems If the computer stops during testing and you canno...

Страница 56: ...197 do not replace a CRU or FRU These numbers appearing in the central position of the error code have the following meaning 000 The computer passed the test Do not replace a CRU or FRU 195 The Esc ke...

Страница 57: ...de is at the latest level 2 Trained service technician only Replace the system board 020 XXX 000 Failed PCI interface test 1 Reseat the adapter 2 Replace the following components one at a time in the...

Страница 58: ...un test Check the system resources and make more memory available see Starting the Configuration Setup Utility program on page 126 then run the test again 035 255 0nn Internal error 1 Reseat the follo...

Страница 59: ...gine test error 1 Update the ServeRAID adapter firmware see Updating the firmware on page 125 2 Reseat the ServeRAID adapter 3 Replace the ServeRAID adapter 035 272 0nn Adapter Drive test error Replac...

Страница 60: ...apter 3 Replace the ServeRAID adapter 035 283 001 Adapter Battery error Replace the battery module on the ServeRAID adapter 035 xxx 099 No adapters were found Reseat the following components 1 ServeRA...

Страница 61: ...vice technician only Microprocessor b Trained service technician only System board 201 XXX 0nn Failed memory test Note Where nn 1 DIMM 1 2 DIMM 2 3 DIMM 3 4 DIMM 4 1 Reseat DIMM nn 2 Replace the follo...

Страница 62: ...217 198 XXX Could not establish drive parameters 1 Reseat the following components and run the test again a SCSI cable b SCSI mini PCI adapter 2 Replace the following components one at a time in the o...

Страница 63: ...the computer each time a Pointing device mouse b Trained service technician only System board 405 XXX 000 Failed Ethernet test on the controller on the system board 1 Run the Configuration Setup Util...

Страница 64: ...n To download the latest image of the IBM Enhanced Diagnostics and create a startable Enhanced Diagnostics diskette complete the following steps 1 Go to http www ibm com pc support 2 Download the disk...

Страница 65: ...test log to a file on a diskette or to the hard disk by selecting Utility from the top of the screen and selecting Save Test Log Notes a To save the test log to a diskette you must use a diskette that...

Страница 66: ...emory failure occurred on DIMM x 1 Reseat DIMM x 2 Replace the following components one at a time in the order shown restarting the computer each time a DIMM x b Trained service technician only System...

Страница 67: ...p Utility Select Start Options and make sure that the Legacy USB Support option is set to Enable Creating an emergency recovery repair diskette in Windows In Windows you can create a recovery repair d...

Страница 68: ...uct Recovery CD to access the Product Recovery program see Product Recovery CDs on page 72 PC Doctor for Windows The computer contains PC Doctor for Windows which is designed specifically for the Wind...

Страница 69: ...t displayed see Using the recovery repair diskette in Windows on page 52 4 Quickly press F11 and wait for the program menu 5 Select Full recovery and follow the instructions on the screen 6 When recov...

Страница 70: ...ette drive then update the BIOS code on the computer v Download the BIOS code update file to a CD using a writeable optical device CD RW or DVD CD RW combo drive then start the computer with the CD in...

Страница 71: ...see Figure 8 removing any adapters that impede access to the jumper 6 Remove the boot block recovery jumper from pins 1 and 2 7 Replace any adapters that were removed then replace the hard disk drive...

Страница 72: ...ng devices might be causing the problem v A failing SCSI device adapter drive controller v An incorrect SCSI configuration v An incorrectly installed cable v A defective cable For any SCSI error messa...

Страница 73: ...ller b Replace the controller Note If the adapter or controller detects a configuration change Do not select Save Changes Instead press F10 to bypass any options to this effect 2 If the ISPR error is...

Страница 74: ...all SCSI cables from the suspected adapter and restart the computer Attention Do not press F5 Doing so changes the computer configuration If the ISPR code is EF10 after the cables are disconnected com...

Страница 75: ...ode and firmware for the controller Then remove the jumpers 2 Reseat the ServeRAID controller 3 Replace the ServeRAID controller 3200 A code DRAM error occurred 1 Install the download jumpers flash th...

Страница 76: ...9003 A ServeRAID controller error occurred 1 Flash the latest level of BIOS code and firmware for controller 2 Make sure that the controller is supported for this computer 3 Integrated RAID controller...

Страница 77: ...that step must be performed only by a trained service technician Error code Description Action FFFF or other code not listed A SCSI bus error occurred 1 Follow the instructions in Interrupt status po...

Страница 78: ...conds then return the CMOS recovery jumper to pins 1 and 2 8 Replace any adapters that were removed then replace the hard disk drive bracket if one was removed and the cover 9 Connect the computer to...

Страница 79: ...OS memory or damaged BIOS code can cause undetermined problems To reset the CMOS data use the clear CMOS jumper to override the power on password and clear the CMOS memory see Erasing a lost or forgot...

Страница 80: ...ngle or multiple computers Is the failure repeatable Has the current computer configuration ever worked What changes if any were made before it failed Is this the original reported failure or has this...

Страница 81: ...and 9236 computer To check for an updated parts listing on the Web complete the following steps 1 Go to http www ibm com support 2 Under Search technical support type 6218 or 9236 and click Search 3...

Страница 82: ...8 5 Memory 1 GB PC2 4200 ECC models 48x 92x 94x 30R5152 5 Memory 512 MB PC2 4200 ECC models 10x 12x 20x 22x 32x 55x CTO 30R5151 5 Memory 2 GB PC2 4200 ECC optional 30R5153 6 Heat sink all models 39M63...

Страница 83: ...ter video NVIDIA NVS 285 models 25x 56x 13M8433 Adapter video FX 4500 model 54x 13M8429 Adapter video FX 1400 models 22x 35x 45x 46x 57x 58x 85x 87x 13M8415 Battery 3 0 V all models 33F8354 Front pane...

Страница 84: ...R7320 Hard disk drive 80 0 GB SATA primary models 10x 12x 20x 22x 25x 27x 32x 35x 37x 57x 58x 84x 85x 87x 92x 94x 39M4503 Hard disk drive 80 0 GB SATA alternate models 10x 12x 20x 22x 25x 27x 32x 35x...

Страница 85: ...s 45x 47x 55x 59x 26K5079 SCSI adapter models 25x 35x 46x 54x 56x 58x 85x 87x 39Y9936 Service label all models 39M0482 Shield system board all models 39M0475 Speaker assembly all models 39Y9720 Tray h...

Страница 86: ...Canada are listed by Underwriter s Laboratories UL and certified by the Canadian Standards Association CSA For units intended to be operated at 115 volts Use a UL listed and CSA certified cord set con...

Страница 87: ...audi Arabia Senegal Serbia Slovakia Slovenia Republic of Somalia Spain Suriname Sweden Syrian Arab Republic Tajikistan Tahiti Togo Tunisia Turkey Turkmenistan Ukraine Upper Volta Uzbekistan Vanuatu Vi...

Страница 88: ...y 39M5226 India 39M5233 Brazil Product Recovery CDs CD description CRU Number US English Windows XPP 32 bit EN 40K2303 French Windows XPP 32 bit FR 40K2304 German Windows XPP 32 bit GE 40K2305 Italian...

Страница 89: ...place v If you must start the computer while the cover is removed make sure that no one is near the computer and that no tools or other objects have been left inside the computer v Do not attempt to...

Страница 90: ...s until you are ready to install them To reduce the possibility of electrostatic discharge observe the following precautions v Limit your movement Movement can cause static electricity to build up aro...

Страница 91: ...ety information that begins on page vii and Installation guidelines on page 73 2 Turn off the computer and all attached devices 3 Disconnect all external cables and power cords 4 Press the cover relea...

Страница 92: ...einstall it before you install the side cover see Installing the bezel on page 78 4 Install the side cover by placing it into position on the computer Make sure that the lip on the bottom of the cover...

Страница 93: ...rn off the computer and all attached devices then disconnect all external cables and power cords 3 Remove the side cover see Removing the side cover on page 75 4 Press the bezel release button and pul...

Страница 94: ...ttom of the bezel toward the computer until the two tabs at the bottom of the bezel snap into place 3 Install the side cover see Installing the side cover on page 76 4 Reconnect the external cables an...

Страница 95: ...s procedure 6 Remove any full length adapters that are installed 7 Disconnect the speaker wire from the system board connector 8 From the front of the computer press down and inward on the two retenti...

Страница 96: ...nings in the front of the computer until they lock securely 4 Reconnect the speaker wire to the system board connector 5 Install any full length adapters that were removed 6 Install the front bezel se...

Страница 97: ...ty information that begins on page vii and Installation guidelines on page 73 2 Turn off the computer and all attached devices then disconnect all external cables and power cords 3 Remove the side cov...

Страница 98: ...10 Carefully tilt the fan housing toward the rear of the computer and disengage the lower retention tabs from the chassis 11 Lift the fan housing up and out of the chassis Note If the computer is lyin...

Страница 99: ...e front of the computer until they lock securely see Figure 18 4 Reconnect the fan power cable to the system board see System board internal connectors on page 7 for the location of the microprocessor...

Страница 100: ...ved see Removing the bezel on page 77 9 Install the side cover see Installing the side cover on page 76 10 Reconnect the external cables and power cords then turn on the attached devices and the compu...

Страница 101: ...power cords 3 Remove the side cover see Removing the side cover on page 75 4 Remove the hard disk drive bracket if one is installed see Removing the hard disk drive bracket on page 95 5 Locate the sl...

Страница 102: ...on slot covers must be installed in all empty slots This maintains the electronic emissions standards of the computer and ensures proper ventilation of computer components 10 If you are instructed to...

Страница 103: ...ight be easier to route cables before you install the adapter 2 Follow the instructions that come with the adapter to set jumpers or switches if any Attention Avoid touching the components and gold ed...

Страница 104: ...d a full length adapter press down on the top tab of the front adapter retention bracket to lock it in place Note If any adapter in your computer is large or has heavy cables attached to it you can se...

Страница 105: ...age from the computer see Figure 23 a Loosen the thumbscrew at the rear of the drive cage b Slide the drive cage to the rear to disengage it from the upper clips and lift the cage out of the computer...

Страница 106: ...on the computer Then remove the new DIMM from the package 3 Turn the DIMM so that the contacts align correctly with the connector 4 Insert the DIMM into the connector see Figure 25 on page 91 Firmly...

Страница 107: ...en the thumbscrew at the rear of the drive cage c Reconnect the power cables to the drives in the cage if any were disconnected 6 Reconnect any cables that were disconnected during removal DIMM Retain...

Страница 108: ...the computer and all attached devices then disconnect all external cables and power cords 3 Remove the side cover see Removing the side cover on page 75 4 Remove the hard disk drive bracket if one is...

Страница 109: ...system has a module containing a lithium battery replace it only with the same module type made by the same manufacturer The battery contains lithium and can explode if not properly used handled or d...

Страница 110: ...et see Removing the front adapter retention bracket on page 79 9 Remove the microprocessor fan assembly see Removing the microprocessor fan assembly on page 81 10 Slide the speaker out of its retainin...

Страница 111: ...e the hard disk drive bracket to access the device To remove the hard disk drive bracket complete the following steps 1 Read the safety information that begins on page vii and Installation guidelines...

Страница 112: ...the tray from the computer 7 If you are instructed to return the hard disk drive bracket follow all packaging instructions and use any packaging materials for shipping that are supplied to you Screws...

Страница 113: ...acket to the chassis 3 Reconnect the signal and power cables to the hard disk drive that is installed in the tray Note If you removed the hard disk drive while removing the tray install it now see Ins...

Страница 114: ...ttached devices then disconnect all external cables and power cords 3 Remove the side cover see Removing the side cover on page 75 4 Remove the front bezel see Removing the bezel on page 77 5 Remove t...

Страница 115: ...equipment specified in the documentation that comes with the new drive v You check the instructions that come with the new drive to determine whether you must set any switches or jumpers on the drive...

Страница 116: ...to the beam Class 1 Laser Product Laser Klasse 1 Laser Klass 1 Luokan 1 Laserlaite Appareil A Laser de Classe 1 2 Touch the static protective package that contains the new drive to any unpainted metal...

Страница 117: ...er Removing a drive in bay 3 or 4 To remove a drive in bay 3 or 4 complete the following steps 1 Read the safety information that begins on page vii and Installation guidelines on page 73 2 Turn off t...

Страница 118: ...d to return the drive follow all packaging instructions and use any packaging materials for shipping that are supplied to you Installing a drive in bay 3 or 4 To install a drive in bay 3 or 4 complete...

Страница 119: ...e drive into the rear of the bay then install the two screws through the side of the drive cage v For a hard disk drive in bay 4 install the hard disk drive tray onto the drive then push the drive int...

Страница 120: ...moving the side cover on page 75 4 Disconnect the signal and power cables from the hard disk drive 5 Remove the thumbscrew at the rear of the drive 6 Lift the rear of the drive out of the hard disk dr...

Страница 121: ...e on each side at the front of the new drive see Figure 37 2 Position the hard disk drive so that the shoulder screws are aligned with the guide slots in the hard disk drive bracket and slide the fron...

Страница 122: ...on page 73 2 Turn off the computer and all attached devices then disconnect all external cables and power cords 3 Remove the side cover see Removing the side cover on page 75 4 Remove the hard disk dr...

Страница 123: ...nsert the front edge of the mini PCI adapter into the mini PCI connector on the system board 2 Lower the rear connector edge onto the plastic standoffs and gently press down on the connector until the...

Страница 124: ...computer see Figure 23 on page 89 a Loosen the thumbscrew at the rear of the drive cage b Slide the drive cage to the rear to disengage it from the upper clips and lift the cage out of the computer No...

Страница 125: ...ee System board internal connectors on page 7 for connector location 3 Reconnect the power switch LED assembly cable to the front I O panel card 4 Reinstall the drive cage if it was removed see Figure...

Страница 126: ...ght be helpful to lay the computer on its left side for the remainder of this procedure 6 Remove the drive cage from the computer see Figure 23 on page 89 a Loosen the thumbscrew at the rear of the dr...

Страница 127: ...l screw on the front of the computer 4 Reconnect the power switch LED assembly cable to the back of the I O card 5 Reconnect the internal IEEE 1394 FireWire cable and front panel cable to the system b...

Страница 128: ...roprocessor fan assembly on page 81 7 Disconnect any cables that impede access to the heat sink and microprocessor Attention The heat sink retention lever is spring loaded when the heat sink is in pla...

Страница 129: ...g components 9 Release the microprocessor socket lever by pressing down on the end moving it to the right and slowly releasing it to the open up position see Figure 46 10 Open the microprocessor socke...

Страница 130: ...ctive surface c Squeeze the bladder of the tool to release the microprocessor from the suction cup 12 If you are instructed to return the microprocessor and heat sink follow all packaging instructions...

Страница 131: ...e Figure 48 a Squeeze and hold the bladder of the tool then place the suction cup on the microprocessor and release the bladder b Using the tool carefully place the microprocessor into the socket c Sq...

Страница 132: ...d lock it securely in place seeFigure 50 Microprocessor Orientation indicator Orientation notches Figure 49 Microprocessor orientation Lever Socket cover Figure 50 Closing the microprocessor socket 11...

Страница 133: ...tion module to maintain proper orientation c Close the heat sink retention lever and lock it securely in place 5 Reconnect any cables that were disconnected during removal 6 Install the air baffle ont...

Страница 134: ...information that begins on page vii and Installation guidelines on page 73 2 Turn off the computer and all attached devices then disconnect all external cables and power cords 3 Remove the side cover...

Страница 135: ...he mounting bracket 8 Carefully lift the power supply out of the computer 9 If you are instructed to return the power supply follow all packaging instructions and use any packaging materials for shipp...

Страница 136: ...e Figure 53 2 Install the power supply retaining screws from the rear of the computer 3 Reconnect the cables from the power supply to the system board and all internal components 4 Install the hard di...

Страница 137: ...e the drive cage from the computer see Figure 23 on page 89 a Loosen the thumbscrew at the rear of the drive cage b Slide the drive cage to the rear to disengage it from the upper clips and lift the c...

Страница 138: ...board out of the computer 15 If you are instructed to return the system board follow all packaging instructions and use any packaging materials for shipping that are supplied to you System board screw...

Страница 139: ...87 and reconnect any cables that were removed or disconnected 7 Reinstall the drive cage see Figure 26 on page 91 a Place the drive cage into position and slide it forward to engage the upper clips b...

Страница 140: ...124 IBM IntelliStation M Pro Type 6218 and 9236 Problem Determination and Service Guide...

Страница 141: ...ion programs are available to configure the computer v Configuration Setup Utility program The Configuration Setup Utility program is part of the basic input output system BIOS code in the computer Yo...

Страница 142: ...D Manager is available as a stand alone program and as an IBM Director extension If a ServeRAID controller is installed in the computer use ServeRAID Manager to define and configure the disk array sub...

Страница 143: ...he startup sequence of the computer complete the following steps 1 Turn off the computer 2 Restart the computer 3 Press F12 4 Select the startup device The next time the computer is started it returns...

Страница 144: ...arrays Drives in an array can have different capacities but the RAID controller treats them as if they all have the capacity of the smallest hard disk drive v To help ensure signal quality do not mix...

Страница 145: ...figuration Utility program to configure a RAID level 1 for the computer complete the following steps 1 Turn on the computer 2 When the prompt CTRL A for Adaptec RAID Configuration Utility appears Pres...

Страница 146: ...feature Configuring the controller To use the SCSI HostRAID feature to configure a RAID level 1 array complete the following steps 1 From the SCSISelect main menu select Configure View HostRAID Settin...

Страница 147: ...n about using the Array Configuration Utility program to create configure and manage arrays If the CD did not come with the computer you can download the IBM ServeRAID 8e Adaptec HostRAID Support CD f...

Страница 148: ...veRAID Manager program in Startable CD mode turn on the computer then insert the IBM ServeRAID Support CD into the CD ROM drive If the ServeRAID Manager program detects an unconfigured controller and...

Страница 149: ...iewing the configuration You can use ServeRAID Manager to view information about RAID controllers and the RAID subsystem such as arrays logical drives hot spare drives and physical drives When you cli...

Страница 150: ...mpted to type the password 3 Use the arrow keys to make the selection and press Enter 4 When the Would you like to configure the SCSI controller or run the SCSI disk utility prompt appears make the se...

Страница 151: ...troubleshooting procedures that IBM provides in the online help or in the documentation that is provided with your IBM product The documentation that comes with Eserver and IntelliStation systems als...

Страница 152: ...For information about which products are supported by Support Line in your country or region see http www ibm com services sl products For more information about Support Line and other IBM services se...

Страница 153: ...TY OF ANY KIND EITHER EXPRESS OR IMPLIED INCLUDING BUT NOT LIMITED TO THE IMPLIED WARRANTIES OF NON INFRINGEMENT MERCHANTABILITY OR FITNESS FOR A PARTICULAR PURPOSE Some states do not allow disclaimer...

Страница 154: ...ed States other countries or both UNIX is a registered trademark of The Open Group in the United States and other countries Java and all Java based trademarks and logos are trademarks of Sun Microsyst...

Страница 155: ...a particular purpose These products are offered and warranted solely by third parties IBM makes no representations or warranties with respect to non IBM products Support if any for the non IBM produc...

Страница 156: ...lead acid nickel cadmium nickel metal hydride lithium or lithium ion battery Consult your user manual or service manual for specific battery information The battery must be recycled or disposed of pr...

Страница 157: ...y also include a chemical symbol for the metal concerned in the battery Pb for lead Hg for mercury and Cd for cadmium Users of batteries and accumulators must not dispose of batteries and accumulators...

Страница 158: ...hielded and grounded cables and connectors must be used in order to meet FCC emission limits IBM is not responsible for any radio or television interference caused by using other than recommended cabl...

Страница 159: ...s been tested and found to comply with the limits for Class A Information Technology Equipment according to CISPR 22 European Standard EN 55022 The limits for Class A equipment were derived for commer...

Страница 160: ...n these countries and regions 02K0546 China 13F9940 Australia Fiji Kiribati Nauru New Zealand Papua New Guinea 13F9979 Afghanistan Albania Algeria Andorra Angola Armenia Austria Azerbaijan Belarus Bel...

Страница 161: ...Barbados Belize Bermuda Bolivia Brazil Caicos Islands Canada Cayman Islands Costa Rica Colombia Cuba Dominican Republic Ecuador El Salvador Guam Guatemala Haiti Honduras Jamaica Japan Mexico Micronesi...

Страница 162: ...146 IBM IntelliStation M Pro Type 6218 and 9236 Problem Determination and Service Guide...

Страница 163: ...Xtreme Gigabit Ethernet Boot Agent 125 Configuration Setup Utility program 126 configuring the computer 125 the Ethernet controller 133 connectors DIMM 6 diskette drive 6 fan internal 7 front 4 IDE 7...

Страница 164: ...r installing 83 removing 81 FCC Class A notice 142 features and specifications 3 FireWire connectors 4 firmware updating 125 flash updating 54 front adapter retention bracket installing 80 removing 79...

Страница 165: ...listing 65 password lost or forgotten 62 PC Doctor for Windows 52 PCI expansion slots 3 pointing device problems 30 POST error codes 18 error log 17 POST ISPR error procedures 57 POST power on self t...

Страница 166: ...ing 94 removing 94 starting Configuration Setup Utility program 126 SCSISelect Utility program 134 static electricity 74 static sensitive devices handling 74 status LEDs 4 system board internal connec...

Страница 167: ......

Страница 168: ...Part Number 31R1998 Printed in USA 1P P N 31R1998...

Отзывы: