background image

Loading the 250-sheet tray

24

Printing

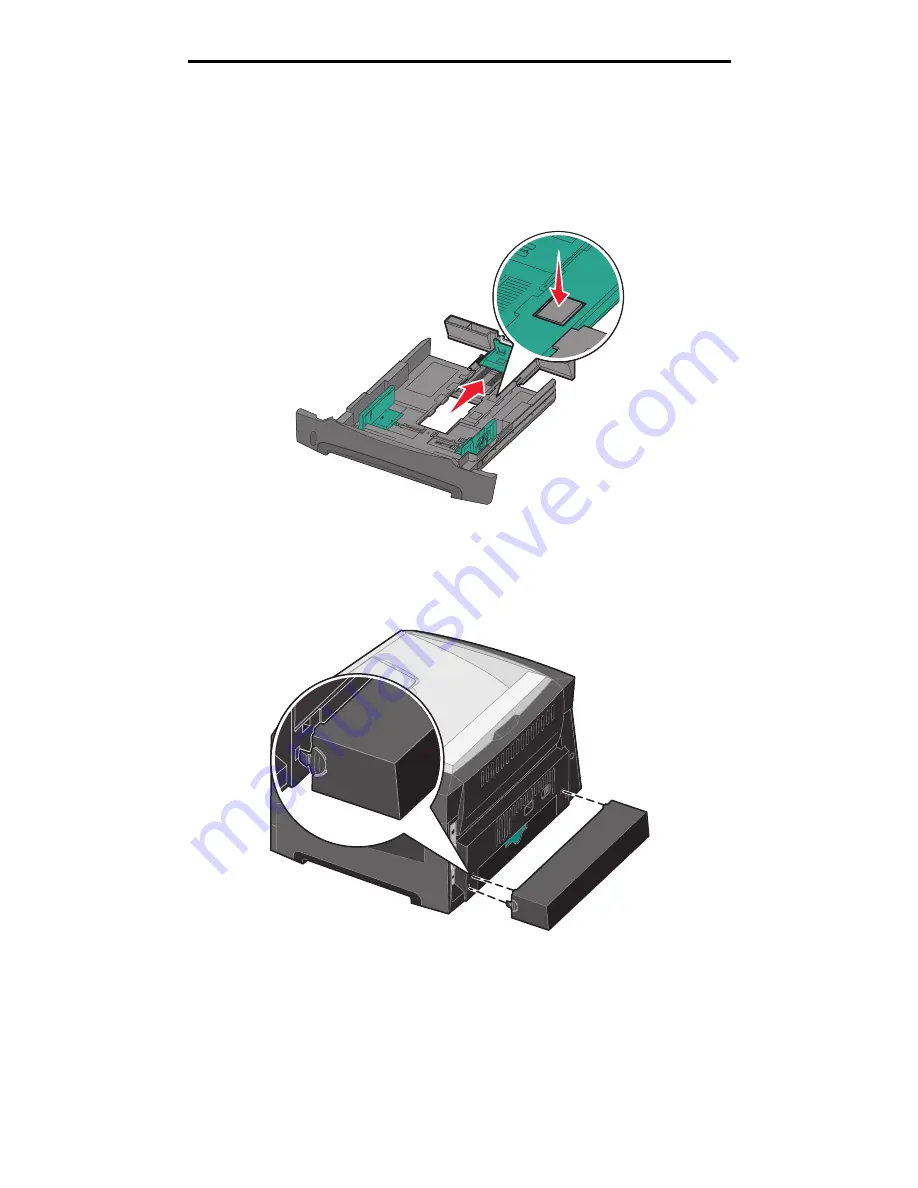
Extending the tray for legal or folio size paper

To load legal or folio size paper, extend the paper tray. You may also attach a dust cover (not available for all models) on 
the back of the printer to protect the tray while it is extended.

1

Press down on the latch at the back of the tray.

2

Expand the tray until the extender locks into place.

Attaching the dust cover

The dust cover helps protect the paper tray from the environment. It also keeps the tray from being knocked out of position 
while it is extended.

Note:

This feature may not be available for all models.

Attach the dust cover (if available) to the back of the printer by aligning the tabs on the cover to the holes on the printer, then 

snap

 the cover into place.

Содержание InfoPrint 1622

Страница 1: ...InfoPrint 1622 MT 4546 User s Guide S510 6759 00 ...

Страница 2: ...n are trademarks of Lexmark International Inc PCL is a registered trademark of the Hewlett Packard Company PCL is Hewlett Packard Company s designation of a set of printer commands language and functions included in its printer products This printer is intended to be compatible with the PCL language This means the printer recognizes PCL commands used in various application programs and the printer...

Страница 3: ...s the printer system board Turn the printer off and unplug the power cord from the wall outlet before continuing CAUTION If you are installing a memory card after setting up the printer turn the printer off and unplug the power cord from the wall outlet before continuing CAUTION If you are installing a flash memory card after setting up the printer turn the printer off and unplug the power cord fr...

Страница 4: ...nt 27 Canceling a print job 28 Printing the menu settings page 29 Printing a network setup page 29 Printing a font sample list 30 Printing held jobs 30 Chapter 4 Installing options 32 Accessing the system board 32 Adding a memory card 35 Adding a flash memory card 35 Installing an optional 550 sheet drawer 37 Recognizing installed options 37 Chapter 5 Maintaining the printer 38 Determining the sta...

Страница 5: ...per feed problems 55 Solving print quality problems 56 Chapter 8 Administrative support 60 Adjusting control panel brightness and contrast 60 Disabling control panel menus 60 Enabling control panel menus 61 Restoring factory default settings 61 Adjusting Power Saver 62 Disabling Power Saver 62 Selecting printer operating mode 63 Setting security using the Embedded Web Server EWS 63 Notices 66 Prod...

Страница 6: ...ake any electrical or cabling connections such as the power cord or telephone during a lightning storm Basic model The following illustration shows a printer with its base features 1 2 3 4 1 150 sheet output bin 4 250 sheet tray 2 Control panel and navigation buttons 5 Paper support 3 Manual feeder 6 Front door 5 6 ...

Страница 7: ...ter The following illustration shows a rear view of the printer with its base features 1 2 3 4 6 7 5 1 Rear paper exit 5 USB connect 2 Power button 6 Parallel connect 3 Power connect 7 Ethernet connect 4 Dust cover not available for some models ...

Страница 8: ...nfigured model The following illustration shows a fully configured printer Items denoted with an asterisk are options 1 2 3 4 5 1 150 sheet output bin 4 250 sheet tray 2 Control panel and navigation buttons 5 550 sheet drawer optional 3 Manual feeder ...

Страница 9: ... Paper Menu Default Source Paper Size Type Substitute Size Paper Texture Paper Weight Paper Loading Custom Types Universal Setup Reports Menu Settings Page Device Statistics Network Setup Page Profiles List Print Fonts Settings Setup Menu Finishing Menu Quality Menu Utilities Menu PDF Menu PostScript Menu PCL Emul Menu Security Job Expiration Network Ports TCP IP Standard Network Standard USB Para...

Страница 10: ...tor light Note A label located on the inside front door shows the control panel buttons in your language An additional translated label is included in the printer box Voltar Zp t Tilbage Terug Takaisin Retour Zurück Vissza Indietro ě Tilbake Wró a a Atrás Bakåt Geri ć H з д Menu Nabídka Menu Menu Valikko Menu Menü Menü Menu Meny Menu Menú Meny Menü Parar Stop Stop Stop Seis Stop Stopp Leállítás St...

Страница 11: ...l appear if the printer is not ready 3 Stop Press the Stop button to stop the mechanical operation of the printer After pressing Stop the message Stopping appears When the printer has stopped the status line in the control panel will show Stopped and a list of options will appear 4 Indicator light A two toned LED is used on the control panel one color being green and the other being red The lights...

Страница 12: ...ss Select when the cursor appears next to the selection you want such as following a link submitting a configuration item or when you want to start or cancel a job 7 Display The display shows messages and graphics describing the current state of the printer and indicating possible printer problems you must resolve The top line of the display is the header line If applicable it will contain the gra...

Страница 13: ...thin a tray Source Sizes Types Weight Capacity sheets 250 sheet tray A4 A5 A6 grain long only JIS B5 letter legal executive folio statement Plain paper bond letterhead transparencies paper labels single sided only 60 90 g m2 16 24 lb 250 paper 50 labels 50 transparencies 550 sheet drawer optional A4 A5 JIS B5 letter legal executive folio statement Plain paper bond letterhead transparencies paper l...

Страница 14: ... 163 g m2 16 to 43 lb bond grain long in the manual feeder Paper lighter than 60 g m2 16 lb might not be stiff enough to feed properly causing jams For best performance use 75 g m2 20 lb bond grain long paper To use paper narrower than 182 x 257 mm 7 2 x 10 1 in it is recommended that the weight be equal to 90 g m2 24 lb bond Curl Curl is the tendency of media to curve at its edges Excessive curl ...

Страница 15: ...y contaminate the printer Preprinted papers that can be affected by the temperature in the printer fuser Preprinted papers that require a registration the precise print location on the page greater than 0 09 in such as optical character recognition OCR forms In some cases you can adjust registration with your software application to successfully print on these forms Coated papers erasable bond syn...

Страница 16: ...atex inks might not When in doubt contact the paper supplier Preprinted papers such as letterhead must be able to withstand temperatures up to 210 C 410 F without melting or releasing hazardous emissions Printing on letterhead Check with the manufacturer or vendor to determine whether the chosen preprinted letterhead is acceptable for laser printers Page orientation is important when printing on l...

Страница 17: ...r trays or manually from the manual feeder See What types of print media can be loaded on page 13 for information about transparency compatibility with input bins Be careful when you handle transparencies Fingerprints on the surface of the transparency cause poor print quality Envelopes Try a sample of any envelope you are considering using with the printer before buying large quantities See Loadi...

Страница 18: ...r or from MarkVision Professional Do not load labels together with paper or transparencies in the same source mixing media can cause feeding problems Do not use label sheets with a slick backing material Do not use vinyl labels Use full label sheets Partial sheets may cause labels to peel off during printing resulting in a jam Partial sheets also contaminate the printer and the cartridge with adhe...

Страница 19: ...63 g m2 90 lb Be aware that preprinting perforation and creasing can significantly affect the print quality and cause media handling or jamming problems Avoid using card stock that may release hazardous emissions when heated Do not use preprinted card stock manufactured with chemicals that may contaminate the printer Preprinting introduces semi liquid and volatile components into the printer The u...

Страница 20: ...ake sure the stack height does not exceed the maximum height indicated by the stack line on the labels in the sources Do not load wrinkled creased damp or curled print media Flex fan and straighten print media before you load it If jams do occur with print media try feeding one sheet at a time through the manual feeder Do not use print media that you have cut or trimmed yourself Do not mix print m...

Страница 21: ... 19 Loading the 250 sheet tray Your printer has a 250 sheet tray You may have also purchased an optional 550 sheet drawer Print media is loaded into both components the same way To load print media Note Do not remove a tray when a job is printing or when the control panel indicator light is blinking Doing so may cause a jam 1 Remove the tray Note To load legal or folio size paper extend the length...

Страница 22: ...ng 4 Flex the sheets back and forth to loosen them then fan them Do not fold or crease the print media Straighten the edges on a level surface 5 Load print media in the tray Note Load letterhead paper with the design side facing down The top edge of the sheet with the logo should be placed at the front of the tray Make sure the print media is below the paper fill indicator on the side guides Overl...

Страница 23: ...Loading the 250 sheet tray 23 Printing 6 Pinch the side guide tab and slide the guide until it lightly rests against the edge of the media 7 Insert the tray 8 Extend the paper support on the output bin ...

Страница 24: ...ress down on the latch at the back of the tray 2 Expand the tray until the extender locks into place Attaching the dust cover The dust cover helps protect the paper tray from the environment It also keeps the tray from being knocked out of position while it is extended Note This feature may not be available for all models Attach the dust cover if available to the back of the printer by aligning th...

Страница 25: ...dicator light is blinking Doing so may cause a jam 1 Slide the width guides to the outside of the feeder 2 Place a sheet of the selected print media print side facing up at the center fo the manual feeder but only to the point where its leading edge can contact the paper guides Load one sheet of the media in the feeder Hold transparencies by the edges and avoid touching the print side Insert envel...

Страница 26: ...o the feeder Forcing the media causes jams 5 Set the Paper Size and Paper Type for the manual feeder Manual Feeder Size and Manual Feeder Type to the correct value for the print media you loaded a Press on the control panel b Press until Paper Menu appears and then press c Press until Paper Size Type appears and then press d Press until Manual Paper Size Type or Manual Env Size Type appears and th...

Страница 27: ...in each one of the trays If all the trays do not have the same type of print media when they are linked you could mistakenly print a job on the wrong paper type Sending a job to print A printer driver is software that lets your computer communicate with your printer When you choose Print from a software application a window representing the printer driver opens You can then select the appropriate ...

Страница 28: ...ars on the display press until Cancel a job appears and then press The message Canceling Job appears until the job is canceled Canceling a job from a computer running Windows Canceling a job from the taskbar When you send a job to print a small printer icon appears in the right corner of the taskbar 1 Double click the printer icon A list of print jobs appears in the printer window 2 Select the job...

Страница 29: ...ady 2 Press on the control panel 3 Press until Reports appears and then press 4 Press until Menu Settings Page appears and then press Printing Menus Settings appears on the display The printer returns to the Ready state after the menu settings page prints Printing a network setup page If the printer is attached to a network print a network setup page on the printer to verify the network connection...

Страница 30: ...res the job in memory so you can print the job later The job is held in memory until you delete it from the Held Jobs menu Reserve Print jobs may be deleted if the printer requires extra memory to process additional held jobs Repeat Print If you send a Repeat Print job the printer prints all requested copies of the job and stores the job in memory so you can print additional copies later You can p...

Страница 31: ...e radio group select the type of held job you want enter a user name and then send your job to the printer Go to the printer when you are ready to retrieve your print job and follow the At the printer steps on page 31 At the printer 1 Press until Held jobs appears and then press 2 Press until the appears next to your user name and then press 3 Press until the appears next to the type of action you...

Страница 32: ...4 Installing options Accessing the system board 1 Remove the paper tray CAUTION To install memory you must access the printer system board Turn the printer off and unplug the power cord from the wall outlet before continuing ...

Страница 33: ...Accessing the system board 33 Installing options 2 Press button on the left side of the printer to release and lower the front door 3 Open the rear exit ...

Страница 34: ...ing the system board 34 Installing options 4 Press both buttons on the front right side of the machine to release the side access door 5 Loosen the four screws of the cover to gain access to the system board ...

Страница 35: ... fully seat the card 6 Make sure each latch fits over the notch on each end of the card 7 Close the side access door 8 Close the rear exit 9 Close the front door Adding a flash memory card The system board has two connectors for an optional flash memory card Note Flash memory card options designed for other printers may not work with your printer 1 Access the system board see Accessing the system ...

Страница 36: ... 4 Push the flash memory card firmly into the holes of the system board until it snaps into place Note The flash card can be installed in the top or the bottom set of connector pin holes 5 Close the side access door 6 Close the rear exit door 7 Close the front door 8 Plug the power cord into the wall outlet and turn the printer on to continue print functions ...

Страница 37: ...alled option when the printer is turned on If it does not you can add the appropriate option manually 1 Click Start Æ Settings Æ Printers 2 Select the printer icon 3 Click File Æ Properties 4 Click the Install Options tab 5 Add the appropriate options to your configuration Memory Card Increase the printer memory to the appropriate number 550 sheet drawer 6 Click OK CAUTION Turn the printer off and...

Страница 38: ...w if any trays are low Selecting Status Supplies on the display will open the Status Supplies screen where you can view the status of the various trays and open the supplies screen to view the current status of your toner cartridge Photoconductor kit end of life To ensure print quality and to avoid damage to the printer the printer stops operating after the photoconductor kit has reached a maximum...

Страница 39: ...s you adjust the level of toner released on a sheet of print media The values range from 1 lightest setting to 10 darkest setting Print media Multipage Print in the Defaults Æ Finishing Menu Causes the printer to print the two or more page images on one side of a sheet Values for Multipage Print are 2 Up 3 Up 4 Up 6 Up 9 Up 12 Up and 16 Up Combined with the duplex setting Multipage Print lets you ...

Страница 40: ...ff 2 Press the button on the left side of the printer to release and lower the front door 3 Remove the toner cartridge a Press the release button on the base of the print cartridge assembly b Grasp the handle pulling up and out to remove the toner cartridge 4 Unpack the new toner cartridge 2 1 ...

Страница 41: ... 8 Turn the printer back on Ordering a photoconductor kit When the 84 PC Life Warning message appears you should order a new photoconductor kit You can print a few hundred pages after the 84 PC Life Warning message appears Changing a photoconductor kit Warning When replacing a photoconductor kit do not leave the new photoconductor kit exposed to direct light for an extended period of time Extended...

Страница 42: ...Do not press the button on the print cartridge assembly Place the print cartridge assembly on a flat clean surface 3 Remove the toner cartridge a Press the button on the base of the print cartridge assembly b Grasp the toner cartridge handle and pull up and out 4 Unpack the new photoconductor kit 1 2 3 1 2 ...

Страница 43: ...y into the printer by aligning the green arrows on the guides of the print cartridge assembly with the green arrows on the tracks in the printer and pushing the print cartridge assembly in as far as it will go 7 Close the front door 8 Turn the printer back on 9 Reset the photoconductor counter see the instruction sheet that shipped with the new photoconductor kit Note Print your printer menu setti...

Страница 44: ... it is time to replace printer maintenance items Order a maintenance kit when 80 Scheduled Maintenance first appears on the display The maintenance kit contains all the items necessary to replace the pick rollers the fuser and the transfer roller For information about maintenance kits available for the printer contact the place where you bought the printer ...

Страница 45: ...ever it is best to clear the entire paper path to ensure you have cleared all possible jams Message What to do 200 Paper Jam Remove Cartridge Open the front door remove the toner cartridge and remove the jammed print media 201 Paper Jam Remove Cartridge Open the front door remove the toner cartridge and remove the jammed print media 202 Paper Jam Open Rear Door Open the rear printer exit and remov...

Страница 46: ...learing jams Clearing printer jams Clearing a jam We recommend clearing the entire paper path when a paper jam occurs To clear the jam 1 Open the paper tray If necessary remove the tray from the printer 2 Remove the jammed media ...

Страница 47: ...ng jams 3 Press down on the green duplex flap to release jammed pages from the duplex area 4 Remove any crumpled paper from the tray CAUTION Fuser or fuser area may be hot 5 Open the front door and remove the print cartridge assembly ...

Страница 48: ...einstall the print cartridge assembly and make sure all printer doors and trays are closed 9 Press Note Jam recovery is set to Auto by default When jam recovery is set to Auto the memory that holds the image of a page may be reused after the page is printed but before it has successfully exited the printer if that memory is needed for another use Therefore a jammed page may or may not be reprinted...

Страница 49: ...Clearing printer jams 49 Clearing jams Clearing a jam in the manual feeder 1 Remove the paper from the manual feeder 2 Open the front door and remove the print cartridge assembly ...

Страница 50: ...ays are closed 6 Press Note Jam recovery is set to Auto by default When jam recovery is set to Auto the memory that holds the image of a page may be re used after the page is printed but before it has successfully exited the printer if that memory is needed for another use Therefore a jammed page may or may not be reprinted depending on the overall memory usage in the printer 7 Load one sheet of t...

Страница 51: ...he place where you bought your printer When calling for service call from the location of the printer Checking an unresponsive printer If your printer is not responding first make sure The power cord is plugged into the printer and a properly grounded electrical outlet The electrical outlet is not turned off by any switch or breaker The printer is not plugged into any surge protectors uninterrupte...

Страница 52: ... from the output bin and then press The specified tray is empty Load paper in the tray You are using the wrong printer driver or are printing to a file Verify you are using the printer driver associated with your printer If you are using a USB Direct interface make sure you are running Windows 2000 Windows XP or Windows Server 2003 and using a printer driver compatible with Windows 2000 Windows XP...

Страница 53: ...ate is not set to On Set Collation to On in the Finishing Menu or through the printer driver Note Setting Collation to Off in the driver overrides the setting in the Finishing Menu For more information see the Menus and Messages Guide The job is too complex Reduce the complexity of the print job by eliminating the number and size of fonts the number and complexity of images and the number of pages...

Страница 54: ...ing the Printer appears briefly followed by a clock The control panel then returns to Ready The printer returns to the Ready state Solving option problems If an option does not operate correctly after it is installed or if it quits working Turn the printer off wait for about 10 seconds and turn the printer on If this does not fix the problem unplug the printer from the wall outlet and check the co...

Страница 55: ...lopes Make sure the print media is below the paper fill indicator on the side guides Guides in the selected tray are not set to the appropriate position for the size paper loaded Move the guides in the tray to the correct position The paper has absorbed moisture due to high humidity Load paper from a fresh package Store paper in its original wrapper until you load it See Storing print media on pag...

Страница 56: ...erify the correct print media is being used Toner smears or print comes off the page If you are printing on an uneven print surface change the Paper Weight and Paper Texture settings in the Paper menu Verify the print media is within the printer specifications See Understanding print media guidelines on page 13 for more details If the problem continues turn the printer off and contact the place yo...

Страница 57: ...or toner cartridge Printing is too dark Change the Toner Darkness setting in the Quality menu Change the Brightness setting in the Quality menu Change the Contrast setting in the Quality menu Note Macintosh computer users should make sure the lines per inch lpi setting is not set too high in the software application Characters have jagged or uneven edges Change the Print Resolution setting in the ...

Страница 58: ...ctor kit Gray background prints The Toner Darkness setting may be too dark Change the Toner Darkness setting in the Quality menu Adjust the Brightness to a darker setting Adjust the Contrast to a darker setting The photoconductor kit may be defective Replace the photoconductor kit Some of the print is cut off on the sides top or bottom of the media Move the guides in the tray to the proper positio...

Страница 59: ...darkens printed output and conserves toner 1 10 8 is the default setting Select a lower number to lighten the printed output or save toner Small Font Enhancer Enhances the quality of small fonts Off Fonts Only Fonts Images Driver option Purpose Values Enhance Fine Lines A selection to enable a print mode preferable for certain files containing fine line detail such as architectural drawings maps e...

Страница 60: ...l menus Since many people could be using the printer an administrator may choose to lock the control panel menus to keep others from changing menu settings from the control panel Note Disabling the control panel menus does not prevent access to Print and Hold functionality To disable the control panel menus so that changes cannot be made to the printer default settings 1 Turn the printer off 2 Pre...

Страница 61: ...vary for different regions When you select a new setting from the control panel Submitting Selection appears When the Submitting Selection message disappears an asterisk appears next to the setting to identify it as the current user default setting These settings are active until new ones are stored or the factory defaults are restored To restore the original printer factory default settings Warni...

Страница 62: ...you must turn the variable on and then select the variable To disable Power Saver 1 Turn the printer off 2 Press and hold and while turning the printer on 3 Release both buttons when Performing Self Test appears on the display The printer performs its power on sequence and then Config Menu appears on the first line of the display 4 Press until Energy Conserve appears and then press 5 Press until O...

Страница 63: ...the printer you want to configure using the format http ip_address 2 Click Configuration 3 Under Other Settings click Security 4 Click Create Password if one has not been set previously If a password has already been set click Change or Remove Password Using the secure Embedded Web Server The SSL Secure Sockets Layer allows for secure connections to the Web server within the print device You can c...

Страница 64: ...v4 and IPv6 To configure IPSec through the Embedded Web Server 1 Open your Web browser In the address line enter the IP address of the printer you want to configure using the format http ip_address 2 Click Configuration 3 Under Other Settings click Network Ports 4 Click IPSec Two types of authentication are supported for IPSec Shared Key Authentication Any ASCII phrase shared among all the partici...

Страница 65: ...can manage the credentials by using the Embedded Web Server of the printer To use certificates as part of the credentials 1 Open your Web browser In the address line enter the IP address of the printer you want to configure using the format http ip_address 2 Click Configuration 3 Under Other Settings click Network Ports 4 Click Certificate Management To enable and configure 802 1x on the Embedded ...

Страница 66: ... Unauthorized changes or modifications could void the user s authority to operate this equipment Note To assure compliance with FCC regulations on electromagnetic interference for a Class B computing device use a properly shielded and grounded cable Use of a substitute cable not properly shielded and grounded may result in a violation of FCC regulations Industry Canada compliance statement This Cl...

Страница 67: ... signifies specific recycling programs and procedures for electronic products in countries of the European Union We encourage the recycling of our products If you have further questions about recycling options please contact the place where you bought your printer Laser advisory label A laser notice label may be affixed to this printer LUOKAN 1 LASERLAITE VAROITUS Laitteen käyttäminen muulla kuin ...

Страница 68: ...azardous The printer contains internally a Class IIIb 3b laser that is nominally a 5 milliwatt gallium arsenide laser operating in the wavelength region of 770 795 nanometers The laser system and printer are designed so there is never any human access to laser radiation above a Class I level during normal operation user maintenance or prescribed service condition ...

Страница 69: ...ry 35 G guide tab 22 guidelines paper unacceptable 15 printing letterhead 16 I Identifying printers 6 Indicator light 11 Internet Protocol Security 64 J jams avoiding 20 clearing 46 L labels guidelines 18 letterhead 16 guidelines 16 page orientation 16 printing 16 loading print media card stock 21 paper input tray 21 multipurpose feeder 25 transparencies input tray 21 lock feature security 65 M Ma...

Страница 70: ... 52 incorrect characters print 53 job didn t print 52 job prints 53 from wrong tray 53 on wrong paper or specialty media 53 large jobs do not collate 53 paper feed blank pages in output bin 55 frequent jams 55 jammed page does not reprint 55 Paper Jam message remains after clearing jam 55 print time seems long 53 unexpected page breaks 53 R repeat print 30 reserve print 30 restoring factory defaul...

Страница 71: ......

Страница 72: ...Printed in USA S510 6759 00 ...

Отзывы: