Note:
If you are installing the system into a 7953-94X or 7965-94Y rack, the pins on the front of the
rails must be exchanged for the pins included with the system rail kit.
5.
Insert the rear slide flange locator studs on the slide rail into the rear EIA mounting holes.
6.
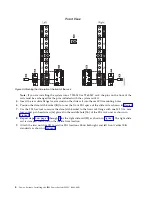
Position the slam-latch bracket (B) to cover the front EIA space of the slide rail as shown in Figure 3.
7.
Use the T25 hex tool to secure the slam-latch bracket to the front rail flange with one M5 X 16 mm
torx socket pan head screw (A) placed in the middle hole (1b) of the EIA rack unit as shown in
Figure 3.
8.
Repeat steps 2 on page 3 through 7 for the right slide rail (D) as shown in Figure 3. The right slide
rail is stamped with an R on the inside front location.
9.
Attach the two nut clips (F) to relative EIA locations 3b on both right and left front vertical EIA
standards as shown in Figure 3.
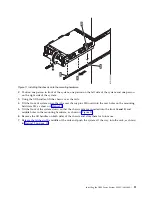
Figure 3. Attaching the slide rails at the front of the rack
4
Power Systems: Installing the IBM Power System E850C (8408-44E)
Содержание E850C
Страница 1: ...Power Systems Installing the IBM Power System E850C 8408 44E GI11 9920 00 IBM...
Страница 2: ......
Страница 3: ...Power Systems Installing the IBM Power System E850C 8408 44E GI11 9920 00 IBM...
Страница 6: ...iv Power Systems Installing the IBM Power System E850C 8408 44E...
Страница 16: ...xiv Power Systems Installing the IBM Power System E850C 8408 44E...
Страница 54: ...38 Power Systems Installing the IBM Power System E850C 8408 44E...
Страница 67: ...Notices 51...
Страница 68: ...IBM Part Number 29R2425 Printed in USA GI11 9920 00 1P P N 29R2425...


