background image

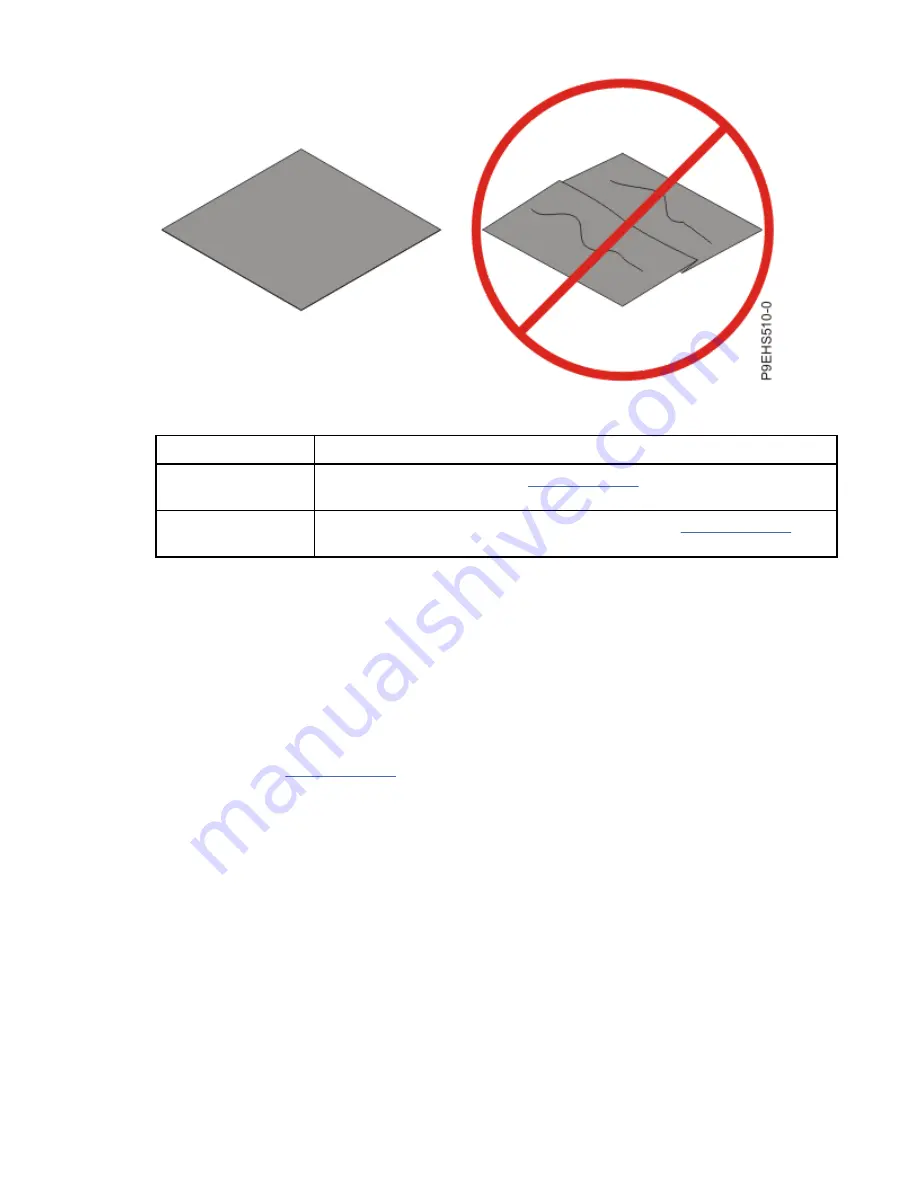
Figure 104. Inspecting the thermal interface material

9. Choose one of the following repair options:

Option

Description

Is the TIM damaged? It is damaged. Proceed to step “10” on page 82 to replace the TIM and

install the existing heat sink.

Is the TIM OK?

It is not damaged and can be reused. Proceed to step “12” on page 82 to

reuse the TIM and install the existing heat sink.

10. Use this step to install a new TIM and reuse the existing heat sink.

a) Open the TIM packaging and carefully remove the TIM, holding it by the edges of the carrier strip

and holding it away from the shipping container.

b) Remove the protective film from the clear carrier strip by using the supplied tweezers.

Note: The TIM must remain flat. Small wrinkles are acceptable, but folds are not acceptable.

c) Using the tweezers, remove the TIM from the carrier strip and center it onto the system processor

module.
The TIM has no preferred up side. The TIM can be placed on the system processor module and

centered..

11. Continue with step “13” on page 82.
12. Use this step to reuse the existing undamaged TIM and heat sink.

a) Using the tweezers, move the old TIM from the clean, dry surface and center it onto the new

system processor module.
The TIM has no preferred up side. The TIM can be placed on the system processor module and

centered.

13. Carefully lower the heat sink over the system processor module, ensuring that the holes in the heat

sink align with the two guide pins (A) on the socket, as shown in the following figure.

82  Power Systems: Servicing the IBM Power Systems HMC (7063-CR2)

Содержание 7063-CR2

Страница 1: ...Power Systems Servicing the IBM Power Systems HMC 7063 CR2 IBM...

Страница 2: ...ual G229 9054 and the IBM Environmental Notices and User Guide Z125 5823 This edition applies to IBM Power Systems servers that contain the POWER9 processor and to all associated models Copyright Inte...

Страница 3: ...ing the power distribution board 41 Replacing the power distribution board 46 Power supplies 51 Removing a power supply 51 Replacing a power supply 52 System backplane 53 Preparing to remove the syste...

Страница 4: ...Service and operating positions 101 Placing a 7063 CR2 system into the service position 101 Placing a 7063 CR2 system into the operating position 103 Removing and replacing covers 104 Removing the se...

Страница 5: ...erordnung geeignet Laser safety information IBM servers can use I O cards or features that are fiber optic based and that utilize lasers or LEDs Laser compliance IBM servers may be installed inside or...

Страница 6: ...wer attach the power cords to the outlets 5 For racks with a DC power distribution panel PDP restore the power from the Customer s DC power source and turn on the circuit breakers located in the PDP 6...

Страница 7: ...mpromise the supply wiring or overcurrent protection To provide the correct power connection to a rack refer to the rating labels located on the equipment in the rack to determine the total power requ...

Страница 8: ...complete the following steps Lower the four leveling pads Install stabilizer brackets on the rack cabinet or in an earthquake environment bolt the rack to the floor If you removed any devices from th...

Страница 9: ...not put any load on the slide rail mounted equipment mounted in the installation position Do not leave the slide rail mounted equipment in the installation position L002 L003 or or or or Safety notice...

Страница 10: ...class 1 laser product Consult the label on each part for laser certification numbers and approval information CAUTION This product might contain one or more of the following devices CD ROM drive DVD R...

Страница 11: ...d for use to assist lift install remove units load up into rack elevations It is not to be used loaded transporting over major ramps nor as a replacement for such designated tools like pallet jacks wa...

Страница 12: ...andle A winch accident could cause serious injury Not for moving humans Make certain clicking sound is heard as the equipment is being raised Be sure winch is locked in position before releasing handl...

Страница 13: ...d DC return DC I design The DC battery return terminal shall not be connected to the chassis or frame ground The dc powered system is intended to be installed in a common bonding network CBN as descri...

Страница 14: ...xiv Power Systems Servicing the IBM Power Systems HMC 7063 CR2...

Страница 15: ...lectrical storm The product might be equipped with multiple power cords To remove all hazardous voltages disconnect all power cords For AC power disconnect all power cords from their AC power source F...

Страница 16: ...illers are present Use the following precautions whenever you handle electronic components or cables The electrostatic discharge ESD kit and the ESD wrist strap must be used when you handle logic card...

Страница 17: ...off the system For instructions see Stopping the 7063 CR2 system on page 99 3 Place the system in the service position on an ESD surface on a table For instructions see Placing a 7063 CR2 system into...

Страница 18: ...s into place in the connector on the power distribution board Figure 2 Connecting the drive power cable 3 Install the service access cover For instructions see Installing the service access cover on a...

Страница 19: ...talling or replacing hardware touch an unpainted metal surface of the system for a minimum of 5 seconds If at any point in this service process you move away from the system it is important to again d...

Страница 20: ...e 1 Ensure that you have the electrostatic discharge ESD wrist strap on and that the ESD clip is plugged into a ground jack or connected to an unpainted metal surface If not do so now 2 Using your lab...

Страница 21: ...l panel cable in the IBM Power Systems HMC 7063 CR2 system Removing the control panel cable from the 7063 CR2 system To remove the control panel cable from the IBM Power Systems HMC 7063 CR2 system co...

Страница 22: ...on page 104 5 Remove the control panel cable a Label where the control panel cable A connects to the power distribution board and to the control panel b Remove the control panel cable from the power d...

Страница 23: ...etal surface of your hardware to prevent the electrostatic discharge from damaging your hardware When you use an ESD wrist strap follow all electrical safety procedures An ESD wrist strap is used for...

Страница 24: ...ol panel cable Clip the cable into the right air baffle Figure 8 Connecting the USB cable 3 Install the service access cover For instructions see Installing the service access cover on a 7063 CR2 syst...

Страница 25: ...ck when using or working on electrical equipment If you do not have an ESD wrist strap just prior to removing the product from ESD packaging and installing or replacing hardware touch an unpainted met...

Страница 26: ...is plugged into a ground jack or connected to an unpainted metal surface If not do so now 2 Replace the drive a Support the drive by the bottom as you position the drive and insert it into the drive s...

Страница 27: ...To remove the drive holder from the IBM Power Systems HMC 7063 CR2 system complete the steps in this procedure About this task You can use a magnetic tip screwdriver to remove and replace the screws...

Страница 28: ...ay from the system it is important to again discharge yourself by touching an unpainted metal surface for at least 5 seconds before you continue with the service process 2 Power off the system For ins...

Страница 29: ...CR2 system on page 104 7 Label and disconnect the cables from the rear of drive holder For instructions see Removing the drive power cable from the 7063 CR2 system on page 2 and Removing a drive sign...

Страница 30: ...trap on and that the ESD clip is plugged into a ground jack or connected to an unpainted metal surface If not do so now 2 Insert the drive holder into the system 3 Install the four screws for the driv...

Страница 31: ...e A by pushing in the handle release latch until it locks into place Figure 14 Installing a drive 9 Replace the system in the rack and replace the components that you removed For instructions see Plac...

Страница 32: ...maging your hardware When you use an ESD wrist strap follow all electrical safety procedures An ESD wrist strap is used for static control It does not increase or decrease your risk of receiving elect...

Страница 33: ...ed on and you remove two or more fans the system powers down a Use the ring A on the front of the fan to pull the fan from the system b Support the bottom of the fan as you slide it out of the system...

Страница 34: ...e system The top side of the fan assembly has an arrow that shows the airflow direction the metal alignment plate is the bottom of the fan assembly Ensure that you align the fan housing under the inte...

Страница 35: ...complete the steps in this procedure About this task The four memory modules must be the same size and type Mixing of memory module types is not allowed The following table lists the supported memory...

Страница 36: ...electric shock when using or working on electrical equipment If you do not have an ESD wrist strap just prior to removing the product from ESD packaging and installing or replacing hardware touch an u...

Страница 37: ...les in the top cover can come into contact with the DIMMs in the system backplane if the insertion of the backplane is at an angle or is rushed As a result of possible contact DIMMs can be scratched a...

Страница 38: ...ckplane Attention Memory is keyed to prevent it from being installed incorrectly Note the location of the key tab within the memory connector before you attempt to install it b Press firmly on each si...

Страница 39: ...plane so that no damage occurs to the components at the socket edge of the backplane Ensure that the system backplane is fully seated and is all the way into the system You must remove and replace the...

Страница 40: ...nd if applicable until the service access cover is replaced Attention Attach an electrostatic discharge ESD wrist strap to the front ESD jack to the rear ESD jack or to an unpainted metal surface of y...

Страница 41: ...tem right side up on the ESD surface 7 Remove the screw A that secures the control panel to the right side of the system Figure 27 Removing the control panel side screw 8 Remove the fan cover from the...

Страница 42: ...gure 28 Removing the fan cover 9 Slide the control panel out of the system Be careful with the cables that are attached to the control panel 28 Power Systems Servicing the IBM Power Systems HMC 7063 C...

Страница 43: ...l cable from the control panel Use your thumb or finger to press the release latch on the connector to remove the cable 11 Remove the three screws that secure the control panel card to the control pan...

Страница 44: ...from new control panel cover 3 Align the new control panel card on the current control panel cover The current control panel cover has the system serial number and needs to be used 4 Replace the thre...

Страница 45: ...ure the control panel to the right side of the system Figure 33 Installing the control panel side screw 8 Turn the system upside down on the ESD surface 9 Install the two screws A to secure the contro...

Страница 46: ...an cover in place c Rotate the two levers on each side of the fan cover down and in to secure the cover to the system Figure 35 Replacing the fan cover 12 Replace the system in the rack and replace th...

Страница 47: ...the service procedure is completed and if applicable until the service access cover is replaced Attention Attach an electrostatic discharge ESD wrist strap to the front ESD jack to the rear ESD jack o...

Страница 48: ...system backplane at a flat angle The ventilation holes in the top cover can come into contact with the DIMMs in the system backplane if the insertion of the backplane is at an angle or is rushed As a...

Страница 49: ...s HMC 7063 CR2 system complete the steps in this procedure Procedure 1 Ensure that you have the electrostatic discharge ESD wrist strap on and that the ESD clip is plugged into a ground jack or connec...

Страница 50: ...n the system backplane and insert it into the system until it is fully seated Important Use care when you insert the system backplane so that no damage occurs to the components at the socket edge of t...

Страница 51: ...trap The ESD wrist strap must be connected to an unpainted metal surface until the service procedure is completed and if applicable until the service access cover is replaced Attention Attach an elect...

Страница 52: ...om as you slide it from the system Figure 48 Removing the system backplane f Place the system backplane on an ESD surface Note You must remove and replace the system backplane at a flat angle The vent...

Страница 53: ...cedure 1 Ensure that you have the electrostatic discharge ESD wrist strap on and that the ESD clip is plugged into a ground jack or connected to an unpainted metal surface If not do so now 2 Install t...

Страница 54: ...re when you insert the system backplane so that no damage occurs to the components at the socket edge of the backplane Ensure that the system backplane is fully seated and is all the way into the syst...

Страница 55: ...able until the service access cover is replaced Attention Attach an electrostatic discharge ESD wrist strap to the front ESD jack to the rear ESD jack or to an unpainted metal surface of your hardware...

Страница 56: ...s in the system backplane if the insertion of the backplane is at an angle or is rushed As a result of possible contact DIMMs can be scratched and can leave residue on the top cover 5 Place the system...

Страница 57: ...wer distribution board 8 Remove the right plastic air baffle A from the right edge of the system lift it straight up Figure 56 Right air baffle 9 Remove the cross bar from inside the system Removing a...

Страница 58: ...rom the cross bar Figure 58 Removing the air baffle c Loosen the three screws at the top of the cross bar Figure 59 Cross bar top screws d Lift the cross bar out of the system 10 Remove the 19 screws...

Страница 59: ...stribution board screws 11 Use the two finger grips to lift the power distribution board up and out of the system 12 Place the power distribution board on an ESD surface Removing and replacing parts i...

Страница 60: ...the electrostatic discharge ESD wrist strap on and that the ESD clip is plugged into a ground jack or connected to an unpainted metal surface If not do so now 2 Use the two finger grips to lift the p...

Страница 61: ...eplace the cross bar inside the system a Put the cross bar into its location inside the system Ensure that the five screw holes face the front b Tighten the three screws at the top of the cross bar Re...

Страница 62: ...t side of the cross bar Figure 63 Replacing the air baffle d Replace the five screws into the front of the cross bar Figure 64 Cross bar front screws 5 Replace the plastic air baffle A on the right ed...

Страница 63: ...power distribution board Reconnect the drive cables to the rear of the drive holder The USB cable nests inside the control panel power cable in the right air baffle Ensure that the cable latch clips...

Страница 64: ...is fully seated Important Use care when you insert the system backplane so that no damage occurs to the components at the socket edge of the backplane Ensure that the system backplane is fully seated...

Страница 65: ...ESD jack or to an unpainted metal surface of your hardware to prevent the electrostatic discharge from damaging your hardware When you use an ESD wrist strap follow all electrical safety procedures A...

Страница 66: ...clip is plugged into a ground jack or connected to an unpainted metal surface If not do so now 2 Wait 30 seconds after you remove a power supply before you install a power supply 3 To install a power...

Страница 67: ...ckplane write down the system serial number and machine model type After you replace the system backplane you must set the system serial number and machine model type in the system backplane Preparing...

Страница 68: ...procedures An ESD wrist strap is used for static control It does not increase or decrease your risk of receiving electric shock when using or working on electrical equipment If you do not have an ESD...

Страница 69: ...lace the system backplane in the IBM Power Systems HMC 7063 CR2 system complete the steps in this procedure Procedure 1 Ensure that you have the electrostatic discharge ESD wrist strap on and that the...

Страница 70: ...73 Loosening the load arm screw of the heat sink 4 Grip the heat sink and remove it by lifting it straight up as shown in the following figure 56 Power Systems Servicing the IBM Power Systems HMC 706...

Страница 71: ...he system processor socket on the new system backplane 8 Inspect the system processor socket area and remove any dust or debris use a can of compressed air 9 Align the tool with the beveled edge A of...

Страница 72: ...system processor module push down on the tool to lock the system processor module into the tool as shown in the following figure The tool drops slightly when you push down on the system processor mod...

Страница 73: ...s C are inserted into the alignment holes B on each side of the tool Use care to lower the tool evenly without tilting the tool Do not attempt to slide the tool and the system processor module in any...

Страница 74: ...ssor module holes and guide pins are properly aligned squeeze and hold the two blue release tabs A together until a firm stop is reached as shown in the following figure Then lift the tool off the sys...

Страница 75: ...stem processor module tool 14 Inspect the thermal interface material TIM for visible signs of damage If you see folds tears bends or if you have doubts about the TIM replace it Removing and replacing...

Страница 76: ...eezers Note The TIM must remain flat Small wrinkles are acceptable but folds are not acceptable c Using the tweezers remove the TIM from the carrier strip and center it onto the system processor modul...

Страница 77: ...ove the load arm A into position over the heat sink B and tighten the load arm screw with a T20 hexalobular driver as shown in the following figure Note Do not over tighten the load arm screw Removing...

Страница 78: ...mory in the 7063 CR2 on page 21 22 Move the TPM card from the old system backplane to the corresponding location on the new system backplane For instructions see Removing and replacing the trusted pla...

Страница 79: ...ing latch c Move the retainer clip away from the PCIe adapter d Remove the PCIe adapter from the PCIe riser on the old system backplane Figure 84 Removing the PCIe adapter e Replace the PCIe adapter i...

Страница 80: ...by the bottom as you position the system backplane and insert it into the system until it is fully seated Important Use care when you insert the system backplane so that no damage occurs to the compo...

Страница 81: ...em starts to avoid issues Follow the steps listed here Scale out LC system VPD update tool www14 software ibm com webapp set2 sas f lopdiags scaleOutLCdebugtool html OpenPOWER 2 Ensure that the BMC ne...

Страница 82: ...system complete the steps in this procedure About this task L007 CAUTION A hot surface nearby L007 Procedure 1 Power off the system For instructions see Stopping the 7063 CR2 system on page 99 2 Atta...

Страница 83: ...ide to unlock the system backplane from the system Figure 90 Unlatching the system backplane e Support the system backplane by the bottom as you slide it from the system Figure 91 Removing the system...

Страница 84: ...Loosen the load arm screw A of the system processor heat sink B that you are removing with a T20 hexalobular driver The load arm pivots up in the direction that is shown in the following figure 70 Po...

Страница 85: ...Figure 93 Loosening the load arm screw of the heat sink 6 Grip the heat sink and remove it by lifting it straight up as shown in the following figure Removing and replacing parts in the 7063 CR2 71...

Страница 86: ...easily 9 Inspect the system processor socket area and remove any dust or debris use a can of compressed air 10 Align the tool with the beveled edge A of the system processor module as shown in the fol...

Страница 87: ...processor module into the tool as shown in the following figure The tool drops slightly when you push down on the system processor module so that the jaws can grab the bottom of the module Make sure...

Страница 88: ...angle on the top cover of the system processor module packaging as shown in the following figure Setting the system processor module at an angle on the top cover of the system processor module packag...

Страница 89: ...m processor module at an angle on the top cover of the packaging 13 Squeeze the two blue tabs to release the system processor module from the tool as shown in the following figure Removing and replaci...

Страница 90: ...strap on and that the ESD clip is plugged into a ground jack or connected to an unpainted metal surface If not do so now 2 Inspect the system processor socket area and remove any dust or debris use a...

Страница 91: ...into the tool as shown in the following figure The tool drops slightly when you push down on the system processor module so that the jaws can grab the bottom of the module Make sure that both of the t...

Страница 92: ...100 Locking the system processor module into the tool 5 Lift the system processor module from the packaging tray as shown in the following figure 78 Power Systems Servicing the IBM Power Systems HMC 7...

Страница 93: ...e pins C are inserted into the alignment holes B on each side of the tool Use care to lower the tool evenly without tilting the tool Do not attempt to slide the tool and the system processor module in...

Страница 94: ...ssor module holes and guide pins are properly aligned squeeze and hold the two blue release tabs A together until a firm stop is reached as shown in the following figure Then lift the tool off the sys...

Страница 95: ...ystem processor module tool 8 Inspect the thermal interface material TIM for visible signs of damage If you see folds tears bends or if you have doubts about the TIM replace it Removing and replacing...

Страница 96: ...eezers Note The TIM must remain flat Small wrinkles are acceptable but folds are not acceptable c Using the tweezers remove the TIM from the carrier strip and center it onto the system processor modul...

Страница 97: ...ove the load arm A into position over the heat sink B and tighten the load arm screw with a T20 hexalobular driver as shown in the following figure Note Do not over tighten the load arm screw Removing...

Страница 98: ...odule that you replaced by the edges and lift it off the shipping cover Align the beveled corner of the module A to the corner of the tray with the triangle B and place it in the tray as shown in the...

Страница 99: ...t the system backplane so that no damage occurs to the components at the socket edge of the backplane Ensure that the system backplane is fully seated and is all the way into the system You must remov...

Страница 100: ...strap to the front ESD jack to the rear ESD jack or to an unpainted metal surface of your hardware to prevent the electrostatic discharge from damaging your hardware When you use an ESD wrist strap f...

Страница 101: ...he system backplane at a flat angle The ventilation holes in the top cover can come into contact with the DIMMs in the system backplane if the insertion of the backplane is at an angle or is rushed As...

Страница 102: ...system until it is fully seated Important Use care when you insert the system backplane so that no damage occurs to the components at the socket edge of the backplane Ensure that the system backplane...

Страница 103: ...ar ESD jack or to an unpainted metal surface of your hardware to prevent the electrostatic discharge from damaging your hardware When you use an ESD wrist strap follow all electrical safety procedures...

Страница 104: ...kplane on an ESD surface Note You must remove and replace the system backplane at a flat angle The ventilation holes in the top cover can come into contact with the DIMMs in the system backplane if th...

Страница 105: ...insert it into the system until it is fully seated Important Use care when you insert the system backplane so that no damage occurs to the components at the socket edge of the backplane Ensure that th...

Страница 106: ...system d Tighten the two screws on the sides of the system backplane e Using your labels replace the signal cables into the rear of the system f Using your labels replace the two power cords at the re...

Страница 107: ...stribution panel PDP connect the customer s DC power source to the PDP Ensure that the proper polarity is used when attaching the DC power and DC power return wiring Connect any equipment that will be...

Страница 108: ...slide rail mounted equipment in the installation position Each rack cabinet might have more than one power cord For AC powered racks be sure to disconnect all power cords in the rack cabinet when dire...

Страница 109: ...ion including operating systems licensed programs and data 3 Review the installation or replacement procedure for the feature or part 4 Note the significance of color on your system Blue on a part of...

Страница 110: ...problem indicator LED you can use a troubleshooting program such as impitool to identify the issue The front control panel LEDs are shown in the following figure The green LED 6 indicates the power s...

Страница 111: ...needs servicing Use the Intelligent Platform Management Interface IPMI program to turn on the blue identify LED to help you find the IBM Power Systems HMC 7063 CR2 system that needs servicing Procedu...

Страница 112: ...e installed and fully seated before you power on the system You can use this procedure to power on the system or you can use a console and the IPMI tool to power on the system Procedure 1 Before you p...

Страница 113: ...rcconf command arcconf getconfig 1 pd Note the Channel and Device numbers of the desired drive In the following example the channel number is 0 and the device number is 1 Reported Channel Device T L 0...

Страница 114: ...password H BMC IP address or BMC host name fru status v Sensors that have a status of present and functional do not require a service action Sensors that have a status of present and not functional r...

Страница 115: ...tions for the 7063 CR2 system Learn how to place an IBM Power Systems HMC 7063 CR2 system into the service or operating position Placing a 7063 CR2 system into the service position To place an IBM Pow...

Страница 116: ...aneously rotate the two levers A on each side of the system backplane out and to the side to unlock the system backplane from the system Figure 126 Unlatching the system backplane d Support the system...

Страница 117: ...his part or unit is heavy but has a weight smaller than 18 kg 39 7 lb Use care when lifting removing or installing this part or unit C008 Procedure 1 Lift the system from the table 2 Align the rails o...

Страница 118: ...he two power cords at the rear of the system For instructions see Connecting the power cords to a 7063 CR2 system on page 101 Removing and replacing covers on a 7063 CR2 system Learn how to remove and...

Страница 119: ...see Disconnecting the power cords from a 7063 CR2 system on page 100 4 Remove the rails from both sides of the system a Remove the two screws that secure the rail to the front of the system b Slide t...

Страница 120: ...cure the cover as shown in the following figure The system has 4 screws on each side and 11 screws on the top surface Use a 2 Phillips screwdriver Figure 133 Replacing the cover screws 5 Replace the r...

Страница 121: ...b Slide the rail forwards onto the support pins c Replace the two screws that secure the rail to the front of the system Common procedures for servicing the 7063 CR2 107...

Страница 122: ...108 Power Systems Servicing the IBM Power Systems HMC 7063 CR2...

Страница 123: ...duct s and or the program s described in this publication at any time without notice Any references in this information to non IBM websites are provided for convenience only and do not in any manner s...

Страница 124: ...information technology content successfully Overview The IBM Power Systems servers include the following major accessibility features Keyboard only operation Operations that use a screen reader The I...

Страница 125: ...ware Offering does not use cookies or other technologies to collect personally identifiable information If the configurations deployed for this Software Offering provide you as the customer the abilit...

Страница 126: ...eine Verantwortung f r die Einhaltung der Schutzanforderungen wenn das Produkt ohne Zustimmung von IBM ver ndert bzw wenn Erweiterungskomponenten von Fremdherstellern ohne Empfehlung von IBM gesteckt...

Страница 127: ...products less than or equal to 20 A per phase This statement applies to products greater than 20 A single phase This statement applies to products greater than 20 A per phase three phase Japan Volunta...

Страница 128: ...s own expense Properly shielded and grounded cables and connectors must be used in order to meet FCC emission limits Proper cables and connectors are available from IBM authorized dealers IBM is not r...

Страница 129: ...te wie in den Handb chern beschrieben zu installieren und zu betreiben Des Weiteren d rfen auch nur von der IBM empfohlene Kabel angeschlossen werden IBM bernimmt keine Verantwortung f r die Einhaltun...

Страница 130: ...less than or equal to 20 A per phase This statement applies to products greater than 20 A single phase This statement applies to products greater than 20 A per phase three phase Japan Voluntary Contro...

Страница 131: ...device must accept any interference received including interference that may cause undesired operation Responsible Party International Business Machines Corporation New Orchard Road Armonk New York 10...

Страница 132: ...INCLUDING BUT NOT LIMITED TO IMPLIED WARRANTIES OF MERCHANTABILITY NON INFRINGEMENT AND FITNESS FOR A PARTICULAR PURPOSE 118 Power Systems Servicing the IBM Power Systems HMC 7063 CR2...

Страница 133: ......

Страница 134: ...IBM...

Отзывы: