IAI RCM-T Скачать руководство пользователя страница 24


16 

8-2  Controller Selection (when using multiple units) 

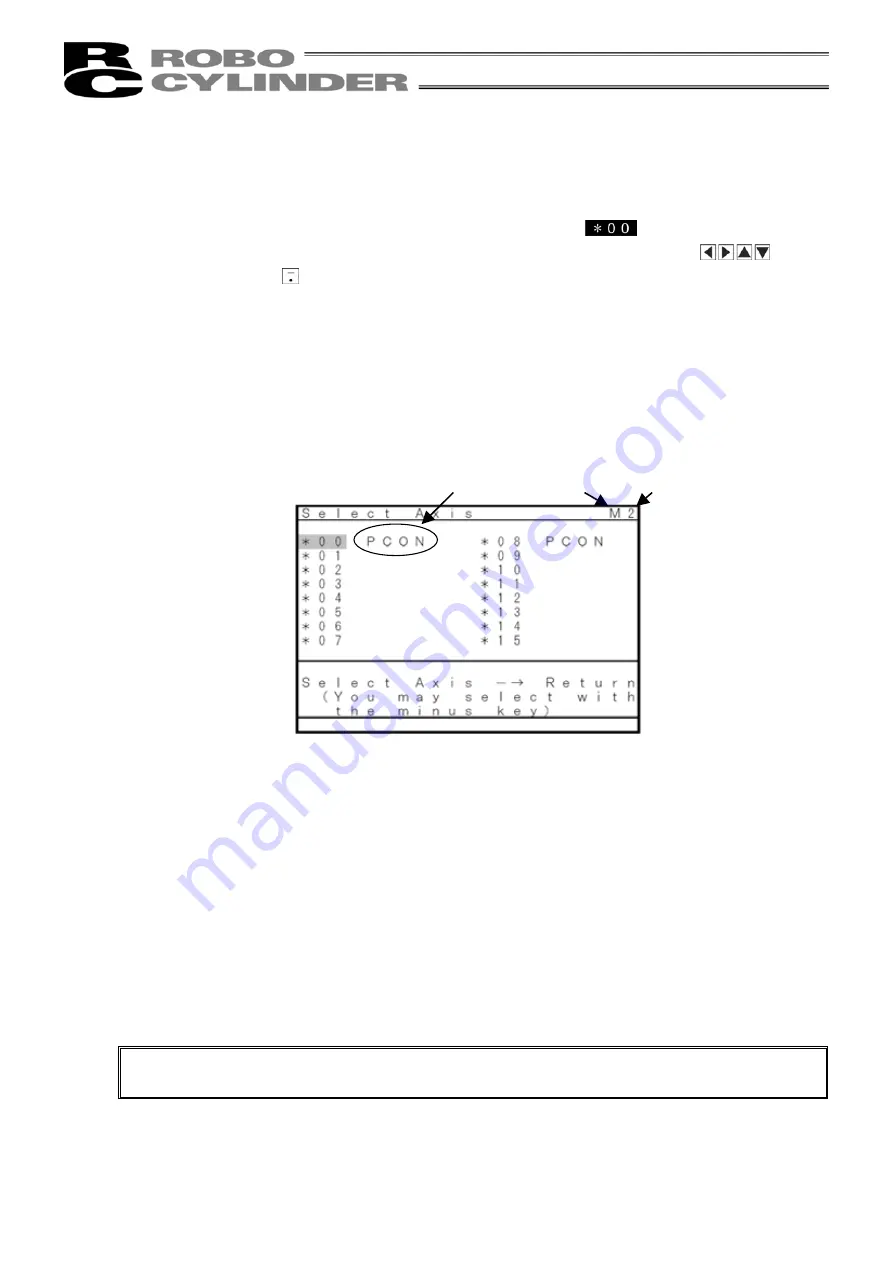
In the case of multiple units connected serially via the communication line, the axis selection screen 

will be displayed. For a single unit, since there is no need to select the axis, the first screen below will 
not appear (refer to Section 8.3 entitled Operational Mode Selection of this manual). 

When a screen has a reversed character background such as 

, this field is selected (from 

now on, referred to as the "cursor location"). By pressing either arrow key switches 

 Iocated 

on the key sheet or the 

  key, the cursor will move. 

The controller can connect up to 16 units. However, the PCON, ACON, SCON, or ERC2 controller 

cannot be used by linking to the RCP, RCS, E-Con, RCP2, or ERC controller. All the controller axis 
numbers (0-15) will be displayed. In the case of PCON, ACON, SCON, or ERC2, a connected model 
will be displayed for the connected controller.   

In the case of RCP, RCS, E-Con, RCP2, or ERC, “Connected” will be displayed. 
By placing the cursor on the desired controller, and pressing the Return key, selection will occur. 

The screen will then change to the "Mode Select" screen. 


Fig. 8.3 Axis Selection Screen


(1) Protocol type display    M: Modbus, T: proprietary protocol 
(2) Board type display    1: Flash ROM 128KB board, 2: Flash ROM 1MB board 

(3) Connection axis display:  In  the  case  of  PCON, ACON, SCON, or ERC2, the model name of the 

connection axis such as PCON will be displayed. 
In the case of RCP, RCS, E-Con, RCP2, or ERC, “Connected” will be 
displayed. 


The above screen shows the following three controllers are connected to the communication line: 

Controller axis number: No. 00, No. 04, and No. 13 
(Only the powered controller(s) will be detected when power is present for the Teaching Pendant.) 


Caution:


In the case of controllers with the PORT switch, only the powered controller(s) will be 
detected when the PORT switch is ON and power is present for the Teaching Pendant.


The content explained hereinafter will be based on operation in response to the selected axis (controller). 

(3)

(1)

(2)


Содержание RCM-T

Страница 1: ...Teaching Pendant Operating Manual First edition IAI America Inc ...

Страница 2: ......

Страница 3: ...r to 8 10 TP Operation Mode Note When the controller is set by connecting the Teaching Pendant to ERC2 the conditions shown below occur When the controller is set by connecting the Teaching Pendant to the gateway unit SIO converter the conditions shown below occur If the Teaching Pendant is disconnected while the setting of Teach 1 or Teach 2 remains I O will become invalid and control from PLC wi...

Страница 4: ......

Страница 5: ...CON V2 00 SCON V2 00 1 This Teaching Pendant also supports the RCP RCS E Con RCP2 and ERC controllers Check the model to connect and the version of the Teaching Pendant If any unsupported model is connected unexpected movement may occur The software reset function is effective for models corresponding to 1 61 or later of the support started version ERC2 PCON ACON or SCON cannot be used by linking ...

Страница 6: ...MEMO ...

Страница 7: ...election when using multiple units 16 8 3 Operation Mode Selection 17 8 3 1 Positioner PCON PL PO ACON PL PO or SCON Mode Other than Pulse Train Mode 17 8 3 2 Pulse Train PCON PL PO ACON PL PO or SCON Pulse Train Mode 18 8 4 Edit Teaching 19 8 4 1 PCON ACON SCON or ERC2 19 8 4 2 RCP RCS E Con RCP2 or ERC 21 8 5 Position Data Table Contents 23 8 5 1 Position Data Table Contents for PCON ACON SCON a...

Страница 8: ...number setting 81 8 9 2 Software Reset 83 8 9 3 Error List Clear 85 8 10 TP Operation Mode 87 8 11 End 89 9 Message Area 90 9 1 Warning Label Error Code No 000h 07Fh 90 9 2 Teaching Pendant Message Level Error 91 9 3 Controller Error 91 Appendix 92 Parameter Shipment Initialization Method 92 Teaching Pendant error table 95 ...

Страница 9: ... the Instruction Manuals attached to the products Caution Do not edit position data while the actuator is operating by PLC etc Also do not edit any position number not actually operated 2 Before You Begin 1 Be sure to read this Instruction Manual for proper use of this product 2 Part or all of this Instruction Manual may not be used or reproduced without permission 3 For any handling and operating...

Страница 10: ...read location In addition give special consideration to prevent third parties from turning on the power carelessly by hauling in the power cord to the operator Alternatively lock the power plug or receptacle and direct the operator to keep the key or prepare a safety plug 4 When more than one operator works advance work by determining the signal method and checking each other s safety Especially f...

Страница 11: ...s a cable Defects resulting from sensory phenomena such as generated noise that have no functional effects Defects resulting from mishandling or improper use Defects resulting from an inadequacy or error in maintenance and inspection Defects resulting from the use of any part other than our genuine parts Defects resulting from a modification not approved by us or our dealers Defects resulting from...

Страница 12: ...endant Body so that the Teaching Pendant Cable does not get pulled by unwanted cables Caution This Teaching Pendant is designed exclusively for IAI RC Controllers PCON ACON SCON ERC2 RCP RCS E Con RCP2 and ERC and should not be used to connect with other devices Turn the controller front side PORT switch OFF before connecting to controller equipped with a PORT switch ...

Страница 13: ... as to execute teaching without using the PC Interface Software Utilizing a large liquid crystal display kit the display will show each description simultaneously for easy operation In addition for quick reference a manual card is stored inside the Teaching Pendant body Large type LCD Horizontal 21 characters Vertical 16 columns Manual card storage Up to 3 cards 6 1 Specifications Item Specificati...

Страница 14: ...6 6 2 External View External Dimensions When drawing out the manual card ...

Страница 15: ...liquid crystal display with a range of 62 69 62 69mmm with a maximum of horizontal 21 characters per column and vertical 16 columns per row 1 Large LCD Display 8 key 9 Return key 10 DEADMAN SWITCH 6 key 4 Arrow key 3 EMERGENCY STOP 7 Minus key 5 key 2 Manual Card ...

Страница 16: ... is enabled only for the axis of the controller which is connected to the Teaching Pendant Caution For the RCP2 CG cutout relay external type and ERC ERC2 series the EMERGENCY STOP switch is enabled only when the emergency stop circuit is externally installed Always read the operating manual of the controller carefully 4 Arrow key Every time you press the cursor key of the Selection Display Column...

Страница 17: ... key will return the user to the previous screen Note When you don t understand the operation undo the operation by pressing the key 7 Minus key Switches between Relative Coordinates and Absolute Coordinates Move the cursor to the position table No and press the Minus key will be displayed between No and position to indicate it is Relative Coordinates By pressing the Minus key one more time disapp...

Страница 18: ...this switch is a open a contact Caution If multiple controllers are connected using link cables the Deadman SW is enabled only for the axis of the controller which is connected to the Teaching Pendant For the RCP2 CG cutout relay external type and ERC ERC2 series the Deadman SW is enabled only when the emergency stop circuit is externally installed Always read the operating manual of the controlle...

Страница 19: ...y for more than 2 5 seconds 2 Use the Arrow key to select Complete Screen and then press the Return key 3 Turn the PORT switch OFF for the controller having this switch 4 Remove the Teaching Pendant connector Caution In the case of PCON ACON SCON or ERC2 an instantaneous stop will be made when the Teaching Pendant is disconnected However this is not an error Caution In the case of the PCON ACON or...

Страница 20: ... or leaving the mode check whether to reset software Displayed only for PCON ACON SCON and ERC2 Increment All Clear Clear Displayed only when 2 or more axes are connected CTR ErrList Teach Play User Parameter Available only for PCON ACON SCON and ERC2 TP Operation Mode Return Return Return Select with key When the servo is OFF Servo OFF Check Soft Reset When the servo is ON Clr All Selectable only...

Страница 21: ... when Reconnection is selected Return End Before changing the parameter or leaving the mode check whether to reset software Displayed only for PCON ACON SCON and ERC2 Displayed only when 2 or more axes are connected CTR ErrList User Parameter TP Operation Mode Return When the servo is OFF Servo OFF Check Soft Reset When the servo is ON User Adjustment TP operation mode Homing Axis No Setting Suspe...

Страница 22: ...endant and operation starts In the case of a controller with a PORT switch power will be supplied to the Teaching Pendant and operation will start once power is supplied to the Teaching Pendant Upon power on the LCD display screen hereinafter called the screen displays the Teaching Pendant software version as follows Fig 8 1 Initial Screen During Power UP ...

Страница 23: ... Teach 2 PIO Prh SftyVel Non PIO Prh Enables writing of position data parameters etc in the controller and commands of the actuator movement system SftyVel Non Enables movement at the speed described in position data Monitor 1 PIO Prm SftyVel Efct PIO Prm Enables monitoring only Writing of position data parameters etc in the controller and commands of the actuator movement system are disabled Sfty...

Страница 24: ...e case of RCP RCS E Con RCP2 or ERC Connected will be displayed By placing the cursor on the desired controller and pressing the Return key selection will occur The screen will then change to the Mode Select screen Fig 8 3 Axis Selection Screen 1 Protocol type display M Modbus T proprietary protocol 2 Board type display 1 Flash ROM 128KB board 2 Flash ROM 1MB board 3 Connection axis display In the...

Страница 25: ... Return key Caution The TP Operation Mode will be displayed only for PCON ACON SCON or ERC2 Category of Modes 1 Edit Teach Position Teach and Edit function for position table Refer to 8 4 and 8 5 2 Monitor Controller status display Refer to 8 6 3 Error list Alarm content detailed display Refer to 8 7 4 User Parameter Setting of axis zone signal output range and axis attributes Refer to 8 8 5 User ...

Страница 26: ...switch and confirm it with the Return key Category of Modes 1 Jog Servo ON homing jogging increment movement Refer to 8 5 8 2 Monitor Controller status display Refer to 8 6 3 Error list Alarm content detailed display Refer to 8 7 4 User Parameter Setting of axis zone signal output range and axis attributes Refer to 8 8 5 User Adjustment Executing homing and axis number setting of actuator integrat...

Страница 27: ...e sub display area use the key to move the cursor Screen Display Descriptions The screen display is divided into the following 5 areas for use Title Display Area Displays the current mode and the selected controller axis number Main Display Area Displays the movement position data saved in the controller Sub Display Area Used for sub command assignment such as position add and delete Status Displa...

Страница 28: ... Zone Range LoTh Push Dcl Acc Vel Position Note When the cursors on the position data table main display area are flashing you can change the right and left areas by pressing the key and key simultaneously If you continue pressing the key for 2 sec or more the screen will change to the BEGIN END screen Note The position number changes according to the model and PIO pattern ...

Страница 29: ...reen Display Descriptions The screen display is divided into the following 5 areas for use Title Display Area Displays the current mode and the selected controller axis number Main Display Area Displays the movement position data saved in the controller Sub Display Area Used for sub command assignment such as position add and delete Status Display Area Display servo status and current location Err...

Страница 30: ...rs on the position data table main display area are flashing you can change the right and left areas by pressing the key and key simultaneously If you continue pressing the key for 2 sec or more the screen will change to the BEGIN END screen Note The position number is 0 to 63 for E Con RCP2 according to the parameter setting Position Vel Acc Push Range Acc ...

Страница 31: ...ress the minus key The sign will appear between No and Position By pressing the minus key again disappears and the screen returns to absolute coordinates Warning Always specify absolute coordinates for the 3 point type of PCON C CG ACON C CG and SCON C and the proximity switch type of PCON CY and ACON CY If you specify relative coordinates a position data error will occur 2 Position Input the targ...

Страница 32: ...f the numeric value is made larger and it will become gradual if the numeric value is made smaller Caution Enter appropriate values for Vel and Acc Dec in such a way as to prevent excessive impact or vibration from being applied to the actuator in consideration of the installation conditions and the shape of transferred work by referring to the List of Actuator Specifications in the Appendix Incre...

Страница 33: ... push amount from the target position in the push operation Set the positioning width in such a way as to prevent positioning completion before the actuator contacts work by considering mechanical variations of work Since increasing the positioning width value hastens the next sequence operation it becomes a factor for tact time reduction Set the optimum value by considering the balance of the ent...

Страница 34: ...nt command to backward end Movement command to forward end Movement command to midpoint 9 Acc Dcl Mode It defines the acceleration deceleration characteristics The default value is 0 0 Trapezoid pattern 1 S shaped motion 2 First order delay filter Trapezoid pattern Set the acceleration and deceleration in the Acc and Dcl fields of the position table Setting example Home Zone output signal Backward...

Страница 35: ...operation Note It cannot be set for the ERC2 or PCON controller The parameter No 56 is reserved First order delay filter More gradual acceleration deceleration curves are drawn than the linear acceleration deceleration trapezoid pattern Use this in the applications by giving micro vibrations to work during acceleration deceleration not desired Set the degree of the first order lag with the paramet...

Страница 36: ...ndition etc but the holding current decreases approximately by a factor of 2 to 4 No displacement occurs since this method maintains the servo ON status The actual holding current can be checked on the monitoring screen of PC compatible software Auto servo OFF method When a given length of time has elapsed after completion of positioning the servo OFF status is automatically entered Since the hold...

Страница 37: ...tween the current position and target position Any negative value can be input if coordinates are in the negative direction Caution In the case of PCON ACON SCON or ERC2 there are cases where the input value to Push may be rounded off to the multiple of the minimum resolution of the controller during data acquisition from the controller 3 Vel Input the speed at which the actuator will be moved in ...

Страница 38: ... the range column Diagram A Diagram B 7 Acc only MAX Selects either the assigned acceleration or the maximum acceleration Inputs are either 1 or 0 The default value is set as 0 0 Assigned acceleration The value placed in 4 will be used as the actual acceleration value and deceleration value 1 Maximum acceleration This will automatically utilize the maximum acceleration matched to the load Decelera...

Страница 39: ...speed will be gained if the maximum speed is slower than the specified speed 4 Increment Use the arrow key to incrementally move and match the desired location and read that location current position into the position table For the input example see page 49 If you press the arrow key once the actuator will move by a specified pitch 0 03 0 10 0 50 mm If you continue pressing the arrow key the actua...

Страница 40: ...by the arrow key or key 2 Match the cursor to the position The number can be anywhere Edit Teach Axis 1 Clr All No Return Teach Play Ten key Match Position Return Srv ON Pos 0 00 Data unregistered position data will display sign 3 Press the Return key Edit Teach Axis 1 Clr All No Return Teach Play Ten key Match Position Return Srv ON Pos 0 00 For numeric values press just the Return key Select Mod...

Страница 41: ...key to move the cursor in the sub display area 5 Press the Return key Edit Teach Axis 1 Direct Teach Servo OFF Jog Increment Home Move Continuous Srv ON Pos 0 00 Automatically executes home 6 Press the key will turn the mode into Ten key Card Mode Edit Teach Axis 1 Direct Teach Servo OFF Jog Increment Home Move Continuous Srv ON Pos 0 00 Position Vel Position Vel Position Vel ...

Страница 42: ... Match Position Return Srv ON Pos 0 00 The cursor will move with the arrow key Any remaining data will be written over Data unregistered position data will display sign 3 Input here and press the Return key again Edit Teach Axis 1 Clr All No Return Teach Play Ten key Match Position Return Srv ON Pos 0 00 In order to stop during numeric input press the key to cancel the input Example With the left ...

Страница 43: ...tion etc will be input automatically In the left screen the initial value is set as 100mm sec 5 Input here and press the Return key again the cursor automatically moves If change is not needed press the Return key again Edit Teach Axis 1 Clr All No Return Teach Play Ten key Match Position Return Srv ON Pos 0 00 6 Edit Teach Axis 1 Clr All No Return Teach Play Ten key Match Position Return Srv ON P...

Страница 44: ...er to stop during numeric input press the key to cancel the input 8 Edit Teach Axis 1 Clr All No Return Teach Play Ten key Match Position Return Srv ON Pos 0 00 The cursor will automatically move to speed 9 Input here and press the Return key Edit Teach Axis 1 Clr All No Return Teach Play Ten key Match Position Return Srv ON Pos 0 00 Position Vel Position Vel Position Vel ...

Страница 45: ...00 The cursor will move with the arrow key Any remaining data will be written over Data unregistered position data will display sign 3 Input here and press the Return key again Edit Teach Axis 1 Clr All No Return Teach Play Ten key Match Position Return Srv ON Pos 0 00 In order to stop during numeric input press the key to cancel the input Example With the left operation by pressing immediately af...

Страница 46: ...utomatically In the left screen the initial value is set as 100mm sec 5 Press the Return key Edit Teach Axis 1 Clr All No Return Teach Play Ten key Match Position Return Srv ON Pos 0 00 At the left the user parameter is used as it is The cursor will move to the position of No 1 by the left operation 6 Input here and press the Return key Edit Teach Axis 1 Clr All No Return Teach Play Ten key Match ...

Страница 47: ...y when the cursor is located at Vel Edit Teach Axis 1 Acc and Dcl can be individually set Srv ON Pos 0 00 The screen will switch 9 Press the key when the cursor is located at Acc The cursor position will move to Dcl Press the key again Edit Teach Axis 1 Push 0 PTP else Push Push Range 0 Forward 0 Backward Srv ON Pos 0 00 The screen will switch Acc Dcl Push LoTh Range Position Vel ...

Страница 48: ... PTP else Push Push Range 0 Forward 0 Backward Srv ON Pos 0 00 For push control refer to the Controller Operating Manual 11 Input the maximum push range during push into the Range In this example input 5 mm Input and press the Return key Edit Teach Axis 1 Push 0 PTP else Push Push Range 0 Forward 0 Backward Srv ON Pos 0 00 Push LoTh Range Push LoTh Range ...

Страница 49: ...rsor will move with the arrow key Any remaining data will be written over Data unregistered position data will display sign 3 Input here and press the Return key again Edit Teach Axis 1 Clr All No Return Teach Play Ten key Match Position Return Srv ON Pos 0 00 In order to stop during numeric input press the key to cancel the input Example With the left operation by pressing immediately after input...

Страница 50: ...ers for velocity acceleration deceleration etc will be input automatically In the left screen the initial value is set as 100mm sec 5 The cursor moves to the next No 1 position automatically Press the key to move the cursor to No Edit Teach Axis 1 Clr All No Return Teach Play Ten key Match Position Return Srv ON Pos 0 00 6 Press the key here Edit Teach Axis 1 Clr All No Return Teach Play Ten key M...

Страница 51: ...eturns the mode to the absolute coordinate mode 8 Input here and press the Return key Edit Teach Axis 1 Clr All No Return Teach Play Ten key Match Position Return Srv ON Pos 0 00 The relative repositioning rate plus 10 mm are input To input the relative repositioning rate in the negative direction press the key prior to numeric input 9 Edit Teach Axis 1 Clr All No Return Teach Play Ten key Match P...

Страница 52: ...y the arrow key or key 2 Match the cursor to the position of the position number column you wish to input The mode will automatically turn into the ten key input mode Edit Teach Axis 1 Clr All No Return Teach Play Ten key Match Position Return Srv ON Pos 0 00 The cursor will move with the arrow key Any remaining data will be written over Data unregistered position data will display sign 3 Press th...

Страница 53: ...nt Home Move Continuous Srv ON Pos 0 00 Use the key to move the cursor inside the sub display area 5 Manually move the slider and match to the desired position Press the Return key Edit Teach Axis 1 Direct Teach Servo OFF Return Acquire Srv OFF Pos 100 00 The controller status will be displayed on the bottom row of the screen Servo Control OFF Position 100 00 Use the key to move the cursor of the ...

Страница 54: ...d match to the next desired position Press the Return key Edit Teach Axis 1 Direct Teach Servo OFF Return Acquire Srv OFF Pos 100 00 The position data number will automatically select the next number auto increment As for the speed and Acc Dec value the initial value set in the user parameter will automatically input In the example at the left the initial value is 300mm sec Only during new positio...

Страница 55: ...ach Axis 1 Clr All No Return Teach Play Ten key Match Position Return Srv ON Pos 0 00 The screen will return to the Edit Teach main screen At this time the servo control will turn ON 10 Press the key gain The screen will return to the mode select screen Position Vel Position Vel Select Mode Axis 1 Edit Teach Position Monitor Error list User Parameter User Adjustment TP Operation Mode Select Mode R...

Страница 56: ... of PCON ACON SCON and ERC2 Example 2 point continuous loop Point A Point B speed 300mm sec Operation Screen Reference 1 Select Edit Teach and press the Return key The cursor will move by the arrow key or key 2 Match the cursor to the position of the position number column you wish to input The mode will automatically turn into the ten key input mode Edit Teach Axis 1 Clr All No Return Teach Play ...

Страница 57: ...he sub display area 5 Select speed with the key Move the slider with the key and match it to the desired position Plus direction of display coordinates Minus direction of display coordinates Press the Return key Edit Teach Axis 1 Jog key Speed 1 2 3 4 5 Fast Return Acquire Srv ON Pos 500 00 Speed select Using the key move the main screen cursor to change the inputting position number Vel 1 1 mm se...

Страница 58: ...n 7 Match to the next desired position Press the Return key Edit Teach Axis 1 Jog key Speed 1 2 3 4 5 Fast Return Acquire Srv ON Pos 100 00 The position data number will automatically select the next number auto increment As for the speed and Acc Dec value the initial value set in the user parameter will automatically input In the example at the left the initial value is 300mm sec Position Vel Pos...

Страница 59: ...y Then press the key gain Edit Teach Axis 1 Clr All No Return Teach Play Ten key Match Position Return Srv ON Pos 100 00 The screen will return to the Edit Teach main screen 10 Press the key The screen will return to the mode select screen Position Vel Position Vel Select Mode Axis 1 Edit Teach Position Monitor Error list User Parameter User Adjustment TP Operation Mode Select Mode Return You may ...

Страница 60: ...ructions are described on the screens of PCON ACON SCON and ERC2 Example 2 point continuous loop Point A Point B speed 300mm sec Operation Screen Reference 1 Select Edit Teach and press the Return key The cursor will move by the arrow key or key 2 Match the cursor to the position of the position number column you wish to input The mode will automatically turn into the ten key input mode Edit Teach...

Страница 61: ...e key and match it to the desired position Plus direction of display coordinates Minus direction of display coordinates Press the Return key Edit Teach Axis 1 Increment Jog key Distance 0 03 0 10 0 05 Return Acquire Srv ON Pos 0 00 Increment distance select When is pressed for more than 2 seconds jog movement is possible Upon that the speed will increase to 1 10 30 50 and 100 mm sec every one seco...

Страница 62: ...ired position Press the Return key Edit Teach Axis 1 Increment Jog key Distance 0 03 0 10 0 05 Return Acquire Srv ON Pos 10 00 The position data number will automatically select the next number auto increment As for the speed and Acc Dec value the initial value set in the user parameter will automatically input In the example at the left the initial value is 300mm sec Only when new position data i...

Страница 63: ...y Then press the key again Edit Teach Axis 1 Clr All No Return Teach Play Ten key Match Position Return Srv ON Pos 90 00 The screen will return to the Edit Teach main screen 10 Press the key The screen will return to the mode select screen Position Vel Position Vel Select Mode Axis 1 Edit Teach Position Monitor Error list User Parameter User Adjustment TP Operation Mode Select Mode Return You may ...

Страница 64: ...ation As for manual input the data entered will erase the old data The position will be updated only when the Return key is pressed to read in the current location direct teach jog increment It does not influence speed and others Once the position data is cleared the previous data will not remain anywhere therefore when the next position data is set the position move is selected as a default When ...

Страница 65: ...y 2 Match the cursor to the position of the position number column Edit Teach Axis 1 Clr All No Return Teach Play Ten key Match Position Return Srv ON Pos 0 00 Data unregistered position data will display sign 3 Press the Return key again Edit Teach Axis 1 Clr All No Return Teach Play Ten key Match Position Return Srv ON Pos 0 00 Select Mode Axis 1 Edit Teach Position Monitor Error list User Param...

Страница 66: ...splay If you wish to delete move the cursor to Yes using the key and press the Return key Edit Teach Axis 1 Clear Position No 2 NO Yes Srv ON Pos 0 00 When the screen switches to this screen the cursor will be at No 6 Edit Teach Axis 1 Select Clr All No Return Clear All Clear Srv ON Pos 0 00 The cursor row will clear unregistered status 7 Press the key Edit Teach Axis 1 Increment Jog key Distance ...

Страница 67: ...mn Edit Teach Axis 1 Clr All No Return Teach Play Ten key Match Position Return Srv ON Pos 0 00 The position can be anywhere 3 Press the Return key again Edit Teach Axis 1 Clr All No Return Teach Play Ten key Match Position Return Srv ON Pos 0 00 Select Mode Axis 1 Edit Teach Position Monitor Error list User Parameter User Adjustment TP Operation Mode Select Mode Return You may also select the min...

Страница 68: ...splay If you wish to delete move the cursor to Yes using the key and press the Return key Edit Teach Axis 1 Clear all position data NO Yes Srv ON Pos 0 00 When the screen switches to this screen the cursor will be at No 6 Edit Teach Axis 1 Select Clr All No Return Clear All Clear Srv ON Pos 0 00 All position data will be cleared showing sign indicating unregistered Position Vel Position Vel Positi...

Страница 69: ...r to the continuous position data number until an empty location is reached What is Continuous In the case of the position data similar to the table below when a Continuous command is executed from the position No the place where data exists continuously to the position before unregistered data will operate as one group Example Position No 2 Æ No 3 Æ No 1 Æ No 2 and so on Specific examples will be...

Страница 70: ...mber column you wish to move Edit Teach Axis 1 Clr All No Return Teach Play Ten key Match Position Return Srv ON Pos 0 00 The cursor will move by the arrow key For any unregistered data the display will show sign 3 Press the Return key again Edit Teach Axis 1 Clr All No Return Teach Play Ten key Match Position Return Srv ON Pos 0 00 Input only the Return key without inputting any numeric value Sel...

Страница 71: ...0 50 100 Return position Move Srv ON Pos 0 00 Speed is divided into 3 levels and can be selected using the key Move to the position No 2 position The cursor will automatically move to No 3 position Note When PCON ACON SCON or ERC2 is connected the maximum speed will be the safety speed set for the parameter if the MANU operation mode is set to the Teach Mode 1 safety speed valid 6 When moving towa...

Страница 72: ...twice and return to the edit teach screen Edit Teach Axis 1 Clr All No Return Teach Play Ten key Match Position Return Srv ON Pos 300 00 The screen will return to the Edit Teaching main screen Caution When moving towards position in push mode After the actuator pushes the work and position complete output turns ON the actuator is in a state of continuously pressing the work Be extremely careful ab...

Страница 73: ... the position number column you wish to move first Edit Teach Axis 1 Clr All No Return Teach Play Ten key Match Position Return Srv ON Pos 0 00 The cursor will move by the arrow key For any unregistered data the display will show sign 3 Press the Return key again Edit Teach Axis 1 Clr All No Return Teach Play Ten key Match Position Return Srv ON Pos 0 00 Input only the Return key without inputting...

Страница 74: ...n Continuous Srv ON Pos 0 00 Speed is divided into 3 levels and can be selected using the key Continuous operation stop Stop after moving to the position Continuous operation stop Immediately stop on the spot Note When PCON ACON SCON or ERC2 is connected the maximum speed will be the safety speed set for the parameter if the MANU operation mode is set to the Teach mode 1 safety speed valid 6 When ...

Страница 75: ...hing main screen Caution When moving towards position in push mode After the actuator pushes the work and position complete output turns ON the actuator is in a state of continuously pressing the work Be extremely careful about handling at this time However in the case of continuous move the actuator will move to the next position after position complete output turns ON Position Vel ...

Страница 76: ...where Edit Teach Axis 1 Clr All No Return Teach Play Ten key Match Position Return Srv OFF Pos 0 00 Data unregistered position data will display sign 3 Press the Return key Edit Teach Axis 1 Clr All No Return Teach Play Ten key Match Position Return Srv OFF Pos 0 00 Input only the Return key without inputting any numeric value Select Mode Axis 1 Edit Teach Position Monitor Error list User Paramete...

Страница 77: ...ide the sub display area 5 Press the Return key Edit Teach Axis 1 Direct Teach Servo OFF Jog Increment Home Move Continuous Srv ON Pos 0 00 Every time the Return key is pressed the servo will turn ON and OFF 6 Press the key to change the mode to the ten key input mode Edit Teach Axis 1 Direct Teach Servo OFF Jog Increment Home Move Continuous Srv ON Pos 0 00 Position Vel Position Vel Position Vel ...

Страница 78: ...d Jogging In the case of the PCON PL PO ACON PL PO or SCON controller pulse train mode if you select Jog servo ON OFF homing jogging or increment movement can be performed Select Jog on the Select Mode screen and press the Return key Use the key or key to move the cursor ...

Страница 79: ... press the key the cursor will move in the positive direction of the display coordinates If you press the key the cursor will move in the negative direction of the display coordinates 5 Increment Can perform increment movement Select Increment and press the Return key The cursor will move to the distance of 0 03 mm Select Dist 0 03 mm 0 1 m 0 5 mm If you press the arrow key the cursor will move If...

Страница 80: ...ontrollers connected on the serial communication line Select Monitor on the Select Mode screen and press the Return key Use the key or key to move the cursor Note In the case of the PCON PL PO ACON PL PO or SCON controller pulse train mode Edit Teach Position will be displayed as Jog ...

Страница 81: ... return to the Current Rate display Refer to the following page 6 Displays the special input ports such as HMCK home check sensor 7 Displays the model and version of the connecting controller The left figure shows an example of the PCON CY controller The display contents vary depending on the controller or controller s I O pattern For details refer to the operating manual of each controller If you...

Страница 82: ...74 Pulse Position Display PCON PL PO ACON PL PO SCON Pulse Train Mode Current Value mA Display 1 6 5 ...

Страница 83: ...ACON PL PO or SCON controller pulse train mode Edit Teach Position will be displayed as Jog An error occurring after the connection PORT ON of the Teaching Pendant will be displayed The figure at the left shows an example of the RCP2 controller Errors which occurred in the past can be displayed using the arrow key If you press any of the ten key 0 to 8 from this screen an error which occurred afte...

Страница 84: ...ror detected 9 times before 0 Alarm level error detected 10 times before 1 Alarm level error detected 11 times before 2 Alarm level error detected 12 times before 3 Alarm level error detected 13 times before 4 Alarm level error detected 14 times before 5 Alarm level error detected 15 times before If you press the key the screen will return to the Teaching Pendant error list screen If you press any...

Страница 85: ...Return key To move the cursor use the key Restore the controller power after making parameter changes In the case of any model which supports the software reset restart function PCON ACON SCON ERC RCP2 ERC2 the screen can be moved to the Soft Reset screen by pressing the key When software has been reset it is not required to restore the power Note The changed parameter will become valid by restori...

Страница 86: ...78 Examples of PCON CY Controller ...

Страница 87: ...he servo is ON the screen will move to the servo OFF confirmation screen When restarting the controller select Yes and press the Return key Since the servo is automatically turned OFF it is not required to turn SON input OFF When stopping software reset select No and press the Return key The screen will return to the Select Mode screen regardless of whether you select Yes or No ...

Страница 88: ...after making parameter changes Alternatively reset software in the case of any model which supports the software reset function Although pressing the emergency switch or port switch ON OFF will rewrite the parameter there may be ones that will not be changed Regarding parameter please refer to the Controller Operating Manual Soft Limit set in controller Effective area Jog Increment allowable range...

Страница 89: ... servo on input Execute homing Set the axis number of the controller PCON ACON ERC2 RCP RSI RCP RMI ERC etc Select User Adjustment on the Select Mode screen and press the Return key Use the key or key to move the cursor Note In the case of the PCON PL PO ACON PL PO or SCON controller pulse train mode Edit Teach Position will be displayed as Jog ...

Страница 90: ...ry stop non effect 91 Input 91 into Adjust no and press the Return key After that turn off the controller power Servo ON input effect 92 Input 92 into Adjust no and press the Return key After that turn off the controller power Servo ON input non effect 93 Input 93 into Adjust No and press the Return key After that turn off the controller power Axis number setting Move the cursor to Adjust No with ...

Страница 91: ...The software reset function is supported by Ver 2 00 or later The compatible models are PCON ACON SCON RCP2 ERC and ERC2 Select User Adjustment on the Select Mode screen and press the Return key Use the key or key to move the cursor Input 4 into Adjust and press the Return key ...

Страница 92: ... the servo is ON the screen will move to the servo OFF confirmation screen When restarting the controller select Yes and press the Return key Since the servo is automatically turned OFF it is not required to turn SON input OFF When stopping software reset select No and press the Return key The screen will return to the Select Mode screen regardless of whether you select Yes or No ...

Страница 93: ...ared The error list clear function is supported by Ver 2 00 or later The compatible models are PCON ACON SCON and ERC2 Select User Adjustment on the Select Mode screen and press the Return key Use the key or key to move the cursor Input 3 into Adjust and press the Return key ...

Страница 94: ...ring the error list select Yes and press the Return key When stopping error list clear select No and press the Return key The screen will return to the Select Mode screen regardless of whether you select Yes or No ...

Страница 95: ...een Select TP Operation Mode on the Select Mode screen and press the Return key Use the key or key to move the cursor Note In the case of PCON PL PO ACON PL PO or SCON controller pulse train mode Edit Teach Position will be displayed as Jog Select the menu using the arrow keys or minus key and press the Return key The screen will move to the Select Controller screen ...

Страница 96: ... actuator movement system SftyVel Non Enables movement at the speed described in the position data Monitor 1 PIO Prm SftyVel Ect PIO Prm Enables monitoring only Writing of position data parameters etc in the controller and commands of the actuator movement system are disabled SftyVel Ect Keeps the maximum speed at the safety speed set for the parameter regardless of the command from PLC Monitor 2 ...

Страница 97: ...ler that is not directly connected to the Teaching Pendant please execute a reconnect Caution In the case of the PCON ACON or ERC2 controller with no AUTO MANU switch set the TP operation mode to Monitor 2 before removing the Teaching Pendant Refer to 8 10 TP Operation Mode In the case of ERC2 or when the controller is set by connecting the Teaching Pendant to the gateway unit SIO converter the co...

Страница 98: ...arning is probably due to the following possibilities RS485 communication abnormality Teaching Pendant operational mistake a RS 485 communication related abnormality Indicates occurrence of any abnormality on the RS485 communication line Code No 05Ah 05Bh 05Dh 05Eh 07Fh Communication error detected by the controller Cause 1 Teaching Pendant is in conflict with other devices PLC or PC For example w...

Страница 99: ...operating manual carefully for error compliance If any errors of the below code numbers occur it is required to perform the error reset of the controller press the key to reset it in the case of a movement release level error It is required to perform the reset of the controller software in the case of a cold start level error Refer to 8 9 2 With regard to the controllers not equipped with the sof...

Страница 100: ...ed to shipment parameters The compatible models are PCON ACON SCON and ERC2 Caution Please take note that if parameter shipment initialization is performed user set parameters will be changed to shipment parameters Select User Adjustment and press the Return key Use the key or key to move the cursor ...

Страница 101: ...n performing parameter shipment initialization select Yes and press the Return key When parameter shipment initialization is completed the screen will return to the Soft Reset screen When stopping parameter shipment initialization select No and press the Return key ...

Страница 102: ...y When stopping software reset select No and press the Return key The screen will return to the Select Mode screen When the servo is ON the screen will move to the servo OFF confirmation screen When restarting the controller select Yes and press the Return key Since the servo is automatically turned OFF it is not required to turn SON input OFF When stopping software reset select No and press the R...

Страница 103: ...h end over The final position in push operation exceeds the soft limit This has no negative effect if the actuator contacts the work If the actuator misses the work however the soft limit will be reached and this message is displayed as a warning Change either the target position or positioning band 122 Allocate multi axes connect Address was assigned when multiple axes were connected Assign each ...

Страница 104: ...cate an error in the serial communication with the controller Cause 1 Garbage data due to the effect of noise 2 Duplicate slave numbers when multiple controllers are controlled by serial communication Action 1 Adjust the wiring in a manner eliminating the effect of noise and review the installation of equipment etc 2 Change the slave numbers to avoid duplication If the message is still displayed a...

Страница 105: ......

Страница 106: ...e 7 South Main St Suite F Marlboro NJ 07746 TEL 732 683 9101 FAX 732 683 9103 Home page www intelligentactuator com IAI Industrieroboter GmbH Ober der Röth 4 D 65824 Schwalbach am Taunus Germany TEL 06196 88950 FAX 06196 889524 The prices specifications dimensions and other information provided in this manual are subject to change without notice for purposes of product improvement Copyright 2006 S...

Отзывы: