background image

i3TOUCH PXr Series - Manual 

|

 29

Annotating

The annotate interface is very similar to the whiteboard interface. This consists of 2 main parts:

1.  Floating Tools Menu 
2. Annotation Canvas

Floating tools menu

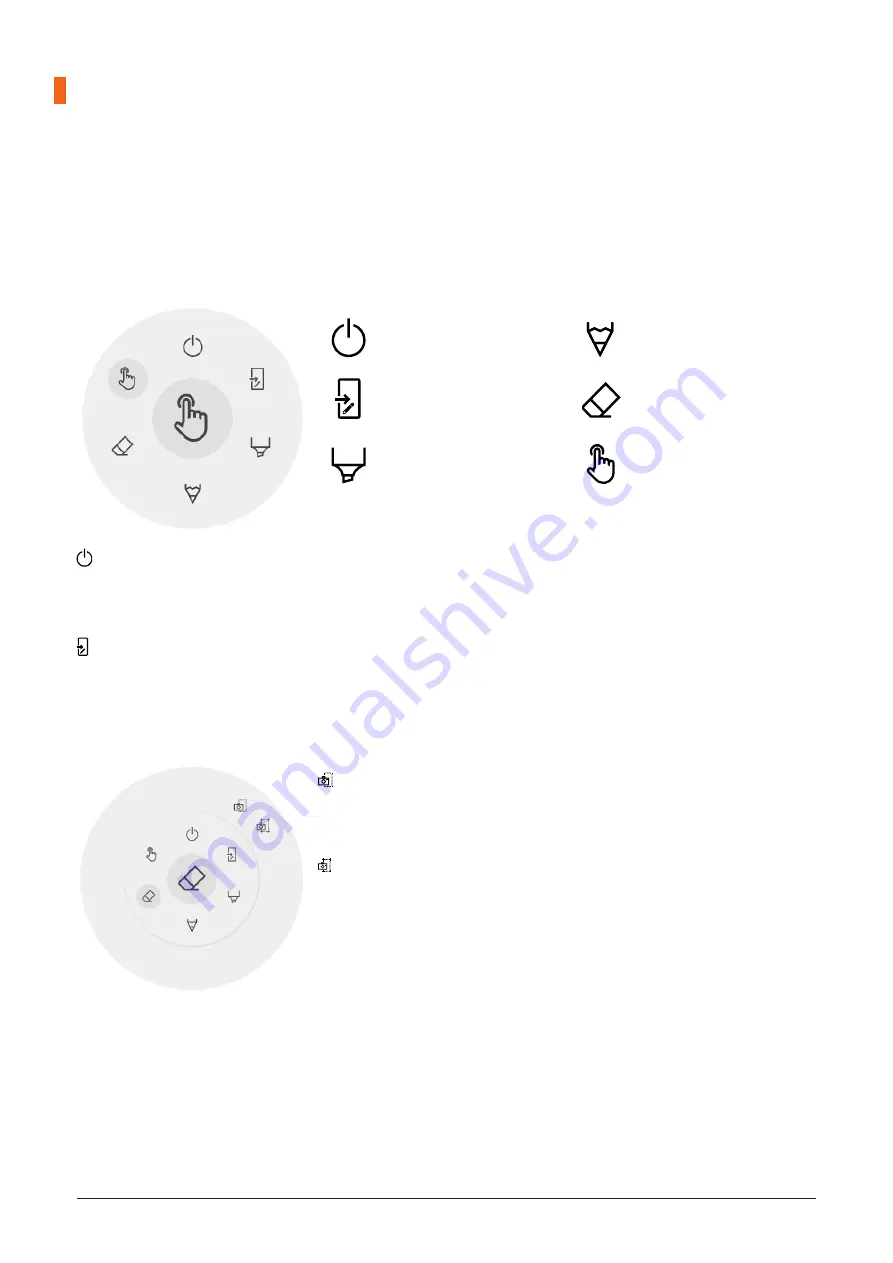
Clicking on the floating tools menu will activate it and show 6 options.

Close annotation

This will close the annotate application and delete all notes permanently, there is no option to retrieve de-
leted content. 

Export to whiteboard

This will make an image of your notes combined with the current background and send it to the whiteboard 
application. It will happen in the background, so you can continue working in the annotate application and 
once you return to the whiteboard application all your screenshots will be available in separate pages.
There are 2 export options: 

Fullscreen Screenshot

This will take a screenshot off the entire visible screen and export it to 
the whiteboard application.

Crop Screenshot

This option will provide the user with a cropping view. The user can 
position and resize the rectangle exactly to the area he wants to screen-
shot. At the bottom there will be 2 buttons, to cancel the cropping and to 
submit and send it to the whiteboard application.

Close i3OVERLAY, this 
will also delete all notes

Export to whiteboard

Marker, you can write 
with semi-transparent 
ink

Pen, normal writing  
behaviour

Eraser, erase parts of the 
canvas

Pointer, 
will hide notes and make 
the background interac-
tive again

Содержание i3TOUCH PXr Series

Страница 1: ...i3TOUCH PXr Series Manual 1 i3TOUCH PXr Series Manual...

Страница 2: ...Installation Precautions 13 Installing the Built In OPS computer optional 14 Turning On Off 16 Power On 16 Power Off 17 Indicator Status 17 Home Interface 18 Start whiteboarding 18 Start presenting 19...

Страница 3: ...i3TOUCH PXr Series Manual 3 Whiteboard 24 Initial calibration 24 Floating tools menu 24 Annotate 29 Floating tools menu 29 Browsing 31 Present 31 Quick Troubleshooting 34 Maintenance 35...

Страница 4: ...4 i3TOUCH PXr Series Manual...

Страница 5: ...the disconnect device shall remain readily operable In the preceding scenarios do not continue to use the product Disconnect power supply immediately and contact professional staff for troubleshooting...

Страница 6: ...ric shock Install or place components that supply high enough voltage to cause personal injury out of the reach of children Do not touch the power cable with wet hands Do not install the product in hi...

Страница 7: ...use a new battery with a used one Take out the battery if the remote control is not used for a long period Do not expose the battery to overheated environments such as sunlight or heat sources Dispos...

Страница 8: ...anual Product Appearance Parts Front 1 Proximity Sensor 2 Light Sensor 3 IR Receiver 4 Stylus Pen box 5 Speakers Back 6 Power Button 7 Power Port Switch 8 Rear Port 1 9 Rear Port 2 10 Computer Port OP...

Страница 9: ...o achieve the touch mode of PC operation USB Touch Connect to the PC s touch port Type C Connect to devices with Type C interface such as USB flash drive MAC PC or mobile phone with OTG function Outpu...

Страница 10: ...overheated source Button Function Power on off PC Switch to the internal PC source Mute or unmute Freeze the Current Screen Click Again to Exit Freeze Function Up Down Left Right selection button OK...

Страница 11: ...Range of Remote control Use the remote control within a range of about 5 meters in front of the remote control receiver of this product and about 30 degrees on both sides about 3 meters within a 30 d...

Страница 12: ...12 i3TOUCH PXr Series Manual Installation Guide Safety Precautions Installation Environment Installation Direction...

Страница 13: ...ility for any problems caused by improper operation if the third party mobile stand or wall mount bracket is beyond the scope of the product Do not install the product where it might be hit by an open...

Страница 14: ...fer to CAS 132 2006 standard Installing the Built in OPS Computer Optional Caution The built in computer does not support hot plugging Therefore you must insert or remove the built in computer when th...

Страница 15: ...e screws Note If the screen fuzzes flashes or if no signal is received from the built in computer channel after turning on the power it means that the built in computer has not been properly installed...

Страница 16: ...t is properly connected Step 2 Turn on the rocker switch on the rear side of the machine next to the power socket after a power source has been connected The power indicator should be red inserted and...

Страница 17: ...shut down the machine before disconnecting the power source or it may damage the machine Accidental power failure may damage to the machine Do not repeatedly turn the power on off in a short period of...

Страница 18: ...t can be shared very easily with all participants BIZ STUDIO EDU STUDIO Whiteboard STUDIO The BIZ studio equips the display with a stylish background and extends the user interface with an extra confi...

Страница 19: ...he hamburger button will make the menu appear with a number of options 1 Exit the menu and navigate back 2 Navigate to the homescreen 3 Start the Whiteboard application 4 Start the Present application...

Страница 20: ...In the bottom right corner you can find the button to access the settings menu Clicking the video input button will make the menu appear with a number of options 1 Switch to the Android video source...

Страница 21: ...Series Manual 21 Settings When opening the settings menu you get an overview of all the settings you can adjust Network Internet Settings Make a connection to your network and internet via Wi Fi or Et...

Страница 22: ...ware version online OTA If a newer system version is available this button will provide instructions to update your device Display Audio Settings Control the brightness of the i3TOUCH display in the D...

Страница 23: ...together with display 3 Schedule an automatically startup and shutdown schedule 4 Set the inactivity timer of the display Turn the display off if there is no video signal for a defined time 5 Enable...

Страница 24: ...n screen to calibrate and activate this quick erase gesture Floating tools menu Clicking on the floating tools menu will activate it and show 7 options Close i3NOTES this will also delete all pages Sa...

Страница 25: ...ecting a custom color the plus icon will be replaced by the selected color In order to change this again long press on the custom color circle and the color selection window will show up again Close T...

Страница 26: ...by a space There are also 2 other options Get meetings This will get all your calendar events from today On selecting one it will add all email ad dresses of that event and add them to the mailing li...

Страница 27: ...to be connected to the same local network After closing the QR dialog the PDF will immediately be unavailable for download Required your network firewall will need to allow peer to peer connections U...

Страница 28: ...update the page numbers of the remaining pages This action is permanent Whiteboard canvas This is the biggest part of the whiteboard Here you can write using the canvas tools Passive stylus The passiv...

Страница 29: ...in the annotate application and once you return to the whiteboard application all your screenshots will be available in separate pages There are 2 export options Fullscreen Screenshot This will take a...

Страница 30: ...permanently remove all notes from the current canvas Pointer The pointer option enables the user to interact with the device without needing to close the annotate application This will hide the curre...

Страница 31: ...on to quickly and easily stream the screen content of any mobile device to the display Download transmitting client software i3ALLSYNC is our client software available for most operating systems and d...

Страница 32: ...top the shared content from all connections Start annotating Press this button to start the annotating function of the i3TOUCH EX This button behaves exactly as the Annotate button in the hamburger me...

Страница 33: ...Allow or deny the touch input on the screen of the i3TOUCH EX to control the connected computer NOTE Touch functionality only works via the i3ALLSYNC Transmitting clients on Windows and MacOS Use the...

Страница 34: ...s corresponding to it If in internal computer mode check whether internal computer is started With horizontal or vertical stripes or image dithering Check whether signal wire is well connected Check w...

Страница 35: ...event electric shock Clean screen Please mix and stir even a little fabric softener or tableware detergent with alcohol Please use a soft cloth to be completely soaked in the mixture Please take out c...

Страница 36: ......

Отзывы: