background image

10

i3-TRNG-CAMS-Ax46/66.indd

Rev. 130816

4. Connecting to the SRX-Pro Server


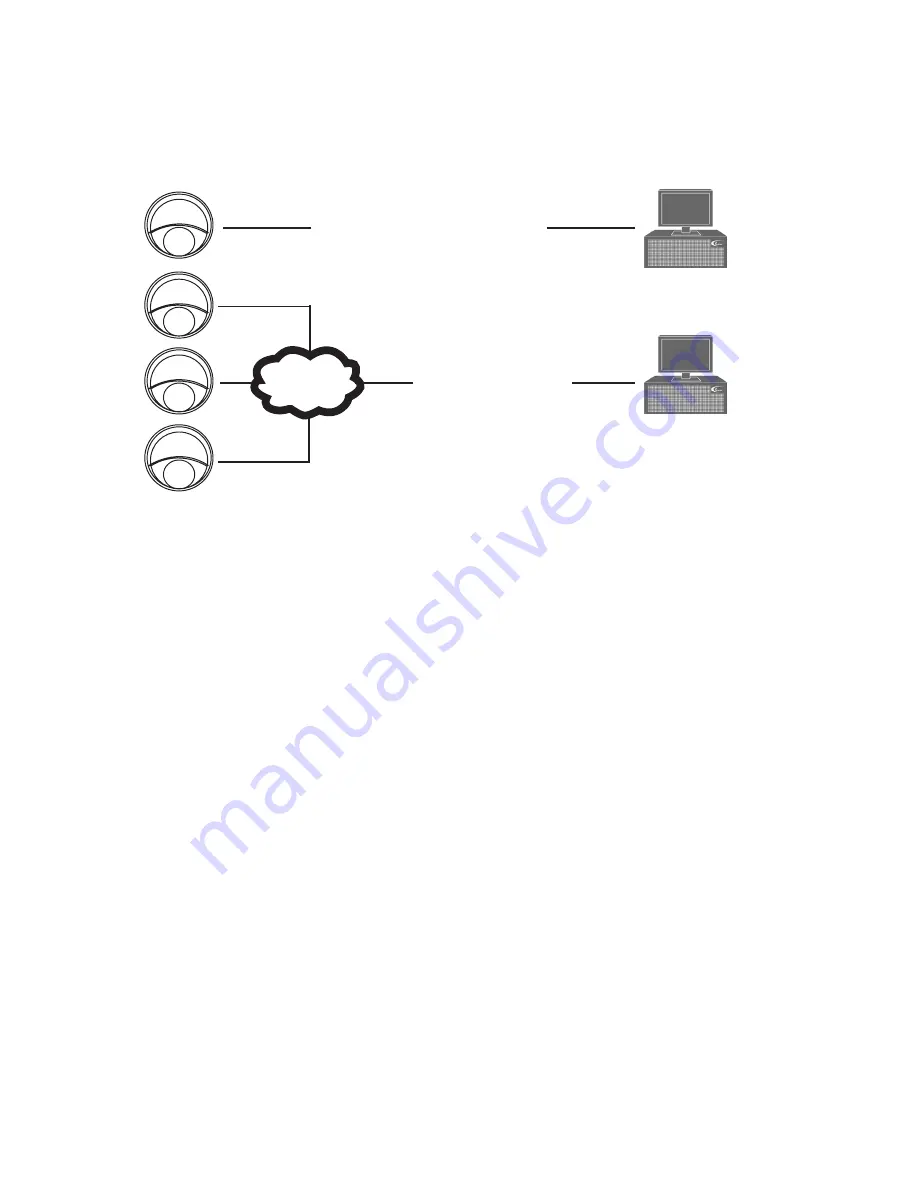
4.1 Camera Connection Options

4.2 Hardware/Software Requirements

The following requirements must be met to achieve a successful network connection 
with the Ax46/66-series IP camera.

SRX-Pro Server:

•  i3 SRX-Pro Version 3.0 or higher

•  Latest GiPi adapter is installed. GiPi adapters can be downloaded from i3 FTP 

website. (Please contact i3 Technical Support for more information.)

•  Windows XP, XPe, 7 Pro or 7e

•  Internet Explorer Version 8.0 or later

•  CPU: Intel Pentium Core 2 or higher

•  Memory: 1GB or more
•  VGA card--supporting Direct X 9.0 or above

Power Supply

Your camera requires a DC12V/PoE power supply. Make sure to use the correct 

power supply before connecting to this network camera. Use a RJ45 network 

connector to connect the camera to your computer or hub switch. Remember, If PoE 

(Power over Ethernet) connector is used, an electrical cable is not required

Note: Camera damages resulted from improper power application are 

i3 SRX-Pro Server

Crossover direct connection

LAN

i3 SRX-Pro Server

Via Gigabit Switch

Connection Type 1:

Connection Type 2:

Содержание Ax46 Series

Страница 1: ...nect or operate this product read these instructions carefully Save this manual for future use CONTENTS 1 Warnings and operation notes 3 2 Unpacking 5 3 Installation 6 4 Connecting to the SRX Pro Server 10 5 Advanced Camera Setup 18 6 Specifications 36 ...

Страница 2: ...butors shall be liable to any person or entity with respect to any liability loss or damage caused or alleged to have been caused directly or indirectly by this information Furthermore i3 International Inc reserves the right to revise this publication and to make changes to the content at any time without notice FCC This device complies with part 15 of the FCC Rules Operation is subject to the fol...

Страница 3: ...to all local codes and to maintain your warranty When installing your Ax46 66 camera be sure to avoid excessive heat such as direct sunlight or heating appliances contaminants such as dust and smoke strong magnetic fields sources of powerful electromagnetic radiation such as radios or TV transmitters moisture and humidity areas with mechanical vibrations fluorescent lamps or objects that reflect l...

Страница 4: ...to remove finger prints and dust from the dome cover Use a blower to remove dust from the lens Clean the body with a soft dry cloth If it is very dirty use a cloth dampened with a small quantity of neutral detergent then wipe dry Do not use volatile solvents such as alcohol benzene or thinners as they may damage the surface finish 1 4 Servicing To avoid electrical shock and to preserve the product...

Страница 5: ...lly assembled camera the dome camera packing box includes 1 User Manual and Annexxus Finder CD x1 2 Guide Pattern sticker x1 3 Torx key x1 4 Plastic Anchor x3 5 Round Head Screw Tapping type x3 If any parts are missing or damaged contact the dealer you purchased the camera from Accessories not to scale 1 User Guide IP Finder 2 5 4 3 Ceiling Mounting Hole Hole Hole Hole ...

Страница 6: ...g the camera your network camera should be accessed from your local network 3 1 Camera Parts and definitions Mounting base Horizontal stand Vertical stand Lower dome Infrared lamp plate Lens Black liner Safety rope IN DC12V Cables Power line Network cable Ø111 82 4 Ø79 1 Ø100 4 Unit mm Fig 3 1 Parts and connectors Fig 3 2 Dimensions ...

Страница 7: ...s straight in front of the camera as much as possible To mount the camera do the following 1 Prepare the surface for mounting Drill screw holes on the surface with the supplied camera mounting template Figure 3 3 If you need to route cables from the bottom of the camera cut a hole in the ceiling Alternatively if necessary cables can be routed through the opening on the side of the camera s mountin...

Страница 8: ... Adjust the camera s pan and tilt position to obtain an optimal view ing angle Loosen the tilt lock screws inside the camera Adjust the tilting posi tion within 65 degrees and tighten the tilt lock screws Rotate the black liner to adjust the panning position within 360 degrees 5 Reinstall the lower dome Replace the lower dome onto the camera base and tighten the screws Fig 3 5 Attaching camera to ...

Страница 9: ...9 Rev 130816 i3 TRNG CAMS Ax46 66 indd Fig 3 7 Reattach dome ...

Страница 10: ...XP XPe 7 Pro or 7e Internet Explorer Version 8 0 or later CPU Intel Pentium Core 2 or higher Memory 1GB or more VGA card supporting Direct X 9 0 or above Power Supply Your camera requires a DC12V PoE power supply Make sure to use the correct power supply before connecting to this network camera Use a RJ45 network connector to connect the camera to your computer or hub switch Remember If PoE Power ...

Страница 11: ...s 1 Open Security tab in the Internet Options window 2 If the camera operates inside of the Intranet click the Intranet icon If the camera operates outside outside of the Intranet click the Internet icon 3 Click Custom Level Security Settings Internet Zone window will be displayed 4 Scroll down to the ActiveX controls and plug ins radio buttons and configure as follows Automatic prompting for Acti...

Страница 12: ...ll Annexxus Finder application Annexxus Finder application discovers all Annexxus cameras connected to your network 7 Follow the Annexxus Finder installation instructions until the application has been successfully installed on your SRX Pro Server 8 Double click Annexxus Finder icon on the Desktop to launch the application The application window will appear displaying a list of active network came...

Страница 13: ...nnexxus Cameras cannot share an IP address each camera requires its own unique IP address 11 Enter the default camera password 1234 in the Input Password field and click Save 12 Wait a few moments as the new IP address is being applied to your Annexxus ...

Страница 14: ...xxus Finder 14 Now that the new IP address has been successfully assigned to your camera make sure you can connect to it through the Internet Explorer 15 Launch Internet Explorer on your SRX Pro Server and enter the IP Address you have just assigned to your Annexxus camera The password window should be displayed 16 Enter the default camera User Name admin and default Password 1234 ...

Страница 15: ...ftp i3international com drivers gipi Please contact i3 Technical Support team for access information 2 Once the latest GiPi updater has been installed restart i3 SRX Pro Server software 1 The Annexxus camera interface will be displayed in the Internet Explorer window You should be able to see the camera image on the screen If you do not see the camera image on the screen call i3 International tech...

Страница 16: ...16 i3 TRNG CAMS Ax46 66 indd Rev 130816 1 Log In and go to the Setup IP Camera tab 2 Click the Search button to display connected Annexxus cameras ...

Страница 17: ...en click Add 3 The selected camera will be added to the IP Camera list Don t forget to assign the IP camera to the SRX Pro video channel in the Your Annexxus camera is now connected to SRX Pro Server and is ready to record You may change resolution and frame rate for the Annexxus camera in the IP Camera tab menu or you may choose to configure the camera s advanced settings see the following sectio...

Страница 18: ...etup go to Setup IP Camera tab select the camera in the list of added IP cameras and click the Advanced Setup button The password window should be displayed Enter the default camera User Name admin and default Password 1234 Camera s user interface will be displayed in a separate Internet Explorer window ...

Страница 19: ...led in the Live View mode only and is disabled when in the Setup mode Next click the Setup button to access Annexxus camera Setup features 5 1 Basic Setup You may switch to the advanced setup at any time by clicking the button in the bottom left hand corner To switch back to the Basic Setup click the same button again Basic Setup is divided into Camera and Network settings After making any setting...

Страница 20: ...ty will remain constant resulting in high quality video images Network infrastructure must be able to provide the set bandwidth to account for bit rate variations CBR Constant Bit Rate This setting will produce a constant bit rate video stream at the cost of video quality The quality may deteriorate considerably when motion is detected This setting is beneficial for installations with limited band...

Страница 21: ...played at the top of the Internet browser page Video Adjustment Brightness adjust the image brightness level Values range from 0 to 100 Contrast adjust the image contrast level Values range from 0 to 100 Saturation adjust the image saturation level Values range from 0 to 100 Sharpness adjust the image sharpness level Values range from 0 to 100 Hue adjust the image hue Values range from 0 to 100 No...

Страница 22: ...he time span between frames between 1 400 The default value will follow the Frame Rate Advance Settings White Balance Set White Balance mode to MWB manual white balance AWB1 auto white balance Locked WB Incandescent Lamp Warm Light Lamp Natural Light Fluorescent Lamp Exposure Time Set shutter speed between 1 3 1 6 1 12 1 30 1 60 1 120 1 250 1 500 1 750 1 1000 1 2000 1 4000 1 10000 or 1 100000 Vide...

Страница 23: ...ameras placed in an indoor setting with stable lighting conditions Motion Settings Enable Detection Check to enable uncheck to disable Enable Dynamic Analysis for Motion Check to enable uncheck to disable Arming Schedule Settings Arming Schedule Check the checkboxes next to the day to enable motion recording on that day of the week Choose a Start Time by using the drop down menus to select the hou...

Страница 24: ...le holding down the left mouse button drag the cursor to draw a rectangular area over the zone desired 4 Release the mouse button The motion detection rectangle will be the grey shaded area in the Preview window 5 If you are not satisfied with the size of motion detection area hold down the points on the corners or edges of the area and drag to the desired size If you are not satisfied with the po...

Страница 25: ...these instructions 1 Click Enable Tamper Proof to activate the feature 2 Position your mouse cursor over the Preview window press and hold the left mouse button 3 While holding down the left mouse button drag the cursor to draw a rectangular area over the zone desired 4 Release the mouse button The tamper proofing rectangle will be the grey shaded area in the Preview window 5 If you are not satisf...

Страница 26: ...draw the privacy zone follow these instructions 1 Click Enable Mask to activate the feature 2 Position your mouse cursor over the Preview window press and hold the left mouse button 3 While holding down the left mouse button drag the cursor to draw a rectangular area over the zone that needs to be concealed 4 Release the mouse button The privacy area rectangle will be the grey shaded area in the P...

Страница 27: ...between Text Overlay and OSD Setting Text Overlay The options here are only enabled if the Mode is set to Text Overlay Input up to 4 lines of text in the four fields To enable any one of the four lines check its corresponding checkbox Uncheck its corresponding checkbox to disable the line of text The text will appear in the Preview window Click and drag the text around in the preview window to rep...

Страница 28: ...tab the camera can be configured to send out an email alert every time motion is detected It can also record video to a configured FTP server based on motion or on pre set schedule SMTP Server SMTP Server Enter the SMTP Email Server address Port Enter the SMTP Server port Accepts values from 1 to 65535 Check Enable SSL to enable Secure Socket Layer protocol Interval Select an interval time Check o...

Страница 29: ...n menu Parent directory will be enabled In the Parent directory drop down menu select between Use Device Name Use Device Number and Use Device IP Address to save the recording to the folder with that specified name Save in the child directory The camera will save to a folder in the server If this option is selected the drop down menus Parent directory and Child directory will be enabled In the Par...

Страница 30: ... down menu DHCP Enable or Disable to have the network automatically assign an IP address to the camera IP Address Manually enter the camera s IP address here This option should NOT be used if DHCP is enabled Subnet Mask Manually enter the camera s Subnet Mask here This option should NOT be used if DHCP is enabled Default Gateway Provide the IP address of the network s router if necessary Contact y...

Страница 31: ...but may result in somewhat jerky low quality video Balanced The video as seen by a user in Live View will be a compromise between being as close to real time as possible and having smooth playback Best Fluency The video as seen by a user in Live View will be as high quality and smooth as possible but may result in video that lags behind the camera s actual view Live Record Video Record File Size S...

Страница 32: ... remember to update this information in the IP Setup tab of the SRX Pro Server Three types of user permissions exist Administrator Operator and Viewer Administrator users have access to the camera s setup settings and user administration Operator users have access to the camera s settings but no user administration options while Viewer may only view camera live streams Each camera has one master A...

Страница 33: ...in the Password field and Confirm Password fields of the Modify User area 4 To change permission type select either Administrator Operator or Viewer in the Permission drop down menu 5 Click Modify or Add button to apply changes 6 Click OK in the confirmation message After making any setting adjustments remember to click the Save button to save any changes made 5 10 System Setup In this section you...

Страница 34: ...on in the camera s System setup tab and locate the new firmware file Then click the Upload button and wait while the firmware is being updated on your camera Note Be sure to stop all camera operations prior to an update Do not turn off power or disconnect from the network during the process Click Restart Camera after you have updated firmware successfully Restart Reset Click Restart Camera to rest...

Страница 35: ... to export your camera s settings If you have multiple cameras of the same model and you would like to apply a set of customer settings to each one exporting the configuration file may save time Click Browse to locate a configuration file to apply new settings to your camera and click Import File After making any setting adjustments remember to click the Save button to save any changes made ...

Страница 36: ...AGC ON 0 028 lux F2 0 AGC ON 0 lux w ICR 0 05 lux F1 2 AGC on 0 14 lux F2 0 AGC on 0 lux w ICR Image Enhancements Saturation Brightness Contrast Saturation Brightness Contrast Backlight compensation zone configurable Digital WDR Digital noise reduction Other Features Other Flickerless heartbeat mirror user authentication video mask watermark Mechanism Dimensions ø 140 92 mm ø 111 82 mm Weight appr...

Страница 37: ...i3 INTERNATIONAL INC 1 866 840 0004 www i3international com Canada 780 Birchmount Road Unit 16 Scarborough ON M1K 5H4 U S A 1967 Wehrle Drive Suite 1 PMB 034 Buffalo NY 14221 ...

Отзывы: