1
7
Installation (Cont'd)
Boston 1000 Series
NOTE: Flexible top: Over cut vinyl 1/8" for every 4' section for
the fl exible top to ensure a proper fi t.
NOTE: Rigid Top: Do not over cut.
Installation
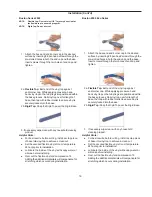
1. Attach the base and end/corner cap to the desired
surface by inserting
#8 pan head screws through the
pre-slotted holes in both the end cap and the base.
Insert screws through the two holes of end cap and
tighten.
2a.
Flexible Top:
Butt end of the vinyl top against
end/corner cap. While applying pressure, bend
back vinyl top so that vinyl legs are positioned within
the base grooves. Roll vinyl top over full length of
base, then tap with rubber mallet to ensure vinyl is
securely locked into the base.
2b.
Rigid Top:
Snap the Rigid Top over the Rigid Base.
3. If necessary wipe clean with any household
cleaning product.
Helpful Hints:
● For best results, before cutting, install a scrap piece
of base into vinyl top to achieve a clean cut.
● Set the uncoiled flexible vinyl at room temperature
24 hours prior to installation.
● Lubricate the inside of the vinyl with soapy water or
silicone before installing.
● Over cut the flexible vinyl and compression fit.
Adding the additional materials will compensate for
stretching which occurs during installation.

