20
41462-01 10/14/2005
®
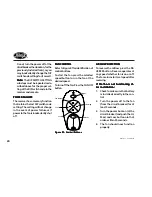
Figure 9f - Control Buttons
Figure 9f - Control Buttons
Figure 9f - Control Buttons
Figure 9f - Control Buttons
Figure 9f - Control Buttons
Do not turn the power off at the
circuit breaker, then back on, for the
previously installed fan(s), as you
may inadvertently change the DIP
switch code settings for it as well.
Note:
Note:
Note:
Note:
Note: The DIP SWITCH SETTING
sub steps must be repeated as de-
scribed above for the proper set-
ting of the DIP switch code in the
receiver and remote.
POWER FAILURE
POWER FAILURE
POWER FAILURE
POWER FAILURE
POWER FAILURE
The receiver has a memory function
that retains the last DIP switch code
setting. The setting will not change
in the event of power failure or if
power to the fan is inadvertently shut
off.
FAN CONTROL
FAN CONTROL
FAN CONTROL
FAN CONTROL
FAN CONTROL
Refer to Figure 9f for identification of
control buttons.
To start the fan press the selected
speed button to run the fan at the
desired speed.
To turn off the fan. Press the FAN OFF
button.
AIRFLOW DIRECTION
AIRFLOW DIRECTION
AIRFLOW DIRECTION
AIRFLOW DIRECTION
AIRFLOW DIRECTION
To reverse the airflow press the RE-
VERSE button. Reverse operates at
any speed whether fan is on or off.
The fan returns to its set speed after
reversing.
If the fan is not functioning af-
If the fan is not functioning af-
If the fan is not functioning af-
If the fan is not functioning af-
If the fan is not functioning af-
ter installation:
ter installation:
ter installation:
ter installation:
ter installation:
1.
Check to make sure that battery
is installed correctly in the con-
trol.
2.
Turn the power off to the fan
(from the circuit breaker) for at
least 5 seconds.
3.
Turn the power back on (at the
circuit breaker) and push the Hi,
Med, and Low buttons–in that
order–within 20 seconds.
4.
The fan should now function
properly.
Fan High
Reverse
Light
Fan Medium
Fan Low
Fan Off


