background image

INSTALLATION

10

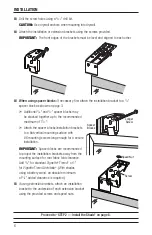
Plug the Power Cable into the Battery Wand


On the back of the headrail, connect the power cable 
from the shade into the socket on the battery wand.

Check the Power Cord


Check the headrail to ensure the power cord is not visible. 


If it is visible, adhere the wire saddle on the power cord to the back of the shade.

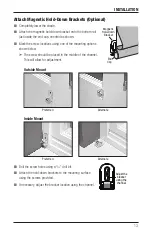
If you ordered a Magnetic Hold-Down Brackets, proceed to “Attach Magnetic Hold-Down 

Brackets (Optional)” on page 13; otherwise proceed to “Testing the Shade” on page 14.

If You Have a Satellite Battery Pack...

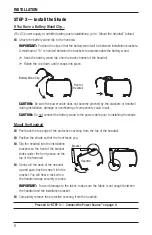
Install the Batteries into the Battery Wand


Refer to the instructions on page 9.

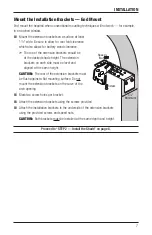
Mount the Satellite Battery Pack


Decide where you want to attach the wall mount bracket for the satellite battery pack. The 
satellite battery pack may be installed in any orientation.


Mark the screw holes and drill them using a 

3

/

32

" drill bit. 


Remove the backing from the double-sided tape on the wall  
mount bracket. Press the bracket into place. 


Attach the bracket using the screws provided.


Position the battery wand so the power cable can easily be connected to the socket. Snap 
the wand into the wall mount bracket.

Wire 

Saddle

Back of Shade

Visible

Wire

Wire 

Saddle

Back of Shade

Visible

Wire

Wall Mount Bracket

Socket

Содержание Vignette Tiered

Страница 1: ...Installation Operation Care Vignette Modern Roman Shades Tiered Style Shades PowerView Motorization...

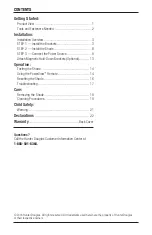
Страница 2: ...ptional 13 Operation Testing the Shade 14 Using the PowerView Remote 14 Resetting the Shade 16 Troubleshooting 17 Care Removing the Shade 19 Cleaning Procedures 19 Child Safety Warning 21 Declarations...

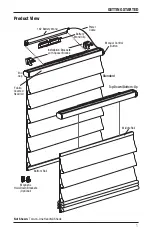
Страница 3: ...rd Magnetic Hold Down Brackets Optional End Cap Installation Brackets with Spacer Blocks Power Cable Manual Control Button 18V Battery Wand Battery Wand Clip Fabric Covered Headrail Top Down Bottom Up...

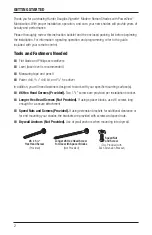
Страница 4: ...tape and pencil Power drill 3 32 drill bit and 1 4 hex driver In addition you will need fasteners designed to work with your specific mounting surface s 6 Hex Head Screws Provided Two 11 2 screws are...

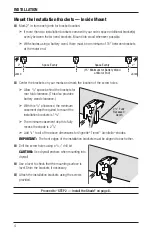
Страница 5: ...t into the tabs on the spacer block Rotate the installation bracket back as shown Mounting Types and Window Terminology If the installation brackets are mounted correctly the rest of the installation...

Страница 6: ...earance With this 3 4 allowance the minimum casement depth required to mount the installation brackets is 15 8 The minimum casement depth to fully recess the shade is 23 4 Add 1 4 to all of the above...

Страница 7: ...n mark each of the screw holes A minimum 1 flat vertical surface is required to mount the brackets The top of the installation brackets or extension brackets should be at the desired shade height The...

Страница 8: ...11 2 Attach the spacer blocks installation brackets to a flat vertical mounting surface with 6 mounting screws long enough for a secure installation IMPORTANT Spacer blocks are recommended to project...

Страница 9: ...extension brackets on each side must be level and aligned at the same height CAUTION The rear of the extension brackets must be flush against a flat mounting surface Do not mount the extension bracke...

Страница 10: ...nents could result CAUTION Do not connect the battery wand to the power cable prior to installing the shade Mount the Headrail Peel back the top edge of the protective covering from the top of the hea...

Страница 11: ...eries for use with our battery powered shades These will provide more than one year of operation depending on usage Lithium and rechargeable batteries are not recommended Squeeze the cap latch to rele...

Страница 12: ...Battery Pack Install the Batteries into the Battery Wand Refer to the instructions on page 9 Mount the Satellite Battery Pack Decide where you want to attach the wall mount bracket for the satellite...

Страница 13: ...Connect the Power Supply Plug the power cable from the shade into the extension cable Plug the other end of the extension cable into the DC power supply Plug the DC power supply into a standard outlet...

Страница 14: ...PowerView motorized shades to be powered by a single DC power supply However each shade has its own RF receiver and can operate independently The daisy chain feature is only available with the DC powe...

Страница 15: ...ting options shown below The screw should be placed in the middle of the channel This will allow for adjustment Drill the screw holes using a 3 32 drill bit Attach the hold down brackets to the mounti...

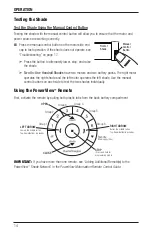
Страница 16: ...e right shade and the left motor operates the left shade Use the manual control buttons on each side to test the two shades individually Using the PowerView Remote First activate the remote by pulling...

Страница 17: ...le group buttons may be selected at a time b To deselect a group press the group button again The backlight for that group button will go out 3 Press CLOSE to lower the selected shade s 4 Press OPEN t...

Страница 18: ...ravel limit then lower to the fully closed position to set the lower travel limit The shade will move slightly one more time to indicate that the travel limits have been reset Top Down Bottom Up shade...

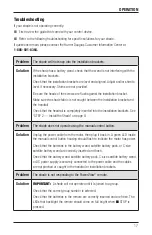
Страница 19: ...motor has power Check that the batteries in the battery wand satellite battery pack or C size satellite battery wand are correctly inserted and fresh Check that the battery wand satellite battery pac...

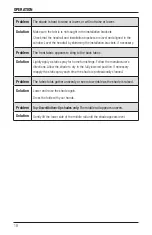
Страница 20: ...he back fabric Solution Lightly apply a static spray for home furnishings Follow the manufacturer s directions Allow the shade to dry in the fully lowered position If necessary reapply the static spra...

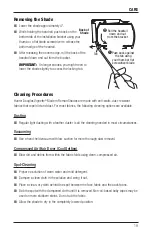
Страница 21: ...Regular light dusting with a feather duster is all the cleaning needed in most circumstances Vacuuming Use a hand held vacuum with low suction for more thorough dust removal Compressed Air Hair Dryer...

Страница 22: ...y Pretreat heavy stains Steaming CAUTION Do not steam the headrail middle rail or bottom rail fabric Steam the face fabric from the bottom to the top making sure to get steam under each fabric fold Be...

Страница 23: ...of children Move cribs playpens and other furniture away from cords Children can climb furniture to get to cords NOTE The warning labels on the bottom rails of corded window coverings contain importan...

Страница 24: ...receiver is connected Consult the dealer or an experienced radio TV technician for help Any changes or modifications not expressly approved by the party responsible for compliance could void the user...

Страница 25: ...Notes...

Страница 26: ...Notes...

Страница 27: ......

Страница 28: ...LIMITED WARRANTY Hunter Douglas window fashion products are covered for defects in materials workmanship or failure to operate for as long as the original retail purchaser owns the product unless shor...

Отзывы: