background image


http://www.huidu.cn/ 


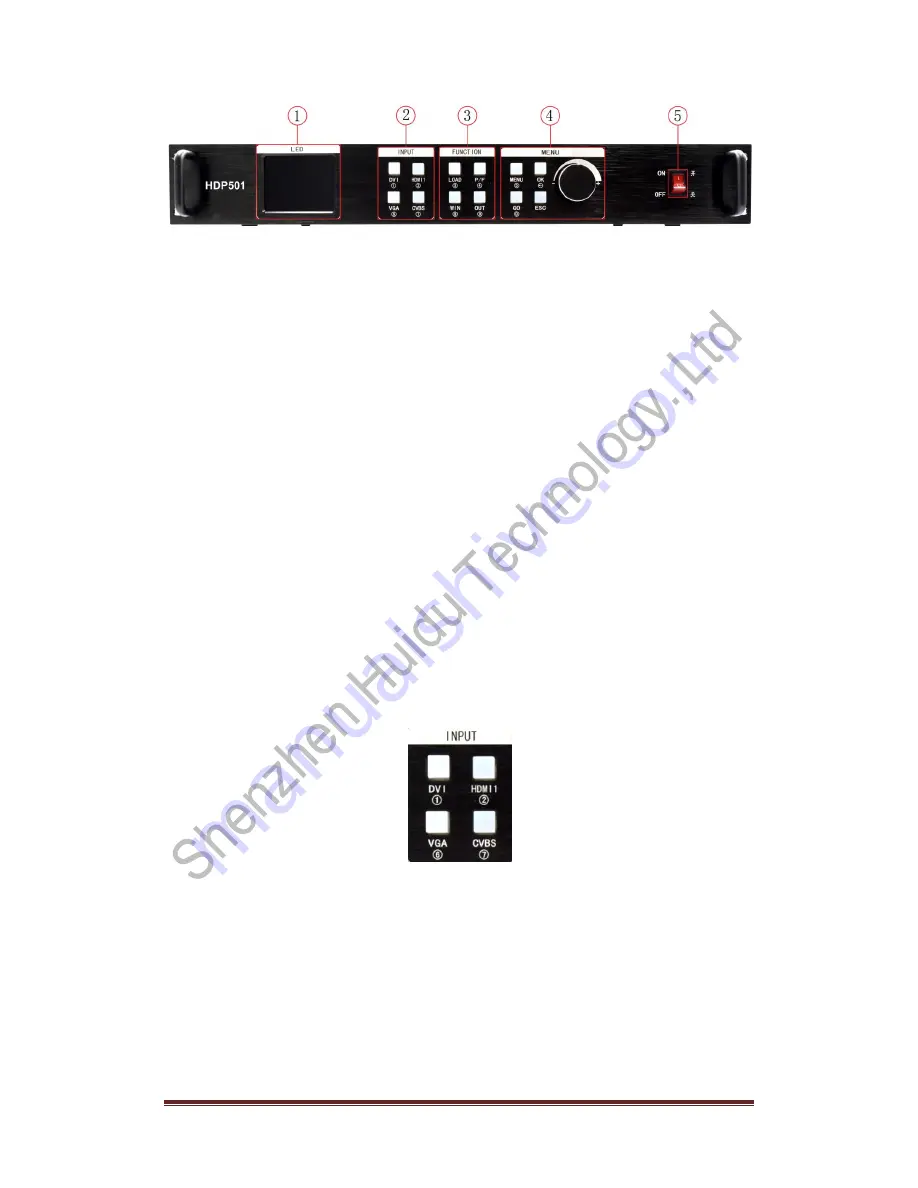
Figure 4 - Processor front panel 

  LCD display -

 display menu and current information.


  Menu Operation Key -

 The menu operation key area includes MENU "Menu Key" OK 

"Confirm Key" GO "Navigation Key" ESC "Back Key" and knob "Confirm and 

Adjustment". The following is about the meaning and use of each button: 
● 

MENU button,

 menu button, enter the main menu; 

● 

OK button,

 press to confirm; 

● 

GO button,

 press to enter navigation mode; 

● 

ESC key,

 menu exit key, or return to previous menu. 

● 

Knob,

 press the OK button, enter the menu or the next menu key, confirm the function. 

Rotate right and left to + "plus" - "minus" operation, you can adjust the menu position or 

adjust the parameter value becomes smaller. 

  input selection -

 in the INPUT button area, contains all 4-channel input switching 

keys, test patterns, screen freeze, black, VGA automatic calibration function keys. The 

key area of the keypad lights have three states, namely: 

Button indicator blinking slowly:

 blinking interval is about 1 second, and has been 

blinking, indicating that when the channel is switched no signal. 

The button light blinks quickly:

 When the button is pressed, the button blinks for about 

0.3 seconds indicating that the device is detecting and decoding the input video. 

The button light is steady:

 it indicates that the current channel signal is connected 

normally or the current function is working. The following is a detailed description of the 

functions of each key in the input keypad 


  Figure 5 - INPUT keypad 

● CVBS composite video switch button. 
● 

VGA key,

 VGA input switch key and automatic calibration key. When the input channel 

is VGA, press the VGA key repeatedly, the video processor will correct the current VGA 

channel, so that the screen output is normal. 
● 

DVI and HDMI keys,

 respectively corresponding to the rear panel DVI, HDMI video 

input interface. 

  function key area -

 the function key area contains the screen display mode, the 

default call, picture in picture and switch the effect of the operation keys to quickly 

Содержание HDP501

Страница 1: ...http www huidu cn 1 User manual Video processor HDP501 V1 220180126...

Страница 2: ...any danger Warning Power Use only the power indicated on the product with this device The equipment must be powered by a power supply system that has a ground wire The third line ground is a safety de...

Страница 3: ...u system 9 1 Navigation mode 9 2 The main menu 10 3 Output resolution 10 4 Screen parameters 11 5 Intercept parameters 12 6 Save mode 12 7 Mode call 13 9 Brightness contrast 14 10 Output settings 14 1...

Страница 4: ...any channel the switching time from 0 to 1 5 seconds adjustable Use the fade transition effect when switching the input channel you can make the screen smooth switch to the second screen Use fast swi...

Страница 5: ...tting the user can read details operating instructions of the following chapters 30 bit image lossless scaling technology video processor with a dual core image processing engine a single core can han...

Страница 6: ...tandard Commonly used to connect desktops and HDMI high definition players VGA video input using DB 25 standard interface input video support VESA standard used to connect desktop computers laptops or...

Страница 7: ...ee states namely Button indicator blinking slowly blinking interval is about 1 second and has been blinking indicating that when the channel is switched no signal The button light blinks quickly When...

Страница 8: ...e preset scene list and then together with the menu function keys to bring up the default scene Preservation and recalling of preset scenes are described in detail in the following chapters AC switch...

Страница 9: ...re is a save mode boot directly into the main menu Click OK to enter the parameters window Large screen parameters that is the actual number of pixels LED screen the default is 1920 1080 1 Ps value ch...

Страница 10: ...lick MENU to enter save mode Setting completed 2 The main menu After the device is started or click on the front panel key MENU to enter the main menu then you can see on the LCD screen 3 Output resol...

Страница 11: ...The main menu to enter the menu You can set the total size of the output screen ie large screen pixel size Description 1 Observe the icon on the dark background of the screen which is the currently va...

Страница 12: ...tion 1 The user can save up to thirty two groups of parameters click the corresponding button to save the parameters to the corresponding mode 2 Dark background icon indicates that the model has saved...

Страница 13: ...he data 2 The background color becomes darker when selected 8 VGA adjustment The main menu to enter the menu In this menu you can make various advanced settings on the device This menu is used to corr...

Страница 14: ...can set the brightness contrast here to match the corresponding display system 10 Output settings Through the output settings can be set to normal output and output black screen 11 Version Informatio...

Страница 15: ...settings Under this menu click OK to return all the parameters of the device to the factory state Prompt before the success do not do anything else Note After reset to factory settings all previously...

Страница 16: ...uidu cn 16 15 Key lock Lock the keys to prevent misoperation Chapter IV Key Settings 1 DVI HDMI VGA CVBS Click one of the following to call up the following screen 2 WIN call window parameters 3 LOAD...

Страница 17: ...http www huidu cn 17 4 P F panoramic switch 5 MENU directly into the main menu 6 OK confirm key 7 GO Enter navigation mode...

Отзывы: