background image

Installation

D

eciDing

 W

heRe


to

 L

ocate


youR

 P

eLLet

 a

PPLiance

:

1.    Check  clearances  to  combustibles  (see 

i

nstallation

  -  c

learances


to

  c

ombustibles

i

nstallation

 - a

lcove

 c

learances

and

 i

nstallation

.

2.    Do  not  obtain  combustion  air  from  an  attic,  garage  or  any  unventilated  space.   

Combustion air may be obtained from a ventilated crawlspace.

3.  Do not install the stove in a bedroom.
4.  You can vent the stove through an exterior wall behind the unit or connect it to an 

existing masonry or metal chimney (must be lined if the chimney is over 6” (15 cm) 

diameter, or over 28 inches² (180 cm²) cross sectional area).  An interior vent can be 

used with approved pipe passing through the ceiling and roof.

5.  Locate the stove in a large and open room that is centrally located in the house.  This 

will optimize heat circulation.

6.  The power cord is 8 feet (2.43 m) long and may require a grounded extension cord to 

reach the nearest electrical outlet.

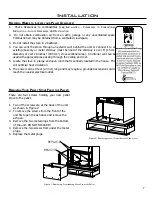
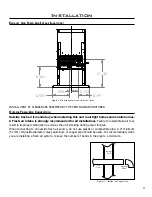
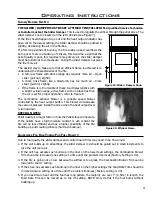
Figure 3: Removing Freestanding Stove From the Pallet. 

7


R

emoving

 y

ouR

 P

eLLet

 S

tove

 f

Rom


the

 P

aLLet

:

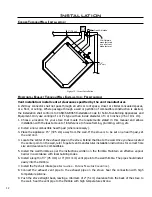
There  are  four  screws  holding  your  new  pellet 

stove to the pallet.

1.  Two of the screws are at the back of the unit 

as shown in Figure 2.

2.  To remove the screws from the front of the 

unit first open the ash door and remove the 

ash pan. 

3.  Remove the two metal plugs from the bottom 

of the unit. DO NOT DISCARD!

4.  Remove the two screws from under the metal 

plugs.

5.  Replace the metal plugs.

A

B

REMOVE

REPLACE

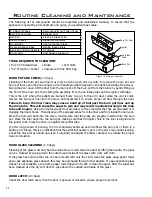
Figure 2: Removing screws from the rear of the stove. 

Содержание KINDERHOOK

Страница 1: ... S MANUAL PLEASE READ THIS ENTIRE MANUAL BEFORE INSTALLATION AND USE OF THIS PELLET BURNING ROOM HEATER FAILURE TO FOLLOW THESE INSTRUCTIONS COULD RESULT IN PROPERTY DAMAGE BODILY INJURY OR EVEN DEATH Contact your building or fire officials about restrictions and installation inspection requirements in your area WH 225767 4001609 ...

Страница 2: ... installation 12 horizontal exhaust through wall installation 12 vertical rise with horizontal termination installation recommended 14 through concrete wall with vertical rise installation 14 inside vertical installations 15 outside vertical installations 16 hearth mount installation 17 thermostat installation 18 slider damper set up 18 operating instructions 19 control board functions 19 automati...

Страница 3: ...1 maximum Premium grade 3 maximum Standard grade Moisture Content 8 maximum Heat Content approximately 8200 Btu per pound minimum ASH The ash content of the fuel and operation of your stove will directly determine the frequency of cleaning The use of high ash fuels may result in the stove needing to be cleaned daily A low ash fuel may allow longer intervals between cleaning CLINKERING Clinkers are...

Страница 4: ...re that the structural integrity of the home is maintained and all construction meets local building codes Minor soot or creosote may accumulate when the stove is operated under incorrect conditions such as an extremely rich burn black tipped lazy orange flames If you have any questions with regard to your stove or the above mentioned information please feel free to contact your local dealer for f...

Страница 5: ... freshen up a fire in the heater Keep all such liquids well away from the heater while it is in use SMOKE DETECTOR Smoke detectors should be installed and maintained in the structure when installing and operating a pellet burning appliance OPERATION The ash pan door and hopper lid must be closed securely for proper and safe operation of the pellet stove Ensure all gaskets and seals are checked reg...

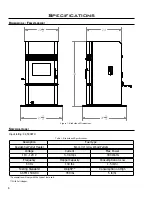
Страница 6: ...ption Fuel type Residential Pellet Heater 6mm dia Wood Pellets Voltage Current Max Power 110 120 V 3 3 Amps 400 Watts Frequency Hopper Capacity Consumption on Low 60 Hz 130 lbs 1 5 lb hr Testing Standard Weight Consumption on High ASTM 1509 04 350 lbs 5 lb hr Consumption will vary with the type of fuel used With Full Hopper 27 3 4 22 1 2 29 3 4 24 44 ...

Страница 7: ... pipe passing through the ceiling and roof 5 Locate the stove in a large and open room that is centrally located in the house This will optimize heat circulation 6 The power cord is 8 feet 2 43 m long and may require a grounded extension cord to reach the nearest electrical outlet Figure 3 Removing Freestanding Stove From the Pallet 7 Removing Your Pellet Stove From the Pallet There are four screw...

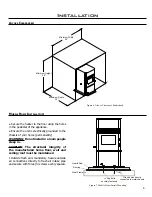
Страница 8: ...stal Floor Protection If the unit is installed on combustible material there must be a minimum of 6 of floor protection in front of the unit The Kinderhook has an adjustable pedestal base which has two positions When in the forward position as shown below it provides 6 of floor protection and a hearth pad is not needed The bolts for adjusting the pedestal base are located under the unit Figure 5 A...

Страница 9: ...lation Installation 9 Secure the heater to the floor using the holes in the pedestal of the appliance Ensure the unit is electrically grounded to the chassis of your home permanently WARNING Do not install in a room people sleep in CAUTION The structural integrity of the manufactured home floor wall and ceiling roof must be maintained Outside fresh air is mandatory Secure outside air connections d...

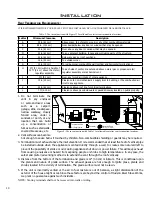
Страница 10: ... 1 for allowable exterior vent termination locations Table 2 Use in conjunction with Figure 13 for allowable exterior vent termination locations Letter Minimum Clearance Description A 24 in 61 cm Above grass top of plants wood or any other combustible materials B 48 in 122 cm From beside below any door or window that may be opened C 24 in 61 cm From above any door or window that may be opened D 24...

Страница 11: ...s the unit smoking during power failures When connecting to an outside fresh air source do not use plastic or combustible pipe A 2 minimum 51 mm ID inside diameter steel aluminum or copper pipe should be used It is recommended when you are installing a fresh air system to keep the number of bends in the pipe to a minimum Installation Exhaust And Fresh Air Intake Locations 2 ID 51 mm Optional Elbow...

Страница 12: ...pliance 15 37 5 cm away from the wall If the stove is to be set on a hearth pad set the unit on it 4 Locate the center of the exhaust pipe on the stove Extend that line to the wall Once you have located the center point on the wall refer to pellet vent manufacturer installation instructions for correct hole size and clearance to combustibles 5 Install the wall thimble as per the instructions writt...

Страница 13: ...ilding If necessary bring another length of pipe PL type to the outside of the home to connect to the first section Do not forget to place high temperature silicone around the pipe that passes through the thimble 11 Install a vertical pipe or if all requirements for direct venting are met install vent termination The stainless steel cap termination manufactured by the vent manufacturer is recommen...

Страница 14: ...d installation to use if there is a concrete or retaining wall in line with exhaust vent on pellet stove The termination must be 12 inches 30 cm from the outside wall and 12 inches 30 cm above the ground Recommended vent size for vertical installation Under 15ft 3 Vent Over 15ft 4 Vent Figure 16 Vertical rise with Horizontal Termination Figure 15 Through Wall with Horizontal Termination 14 Wall fr...

Страница 15: ...r 15ft 4 Vent 2 Place the unit on the hearth pad if installed on a carpeted surface and space the unit in a manner so when the pellet vent is installed vertically it will be 3 76 mm away from a combustible wall 3 Locate the center of the fresh air intake pipe on the unit Match that center with the same point on the wall and cut a hole about 2 51 mm in diameter 4 Install the fresh air intake pipe 5...

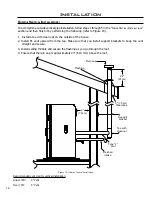
Страница 16: ...it by performing the following refer to Figure 23 1 Install a tee with clean out on the outside of the house 2 Install PL vent upward from the tee Make sure that you install support brackets to keep the vent straight and secure 3 Install ceiling thimble and secure the flashing as you go through the roof 4 Ensure that the rain cap is approximately 24 610 mm above the roof Figure 18 Outside Vertical...

Страница 17: ...View Floor Protection Combustible Floor Masonry Fireplace Min 9 Mantel Minimum 8 20 cm from top of stove NOTE Hopper lid will not open fully with less than 23 Damper Removed or Fastened Open Clean out tee Fresh air intake should come from chimney If holes already exist fresh air intake can be taken through back of the fireplace or through the ash dump Rain cap Storm collar Seal plate cover plate E...

Страница 18: ...switch is found behind the control panel Avoid setting off the high limit switch blower will decrease the vacuum pressure inside the stove and as the heat output button is turned down The vacuum pressure inside the firebox will increase as the combustion exhaust blower increases in speed higher heat output setting The slider damper is used to regulate the airflow through the pellet stove Slider Da...

Страница 19: ... buttons 6 ON OFF BUTTON Used to turn the unit ON and OFF 7 HEAT LEVEL ADJUSTMENT BUTTONS When pressed will change the heat level setting of the unit up or down 8 HEAT OUTPUT INDICATOR Shows the present heat output setting Figure 28 Circuit Board Control Panel Decal automatic Safety featuReS of youR PeLLet Stove A If the fire goes out exhuast temperature drops below 120 F the unit will automatical...

Страница 20: ...HIGH LOW MANUAL AUGER C 11625 MODE 1 2 3 4 5 6 8 7 9 the thermostat contacts close within the 30 minutes the HEAT LEVEL will return to the previous MANUAL setting If the thermostat contacts remain open the stove automatically begins its shutdown routine The ON OFF button can be pressed at any time to immediately shut down the unit The stove will re light when the thermostat contacts close again Tu...

Страница 21: ...o Figure 8 The combustion exhaust blower is a variable speed blower controlled by the heat output button This blower will decrease the vacuum pressure inside the stove when the heat output level is turned down SPECIAL NOTES Pellet quality is a major factor in how the Pellet stove will operate If the pellets have a high moisture content or ash content the fire will be less efficient and has a highe...

Страница 22: ...e auger to jam and may result in pellets burning in the drop tube and hopper Using the metal scraper tool provided remove material that has accumulated or is clogging the liner s holes Then dispose of the scraped ashes from the liner and from inside the burn pot Place the burn pot back into the stove making sure that the pipes are properly inserted into the burn pot Place the liner back into the b...

Страница 23: ... an airtight assembly ASH PAN weekly The ash pan is located under the burner Dump the ashes into a metal container stored away from combustibles Monitor the ash level every week Remember that different pellet fuels will have different ash contents Ash content is a good indication of fuel efficiency and quality Refer to Introduction Safety Warnings And Recommendations for disposal of ashes Freestan...

Страница 24: ...nents Removal POST SEASON CLEAN UP Once you are finished using the pellet appliance for the season unplug the stove for added electrical protection It is very important that the stove be cleaned and serviced as stated above CLEANING PLATED SURFACES Painted surfaces should be wiped with a damp cloth periodically It is important to note that fingerprints and other marks can leave a permanent stain o...

Страница 25: ...ectly placed in the burn pot Check the Heat Level Indicator If the 2 light is flashing see the 2 light is flashing Check the fuse on the circuit board If the unit still does not start contact your local service dealer for service 2 The stove will not operate when hot Check the Heat Level Indicator if a fire is not detected or if the fire has gone out the 3 light will flash because the Exhaust Temp...

Страница 26: ... installed Check the operation by opening a window does this solve the problem If it does install fresh air intake to unit or room Venting system may require vertical section to move termination into a low pressure zone Vacuum Switch failure Bypass the vacuum switch if this corrects the problem check for above problems before replacing the Vacuum Switch Damage to gray wires between Circuit Board a...

Страница 27: ...e bright orange in color If not replace the ignitor 9 Control settings Heat Level has no effect on the fire NOTE If the system light is flashing the Control Board has complete control of the unit When the units system light becomes solid then control of the unit is given back to the operator If there is no control of the Heat Level button make sure the thermostat is calling for heat Call your loca...

Страница 28: ...ange Orange Orange Orange Yellow Yellow Grey Grey Grey Grey Purple Purple Blue 115V Black Black Black Black Blue Vacuum Switch Combustion Blower Power Cord Ground Ignitor Exhaust Temperature Sensor 5 Amp Fuse High Limit Temperature Sensor Convection Blower Auger Motor Common Hot Thermostat Convection Temperature Sensor 28 ...

Страница 29: ...29 Parts diagrams 9 10 11 12 13 14 15 16 17 18 19 20 21 22 23 24 25 34 36 38 39 ...

Страница 30: ...30 Parts diagrams 1 2 3 4 4 5 6 7 8 26 27 28 29 30 31 33 35 37 32 ...

Страница 31: ...T JULY01 08 9 50 1929 CIRCUIT BOARD C 11652 50 1971 PELLET STOVE THERMOSTAT 10 50 2329 GLASS RETAINERS 11 50 2336 BRICK LINER 12 50 2337 CONTROL PANEL C W DECAL 13 50 2342 FIREBOX LINER C W INSULATION 50 2465 KINDERHOOK OWNERS TECHNICAL MANUAL 14 50 2466 KINDERHOOK FS HOPPER LID OLD SERIALIZED PART MUST BE RETURNED 15 50 2467 KINDERHOOK DOOR ASSEMBLY COMPLETE 16 50 2468 KINDERHOOK CABINET SIDE LEF...

Страница 32: ... RESET ALL PELLET 32 EF 017 VACUUM SWITCH 115V 33 EF 018 SILICONE HOSE ALL PELLET RED EF 019 ALUMINUM HOSE BARB ALL PELLET 34 EF 021 EF2 EF3 WIN MER IGNITION BURN POT 35 EF 050 SLIDER DAMPER ROD W KNOB 50 2058 9 16 ROUND DOOR GASKET 10FT 36 EF 061 GLASS W TAPE 13 W X 9 H 37 EF 068 1 KNOB EF 125 EF2 SHOULDER BOLT NUT 38 EF 126 FIREBOX CERAMIC WOOL INSULATION EF 156 PELLET STOVE CLEANING BRUSH EF 16...

Страница 33: ...over damage or breakage due to misuse improper handling or modifications All Claims under this warranty must be made through the dealer in which the stove was originally purchased from If an inspection by the dealer indicated that a warranty claim is justified and that all conditions of this warranty have been met the manufacturer s total responsibilities and liabilities shall be to repair or repl...

Страница 34: ..._______________ DATE OF PURCHASE _____________ dd mm yyyy DATE OF INSTALLATION ___________ dd mm yyyy MAGNEHELIC AT INSTALL ___________________ INSTALLER S SIGNATURE _________________________________________ NAME OF INSTALLER _________________________________________ ADDRESS _________________________________________ _________________________________________ ________________________________________...

Страница 35: ...andard The Kinderhook FS has a two position pedestal base which leaves the factory in the back position When this pedestal base is moved to the forward position it provides 6 of floor protection in front of the unit which meets the floor protection requirements for clearances to combustible materials If the unit is installed on combustible material the pedestal base must be moved to the forward po...

Отзывы: