background image


Ver. 1.4 

 6-21 

15 

Remote Configuration

 (Continued)

                                                        _ 


Video Rate Type:

 Adjust the video rate type 

o


Options include: CBR (Constant Bit Rate) & VBR (Variable Bit Rate) 


Max Rate (Kbps):

 Sets the maximum kilobytes per second of the Video Rate Type. 

o


Range: 0 - 16383 


Frame Rate:

 Adjust the frame rate of the RTSP feed 

o


Options include: Full FPS, 1 - 30 


Key Frame Interval: 

Adjust the I Key Frame Interval 

o


Range 0 

 255 


Video Coding Type:

 Adjust the Video Encoding type 

o


Options include: H.264 & H.265 


Encode Level:

 Adjust the level at which the video is encoded 

o


Options include: Base, Main & High 


Channels:

 Adjust the audio channel of the embedded audio 

o


Options include: Mono & Stereo 


Encode Type:

 Adjust the Audio Encoding type of the embedded audio 

o


Options include: AAC 


Sample Rate:

 Adjust the audio sample rate of the embedded audio 

o


Options include: 16KHz, 44.1KHz, & 48KHz 


Audio Rate:

 Adjust the audio rate of the embedded audio 

o


Options include: 48Kbps, 64Kbps, 96Kbps, & 128Kbps 


Input Pin:

 Adjust the audio connection type 

o


Options include: LineIn & MicIn 


Volume:

 Adjust the audio level of the embedded audio 

o


Range: 0 

 100 

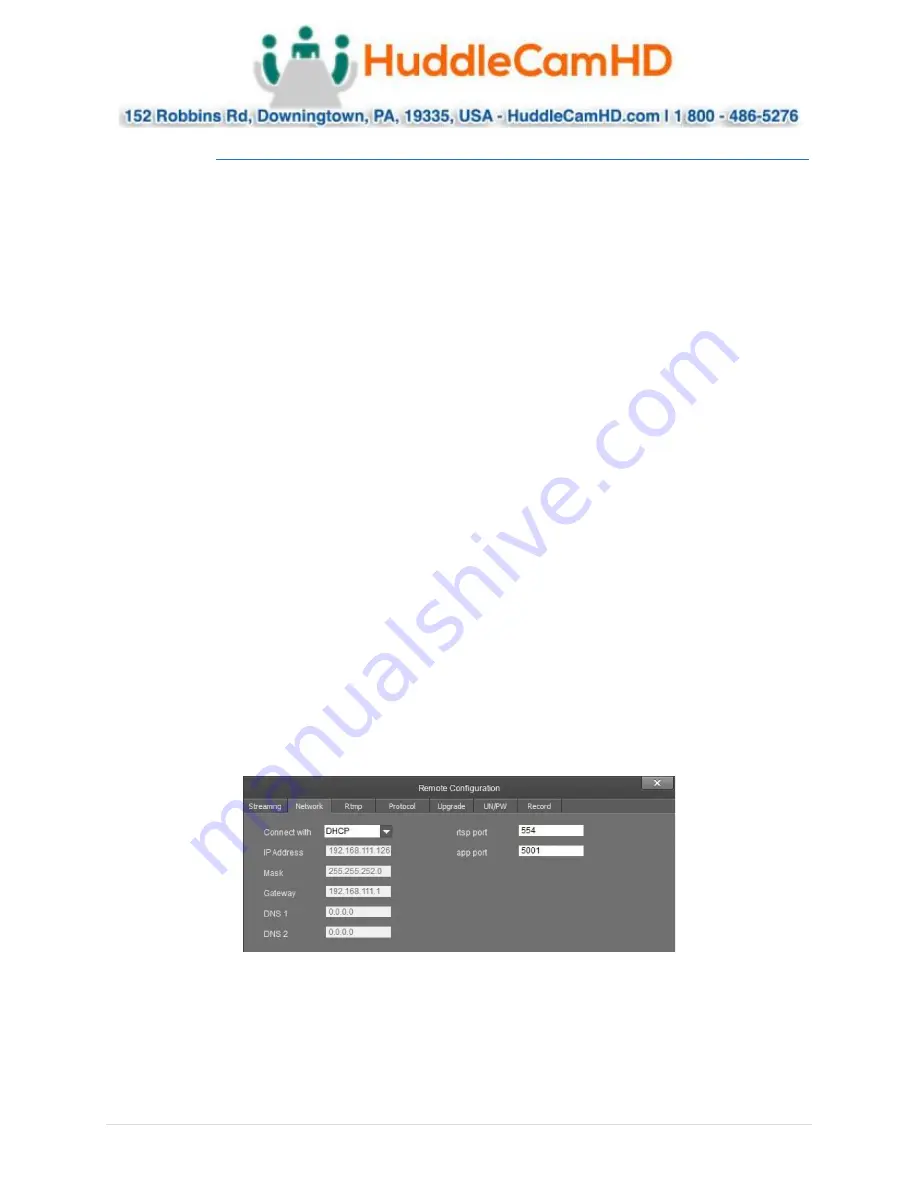
The 

Network

 category allows you to assign a dynamic or static IP address for the camera, in addition to 

settings the port numbers for RTSP & control. 


Connect With:

 Adjust the network connection method 

o


Options include: DHCP (Dynamic) & Static IP 
Note: While in DHCP you can only adjust RTSP Port & App Port 


IP Address:

 Displays IP Address & allows for adjustment the IP address of your camera 

o


Default value: DHCP; or 192.168.1.180 while in Static or no connection to a DHCP server 


Содержание HUD-HC20X-SIMPL2

Страница 1: ...Ver 1 4 6 21 HuddleCamHD SimplTrack2 Auto Tracking Camera Installation Operation Manual...

Страница 2: ...Video Configuration Interface Page 11 Remote Playback Page 12 Connect Camera Page 13 Network Configuration Page 14 Remote Configuration Page 14 Remove Camera Page 19 Configure Video Settings Page 20...

Страница 3: ...trical shock Keep the camera away from strong electromagnetic sources Do not aim the camera at bright light sources e g bright lights the sun etc for extended periods of time Do not clean the camera w...

Страница 4: ...100M Adaptive Ethernet port 1 x 3G SDI BNC type 800mVp p 75 Along to SMPTE 424M standard 1 x DVI DVI I Dual Link 1 x USB 3 0 B type female Audio Input 1 ch 3 5mm audio interface Line In RTSP RTMP Netw...

Страница 5: ...nectivity to a LAN Minimum Resolution 1920x1080 General Specifications Input Voltage DC IN 12V Current Consumption 1 0A Max Power Consumption 12W Max Operating Temperature 32 F to 104 F 0 C to 40 C St...

Страница 6: ...Ver 1 4 6 21 3 Physical Descriptions Front View of Camera 1 Tracking Camera Lens a 20X Optical Zoom b Field of View 3 tele to 59 wide 2 Reference Camera Lens a 86 Horizontal x 52 Vertical 2 1...

Страница 7: ...functionality 3 RJ45 Ethernet Port Allows for setup RTSP RTMP video feed 4 DVI D Video Output Includes DVI to HDMI converter for HDMI output 5 SDI Video Output Outputs up to 1080p60 6 8 Pin Mini Din V...

Страница 8: ...era ip rtsp port 3 or 4 h264 example rtsp 192 168 111 85 5000 3 or 4 h264 SDI Connection _ 1 Connect an SDI cable to the SDI output on the camera 2 Connect the SDI cable to your equipment with an avai...

Страница 9: ...f the software to search for cameras on the same subnet mask as your PC a Note The camera utilizes DHCP by default if your PC is also utilizing DHCP this search should find your camera 2 Alternatively...

Страница 10: ...video feed for that cell as shown below Teacher close up Main RTSP feed PTZ camera Teacher panorama Sub RTSP feed Reference camera Teacher close up RTSP stream 3 feed PTZ camera Teacher panorama RTSP...

Страница 11: ...will open the Basic 1 menu 3 Set the tracking zone and blocking zones for your environment a Note As shown above the tracking zone encompasses anywhere that may include a face The blocking zones are...

Страница 12: ...Track Outside Platform b Tracking Parameters Tracking Sensitivity Pan Speed Tilt Speed Zoom Limit Lost Timeout as required by your room c Target Lost Action Dropdown and select No 0 preset to ensure...

Страница 13: ...Online Device section 3 View download video and or photos Micro SD card required 9 Modify network settings of selected Online Device 4 Manually add device using IP address Port number Username Passwo...

Страница 14: ...a video feed 8 Enable Disable tracking Tracking Status 3 PC performance time 9 Open tracking settings 4 Pan Tilt OSD Menu control 10 Connected camera resolution frame rate 5 Lens control 11 Snapshot E...

Страница 15: ...Play video feed 2 Video feed of recording 8 Currently selected time in hours for video feed 3 Video feed playback speed Options include Fast normal slow speed 9 Recorded video in hours 4 Recorded vid...

Страница 16: ...line Device section you can simply click Search and the Tracking Software will automatically search the subnet your network for any HuddleView SimplTrack2 cameras Select the camera and click Add to Cl...

Страница 17: ...raversing to the Network section Remote Configuration Remote Configuration includes Streaming Network RTMP Protocol Upgrade Username Password Record Stream Type Select the RTSP feed you wish to adjust...

Страница 18: ...Audio Encoding type of the embedded audio o Options include AAC Sample Rate Adjust the audio sample rate of the embedded audio o Options include 16KHz 44 1KHz 48KHz Audio Rate Adjust the audio rate of...

Страница 19: ...me System o Default value 0 0 0 0 RTSP Port Adjust the RTSP connection port o Default value 554 App Port Adjust the app control port o Default value 5001 The RTMP category allows you to define a RTMP...

Страница 20: ...include Server Client IP Adjust the IP address to which the camera sends commands to while in Server mode o Default value 0 0 0 0 Port Adjust the Port number of the device you are connecting to while...

Страница 21: ...Camera Name Adjust the camera device name o Default value SimplTrack2 Display Time checkbox When enabled displays the time in the main video feed o Default value Unchecked Off Time Format Adjust the t...

Страница 22: ...of SD card recording o Options include Black Unlit Not recording Green recording Red Cannot record to SD card Capacity of SD card M Displays total size of Micro SD card in kilobytes Use of SD card M D...

Страница 23: ...vice List and select video feed you wish to view Teacher Close Up Tracking camera video feed Teacher Panorama Reference camera video feed PTZ Control Control the selected camera Menu Button Opens the...

Страница 24: ...ns include 720p60 720p50 1080i60 1080i50 1080p30 1080p25 1080p60 1080p50 Baud Rate Baud rate for analog control o Options include 9600bps Protocols Control protocol for camera control o Options includ...

Страница 25: ...Zones the camera will frame when motion is captured SimplTrack2 only o Allows for up to 4 Preset Zones Once a Preset Zone is designated motion within the zone will trigger a preset the camera calls i...

Страница 26: ...tivity at which the camera tracks objects individuals o Range 0 7 Zoom Sens Adjust the sensitivity of the zoom o Range 0 7 Zoom Limit Allows for adjustment of how much the camera zooms while tracking...

Страница 27: ...ger that can be used when a subject moves out of a Preset Zone This trigger is called whenever the subject moves out of any of the 4 Preset Zones Dynamic Blocking Zones These zones allow you to overla...

Страница 28: ...______________ _ Senior 2 allows for adjustment of camera control parameters In this field you have control over Control Mode Connection Protocol Controlled As Director IP Director Port Connection Tes...

Страница 29: ...deo ___ _ 1 Select your camera from the Device Management page and select Remote Configuration 2 Select the Record tab to begin setup 3 Click the SDCard Record checkbox to begin recording video straig...

Страница 30: ...two methods of taking photos using the SimplTrack2 Option 1 allows you to take live photos from the Main View and option 2 allows for snapshots of recorded video 1 Select the Main View page from the...

Страница 31: ...follow steps 1 4 of Recording Video to record video to the SD card 2 Select your camera and use the date dropdown and sliders to find the timeline you re looking for 3 Click the Snapshot button to tak...

Страница 32: ...0 BLC OFF ON OFF Anti Flicker OFF 50Hz 60Hz 50Hz Manual Gain 0 30 Speed 1 1 1 2 1 4 1 8 1 15 1 30 1 60 1 90 1 100 1 125 1 180 1 250 1 350 1 500 1 725 1 1000 1 1500 1 2000 1 3000 1 4000 1 6000 1 10000...

Страница 33: ...ain 0 255 128 Saturation 0 14 7 Hue 0 14 7 Sodium Lamp Saturation 0 14 7 Hue 0 14 7 Fluo Lamp Saturation 0 14 7 Hue 0 14 7 Field Options Include Default Pan Tilt Zoom Pan Tilt Speed 1 8 5 D Zoom Limit...

Страница 34: ...Iris 5 Menu Use to open close the OSD Menu 6 Data Button Use the Data Button to enable disable display of pan tilt angle zoom time and other prompt messages 7 Number Keys Used for inputting numbers su...

Страница 35: ...a to Device Address 2 F1 3 ENTER Change camera to Device Address 3 F1 4 ENTER Change camera to Device Address 4 F1 5 ENTER Start Tracking F1 6 ENTER End Tracking F2 0 0 1 Set the IP address to DHCP F2...

Страница 36: ...two commands and the command could not be accepted when received Command Canceled z0 6y 04 FF y Socket No Returned when a command which is being executed in a socket specified by the cancel command is...

Страница 37: ...p FF Direct 8x 01 04 48 0p 0q 0r 0s FF pqrs Focus Position Auto Focus 8x 01 04 38 02 FF AF ON OFF Manual Focus 8x 01 04 38 03 FF Auto Manual 8x 01 04 38 10 FF One Push Trigger 8x 01 04 18 01 FF One Pu...

Страница 38: ...0p 0q FF pq Gain Position CAM_Bright Reset 8x 01 04 0D 00 FF Bright Setting Up 8x 01 04 0D 02 FF Down 8x 01 04 0D 03 FF Direct 8x 01 04 4D 00 00 0p 0q FF pq Bright Position CAM_ExpComp On 8x 01 04 3E...

Страница 39: ...YYYY Pan Position ZZZZ Tilt Position Down 8x 01 06 01 VV WW 03 02 FF Left 8x 01 06 01 VV WW 01 03 FF Right 8x 01 06 01 VV WW 02 03 FF UpLeft 8x 01 06 01 VV WW 01 01 FF UpRight 8x 01 06 01 VV WW 02 01...

Страница 40: ...FF Manual y0 50 0A FF Shutter Priority y0 50 0B FF Iris Priority y0 50 0D FF Bright CAM_ShutterPosInq 8x 09 04 4A FF y0 50 00 00 0p 0q FF pq Shutter Position CAM_IrisPosInq 8x 09 04 4B FF y0 50 00 00...

Страница 41: ...50 08 FF 1920 x1080i 50 50 Hz system y0 50 09 FF 1920 x1080p 25 y0 50 0A FF 1280 x720p 50 y0 50 0B FF 1280 x 720p 25 y0 50 0F FF 1920 x1080p 50 IR_Receive 8x 09 06 08 FF y0 50 02 FF On y0 50 03 FF Of...

Страница 42: ...sacrificed for distance Motion The faster the subject moves the larger the shot composition should be Depending on the subject and desired impact this is something that can require a bit of trial and...

Страница 43: ...to move the camera closer to the stage Too complex of a scene with slightly improper lighting The tracking camera seems to be off from the reference camera settings The camera has been moved Manually...

Страница 44: ...Ver 1 4 6 21 41 Notes...

Отзывы: