background image

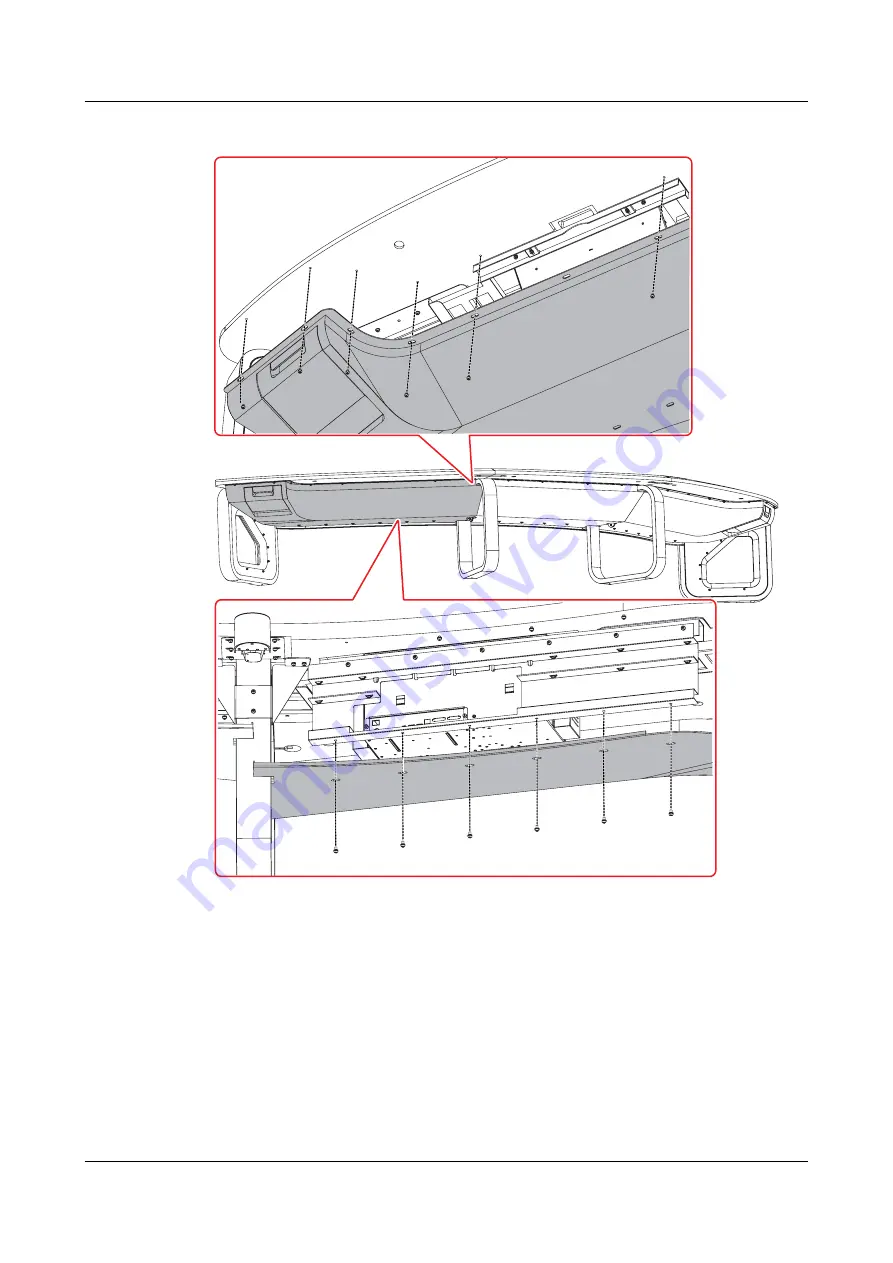
Figure 15-5

 Installing the front decorative part (left)


Step 7

Repeat 

Step 4

 through 

Step 6

 to install the decorative parts on the front side of the right

conference table.

Step 8

Install the decorative parts on the rear side of the center conference table, as shown in 

Figure

15-6

.

HUAWEI TP3106&TP3118S&TP3118 Telepresence
Installation Guide

15 Installing the Multi-Functional Conference Table

Decorative Parts

Issue 07 (2013-11-08)

Huawei Proprietary and Confidential

Copyright © Huawei Technologies Co., Ltd.

132

Содержание TP3106

Страница 1: ...7420001 HUAWEI TP3106 TP3118S TP3118 Telepresence Installation Guide Issue 07 Date 2013 11 08 HUAWEI TECHNOLOGIES CO LTD ...

Страница 2: ...t may not be within the purchase scope or the usage scope Unless otherwise specified in the contract all statements information and recommendations in this document are provided AS IS without warranties guarantees or representations of any kind either express or implied The information in this document is subject to change without notice Every effort has been made in the preparation of this docume...

Страница 3: ...lation Procedure 32 8 Installing the Front Row of the Multi Functional Conference Table 42 8 1 Parts List 44 8 2 Installing the Fixture 45 8 3 Installing the Multi Functional Conference Table Stand 46 8 4 Installing the Tabletop Displays 51 8 5 Installing the Tabletop 58 8 6 Installing the Cable Troughs 62 8 7 Installing the Microphones 63 8 8 Installing the Multi Functional Sockets 65 8 9 Install...

Страница 4: ...DUs 91 11 5 Installing the Telepresence Host 92 11 6 Installing the Power Supply Controller 102 11 7 Installing the Network Switch 103 11 8 Installing the Wireless Router 103 11 9 Installing the Telepresence Codecs 104 11 10 Installing Active Speaker Systems 105 12 Mounting Front Panel 2 109 12 1 Parts List 110 12 2 Installation Procedure 110 13 Installing the Front Panel Decorative Parts 113 13 1...

Страница 5: ...7 Parts List Sorted by Packing Case 139 18 Screws and Accessories 147 HUAWEI TP3106 TP3118S TP3118 Telepresence Installation Guide Contents Issue 07 2013 11 08 Huawei Proprietary and Confidential Copyright Huawei Technologies Co Ltd iv ...

Страница 6: ...ur tabletop segments and eight seats l The TP3118 has two rows of multi functional conference tables The front row is the same as that of the TP3106 The second row has six tabletop segments and 12 seats Related Documentation Document Describes Acquisition HUAWEI TP3106 TP3118S TP3118 Telepresence Quick Start Operating the touch panel l This is provided along with the telepresence system l http sup...

Страница 7: ...rovided along with the HD video terminal l http support huawei com HUAWEI 8660 8650 MCU User Guide How to use maintain and troubleshoot the 8660 8650 Multipoint Control Unit MCU l This is provided along with the MCU l http support huawei com ViewPoint ResourceManager User Guide How to install configure operate maintain and troubleshoot the ResourceManager RM l This is provided along with the RM l ...

Страница 8: ...ews to locate all the parts correctly and then fully fasten them using a rechargeable battery powered electric screwdriver The recommended torque is 12 N m Terms Term Description Partially tighten Insert a screw into a screw hole and tighten the screw halfway using a screwdriver Countersunk screw The heads of common screws protrude from the surface objects into which they are driven resulting in a...

Страница 9: ...ces with you at all times to prevent them from falling l When working at height maintain balance to prevent yourself from falling Electrical Safety l The installation of AC power supply devices must be done in accordance with the local safety regulations Only personnel qualified to perform high voltage AC operations should install AC power supply devices l During operations do not wear any conduct...

Страница 10: ...nd is properly grounded to prevent electrostatic discharge from damaging sensitive components Sharp Edges Wear safety gloves when moving and lifting the system to mitigate the risk of cutting your hands on the system s sharp edges Signal Cable Bundling Signal cables must be bundled separately from heavy current or high voltage cables The minimum distance between bundles is 150 mm HUAWEI TP3106 TP3...

Страница 11: ...s installation guide details the design principles and specifications for Huawei telepresence rooms including principles for decoration acoustics illumination and heating ventilation and air conditioning HVAC requirements 3 1 Room Layout 3 2 Environmental Requirements 3 3 Power Supply and Network 3 4 Fire Control Facilities HUAWEI TP3106 TP3118S TP3118 Telepresence Installation Guide 3 Telepresenc...

Страница 12: ...m Dimensions Room dimensions specified are those of a telepresence room before decoration A telepresence room must meet the following requirements as shown in Figure 3 2 l Dimensions H x W x D 2700 mm x 8000 mm x 5300 mm l No fixed objects such as columns are allowed in the equipment area or in the circulation zone l The distance between the equipment cabinet and the wall is 500 mm to allow servic...

Страница 13: ...illumination temperature humidity air circulation and acoustics of telepresence rooms must meet requirements described in this section Background Noise Background noise also called ambient noise is any noise signal other than the useful or desired noise signals in an electroacoustic system Background noise consists of two parts noise generated by the acoustics devices and noise generated during au...

Страница 14: ...mparison with their color appearance under a reference light source incandescent lamp light The CRI of the light source in the conference area of a telepresence room must be higher than 82 Temperature and Relative Humidity To ensure the normal operation of the telepresence system l The temperature in the telepresence room must range from 0 C to 40 C and the relative humidity from 20 to 80 l During...

Страница 15: ... fire control facilities above the suspended ceiling to ensure the safe use of the telepresence room If the ceiling of the room in which the telepresence system is going to be installed is already equipped with fire control facilities ensure that modifications to the ceiling do not damage them Install fire control facilities based on the layout of the fittings and inlets and outlets of the air con...

Страница 16: ...ded ceiling fire control system HUAWEI TP3106 TP3118S TP3118 Telepresence Installation Guide 3 Telepresence Room Decoration Requirements Issue 07 2013 11 08 Huawei Proprietary and Confidential Copyright Huawei Technologies Co Ltd 11 ...

Страница 17: ...ence system including preparing tools performing unpacking check and setting IP addresses 4 1 Tools List 4 2 Unpacking 4 3 Setting Parameters HUAWEI TP3106 TP3118S TP3118 Telepresence Installation Guide 4 Installation Preparation Issue 07 2013 11 08 Huawei Proprietary and Confidential Copyright Huawei Technologies Co Ltd 12 ...

Страница 18: ...ications and Functions Flat head screwdriv er 2 Length 300 mm Rubber mallet 2 Used for dismantling packages and leveling tabletop segments Diagonal pliers 1 Cuts cables and straps Safety gloves 6 Protect hands from injury Safety glasses 3 Protect eyes from dust HUAWEI TP3106 TP3118S TP3118 Telepresence Installation Guide 4 Installation Preparation Issue 07 2013 11 08 Huawei Proprietary and Confide...

Страница 19: ...s with larger handles are recommended Allen wrench 1 set One set of Allen wrenches has eight different size wrenches among which H6 and H3 are most commonly used l H6 Used for securing HD display stands l H3 Used for securing telepresence codecs Open end wrench 2 Caliber 8 mm to 10 mm and 24 mm to 28 mm Rechargea ble battery powered electric screwdriv er 1 Recommended model Bosch GSR 18 V LI HUAWE...

Страница 20: ... you must unpack the cartons and cases and check the items inside before acceptance The procedure of unpacking cases goes as follows 1 Check items before unpacking 2 Unpack the wooden cases and cartons 3 Check the goods for acceptance Check Before Unpacking NOTICE l Be aware of the doors walls and shelves when transporting and moving equipment parts and components l When transporting moving and in...

Страница 21: ...es and foamed wrap angles NOTICE l Do not put the wooden case upside down Otherwise the equipment will suffer severe damage l It is suggested to move the wooden cases into the equipment room before unpacking if space permits In doing so you may avoid damage to the cabinet during the transportation l When moving the cabinet grip the solid parts such as the support or backbone frames Too much force ...

Страница 22: ...ices It is recommended that one person be in charge of each individual carton Check the cartons one by one Confirm that cartons are empty before they are thrown away The following description and procedure uses the carton for packing boards as an example Figure 4 2 illustrates the procedure for unpacking the carton HUAWEI TP3106 TP3118S TP3118 Telepresence Installation Guide 4 Installation Prepara...

Страница 23: ...e NOTICE To avoid damaging equipment inside do not apply too much force when opening cartons 4 Open the carton and remove the foam plate 5 Check whether the number of boards is consistent with that specified on the carton label Then remove the boards from the carton 6 Check the number and type of boards against the Packing List and accept them HUAWEI TP3106 TP3118S TP3118 Telepresence Installation...

Страница 24: ...stall the boards at a later time pack the boards using the original materials and place them in a cool dry place with no direct sunshine or strong electromagnetic radiation Acceptance After Unpacking After unpacking check the goods as follows 1 Check the number and type of the equipment inside the case against the Packing List and accept them 2 If shortage or miscarriage is identified fill in the ...

Страница 25: ...d Silkscreen The silkscreen is clear and identifiable Connector The connectors are in good condition with straight contact pins Mechanical part Appearance The appearance is tidy without scratches loose mechanical parts or damage Quantity The quantity is consistent with that in the shipping list Interior cable Appearance The cables are tidy and none are missing Connector The connectors are secure A...

Страница 26: ... LAN1 to connect to external networks Center telepresence codec 172 16 21 61 10 11 250 61 Right telepresence codec 172 16 21 62 10 11 250 62 Wireless router 172 16 21 64 Default IP address 192 168 1 1 Touch panel 172 16 21 65 Left tabletop display 172 16 21 30 Default IP address 172 16 21 30 Center tabletop display 172 16 21 31 Default IP address 172 16 21 30 Right tabletop display 172 16 21 32 De...

Страница 27: ...correctly and safely install a telepresence system read this guide carefully before installation and strictly follow the instructions herein during installation Figure 5 1 describes the installation procedure HUAWEI TP3106 TP3118S TP3118 Telepresence Installation Guide 5 Installation Overview Issue 07 2013 11 08 Huawei Proprietary and Confidential Copyright Huawei Technologies Co Ltd 22 ...

Страница 28: ... 5 1 Installation procedure HUAWEI TP3106 TP3118S TP3118 Telepresence Installation Guide 5 Installation Overview Issue 07 2013 11 08 Huawei Proprietary and Confidential Copyright Huawei Technologies Co Ltd 23 ...

Страница 29: ...ul installation and cable routing of other devices and high quality of telepresence conferences the racks must be installed according to the instructions in this chapter 6 1 Parts List 6 2 Installation Procedure HUAWEI TP3106 TP3118S TP3118 Telepresence Installation Guide 6 Installing the Racks Issue 07 2013 11 08 Huawei Proprietary and Confidential Copyright Huawei Technologies Co Ltd 24 ...

Страница 30: ...nk screw Several 8 Curved connecting rod 2 9 Connecting piece 2 6 2 Installation Procedure Procedure Step 1 Arrange the three racks as shown in Figure 6 1 ensuring that the center rack is 570 mm from the rear wall Figure 6 1 Location of the center rack 570mm Step 2 Install the connecting plates as shown in Figure 6 2 HUAWEI TP3106 TP3118S TP3118 Telepresence Installation Guide 6 Installing the Rac...

Страница 31: ...ecting plate upward place it between the right and center racks and screw it to the racks by tightening the six M6 x 16 countersunk screws using a rechargeable battery powered electric screwdriver Step 3 Attach the left and right curved connecting rods The methods for installing the left and right curved connecting rods are the same The following procedure uses the right connecting rod as an examp...

Страница 32: ...base 1 Align the connecting rod with the mounting holes on the rack 2 Secure the connecting rod to the rack with four M6 x 60 countersunk screws Step 4 Adjust all support legs to ensure that the distance between the top of the base of the rack see Figure 6 4 and the floor is 120 mm HUAWEI TP3106 TP3118S TP3118 Telepresence Installation Guide 6 Installing the Racks Issue 07 2013 11 08 Huawei Propri...

Страница 33: ...n the left and right sides of the HD display base until it is level with the side level line red line shown in Figure 6 5 ensure that the distance between the side surface level and the floor is 630 mm HUAWEI TP3106 TP3118S TP3118 Telepresence Installation Guide 6 Installing the Racks Issue 07 2013 11 08 Huawei Proprietary and Confidential Copyright Huawei Technologies Co Ltd 28 ...

Страница 34: ...en the left rack and the rear wall is the same as the distance between the right rack and the rear wall l The side surface level of each rack is 630 mm above the floor Figure 6 6 shows the racks after installation HUAWEI TP3106 TP3118S TP3118 Telepresence Installation Guide 6 Installing the Racks Issue 07 2013 11 08 Huawei Proprietary and Confidential Copyright Huawei Technologies Co Ltd 29 ...

Страница 35: ...6 6 Racks after installation HUAWEI TP3106 TP3118S TP3118 Telepresence Installation Guide 6 Installing the Racks Issue 07 2013 11 08 Huawei Proprietary and Confidential Copyright Huawei Technologies Co Ltd 30 ...

Страница 36: ...D displays liquid crystal displays to display video and presentations 7 1 Parts List 7 2 Installation Procedure HUAWEI TP3106 TP3118S TP3118 Telepresence Installation Guide 7 Installing the HD Displays Issue 07 2013 11 08 Huawei Proprietary and Confidential Copyright Huawei Technologies Co Ltd 31 ...

Страница 37: ...llation l To prevent the screens from being scratched clear the installation site and ensure that there are no obstacles or sharp objects around the HD displays l Two persons are required to lift and move the HD displays When lifting and moving the HD displays stand in front of the screen with one hand supporting the base and the other hand holding the top of the HD display To prevent injury do no...

Страница 38: ... 1 Figure 7 1 Attaching brackets l For the TH 65PF20C HD display align mounting hole 2 with the hole at the rear of the HD display and secure with a screw in mounting hole 2 tightened using an H3 Allen wrench Step 2 Mount the center HD display onto the center rack as shown in Figure 7 2 HUAWEI TP3106 TP3118S TP3118 Telepresence Installation Guide 7 Installing the HD Displays Issue 07 2013 11 08 Hu...

Страница 39: ...splay l Fine tune the pitch angle of the center HD display to 90 degrees as shown in Figure 7 2 l Use a measuring tape to measure the distance between the HD display base and the floor as shown in Figure 6 4 Fine tune the HD display base if required to ensure that the distance is 630 mm as shown in Figure 6 5 l Use a spirit level to check the center HD display along axes X and Y as shown in Figure...

Страница 40: ...ht rack End Follow up Procedure After mounting the HD displays ensure that l No gaps exist between the HD displays l All the HD displays are on the same plane Figure 7 4 illustrates the HD displays after installation HUAWEI TP3106 TP3118S TP3118 Telepresence Installation Guide 7 Installing the HD Displays Issue 07 2013 11 08 Huawei Proprietary and Confidential Copyright Huawei Technologies Co Ltd ...

Страница 41: ... are required for both left most and right most top brackets Seven M6 x 16 countersunk screws are required for each of the center top brackets 1 Attach the six top brackets to the racks as shown in Figure 7 5 HUAWEI TP3106 TP3118S TP3118 Telepresence Installation Guide 7 Installing the HD Displays Issue 07 2013 11 08 Huawei Proprietary and Confidential Copyright Huawei Technologies Co Ltd 36 ...

Страница 42: ...racks The attachment method is the same for the left and right racks The following procedure uses the right rack as an example See Figure 7 6 HUAWEI TP3106 TP3118S TP3118 Telepresence Installation Guide 7 Installing the HD Displays Issue 07 2013 11 08 Huawei Proprietary and Confidential Copyright Huawei Technologies Co Ltd 37 ...

Страница 43: ...the four M6 x 16 countersunk screws to fix the connecting piece 3 Attach side connecting rods to the top and bottom of the left and right racks The attachment method is the same for the left and right racks The following procedure uses the right rack as an example See Figure 7 7 HUAWEI TP3106 TP3118S TP3118 Telepresence Installation Guide 7 Installing the HD Displays Issue 07 2013 11 08 Huawei Pro...

Страница 44: ...wdriver 4 Attach ladder stands to the outer side of the left and right racks The attachment method is the same for the left and right racks The following procedure uses the right rack as an example See Figure 7 8 HUAWEI TP3106 TP3118S TP3118 Telepresence Installation Guide 7 Installing the HD Displays Issue 07 2013 11 08 Huawei Proprietary and Confidential Copyright Huawei Technologies Co Ltd 39 ...

Страница 45: ...he ladder stand c Fasten the 12 M6 x 16 countersunk screws to fix the ladder stand using the rechargeable battery powered electric screwdriver 5 Mount the front brackets 6 Mount side mounting frames to the left and right ladder stands The mounting methods for the left and right racks are the same The following procedure uses the left rack as an example See Figure 7 9 HUAWEI TP3106 TP3118S TP3118 T...

Страница 46: ...ermost spacer b Mount the mounting frame with smaller openings to the rear side of the ladder stand Orient the screw bayonet toward the rack and fix it to the innermost spacer c Tighten all screws to complete HUAWEI TP3106 TP3118S TP3118 Telepresence Installation Guide 7 Installing the HD Displays Issue 07 2013 11 08 Huawei Proprietary and Confidential Copyright Huawei Technologies Co Ltd 41 ...

Страница 47: ... the fixture Step 2 Install the conference table stand Step 3 Install the tabletop displays Step 4 Install the tabletop Step 5 Install the cable troughs Step 6 Install the microphones Step 7 Install the multi functional sockets Step 8 Install the tabletop display buttons End 8 1 Parts List 8 2 Installing the Fixture 8 3 Installing the Multi Functional Conference Table Stand 8 4 Installing the Tabl...

Страница 48: ... 9 Installing the Tabletop Display Buttons 8 10 Checking the Multi Functional Conference Table After Installation HUAWEI TP3106 TP3118S TP3118 Telepresence Installation Guide 8 Installing the Front Row of the Multi Functional Conference Table Issue 07 2013 11 08 Huawei Proprietary and Confidential Copyright Huawei Technologies Co Ltd 43 ...

Страница 49: ...teel plate 1 9 Center steel plate 1 10 Right steel plate 1 11 Left steel frame 4 12 Center steel frame 2 13 Right steel frame 1 14 Tabletop display 1 15 Tabletop display left backboard 1 16 Tabletop display center backboard 1 17 Tabletop display right backboard 1 18 U shaped board 3 19 Side board 3 HUAWEI TP3106 TP3118S TP3118 Telepresence Installation Guide 8 Installing the Front Row of the Multi...

Страница 50: ... Securing tab 4 33 M6 x 16 screw Several 34 Spacer Several 35 Self tapping screw Several 36 M6 x 25 screw Several 37 Connecting rod 3 8 2 Installing the Fixture Context Before installing the multi functional conference table install the fixture to locate the table legs HUAWEI TP3106 TP3118S TP3118 Telepresence Installation Guide 8 Installing the Front Row of the Multi Functional Conference Table I...

Страница 51: ...ing installation l Ensure that the spacing between a table leg and its seat in the fixture is 2 8 mm l To prevent damage to the table legs do not drag or lift them forwards or backwards If required move the table legs to the left or right Procedure Step 1 Place the four table legs to the corresponding seats of the fixture with the edges of the table legs parallel to the those of the fixture as sho...

Страница 52: ... troughs 2 Place the table legs with one 90 degree corner in the center left and center right and orient the side with screw holes upwards and the 90 degree corners toward the HD displays Step 2 Install the center fan shaped steel plates as shown in Figure 8 4 HUAWEI TP3106 TP3118S TP3118 Telepresence Installation Guide 8 Installing the Front Row of the Multi Functional Conference Table Issue 07 2...

Страница 53: ...steel frame 1 Orient the grooves downwards with their back toward the HD displays and insert the steel frames into the slots in the steel plates 2 Align the screw holes 3 Secure the steel frame with five M6 x 16 countersunk screws Step 4 Attach the connecting rod to the left center and right center table legs HUAWEI TP3106 TP3118S TP3118 Telepresence Installation Guide 8 Installing the Front Row o...

Страница 54: ...ing the left and right steel plates Step 6 The installation method is the same for the left and right steel frames The following description uses the left steel frame as an example See Figure 8 8 HUAWEI TP3106 TP3118S TP3118 Telepresence Installation Guide 8 Installing the Front Row of the Multi Functional Conference Table Issue 07 2013 11 08 Huawei Proprietary and Confidential Copyright Huawei Te...

Страница 55: ...are in the correct positions If not move the table legs as required 5 Fully tighten all screws to secure the left and right steel frames Step 7 Attach the connecting rod to the left and left center table legs For details about the attaching method see Step 4 Step 8 Attach the connecting rod to the right and right center table legs For details about the attaching method see Step 4 End HUAWEI TP3106...

Страница 56: ...uttons Procedure Step 1 Using a Phillips screwdriver remove the securing tabs by loosening the four screws holding them in place as shown in Figure 8 9 Figure 8 9 Removing the securing tabs HUAWEI TP3106 TP3118S TP3118 Telepresence Installation Guide 8 Installing the Front Row of the Multi Functional Conference Table Issue 07 2013 11 08 Huawei Proprietary and Confidential Copyright Huawei Technolo...

Страница 57: ...wn in Figure 8 10 Figure 8 10 Removing the rear screws 2 Pull the frame snaps in the order 1 2 and 3 in the direction of 4 as shown in Figure 8 11 3 Open the screens in the direction of 5 4 Remove the frames in the direction of 6 HUAWEI TP3106 TP3118S TP3118 Telepresence Installation Guide 8 Installing the Front Row of the Multi Functional Conference Table Issue 07 2013 11 08 Huawei Proprietary an...

Страница 58: ...d tabletop segments to ensure that the grain of the tabletop display backboards matches that of the tabletop Step 3 Mount the tabletop display backboards as shown in Figure 8 12 HUAWEI TP3106 TP3118S TP3118 Telepresence Installation Guide 8 Installing the Front Row of the Multi Functional Conference Table Issue 07 2013 11 08 Huawei Proprietary and Confidential Copyright Huawei Technologies Co Ltd ...

Страница 59: ...the backboard NOTE To remove the frames reverse the preceding procedure Step 4 Mount the screen frames 1 Place the top edge of the frames over those of the screens 2 Press the frame snaps in the order 1 2 and 3 to fasten the frames as shown in Figure 8 13 HUAWEI TP3106 TP3118S TP3118 Telepresence Installation Guide 8 Installing the Front Row of the Multi Functional Conference Table Issue 07 2013 1...

Страница 60: ...the five screws to their rear as shown in Figure 8 14 HUAWEI TP3106 TP3118S TP3118 Telepresence Installation Guide 8 Installing the Front Row of the Multi Functional Conference Table Issue 07 2013 11 08 Huawei Proprietary and Confidential Copyright Huawei Technologies Co Ltd 55 ...

Страница 61: ... tabletop displays as shown in Figure 8 15 Figure 8 15 Mounting the U shaped boards HUAWEI TP3106 TP3118S TP3118 Telepresence Installation Guide 8 Installing the Front Row of the Multi Functional Conference Table Issue 07 2013 11 08 Huawei Proprietary and Confidential Copyright Huawei Technologies Co Ltd 56 ...

Страница 62: ... Do not install any screws as shown in Figure 8 17 Figure 8 17 Installing the tabletop displays End Follow up Procedure Tighten the screws on the tabletop displays after the tabletop is installed For details about how to install the tabletop see 8 5 Installing the Tabletop HUAWEI TP3106 TP3118S TP3118 Telepresence Installation Guide 8 Installing the Front Row of the Multi Functional Conference Tab...

Страница 63: ...nts Procedure Step 1 Place the three tabletop segments onto the conference table stand Align the holes and secure the center tabletop segment with six ST6_3 x 40 self tapping screws as shown in Figure 8 18 Figure 8 18 Installing the center tabletop segment HUAWEI TP3106 TP3118S TP3118 Telepresence Installation Guide 8 Installing the Front Row of the Multi Functional Conference Table Issue 07 2013 ...

Страница 64: ...m to 10 mm 2 Gently hammer the joints between tabletop segments using a rubber mallet until the adjacent tabletop segments are on the same level Step 3 Secure the left and right tabletop segments with eight ST6_3 x 40 self tapping screws The method is the same for the left and right tabletop segments The following procedure uses the left tabletop segment as an example See Figure 8 20 HUAWEI TP3106...

Страница 65: ...w to install the tabletop displays see 8 4 Installing the Tabletop Displays When fixing the tabletop displays l Fix the center tabletop display first then the left and right tabletop displays l Do not exert excessive torque to the screws when using a rechargeable battery powered electric screwdriver to fasten them HUAWEI TP3106 TP3118S TP3118 Telepresence Installation Guide 8 Installing the Front ...

Страница 66: ...wise to raise the tabletop display Figure 8 21 Adjusting the tabletop display height 3 Adjust the gaps between the edges of the tabletop displays and the tabletop to ensure that the gaps around the edges other than the leading edge of the table top display mechanism furthest to conference participants are even and the gap around the leading edge is larger than the other gaps a Arrange one person t...

Страница 67: ...rew holes 2 Secure the center cable trough with four screws using a rechargeable battery powered electric screwdriver Step 2 Install the left and right cable troughs The installation method for the left and right cable troughs is the same The following procedure uses the left cable trough as an example 1 Align the screw holes HUAWEI TP3106 TP3118S TP3118 Telepresence Installation Guide 8 Installin...

Страница 68: ... 1 Remove the washer and one leather cushion and place the microphone in its installation location on the conference table Ensure that the straight edges of the microphone are parallel to the shorter edges of the corresponding tabletop display as shown in Figure 8 23 HUAWEI TP3106 TP3118S TP3118 Telepresence Installation Guide 8 Installing the Front Row of the Multi Functional Conference Table Iss...

Страница 69: ...kwise CAUTION Fully tighten the washer to ensure that the microphones sit properly on the tabletop Step 4 Connect the XLR cable HUAWEI TP3106 TP3118S TP3118 Telepresence Installation Guide 8 Installing the Front Row of the Multi Functional Conference Table Issue 07 2013 11 08 Huawei Proprietary and Confidential Copyright Huawei Technologies Co Ltd 64 ...

Страница 70: ...e Video Graphics Array VGA interface audio interface and network interface Procedure Step 1 Slide the two multi functional sockets separately to their installation locations Step 2 Secure the multi functional sockets with six ST3 x 40 self tapping screws as shown in Figure 8 25 HUAWEI TP3106 TP3118S TP3118 Telepresence Installation Guide 8 Installing the Front Row of the Multi Functional Conferenc...

Страница 71: ... displays and mute or unmute the local microphones Procedure Step 1 Connect the power cable to the tabletop display as shown in Figure 8 26 HUAWEI TP3106 TP3118S TP3118 Telepresence Installation Guide 8 Installing the Front Row of the Multi Functional Conference Table Issue 07 2013 11 08 Huawei Proprietary and Confidential Copyright Huawei Technologies Co Ltd 66 ...

Страница 72: ...stallation location as shown in Figure 8 27 Figure 8 27 Installing the tabletop display buttons End HUAWEI TP3106 TP3118S TP3118 Telepresence Installation Guide 8 Installing the Front Row of the Multi Functional Conference Table Issue 07 2013 11 08 Huawei Proprietary and Confidential Copyright Huawei Technologies Co Ltd 67 ...

Страница 73: ... 2 Installing the Fixture Step 2 The three tabletop segments are level and the gaps between adjacent tabletop segments are small and even For details see 8 5 Installing the Tabletop End Example Figure 8 28 shows the installed multi functional conference table Figure 8 28 Multi functional conference table HUAWEI TP3106 TP3118S TP3118 Telepresence Installation Guide 8 Installing the Front Row of the...

Страница 74: ...for the front row 9 1 Parts List 9 2 Installing the Multi Functional Conference Table Stand 9 3 Installing the Tabletop Displays 9 4 Installing the Tabletop 9 5 Install the Cable Troughs 9 6 Installing the Microphones 9 7 Installing the Multi Functional Sockets 9 8 Installing the Tabletop Display Buttons 9 9 Checking the Multi Functional Conference Table After Installation HUAWEI TP3106 TP3118S TP...

Страница 75: ...st and rightmost table legs table legs 1 and 7 are symmetric with each other On either leg all four corners are rounded with one grooved edge as shown in Figure 9 6 3 Steel plate 7 Steel plates 1 to 7 from left to right l The five center steel plates steel plates 2 to 6 are identical l The leftmost and rightmost steel plates steel plates 1 and 7 are symmetric with each other 4 Steel frame 6 All st...

Страница 76: ...ed with numbers They are numbered 1 to 6 from left to right 12 Front panel 10 13 Cable trough 6 All cable troughs are identical as shown in Figure 9 4 14 Microphone 10 15 XLR cable 10 16 Multi functional socket 3 17 Tabletop display button 6 18 M6 x 16 countersunk screw Seve ral 19 ST_3 x 40 self tapping screw Seve ral 20 M6 x 25 countersunk screw Seve ral 21 Spacer Seve ral HUAWEI TP3106 TP3118S ...

Страница 77: ... connecting rod 4 All the front connecting rods are identical as shown in Figure 9 2 6 Rear connecting rod 4 All the rear connecting rods are identical as shown in Figure 9 3 7 Tabletop display 4 All the tabletop displays are identical 8 Tabletop display backboard 4 The tabletop display backboards are identical in dimensions but the grain of the wood on each will vary to match that of the tabletop...

Страница 78: ...ve ral 19 ST_3 x 40 self tapping screw Seve ral 20 M6 x 25 countersunk screw Seve ral 21 Spacer Seve ral The following figures show some of the parts listed in Table 9 2 Figure 9 1 Steel frame Figure 9 2 Front connecting rod HUAWEI TP3106 TP3118S TP3118 Telepresence Installation Guide 9 Installing the Second Row of the Multi Functional Conference Table Issue 07 2013 11 08 Huawei Proprietary and Co...

Страница 79: ...enter table leg Figure 9 6 Right table leg HUAWEI TP3106 TP3118S TP3118 Telepresence Installation Guide 9 Installing the Second Row of the Multi Functional Conference Table Issue 07 2013 11 08 Huawei Proprietary and Confidential Copyright Huawei Technologies Co Ltd 74 ...

Страница 80: ...e center of front row center tabletop segment edge vertically down to the floor Step 2 Using the measuring tape draw a line parallel to by visual inspection the center tabletop segment edge from the point of intersection Step 3 Draw another 1542 36 mm line perpendicular to the center tabletop segment edge Place table leg 4 secured to its base along the line as shown in Figure 9 7 Figure 9 7 Instal...

Страница 81: ...ts base Then place table leg 5 to one of the appropriate locations Step 6 Mount steel plate 5 on table leg 5 For details see Step 4 Step 7 Mount steel frame 4 into the slots of steel plates 4 and 5 as show in Figure 9 9 Figure 9 9 Mounting steel frame 4 HUAWEI TP3106 TP3118S TP3118 Telepresence Installation Guide 9 Installing the Second Row of the Multi Functional Conference Table Issue 07 2013 11...

Страница 82: ... to table legs 4 and 5 as shown in Figure 9 10 Figure 9 10 Attaching the rear connecting rod 1 Orient the side with two screw holes upwards and align the bracket holes 2 Fasten the six M6 x 16 countersunk screws to fix the rear connecting rod Step 9 Attach the front connecting rod to table legs 4 and 5 as shown in Figure 9 11 HUAWEI TP3106 TP3118S TP3118 Telepresence Installation Guide 9 Installin...

Страница 83: ... rods to table legs 4 and 5 For details see Step 8 and Step 9 Step 14 Secure table legs 2 and 6 to their bases Place table legs 2 and 6 to their appropriate locations Then install the relevant components based on description in Step 6 through Step 9 Step 15 Secure table legs 1 and 7 to their bases Place table legs 1 and 7 to appropriate locations Then install the relevant components based on descr...

Страница 84: ...ing screws Step 5 Install tabletop segments 2 and 5 using methods described in Step 2 and Step 4 Step 6 Install tabletop segments 1 and 6 using methods described in Step 2 and Step 4 End Follow up Procedure Tighten the screws on the tabletop displays after the tabletop is installed For details see 8 4 Installing the Tabletop Displays 9 5 Install the Cable Troughs The second row of the multi functi...

Страница 85: ...fail to install the trough cover a conference table decorative part l For details about how to install the microphones for the first row of the multi functional conference table and the second row s four center tabletop segments see 8 7 Installing the Microphones l Ensure that the angle between the leftmost or rightmost microphone s straight edge and the adjacent tabletop display edge is 30 degree...

Страница 86: ...he multi functional conference table has six tabletop display buttons The installation method is the same as that for the front row of the multi functional conference table For details see 8 9 Installing the Tabletop Display Buttons 9 9 Checking the Multi Functional Conference Table After Installation After the multi functional conference table is installed verify the following HUAWEI TP3106 TP311...

Страница 87: ...Figure 9 13 shows the installed second row of the multi functional conference table Figure 9 13 Second row of the multi functional conference table HUAWEI TP3106 TP3118S TP3118 Telepresence Installation Guide 9 Installing the Second Row of the Multi Functional Conference Table Issue 07 2013 11 08 Huawei Proprietary and Confidential Copyright Huawei Technologies Co Ltd 82 ...

Страница 88: ... to mount the lower front panels of the racks 10 1 Parts List 10 2 Installation Procedure HUAWEI TP3106 TP3118S TP3118 Telepresence Installation Guide 10 Mounting Front Panel 1 Issue 07 2013 11 08 Huawei Proprietary and Confidential Copyright Huawei Technologies Co Ltd 83 ...

Страница 89: ...upper and side front panels after the telepresence devices are installed CAUTION When mounting the front panel fine tune the panel segments to ensure a level surface Procedure Step 1 Align the screw holes of the lower front panel segment center and those of the center rack and secure with four M6 x 16 countersunk screws Step 2 Align the screw holes of the lower front panel segment left and those o...

Страница 90: ...front panel segment center to the lower front panel segment right with two M6 x 25 countersunk screws and nuts Step 7 Fully tighten the four M6 x 16 countersunk screws in the lower front panel segment right as shown in Figure 10 1 Figure 10 1 Mounting the lower front panel End Result After the lower front panel is mounted verify that l The three segments are level with each other l No gaps or step...

Страница 91: ...amera 11 4 Installing the PDUs 11 5 Installing the Telepresence Host 11 6 Installing the Power Supply Controller 11 7 Installing the Network Switch 11 8 Installing the Wireless Router 11 9 Installing the Telepresence Codecs 11 10 Installing Active Speaker Systems HUAWEI TP3106 TP3118S TP3118 Telepresence Installation Guide 11 Installing Telepresence Devices Issue 07 2013 11 08 Huawei Proprietary a...

Страница 92: ...reless router 1 7 Telepresence codec 3 8 Speaker system Two speaker hosts and four speakers 9 Hanging corner Several 11 2 Installation Locations Figure 11 1 shows the rear view of the device placement NOTE Before installing the devices print Figure 11 1 for reference during installation HUAWEI TP3106 TP3118S TP3118 Telepresence Installation Guide 11 Installing Telepresence Devices Issue 07 2013 11...

Страница 93: ... Lens Camera Context Before installing the tri lens camera power it on and verify that its video can be transmitted to the HD displays that is the video captured by the tri lens camera can be viewed on the HD displays Figure 11 2 illustrates the tri lens camera HUAWEI TP3106 TP3118S TP3118 Telepresence Installation Guide 11 Installing Telepresence Devices Issue 07 2013 11 08 Huawei Proprietary and...

Страница 94: ...tall the camera spacer to the rack as shown in Figure 11 3 HUAWEI TP3106 TP3118S TP3118 Telepresence Installation Guide 11 Installing Telepresence Devices Issue 07 2013 11 08 Huawei Proprietary and Confidential Copyright Huawei Technologies Co Ltd 89 ...

Страница 95: ...e spacer Step 3 Align the screw holes Step 4 Fasten the four M6 x 16 countersunk screws to fix the tri lens camera as shown in Figure 11 4 HUAWEI TP3106 TP3118S TP3118 Telepresence Installation Guide 11 Installing Telepresence Devices Issue 07 2013 11 08 Huawei Proprietary and Confidential Copyright Huawei Technologies Co Ltd 90 ...

Страница 96: ...ower distribution units PDUs shown in Figure 11 5 must be installed to the racks Figure 11 5 PDUs HUAWEI TP3106 TP3118S TP3118 Telepresence Installation Guide 11 Installing Telepresence Devices Issue 07 2013 11 08 Huawei Proprietary and Confidential Copyright Huawei Technologies Co Ltd 91 ...

Страница 97: ...e telepresence host power it on and verify that you can log in to its Web interface using the default IP address 172 16 21 10 to configure its parameters Figure 11 6 shows the telepresence host Figure 11 6 Telepresence host Procedure Step 1 Install the securing tabs as shown in Figure 11 7 HUAWEI TP3106 TP3118S TP3118 Telepresence Installation Guide 11 Installing Telepresence Devices Issue 07 2013...

Страница 98: ... the audio processing board for the TP3106 l You need to install one audio processing board for both the TP3118 and TP3118S telepresence hosts 1 Loosen the screws in the baffle as shown in Figure 11 8 HUAWEI TP3106 TP3118S TP3118 Telepresence Installation Guide 11 Installing Telepresence Devices Issue 07 2013 11 08 Huawei Proprietary and Confidential Copyright Huawei Technologies Co Ltd 93 ...

Страница 99: ...11 9 Removing the baffle 3 Insert the audio processing board into the correct slot as shown in Figure 11 10 HUAWEI TP3106 TP3118S TP3118 Telepresence Installation Guide 11 Installing Telepresence Devices Issue 07 2013 11 08 Huawei Proprietary and Confidential Copyright Huawei Technologies Co Ltd 94 ...

Страница 100: ...ing board 4 Tighten screws as shown in Figure 11 11 HUAWEI TP3106 TP3118S TP3118 Telepresence Installation Guide 11 Installing Telepresence Devices Issue 07 2013 11 08 Huawei Proprietary and Confidential Copyright Huawei Technologies Co Ltd 95 ...

Страница 101: ...he audio processing board into place as shown in Figure 11 12 HUAWEI TP3106 TP3118S TP3118 Telepresence Installation Guide 11 Installing Telepresence Devices Issue 07 2013 11 08 Huawei Proprietary and Confidential Copyright Huawei Technologies Co Ltd 96 ...

Страница 102: ...for the TP3106 l You need to install one audio interface board for the TP3118S and two for the TP3118 1 Loosen the screws in the baffle as shown in Figure 11 13 HUAWEI TP3106 TP3118S TP3118 Telepresence Installation Guide 11 Installing Telepresence Devices Issue 07 2013 11 08 Huawei Proprietary and Confidential Copyright Huawei Technologies Co Ltd 97 ...

Страница 103: ...baffle 2 Remove the baffle as shown in Figure 11 14 HUAWEI TP3106 TP3118S TP3118 Telepresence Installation Guide 11 Installing Telepresence Devices Issue 07 2013 11 08 Huawei Proprietary and Confidential Copyright Huawei Technologies Co Ltd 98 ...

Страница 104: ...interface board into the correct slot as shown in Figure 11 15 HUAWEI TP3106 TP3118S TP3118 Telepresence Installation Guide 11 Installing Telepresence Devices Issue 07 2013 11 08 Huawei Proprietary and Confidential Copyright Huawei Technologies Co Ltd 99 ...

Страница 105: ...ce board 4 Tighten screws as shown in Figure 11 16 HUAWEI TP3106 TP3118S TP3118 Telepresence Installation Guide 11 Installing Telepresence Devices Issue 07 2013 11 08 Huawei Proprietary and Confidential Copyright Huawei Technologies Co Ltd 100 ...

Страница 106: ...he audio interface board into place as shown in Figure 11 17 HUAWEI TP3106 TP3118S TP3118 Telepresence Installation Guide 11 Installing Telepresence Devices Issue 07 2013 11 08 Huawei Proprietary and Confidential Copyright Huawei Technologies Co Ltd 101 ...

Страница 107: ... 1 Step 6 Tighten the screws to secure the telepresence host End 11 6 Installing the Power Supply Controller Context Figure 11 18 shows the power supply controller Figure 11 18 Power supply controller HUAWEI TP3106 TP3118S TP3118 Telepresence Installation Guide 11 Installing Telepresence Devices Issue 07 2013 11 08 Huawei Proprietary and Confidential Copyright Huawei Technologies Co Ltd 102 ...

Страница 108: ...nt the hanging corners to the ends of the rear panel Step 2 Place the network switch from the top down in the location shown in Figure 11 1 Step 3 Tighten the screws to secure the network switch End 11 8 Installing the Wireless Router Before installing the wireless router power it on and verify that you can log in to its Web interface using the default IP address 172 16 21 64 to configure its para...

Страница 109: ...ore installing them power them on and verify that their video can be transmitted to the HD displays that is the home screens of the telepresence codecs can be viewed on the HD displays Figure 11 22 shows the telepresence codec HUAWEI TP3106 TP3118S TP3118 Telepresence Installation Guide 11 Installing Telepresence Devices Issue 07 2013 11 08 Huawei Proprietary and Confidential Copyright Huawei Tech...

Страница 110: ... using a rechargeable battery powered electric screwdriver to secure the telepresence codecs End 11 10 Installing Active Speaker Systems Context The telepresence system has two active speaker systems each comprising one speaker host and one pair of speakers Figure 11 23 shows the active speaker system HUAWEI TP3106 TP3118S TP3118 Telepresence Installation Guide 11 Installing Telepresence Devices I...

Страница 111: ...host or speakers It is recommended that you set the output volume of the telepresence codecs to about 6 before starting the telepresence system Procedure Step 1 Locate the DIP switch enclosed in the red box shown in Figure 11 24 on the back of the main speaker HUAWEI TP3106 TP3118S TP3118 Telepresence Installation Guide 11 Installing Telepresence Devices Issue 07 2013 11 08 Huawei Proprietary and ...

Страница 112: ...ort as shown in Figure 11 25 Connect the delivered region specific power cable to the power port Figure 11 25 Power port Step 4 Place the two speaker chairs into the left and right racks Step 5 Align the front sides of the speaker hosts with the cooling holes of the rear panel and place the speaker hosts to the left and right speaker chairs respectively HUAWEI TP3106 TP3118S TP3118 Telepresence In...

Страница 113: ...e front sides of the speakers with the cooling holes of the corresponding front panel and attach the speaker bases to the double sided tape NOTE Place two speakers into the center rack and one into each of the left and right racks End HUAWEI TP3106 TP3118S TP3118 Telepresence Installation Guide 11 Installing Telepresence Devices Issue 07 2013 11 08 Huawei Proprietary and Confidential Copyright Hua...

Страница 114: ...o mount the racks upper and side front panels 12 1 Parts List 12 2 Installation Procedure HUAWEI TP3106 TP3118S TP3118 Telepresence Installation Guide 12 Mounting Front Panel 2 Issue 07 2013 11 08 Huawei Proprietary and Confidential Copyright Huawei Technologies Co Ltd 109 ...

Страница 115: ...untersunk screw Several 8 Nut Several 12 2 Installation Procedure Procedure Step 1 The installation method for the upper front panel and the lower front panel is the same For details see 10 2 Installation Procedure Step 2 The installation method for the left and right front panel segments is the same The following procedure uses the right front panel segment as an example See Figure 12 1 HUAWEI TP...

Страница 116: ...e right front panel segment to the lower front panel segment right 4 Fasten three M6 x 16 countersunk screws to secure the right front panel segment to the side mounting frame End Result After the lower front panel is mounted ensure that l All panel segments are level with each other HUAWEI TP3106 TP3118S TP3118 Telepresence Installation Guide 12 Mounting Front Panel 2 Issue 07 2013 11 08 Huawei P...

Страница 117: ...No gaps exist between the upper front panel lower front panel and HD displays HUAWEI TP3106 TP3118S TP3118 Telepresence Installation Guide 12 Mounting Front Panel 2 Issue 07 2013 11 08 Huawei Proprietary and Confidential Copyright Huawei Technologies Co Ltd 112 ...

Страница 118: ... to install the front panel decorative parts 13 1 Parts List 13 2 Installation Procedure HUAWEI TP3106 TP3118S TP3118 Telepresence Installation Guide 13 Installing the Front Panel Decorative Parts Issue 07 2013 11 08 Huawei Proprietary and Confidential Copyright Huawei Technologies Co Ltd 113 ...

Страница 119: ...le trough decorative part 2 13 2 Installation Procedure Context Install the front panel decorative parts after completing the installation of all telepresence devices including the telepresence host telepresence codec and network switch CAUTION For the second row of the multi functional conference table install a cable trough around the right table leg only HUAWEI TP3106 TP3118S TP3118 Telepresenc...

Страница 120: ...ugh 2 Place the decorative parts in the cable trough 3 Secure the decorative parts to the cable trough using two M6 x 25 countersunk screws as shown in Figure 13 2 HUAWEI TP3106 TP3118S TP3118 Telepresence Installation Guide 13 Installing the Front Panel Decorative Parts Issue 07 2013 11 08 Huawei Proprietary and Confidential Copyright Huawei Technologies Co Ltd 115 ...

Страница 121: ...Step 2 Install the center decorative part to the rack bottoms as shown in Figure 13 3 HUAWEI TP3106 TP3118S TP3118 Telepresence Installation Guide 13 Installing the Front Panel Decorative Parts Issue 07 2013 11 08 Huawei Proprietary and Confidential Copyright Huawei Technologies Co Ltd 116 ...

Страница 122: ...to secure the decorative parts Step 3 Install the left and right decorative parts to the bottom of the racks For details see Step 2 HUAWEI TP3106 TP3118S TP3118 Telepresence Installation Guide 13 Installing the Front Panel Decorative Parts Issue 07 2013 11 08 Huawei Proprietary and Confidential Copyright Huawei Technologies Co Ltd 117 ...

Страница 123: ... same The following procedure uses the right cable trough decorative part as an example See Figure 13 4 Figure 13 4 Installing the left cable trough decorative part End HUAWEI TP3106 TP3118S TP3118 Telepresence Installation Guide 13 Installing the Front Panel Decorative Parts Issue 07 2013 11 08 Huawei Proprietary and Confidential Copyright Huawei Technologies Co Ltd 118 ...

Страница 124: ...ribes how to install the rear panel 14 1 Parts List 14 2 Installation Procedure HUAWEI TP3106 TP3118S TP3118 Telepresence Installation Guide 14 Installing the Rear Panel Issue 07 2013 11 08 Huawei Proprietary and Confidential Copyright Huawei Technologies Co Ltd 119 ...

Страница 125: ...t Several 9 Hook and loop fastener 8 14 2 Installation Procedure Context Install the rear panel after the installation of all telepresence devices including the telepresence host and telepresence codecs The rear panel must be installed in the following order as shown in Figure 14 1 1 Leftmost and rightmost rear panel segments 2 Left center and right center rear panel segments 3 Five center rear pa...

Страница 126: ...he installation method for the leftmost and rightmost rear panel segments is the same The following procedure uses the rightmost rear panel segment as an example See Figure 14 2 HUAWEI TP3106 TP3118S TP3118 Telepresence Installation Guide 14 Installing the Rear Panel Issue 07 2013 11 08 Huawei Proprietary and Confidential Copyright Huawei Technologies Co Ltd 121 ...

Страница 127: ...as shown in Figure 14 2 2 Fasten the six M6 x 16 countersunk screws to secure the rightmost rear panel segment Step 2 The installation method for the left center and right center rear panel segments is the same The following procedure uses the right center rear panel segment as an example See Figure 14 3 HUAWEI TP3106 TP3118S TP3118 Telepresence Installation Guide 14 Installing the Rear Panel Issu...

Страница 128: ... M6 x 16 countersunk screws to secure the right center rear panel segment Step 3 Install the five center rear panel segments The following procedure uses the panel segment next to the right center rear panel segment as an example See Figure 14 4 HUAWEI TP3106 TP3118S TP3118 Telepresence Installation Guide 14 Installing the Rear Panel Issue 07 2013 11 08 Huawei Proprietary and Confidential Copyrigh...

Страница 129: ...using a rechargeable battery powered electric screwdriver Step 4 Attach the hook and loop fasteners to the seams between adjacent panel segments from the top down with the end of the hook and loop fastener level with the top of the panel segment as shown in Figure 14 5 HUAWEI TP3106 TP3118S TP3118 Telepresence Installation Guide 14 Installing the Rear Panel Issue 07 2013 11 08 Huawei Proprietary a...

Страница 130: ...tween adjacent panel segments are even and about 10 mm wide l The hook and loop fasteners are smooth without any folds HUAWEI TP3106 TP3118S TP3118 Telepresence Installation Guide 14 Installing the Rear Panel Issue 07 2013 11 08 Huawei Proprietary and Confidential Copyright Huawei Technologies Co Ltd 125 ...

Страница 131: ...e decorative parts The installation method is the same for the front row and the second row 15 1 Parts List 15 2 Installation Procedure HUAWEI TP3106 TP3118S TP3118 Telepresence Installation Guide 15 Installing the Multi Functional Conference Table Decorative Parts Issue 07 2013 11 08 Huawei Proprietary and Confidential Copyright Huawei Technologies Co Ltd 126 ...

Страница 132: ...ocedure Context Install the decorative parts after the installation cabling and commissioning of all devices on the multi functional conference table including the tabletop displays multi functional sockets and microphones has been completed The installation method is the same for the front row and the second row The following procedure uses the front row of the multi functional conference table a...

Страница 133: ...e outer table leg decorative part 1 Place the outer panel inside the right table leg 2 Align the screw holes 3 Secure the decorative part with two M6 x 25 countersunk screws on each edge Step 2 The method for installing the inner decorative parts to the left and right table legs is the same The following procedure uses the right table leg as an example See Figure 15 2 HUAWEI TP3106 TP3118S TP3118 ...

Страница 134: ...rews Step 3 Install the decorative parts on the front side of the center conference table as shown in Figure 15 3 HUAWEI TP3106 TP3118S TP3118 Telepresence Installation Guide 15 Installing the Multi Functional Conference Table Decorative Parts Issue 07 2013 11 08 Huawei Proprietary and Confidential Copyright Huawei Technologies Co Ltd 129 ...

Страница 135: ...hten 12 M6 x 16 countersunk screws into the holes on the front decorative panel left Step 5 Secure the front decorative panel left to the front decorative panel center with screws as shown in Figure 15 4 HUAWEI TP3106 TP3118S TP3118 Telepresence Installation Guide 15 Installing the Multi Functional Conference Table Decorative Parts Issue 07 2013 11 08 Huawei Proprietary and Confidential Copyright ...

Страница 136: ...corative panel left as shown in Figure 15 5 HUAWEI TP3106 TP3118S TP3118 Telepresence Installation Guide 15 Installing the Multi Functional Conference Table Decorative Parts Issue 07 2013 11 08 Huawei Proprietary and Confidential Copyright Huawei Technologies Co Ltd 131 ...

Страница 137: ...t conference table Step 8 Install the decorative parts on the rear side of the center conference table as shown in Figure 15 6 HUAWEI TP3106 TP3118S TP3118 Telepresence Installation Guide 15 Installing the Multi Functional Conference Table Decorative Parts Issue 07 2013 11 08 Huawei Proprietary and Confidential Copyright Huawei Technologies Co Ltd 132 ...

Страница 138: ...erence table as shown in Figure 15 7 Figure 15 7 Installing the rear decorative part left 1 Align the screw holes and partially tighten the 10 M6 x 25 countersunk screws on the rear panel left HUAWEI TP3106 TP3118S TP3118 Telepresence Installation Guide 15 Installing the Multi Functional Conference Table Decorative Parts Issue 07 2013 11 08 Huawei Proprietary and Confidential Copyright Huawei Tech...

Страница 139: ...ulti functional conference table after the decorative parts have been installed Figure 15 8 Multi functional conference table after the decorative parts have been installed HUAWEI TP3106 TP3118S TP3118 Telepresence Installation Guide 15 Installing the Multi Functional Conference Table Decorative Parts Issue 07 2013 11 08 Huawei Proprietary and Confidential Copyright Huawei Technologies Co Ltd 134 ...

Страница 140: ...s how to install the top cooling plates 16 1 Parts List 16 2 Installation Procedure HUAWEI TP3106 TP3118S TP3118 Telepresence Installation Guide 16 Installing the Top Cooling Plates Issue 07 2013 11 08 Huawei Proprietary and Confidential Copyright Huawei Technologies Co Ltd 135 ...

Страница 141: ...rew 22 16 2 Installation Procedure Context The cooling plates help cool the telepresence devices in the cabinet when they are operating Procedure Step 1 The installation method for the leftmost and rightmost cooling plates is the same The following procedure uses the rightmost cooling plate as an example See Figure 16 1 HUAWEI TP3106 TP3118S TP3118 Telepresence Installation Guide 16 Installing the...

Страница 142: ... installation method for the left center and right center cooling plates is the same The following procedure uses the right center cooling plate as an example See Figure 16 2 HUAWEI TP3106 TP3118S TP3118 Telepresence Installation Guide 16 Installing the Top Cooling Plates Issue 07 2013 11 08 Huawei Proprietary and Confidential Copyright Huawei Technologies Co Ltd 137 ...

Страница 143: ...he center cooling plates For details see Step 2 Step 4 Fine tune the cooling plates until using visual inspection the gaps between them are adjusted even Then fully tighten all screws End HUAWEI TP3106 TP3118S TP3118 Telepresence Installation Guide 16 Installing the Top Cooling Plates Issue 07 2013 11 08 Huawei Proprietary and Confidential Copyright Huawei Technologies Co Ltd 138 ...

Страница 144: ...s in multiple packing cases Each packing case contains sub packing cases Each sub packing case may contain multiple parts On a side surface of each packing case there is a label attached containing the following information l Names of parts contained inside l Serial number of each part l Packing case number which is the unpacking order Table 17 1 Center rack packing case Packi ng Case Num ber Sub ...

Страница 145: ...ack 1 TP3106 2 Vertical beam 2 3 Front bracket 4 Table 17 4 Fixture packing case Packi ng Case Num ber Sub Packing Case Numbe r Name Quantit y Remarks 4 1 Fixture 1 TP3106 Table 17 5 Table leg packing case Packi ng Case Num ber Sub Packing Case Numbe r Name Quantit y Remarks 5 1 Table leg 4 TP3106 HUAWEI TP3106 TP3118S TP3118 Telepresence Installation Guide 17 Parts List Sorted by Packing Case Iss...

Страница 146: ...emarks 6 1 Tabletop segments 3 TP3106 2 Tabletop display panel 9 Table 17 7 Front panel packing case Packi ng Case Num ber Sub Packin g Case Numb er Name Quantity Remarks 7 1 Front panel center 1 TP3106 2 Accessory and screw 1 HUAWEI TP3106 TP3118S TP3118 Telepresence Installation Guide 17 Parts List Sorted by Packing Case Issue 07 2013 11 08 Huawei Proprietary and Confidential Copyright Huawei Te...

Страница 147: ...Quantity Remarks 9 1 Multi functional conference table decorative part left and right 1 TP3106 2 Multi functional conference table decorative part center 1 Table 17 10 Multi functional conference table cable trough packing case Packi ng Case Num ber Sub Packin g Case Numb er Name Quantity Remarks 10 1 Left cable trough 1 TP3106 2 Right cable trough 1 HUAWEI TP3106 TP3118S TP3118 Telepresence Insta...

Страница 148: ...arks 12 1 Left and right rear panels 4 TP3106 2 Left and right font panels 2 Table 17 13 Second row steel frame packing case Packi ng Case Num ber Sub Packin g Case Numb er Name Quantity Remarks 13 1 Table leg 5 TP3118S 2 Multi functional conference table stand 4 TP3118S HUAWEI TP3106 TP3118S TP3118 Telepresence Installation Guide 17 Parts List Sorted by Packing Case Issue 07 2013 11 08 Huawei Pro...

Страница 149: ... Remarks 15 1 Multi functional conference table decorative part 4 TP3118S 2 Screws and accessories 1 TP3118S Table 17 16 Second row decorative part packing case Packi ng Case Num ber Sub Packin g Case Numb er Name Quantity Remarks 16 1 Multi functional conference table decorative part 2 TP3106 2 Accessories 1 HUAWEI TP3106 TP3118S TP3118 Telepresence Installation Guide 17 Parts List Sorted by Pack...

Страница 150: ...ntity Remarks 18 1 Tabletop segments 2 TP3106 2 Tabletop display panel 2 Table 17 19 Second row multi functional conference table packing case Packi ng Case Num ber Sub Packin g Case Numb er Name Quantity Remarks 19 1 Cable trough 1 TP3118S 2 Multi functional conference table decorative part 1 TP3118S HUAWEI TP3106 TP3118S TP3118 Telepresence Installation Guide 17 Parts List Sorted by Packing Case...

Страница 151: ...se Numb er Name Quantity Remarks 20 1 Cable trough 1 TP3106 2 Multi functional conference table decorative part 1 HUAWEI TP3106 TP3118S TP3118 Telepresence Installation Guide 17 Parts List Sorted by Packing Case Issue 07 2013 11 08 Huawei Proprietary and Confidential Copyright Huawei Technologies Co Ltd 146 ...

Страница 152: ...ew Thread specifications M6 Length 25 mm Used for securing the front panel rear panel and steel frames M6 x 60 countersunk screw Thread specifications M6 Length 60 mm Used for securing curved connecting rods to the racks ST_3 x 40 self tapping screw Length 40 mm Used for securing steel frames and tabletop segments HUAWEI TP3106 TP3118S TP3118 Telepresence Installation Guide 18 Screws and Accessori...

Отзывы: