5
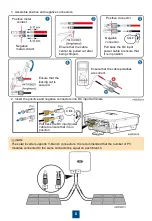
1. DC terminal connector model: straight male HH4CMD4TMS (Amphenol), straight female
HH4CFD4TMS (Amphenol).
2. Crimp the metal stamping forming contacts using crimping tool H4TC0003 (Amphenol,
recommended), H4TC0002 (Amphenol), PV-CZM-22100 (Staubli), or PV-CZM-19100 (Staubli).
When choosing PV-CZM-22100 or PV-CZM-19100, do not use the locator. Otherwise metal
contacts would be damaged.
3. Ensure that the PV module output side is well insulated to the ground.
4. The DC input voltage of the solar inverter must be lower than or equal to 600 V DC under any
circumstances.
5. Before installing the DC input power cables, label the cable polarities to ensure correct cable
connections.
6. Use the positive and negative metal terminals and DC connectors supplied with the solar inverter.
Using incompatible positive and negative metal terminals and DC connectors may result in
serious consequences. The caused device damage is not covered under any warranty.
7. If the DC input power cable is reversely connected, do not operate the DC switch as well as
positive and negative connectors immediately. Failing to do so may cause the device damage,
which is not covered under any warranty. Wait until the solar irradiance declines at night and the
PV string current reduces to below 0.5 A, and then turn off the DC switch and remove the positive
and negative connectors. Correct the string polarity before reconnecting the string to the solar
inverter.
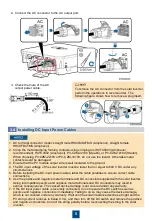
2. Connect the AC connector to the AC output port.
3. Check the route of the AC
output power cable.
To remove the AC connector from the solar inverter,
perform the operations in reverse order. The
following figure shows how to remove a plug insert.
Installing DC Input Power Cables
3.4
Содержание SmartACBox
Страница 23: ...22 ...

