FusionModule1000B Air-Cooled IT Solution
Maintenance Guide
6 Parts Replacement
Issue 02 (2017-01-10)
Huawei Proprietary and Confidential
Copyright © Huawei Technologies Co., Ltd.
79
Impact on the System
None
Preparations
Tools: Phillips screwdriver, ESD box or ESD bag
Materials: spare MDU
Documents required: documents delivered with the MDU
Skill requirement: power distribution system engineer
Procedure
Step 1
Remove the CAN and RS485_1 communications cables connected to the MDU, as shown in
Step 2
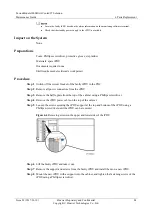
Remove the four screws fixing the MDU using a Phillips screwdriver, and set them aside, as
shown in
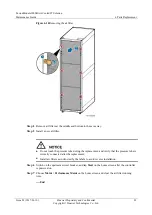
Figure 6-2
Removing the MDU
Step 3
Hold the MDU front panel by one hand, and push out the MDU from the fastener on the front
panel by the other hand.
Step 4
Align the new MDU with the mounting holes, snap the bottom of the new MDU into the
fastener on the front panel until you hear a slight
click
sound, and push the top of the MDU in
place.
Step 5
Secure the MDU using screws removed during
Step 6
Connect the CAN and RS485_1 communications cable to the MDU.


