15
a minimum.
•
Only use appliances which are in perfect
wor-king order.
•
Service and clean the appliance regularly.
•
Adapt your working style to suit the appliance.
•
Do not overload the appliance.
•
Have the appliance serviced whenever ne-
cessary.
•
Switch the appliance off when it is not in use.
Caution!
Residual risks
Even if you use this electric power tool in
accordance
with
instructions,
certain
resi-dual risks cannot be rules out. The
following hazards may arise in connection
with the equipment
’
s construction and
layout:
1. Lung damage if no suitable protective dust
mask is used.
2. Damage to hearing if no suitable ear
protec-tion is used.
5. Before starting the equipment
Before you connect the equipment to the mains
supply make sure that the data on the rating
plate are identical to the mains data.
Warning!
The maximum permissible system
impedance is
0.340
Ω
at the interface point of
the user
’
s supply. The manufactory should
declare it in the equipment instruction manual
and instruct the user to determine in
consultation with the supply authority, if
necessary, that the equipment is connected
only to a supply of that impedance or less.
Warning!
Always pull the power plug before making
adjustments to the equipment.
•
Unpack the bench-type circular saw and
check it for damage which may have occurred
in transit.
•
The machine has to be set up where it can
stand firmly, e.g. on a work bench, or it must be
bolted to a strong base.
•
All covers and safety devices have to be
pro-perly fitted before the machine is switched
on.
•
It must be possible for the saw blade to run
freely.
•
When working with wood that has been
pro-cessed before, watch out for foreign bodies
such as nails or screws etc.
•
Before you actuate the On/Off switch, make
sure that the saw blade is correctly fitted and
that the machine
’
s moving parts run smoothly.
6. Assembly
Danger! Pull out the power plug before
carry-ing out any maintenance, resetting or
assem-bly
work
on
the
cutting-o
ff
machine!
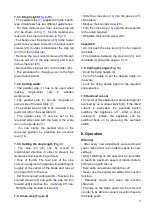
6.1 Assembling the base frame
(Fig.15/16/17)
•
Turn the saw upside down and place it on the
floor.
•
Use the washers
(c)
and the hex screws
(a)
to
fasten the 4 legs
(29)
loosely to the saw.
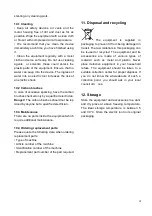
•
Now use the hex screws
(a)
, the washers
(c)
and the nuts
(d)
to fasten the longitudinal-struts
(31)
and the cross-struts
(30)
loosely to the legs.
Please note: The longer struts have to be used
on the sides.
•
Finally, tighten all screws and nuts on the
base frame.
•
Screw the additional legs
(A)
to the rear legs
(29)
so that they point towards the rear of the
machine
(Fig. 17).
•
Plug the rubber feet
(13)
onto the legs
(29)
.
•
Mount the tool hooks on the side of a front leg.
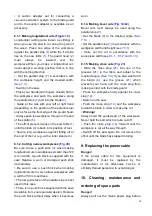
6.2 Fitting / removing the saw blade guard
(Fig. 3)
•
Mount the saw blade guard
(2)
on the splitter
(5)
so that the screw fits through the hole
(18)
in
the splitter.
•
Do not tighten the screw
(15)
too far
–
the
bla-de guard must be able to move freely.
•
To remove the saw blade guard, proceed in


