background image


THT32 


EN - 8

5 OPERATING 

INSTRUCTIONS 

5.1  DESCRIPTION OF THE MAIN INTERFACE 

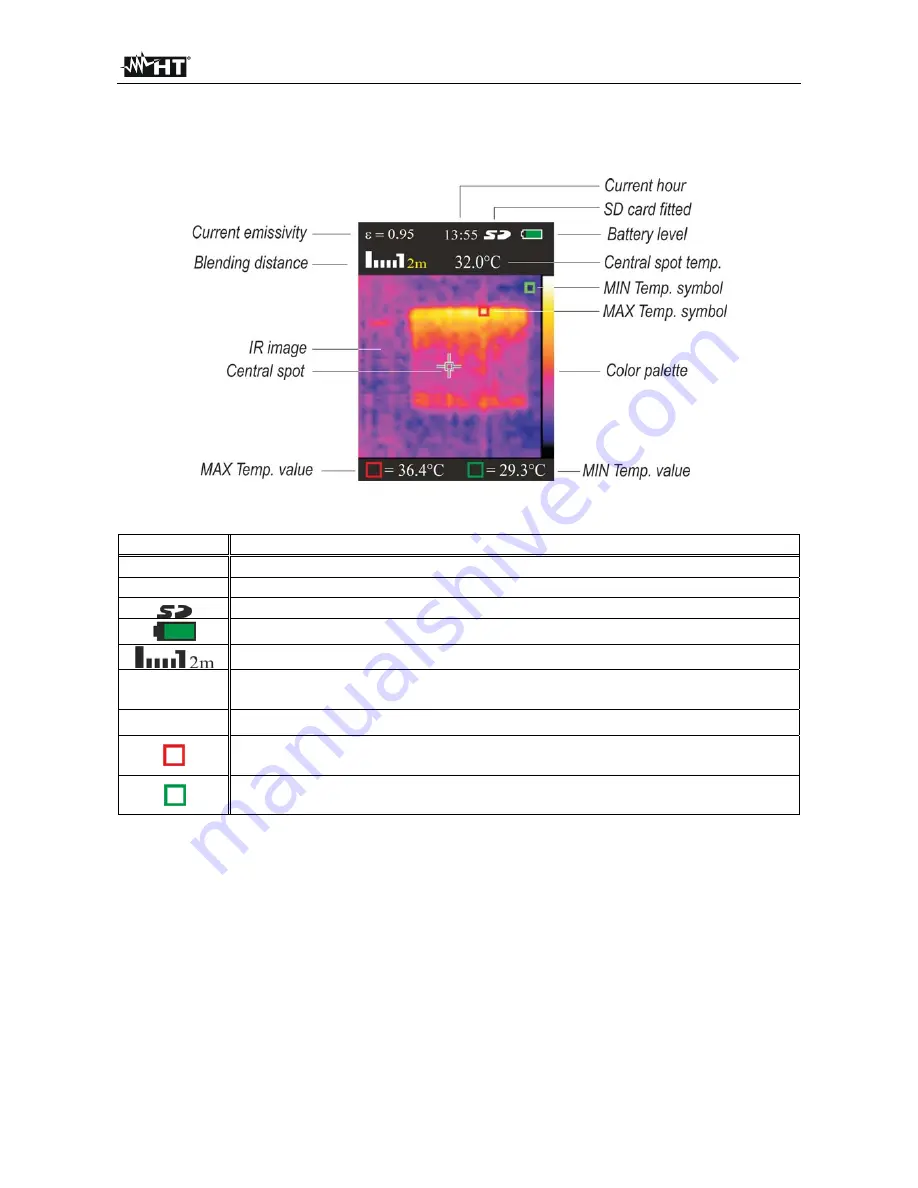
The instrument shows the following main interface on the display: 


Fig. 4: Main instrument interface 


The meaning of the symbols found on the display is described below. 


Symbol Description 

=0.95 

Set value of object emissivity (see § 5.2.1) 

13:55 

Indication of the system's current time 


Indication of fitted micro SD card 


Indication of battery charge level 


Indication of distance in 

Blending Fusion

” 

function (see § 5.1.1) 

32.0°C 

Indication of the temperature value associated with the central steady 
cursor 

Palette 

Indication of colour palette (see § 5.2.4) 


Cursor (red) associated with the Maximum temperature of the image on 
the display. 


Cursor (green) associated with the Minimum temperature of the image on 
the display. 


5.1.1  Adjusting the distance of the object in Blending Fusion function 

The instrument is provided with the 

Blending Fusion

” 

function, which allows aligning the 

infrared and the visual image. This function is therefore especially useful in the instant 
search of heat maps found on the surface of the framed object. Due to the different 
position of the lens and of the built-in photo camera, when the object is close to the lens, 
the visual image tends to become bigger, while the IR image tends to reduce. When the 
object is more than 2m far from the lens, this effect tends to disappear. The instrument 
allows setting the distance of the object in order to compensate the effect at distances 
shorter than 2m. Proceed as follows: 


1. Frame the object to be measured 
2.  Use the arrow keys 

 or 

 to adjust the infrared/visual image mixing percentage from 

0%

 to 

100%

 in steps of 

25%

3.  Use the arrow keys 

 or 

 to set the value of distance between lens and object. The 

following values are available: 

0.5m (1.6ft), 1m (3.3ft), 2m(6.6ft) 

and 

3m(9.8ft)


Содержание THT32

Страница 1: ...Copyright HT ITALIA 2016 Version EN 1 01 25 03 2016 ENGLISH User manual...

Страница 2: ...e of the object in Blending Fusion function 8 5 2 General menu description 9 5 2 1 Menu EMS 9 5 2 2 Menu UNIT 10 5 2 3 Menu MAXMIN 11 5 2 4 Menu PLT 11 5 2 5 Menu DATE 12 5 2 6 Menu MEMORY 13 5 2 7 Me...

Страница 3: ...t will guarantee safety standards They must be used only if in good conditions and replaced with identical models when necessary Check that the battery is correctly inserted Check that the LCD display...

Страница 4: ...g Fusion function 3 measuring cursors 6 standard colour palettes Automatic detection of hot cold spots of the image Storage of BMP images on external micro SD card IR sensor resolution 32x31pxl USB po...

Страница 5: ...ease contact the Dealer In case the instrument should be returned please follow the instructions given in 8 3 2 INSTRUMENT POWER SUPPLY The instrument is supplied by 1x3 7V rechargeable Li ION battery...

Страница 6: ...ENT Fig 1 Description of the instrument s front and backside CAPTION 1 LCD display 2 Function keys Menu Enter 3 Grip 4 In built visual photo camera 5 IR sensor 6 USB port for connecting AC adapter bat...

Страница 7: ...connecting AC adapter battery charger 7 Trigger key T 8 Battery compartment cover 9 Hole for tripod insertion Fig 3 Description of the instrument s inputs and outputs CAPTION 1 Inside of the battery...

Страница 8: ...Keys The arrow keys allow setting system parameters in the instrument s general menu and defining percentage and distance of the Blending Fusion function see The arrow keys also allow scrolling throu...

Страница 9: ...distance of the object in Blending Fusion function The instrument is provided with the Blending Fusion function which allows aligning the infrared and the visual image This function is therefore espec...

Страница 10: ...mit infrared radiation according to the kind of material the measured object is made of Table 1 shows the emissivity values for the most common materials Emissivity takes values between 0 mirror or pe...

Страница 11: ...enu key to go back to the instrument s main screen 5 2 2 Menu UNIT In this section it is possible to define the temperature measuring unit used by the instrument 1 Select the item UNIT with keys or an...

Страница 12: ...e display of MAX and MIN values on the display 3 Press the Menu key to confirm go back to the general menu and to the instrument s main screen 5 2 4 Menu PLT In this section it is possible to select t...

Страница 13: ...l selection 2 Use the or keys to select the options Date or Time and press the Enter key to confirm The following screen appears on the instrument s display Fig 11 System date time setting Configurati...

Страница 14: ...de 6 Press the Enter key to confirm deletion of the image 7 Press the Menu key to go back to the general menu and to the instrument s main screen 5 2 7 Menu BGT In this section it is possible to set t...

Страница 15: ...nd press the Enter key The screen appears on the display Fig 14 Setting of alarm thresholds on measurements 2 Use the or keys to select the options High or Low and press the Enter key to confirm The s...

Страница 16: ...confirm go back to the general menu and to the instrument s main screen 5 2 10 Menu DIST In this section it is possible to set the measurement unit of distance associated with the Blending Fusion func...

Страница 17: ...reen 5 2 12 Menu INFO In this section it is possible to read the general information of the instrument and the residual memory space of the fitted micro SD card 1 Select the item INFO with keys or and...

Страница 18: ...nstrument displays the temperature values associated with the measuring cursors 5 Use the trigger key T to freeze the image The following screen appears on the display Fig 19 Image saving 6 Press the...

Страница 19: ...environmental temperature and anyway in a range between 0 C and 50 C 32 F and 122 F When using the instrument for the first time recharge the battery for at least 6 hours 1 Connect the battery charge...

Страница 20: ...s on measurements MAX and MIN thresholds Memory micro SD card 4GB 6000 BMP images Max allowed micro SD card 16GB PC interface USB 2 0 Power supply Internal supply rechargeable Li ION battery 3 7V 1400...

Страница 21: ...sequence of improper packaging Repairs which may become necessary as a consequence of interventions performed by unauthorized personnel Modifications to the instrument performed without the manufactur...

Отзывы: