background image


THT8 


EN - 9

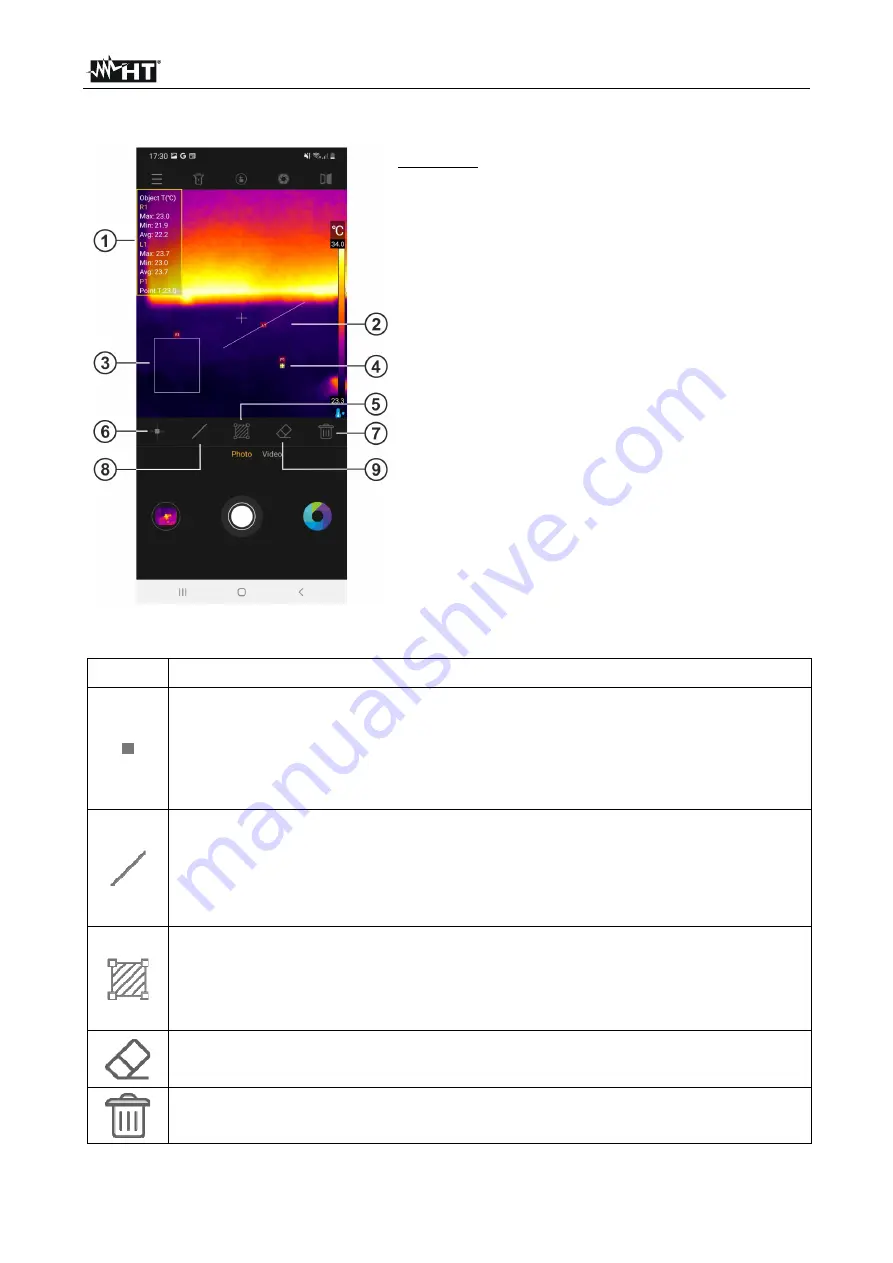
5.5  ADVANCED ANALYSIS SECTION 


CAPTION: 
1.  Object temperature information on image 
2.  Line on Image object 
3.  Area object on image 
4.  Point object on image 
5.  Manual instrument calibration 
6.  Added Point on image 
7.  Deleting all objects on the image 
8.  Adding Line on Image 
9.  Deletion of the last object on the image 
 

Fig. 7: Visualization of the advanced analysis section 


Icon Description 


Tap this icon to add a Measure Point (Px) on the image (

max 5 points) 

that 

can be dragged to each position. The message "Add point" appears for a 
moment. The temperature associated with the point is shown at the top of the 
screen (see Fig. 7 – part 1) and varies dynamically at displacement  


Tap this icon to add a Measurement Line (Lx) on the image (

max 4 lines)

 that 

can be edited and dragged to each position. The message "Add line" appears 
for a moment. The Min, Max and Average temperatures associated with the 
points of the line are shown at the top of the screen (see Fig. 7 – part 1) and 
vary dynamically with each movement 


Tap this icon to add a Measurement Area (Rx) on the image (

max 2 areas)


that can be edited and dragged to each position. The message "Add area" 
appears for a moment. The Min, Max and Average temperatures associated 
with the inner points of the area are shown at the top of the screen (see Fig. 7 
– part 1) and vary dynamically at displacement 


Tap this icon to delete 

the last

 object placed on the image 


Tap this icon to erase 

all

 objects placed on the image 

Содержание HN008000

Страница 1: ...Copyright HT ITALIA 2022 Release EN 1 00 03 05 2022 THT8 User manual...

Страница 2: ...description 4 5 2 Running the application 5 5 3 Main screen 6 5 4 General menu 7 5 5 Advanced Analysis Section 9 5 6 Color palettes 10 5 7 Saving images and videos 11 5 8 Edit images and creating repo...

Страница 3: ...ment stable during each measurement operation Do not use the instrument in environments with temperatures that exceed the limits specified in 7 1 1 in order not to damage it Do not point the instrumen...

Страница 4: ...to MP4 format USB C output for mobile device connection 3 PREPARATION FOR USE 3 1 INITIAL CHECKS The instrument before being shipped was checked electrically and mechanically All possible precautions...

Страница 5: ...Core A35 processor 2GB RAM or better HTSmartCamera APP also downloadable from link www ht instruments com download 5 1 GENERAL DESCRIPTION The HTSmartCamera APP allows the following features Real time...

Страница 6: ...al part indicating the unconnected thermal imaging camera is shown 3 Connect the THT8 thermal imaging camera to the mobile device via the USB C output see Fig 1 Part 1 The recognition of the instrumen...

Страница 7: ...is icon to turn on off your mobile device s flashlight Tap this icon to enter the advanced analysis section in order to add points lines or areas on the image see 5 5 Tap this icon to perform manual c...

Страница 8: ...general settings within the application The following options are available Set Language allows the selection of the language of the application from those available The Available system language opt...

Страница 9: ...section Temperature Settings allows you to select the display of the sliders associated with the temperature measurement of the hot point the cold point and the central cursor of the image see Fig 6 F...

Страница 10: ...7 part 1 and varies dynamically at displacement Tap this icon to add a Measurement Line Lx on the image max 4 lines that can be edited and dragged to each position The message Add line appears for a m...

Страница 11: ...te to associate with the IR image on your mobile device s display The following screen is shown Fig 8 Display of color palettes 2 Select by dragging the desired color palette from the 9 possible optio...

Страница 12: ...wn in Fig 9 left side 2 Tap on the Video option see Fig 3 part 14 to run IR videos and tap on the red middle icon to start the operation Tap again the central icon to finish and save the IR video The...

Страница 13: ...HT8 EN 12 Fig 10 Selection of images videos in the Gallery 6 Select the icons of the images videos you want to delete Tap on the icon to perform the operation or Cancel to return to the previous scree...

Страница 14: ...user Edit saved image 1 Enter the Gallery and select the desired image see 5 7 as shown in Fig 11 left side 2 Tap the icon to open the image editing section 3 Tap the icon to change the color palette...

Страница 15: ...tart the operation 3 Select a visible image from those available within the mobile device or take an instant snapshot of the framed object see Fig 12 central part 4 Insert any comment associated with...

Страница 16: ...THT8 EN 15 Fig 13 Visualization of PDF report...

Страница 17: ...pose directly to sunlight Always turn off the tool after use 6 2 CLEANING THE INSTRUMENT For cleaning the tool use a soft dry cloth Never use damp cloths solvents water etc 6 3 END OF LIFE CAUTION The...

Страница 18: ...PP Emissivity fixed 0 95 Advanced analytics central fixed cursor points 5 lines 4 areas 2 Hot Cold cursors Image format JPG snapshots IR Video Recording MP4 Format Interface to mobile devices USB C wi...

Страница 19: ...with incompatible equipment Repairs that are necessary due to inadequate packaging Repairs that are necessary due to interventions carried out by unauthorized personnel Changes made to the instrument...

Страница 20: ...OOD Phone 55 19 3367 8775 Fax 55 19 9979 11325 eMail vendas ht instruments com br Web www ht instruments com br HT INSTRUMENTS USA LLC 3145 Bordentown Avenue W3 08859 Parlin NJ USA Tel 1 719 421 9323...

Отзывы: