background image

EXB1 Recumbent Exercise Bike 


E&OE 

© 2017 HPF/Proflex 

Assembly 

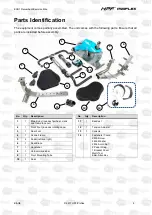
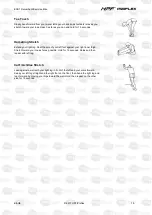
1.  Take all parts out of the carton and place them on a firm, flat surface. Remove all packing 

materials. Check that all parts have been supplied. Note that some parts, such as the feet, 
have the necessary fasteners pre-assembled – these will need to be removed during the 
assembly process. 

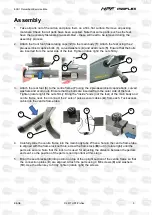
2.  Attach the front foot (has rotating caps) (

2

) to the main body (

1

). Attach the feet using the 2 

pre-assembled captive bolts (

3

), curved washers (

4

) and acorn nuts (

5

). Ensure that the bolts 

are inserted from the outer side of the feet. Tighten (rotate right) the nuts firmly. 


3.  Attach the rear foot (

6

) to the centre frame (

7

) using the 2 pre-assembled captive bolts, curved 

washers and acorn nuts. Ensure that the bolts are inserted from the outer side of the feet. 
Tighten (rotate right) the nuts firmly. Bring the "inside" ends (not the feet) of the main body and 
centre frame near, then connect the 2 sets of pulse sensor cables (

A

) from each. Tuck excess 

cable into the centre frame tube. 


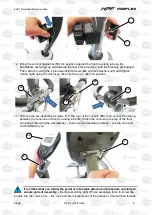
4.  Carefully slide the centre frame into the main body tube. When a hole in the centre frame tube 

is aligned with the frame lock nut hole, screw the frame lock (

B

) nut in (rotate right) until the 

parts are secure. Note that the lock nut is used for adjusting the distance between the pedals 
and seat, so the position of the parts is not important at this stage. 

5.  Bring the seat bracket (

8

) into position on top of the upright section of the centre frame so that 

the connection plates (

C

) are aligned. Attach the parts using 4 M8 screws (

9

) and washers 

(

10

). Use the Allen key to firmly tighten (rotate right) the screws. 

Содержание PROFLEX EXB1

Страница 1: ... vary from the image above READ THIS MANUAL CAREFULLY BEFORE USE FAILURE TO DO SO MAY RESULT IN INJURY PROPERTY DAMAGE AND MAY VOID WARRANTY KEEP THIS MANUAL FOR FUTURE REFERENCE Products covered by this manual may vary in appearance assembly inclusions specifications description and packaging ...

Страница 2: ...d Do not operate where aerosol spray products are in use or where adequate oxygen is not available Keep dry do not operate in wet or moist conditions Keep the unit on a solid level surface with a minimum safety area clearance of two meters around it Be sure the area around the equipment remains clear of any obstructions during use The equipment is for domestic household use only One person only sh...

Страница 3: ...rts Identification 4 Assembly 5 Operation 11 Console and Functions 11 Setting a Pre Set Session Time Distance Calorie Pulse 12 Adjusting Resistance 12 Care Maintenance and Troubleshooting 13 Cleaning 13 Storage 13 Troubleshooting 13 Specifications 13 Warm Up and Cool Down Routine 14 ...

Страница 4: ...ption 1 1 Main Body includes flywheel crank and frame lock nut 11 1 Backrest 2 1 Front Foot includes rotating caps 12 1 Tension Adjuster 3 1 Rear Foot 13 1 Console 4 1 Centre Frame 14 1 Fasteners Tools 2 M6 Screw 2 M6 Washer 2 M6 Acorn Nut 2 Pedal Strap 1 Bracket Cover Multi Tool 6mm Allen Key 5 2 Pedal left and right 6 1 Seat Brace 7 1 Handlebar 8 1 Vertical Handlebar 9 1 Front Mounting Tube 10 1...

Страница 5: ...acorn nuts Ensure that the bolts are inserted from the outer side of the feet Tighten rotate right the nuts firmly Bring the inside ends not the feet of the main body and centre frame near then connect the 2 sets of pulse sensor cables A from each Tuck excess cable into the centre frame tube 4 Carefully slide the centre frame into the main body tube When a hole in the centre frame tube is aligned ...

Страница 6: ...ing up Attach it using the 2 pre assembled screws acorn nuts and washers with the screws inserted from the underside of the seat bracket Use the spanner to firmly tighten rotate right the nuts When the handlebar is installed connect the pulse sensor cables from the handlebar to the cables in the seat bracket in any order then tuck the excess cable into the handlebar seat bracket tubing 8 Pull the ...

Страница 7: ...ensioning knob in the 1 position the tension cable will be at its longest at this setting to the cable connection bracket D protruding from the front mounting tube The ball F on the end of the centre brace tensioning cable must sit in the hook G in the connection bracket on the end of the main body tensioning cable Once the cable end is hooked into position pull the cable collar H up and over the ...

Страница 8: ...position 13 Remove the pre assembled screws from the rear of the console 23 then connect the wiring between the console and front mounting tube K Attach the console to the top of the front mounting tube using the 2 screws L there are two possible positions use the one most comfortable for you It is critical that you follow the pedal arm to crank attachment procedure carefully to ensure correct ass...

Страница 9: ...otate right clockwise to tighten and an R M on the end of the pedal bolt thread and on the underside of the pedal 15 Very carefully begin screwing the pedal bolt into the crank arm N rotate right clockwise If the pedal bolt does not feel right when being screwed in STOP immediately and check that it is the correct pedal and that it is aligned properly with the crank arm Firmly tighten rotate clock...

Страница 10: ...e of the pedal near the crank arm Attach the other end of the strap using a slot that is suitable for your foot When correctly assembled the machine should resemble the image below and is ready for use Moving The unit can be tilted onto its front foot rotating caps for easy moving and storage Firmly grasp the vertical handlebar with both hands Next carefully tilt the equipment forward until it rol...

Страница 11: ...ress to switch between available functions The current function is displayed at the bottom of the display DIST When in setting mode program a target distance range 0 to 999 9 km When exercising shows the current distance travelled for the session CAL When in setting mode program a target calorie amount range 10 to 9999 cal When exercising shows the current calories used for the session ODO When ex...

Страница 12: ...s MODE as required until the required function name is shown at the bottom of the display distance calories pulse or time 2 Press SET to enter setting mode and apply a target value Press again to increase the value or hold down to more quickly increase the target value 3 Press MODE to step to the next function you want to set a target value for then use SET to enter the value and so on Repeat this...

Страница 13: ...uids Keep the equipment especially the display console out of direct sunlight to prevent damage to the screen Storage Store the equipment in a clean and dry indoor environment Never leave or use the unit outdoors Troubleshooting The following information may assist in identifying a problem and rectifying it Problem Potential Reason Correction Console not working A Batteries no longer serviceable B...

Страница 14: ...t for one second you should feel a stretching sensation up the left side of your neck Then rotate your head back for one second stretching your chin to the ceiling and letting your mouth open Rotate your head to the left for one second then drop your head to your chest for one second Shoulder Lift Lift your right shoulder toward your ear for one second Then lift your left shoulder up for one secon...

Страница 15: ...eg Rest the sole of your left foot against your right inner thigh Stretch toward your toe as far as possible Hold for 15 seconds Relax and then repeat with left leg Calf Achilles Stretch Lean against a wall with your right leg in front of the left and your arms forward Keep your left leg straight and the right foot on the floor then bend the right leg and lean forward by moving your hips toward th...

Страница 16: ...ecific application or your description of the application Be sure to attain third party approval for your application from a qualified specialist before use regardless of prior assurances by the retailer or its representatives This product is not intended for use where fail safe operation is required As with any product take an automobile aircraft computer or ball point pen for example there is al...

Отзывы: