


EXB1 Recumbent Exercise Bike
E&OE
© 2017 HPF/Proflex
6
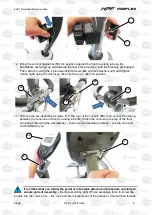
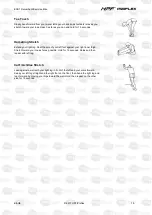
6. Bring the seat (
11
), pointed end facing forward, into position on the seat bracket, and attach it
from underneath using the 4 pre-assembled screws and washers. Bring the backrest (
12
) into
position against the back of the seat bracket, and attach it from the rear using the 4 pre-
assembled screws and washers. Use the Allen key to firmly tighten (rotate right) all screws.
7. Bring the handlebar (with pulse sensors) (
13
) into position at the rear of the seat bracket so
that the arms are facing forward and the sensors facing up. Attach it using the 2 pre-
assembled screws, acorn nuts and washers, with the screws inserted from the underside of
the seat bracket. Use the spanner to firmly tighten (rotate right) the nuts. When the handlebar
is installed, connect the pulse sensor cables from the handlebar to the cables in the seat
bracket (in any order), then tuck the excess cable into the handlebar/seat bracket tubing.
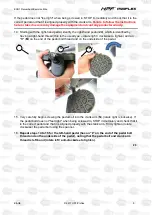
8. Pull the cable connection bracket (
D
) and wiring from the main body tube (where the front
mounting tube is to attach). Ensure that the cable connection bracket and wiring remains in
position by itself and does not slip back inside the tube. Then, carefully slide the front
mounting tube (
14
) over the main body tube – ensure that the front mounting tube slot (
E
) is
8
9
10
C
11
12
13


