background image

Using Disk Defragmenter .................................................................................................................. 15
Using Disk Cleanup ............................................................................................................................ 15
Using HP 3D DriveGuard (select products only) ................................................................................ 15

Identifying HP 3D DriveGuard status .............................................................................. 16

Updating programs and drivers ..........................................................................................................................  16
Cleaning your Sprout ...........................................................................................................................................  16

Cleaning procedures .......................................................................................................................... 16

Cleaning the display ........................................................................................................ 17
Cleaning the sides or cover ............................................................................................. 17
Cleaning the touch mat ................................................................................................... 17
Cleaning the keyboard or mouse .................................................................................... 17

5  Security ......................................................................................................................................................  18

Protecting the computer .....................................................................................................................................  18
Using passwords .................................................................................................................................................. 18

Setting passwords in Windows .........................................................................................................  19
Setting passwords in Computer Setup .............................................................................................  20
Managing a BIOS administrator password ........................................................................................ 20

Entering a BIOS administrator password .......................................................................  22

Using DriveLock Security Options .....................................................................................................  22

Selecting Automatic DriveLock (select products only) ................................................... 22

Enabling Automatic DriveLock .....................................................................  22
Disabling Automatic DriveLock ....................................................................  23
Entering an Automatic DriveLock password ................................................  23

Selecting manual DriveLock ...........................................................................................  23

Setting a DriveLock master password .........................................................  24

Enabling DriveLock and setting a DriveLock user password .........................................  24
Disabling DriveLock ........................................................................................................  25
Entering a DriveLock password ......................................................................................  25
Changing a DriveLock password ..................................................................................... 25

Using Windows Hello (select products only) .......................................................................................................  26
Using antivirus software ...................................................................................................................................... 26
Using firewall software ........................................................................................................................................ 26
Installing software updates ................................................................................................................................. 27
Using HP Client Security (select products only) ..................................................................................................  27
Using HP Touchpoint Manager (select products only) ........................................................................................  27
Using an optional security cable (select products only) .....................................................................................  27
Using a fingerprint reader (select products only) ...............................................................................................  28

Locating the fingerprint reader ......................................................................................................... 28

iv

Содержание Sprout

Страница 1: ...User Guide ...

Страница 2: ...s may require upgraded and or separately purchased hardware drivers software or BIOS update to take full advantage of Windows functionality Windows 10 is automatically updated which is always enabled ISP fees may apply and additional requirements may apply over time for updates Go to http www microsoft com for details To access the latest user guide go to http www hp com support and select your co...

Страница 3: ...9 Using HP Mobile Connect Pro select products only 10 Using GPS select products only 10 Using Bluetooth wireless devices select products only 10 Connecting Bluetooth devices 10 Connecting to a wired network 10 Connecting to a local area network LAN select products only 11 3 Managing power 12 User replaceable battery notices 12 Using power saving states 12 Initiating and exiting Sleep 12 Enabling a...

Страница 4: ...y Options 22 Selecting Automatic DriveLock select products only 22 Enabling Automatic DriveLock 22 Disabling Automatic DriveLock 23 Entering an Automatic DriveLock password 23 Selecting manual DriveLock 23 Setting a DriveLock master password 24 Enabling DriveLock and setting a DriveLock user password 24 Disabling DriveLock 25 Entering a DriveLock password 25 Changing a DriveLock password 25 Using ...

Страница 5: ...s 35 Creating HP Recovery media select products only 35 Using Windows tools 36 Restore and recovery 37 Recovering using HP Recovery Manager 37 What you need to know before you get started 37 Using the HP Recovery partition select products only 38 Using HP Recovery media to recover 38 Changing the computer boot order 39 Removing the HP Recovery partition select products only 40 9 Troubleshooting 41...

Страница 6: ... the touch mat is connected again 46 The touch mat is not registering touches 46 Audio problems 47 No sound is produced through external speakers purchased separately 47 Software problems 47 10 Specifications 48 Input power 48 Operating specifications 48 11 Electrostatic Discharge 49 12 More HP resources 50 13 Accessibility 52 Supported assistive technologies 52 Contacting support 52 Appendix A Sc...

Страница 7: ...onal HP resources Finding hardware and software information Locating hardware To find out what hardware is installed on your Sprout Type device manager in the taskbar search box and then select Device Manager A list displays all the devices installed on your Sprout Locating software To find out what software is installed on your immersive computer Select the Start button and then select All apps F...

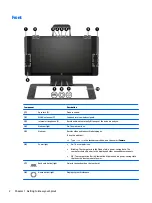
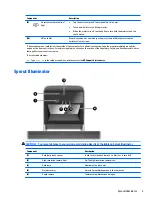
Страница 8: ... Type camera in the taskbar search box and then select Camera 6 Power light On The computer is on Blinking The computer is in the Sleep state a power saving state The computer shuts off power to the display and other unneeded components Off The computer is off or in Hibernation Hibernation is a power saving state that uses the least amount of power 7 Keyboard button light Projects the keyboard on ...

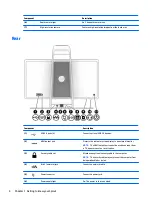
Страница 9: ...ons For wireless regulatory notices see the section of the Regulatory Safety and Environmental Notices that applies to your country or region To access this document Type support in the taskbar search box and then select the HP Support Assistant app Sprout Illuminator CAUTION To prevent damage to your vision avoid staring directly at the lights on Sprout Illuminator Component Description 1 Desk la...

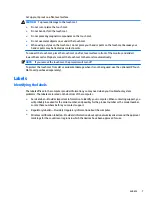
Страница 10: ...reen display to an external monitor NOTE The HDMI output port cannot be used as an input from a TV a game console or a set top box 3 Security cable slot Attaches an optional security cable to the computer NOTE The security cable may not prevent the computer from being mishandled or stolen 4 RJ 45 network jack Connects a network cable 5 Power connector Connects a power cord 6 Power supply light On ...

Страница 11: ...ed the hard drive NOTE For information about HP 3D Driveguard see Using HP 3D DriveGuard select products only on page 15 9 Memory card reader Reads optional memory cards SD SDHC and SDXC that store manage share or access information To insert a card 1 Hold the card label side up with the connectors facing the computer 2 Insert the card into the memory card reader and then press in on the card unti...

Страница 12: ...ss the button briefly to exit Hibernation CAUTION Pressing and holding down the power button will result in the loss of unsaved information If the computer has stopped responding and shutdown procedures are ineffective press and hold the power button down for at least 5 seconds to turn off the computer To learn more about your power settings see your power options 1 Type power options in the taskb...

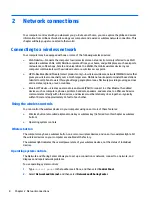
Страница 13: ...off To protect the touch mat from dirt or accidental damage when it is not being used use the optional HP Touch Mat Cover purchased separately Labels Identifying the labels The labels affixed to the computer provide information you may need when you troubleshoot system problems The labels are located on the bottom of the computer Service label Provides important information to identify your comput...

Страница 14: ...even countries Bluetooth device Creates a personal area network PAN to connect to other Bluetooth enabled devices such as computers phones printers headsets speakers and cameras In a PAN each device communicates directly with other devices and devices must be relatively close together typically within 10 meters approximately 33 feet of each other Using the wireless controls You can control the wir...

Страница 15: ...n WLAN implementation router manufacturer and interference from other electronic devices or structural barriers such as walls and floors Using HP Mobile Broadband select products only Your HP Mobile Broadband computer has built in support for mobile broadband service Your new computer when used with a mobile operator s network gives you the freedom to connect to the Internet send e mail or connect...

Страница 16: ...ications that replace the physical cable connections that traditionally link electronic devices such as the following Computers desktop notebook Phones cellular cordless smartphone Imaging devices printer camera Audio devices headset speakers Mouse External keyboard Connecting Bluetooth devices Before you can use a Bluetooth device you must establish a Bluetooth connection 1 Type bluetooth in the ...

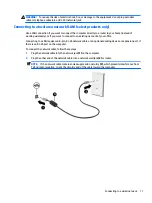
Страница 17: ...etwork at your office Connecting to a LAN requires an 8 pin RJ 45 network cable or an optional docking device or expansion port if there is no RJ 45 port on the computer To connect the network cable follow these steps 1 Plug the network cable into the network jack 1 on the computer 2 Plug the other end of the network cable into a network wall jack 2 or router NOTE If the network cable contains noi...

Страница 18: ...s of information do not initiate Sleep while reading from or writing to a disc or an external memory card NOTE You cannot initiate any type of networking connection or perform any computer functions while the computer is in the Sleep state Initiating and exiting Sleep With the computer on you can initiate Sleep in any of the following ways Briefly press the power button Select the Start button sel...

Страница 19: ...he mouse pointer over the power meter icon To use Power Options right click the power meter icon and then select an item from the list You can also type power options in the task bar search box and then select Power Options Different power meter icons indicate whether the computer is running on battery or external power The icon also reveals a message if the battery has reached a low or critical b...

Страница 20: ...rdware device to a port other than a USB or video port When Sprout will be unused and disconnected from external power for an extended period Although you can shut down Sprout with the power button the recommended procedure is to use the turn off command as follows NOTE If Sprout is in the Sleep state or in Hibernation you must first exit Sleep or Hibernation before shutdown is possible 1 Save you...

Страница 21: ... information access the Disk Defragmenter software Help Using Disk Cleanup Use Disk Cleanup to search the hard drive for unnecessary files that you can safely delete to free up disk space and help the computer run more efficiently To run Disk Cleanup 1 Type disk in the taskbar search box and then select Free up disk space by deleting unnecessary files or Uninstall apps to free up disk space 2 Foll...

Страница 22: ...grams and drivers In addition register to receive automatic notifications when updates become available If you would like to update your programs and drivers follow these instructions 1 Type support in the taskbar search box and then select the HP Support Assistant app or Click the question mark icon in the taskbar 2 Select My PC select the Updates tab and then select Check for updates and message...

Страница 23: ...osable wipe NOTE When cleaning the cover of Sprout use a circular motion to aid in removing dirt and debris Cleaning the touch mat CAUTION Do not spray or place the cleaner directly on the touch mat Gently wipe the surface of the touch mat using a soft lint free cloth moistened with an alcohol free glass cleaner To prevent damage to the touch mat avoid using strong chemicals Cleaning the keyboard ...

Страница 24: ...ed fingerprints or other authentication credential BIOS power on password Unauthorized access to Computer Setup BIOS BIOS administrator password in Computer Setup Unauthorized access to the contents of a hard drive DriveLock password select products only in Computer Setup Unauthorized startup from an optional external optical drive select products only optional external hard drive select products ...

Страница 25: ... Windows password for any other application or website Use the Password Manager feature of HP Client Security to store your user names and passwords for your websites and applications You can securely read them in the future if they cannot be remembered Do not store passwords in a file on the computer The following tables list commonly used Windows and BIOS administrator passwords and describe the...

Страница 26: ...swords see the following topics Managing a BIOS administrator password To set change or delete this password follow these steps Setting a new BIOS administrator password 1 Start Computer Setup Computers or tablets with keyboards Turn on or restart the computer and when the HP logo appears press f10 to enter Computer Setup Tablets without keyboards Turn off the tablet Press the power button in comb...

Страница 27: ... the computer restarts Deleting a BIOS administrator password 1 Start Computer Setup Computers or tablets with keyboards Turn on or restart the computer and when the HP logo appears press f10 to enter Computer Setup Tablets without keyboards Turn off the tablet Press the power button in combination with the volume down button until the Startup menu is displayed and then tap f10 to enter Computer S...

Страница 28: ...tomatic DriveLock is enabled a random DriveLock user password and a DriveLock master password derived from the BIOS administrator password are created When the computer is turned on the random user password automatically unlocks the drive If the drive is moved to another computer you must enter the BIOS administrator password for the original computer at the DriveLock password prompt to unlock the...

Страница 29: ...tructions or Select Main select Save Changes and Exit and then press enter Entering an Automatic DriveLock password While Automatic DriveLock is enabled and the drive remains attached to the original computer you will not be prompted to enter a DriveLock password to unlock the drive However if the drive is moved to another computer or the system board is replaced on the original computer you will ...

Страница 30: ... 1 Turn off the tablet 2 Press the power button in combination with the volume down button until the Startup menu is displayed and then tap f10 to enter Computer Setup 2 Select Security make the selection for Hard Drive Utilities select DriveLock Automatic DriveLock and then press enter 3 Select the hard drive you want to protect and then press enter 4 Select Set DriveLock Master Password and then...

Страница 31: ...tton in combination with the volume down button until the Startup menu is displayed and then tap f10 to enter Computer Setup 2 Select Security select Hard Drive Utilities select DriveLock Automatic DriveLock and then press enter 3 Select the hard drive you want to manage and then press enter 4 Select Disable DriveLock and then press enter 5 Follow the on screen instructions to disable DriveLock 6 ...

Страница 32: ...oll your fingerprint or facial ID NOTE The PIN is not limited in length but it must consist of numbers only No alphabetic or special characters are allowed Using antivirus software When you use the computer to access e mail a network or the Internet you potentially expose it to computer viruses Computer viruses can disable the operating system programs or utilities or cause them to function abnorm...

Страница 33: ...ect Windows Update and then follow the on screen instructions 3 To schedule a time for installing updates select Advanced Options and then follow the on screen instructions Using HP Client Security select products only HP Client Security software is preinstalled on your computer This software can be accessed through the HP Client Security icon at the far right of the taskbar or Windows Control Pan...

Страница 34: ...d Manager to store and fill in your user names and passwords in supported websites and applications Locating the fingerprint reader The fingerprint reader is a small metallic sensor that is located in one of the following areas of your computer Near the bottom of the TouchPad On the right side of the keyboard On the upper right side of the display On the left side of the display Depending on your ...

Страница 35: ...board arrow keys and then press enter or use a pointing device to select the item To scroll up and down select the up arrow or the down arrow in the upper right corner of the screen or use the up arrow key or the down arrow key on the keyboard To close open dialog boxes and return to the main Computer Setup screen press esc and then follow the on screen instructions To exit Computer Setup menus ch...

Страница 36: ...able on the HP website Most BIOS updates on the HP website are packaged in compressed files called SoftPaqs Some download packages contain a file named Readme txt which contains information regarding installing and troubleshooting the file Determining the BIOS version To decide whether you need to update Computer Setup BIOS first determine the BIOS version on your computer BIOS version information...

Страница 37: ...fter it has been downloaded to your hard drive b Follow the on screen instructions to download your selection to the hard drive Make a note of the path to the location on your hard drive where the BIOS update is downloaded You will need to access this path when you are ready to install the update NOTE If you connect your computer to a network consult the network administrator before installing any...

Страница 38: ...you change the TPM setting to Hidden TPM is not visible in the operating system To access TPM settings in Computer Setup 1 Start Computer Setup See Starting Computer Setup on page 29 2 Select Security select TPM Embedded Security and then follow the on screen instructions Using HP Sure Start select products only Select computer models are configured with HP Sure Start a technology that monitors th...

Страница 39: ...lowing order a Connected USB drive NOTE To download the HP PC Hardware Diagnostics UEFI tool to a USB drive see Downloading HP PC Hardware Diagnostics UEFI to a USB device on page 33 b Hard drive c BIOS 3 When the diagnostic tool opens select the type of diagnostic test you want to run and then follow the on screen instructions NOTE If you need to stop a diagnostic test press esc Downloading HP PC...

Страница 40: ...let HP automatically detect your product 4 Select your computer and then select your operating system 5 In the Diagnostic section follow the on screen instructions to select and download the UEFI version you want 34 Chapter 7 Using HP PC Hardware Diagnostics UEFI ...

Страница 41: ... the HP Recovery partition on the computer The backup can be used to reinstall the original operating system in cases where the hard drive is corrupted or has been replaced For information on creating recovery media see Creating HP Recovery media select products only on page 35 For information on the recovery options that are available using the recovery media see Using Windows tools on page 36 Us...

Страница 42: ...rately to create recovery discs If you use an external optical drive it must be connected directly to a USB port on the computer the drive cannot be connected to a USB port on an external device such as a USB hub If you cannot create DVD media yourself you can obtain recovery discs for your computer from HP See the Worldwide Telephone Numbers booklet included with the computer You can also find co...

Страница 43: ...o remove the recovery partition to reclaim hard drive space HP Recovery Manager offers the Remove Recovery Partition option For more information see Removing the HP Recovery partition select products only on page 40 Recovering using HP Recovery Manager HP Recovery Manager software allows you to recover the computer to its original factory state by using the HP Recovery media that you either create...

Страница 44: ...rking To start HP Recovery Manager from the HP Recovery partition IMPORTANT For a tablet with a detachable keyboard connect the keyboard to the keyboard dock before beginning these steps select products only 1 Type recovery in the taskbar search box select Recovery Manager and then select HP Recovery Environment or For computers or tablets with keyboards attached press f11 while the computer boots...

Страница 45: ...to the keyboard dock before beginning these steps 1 Insert the HP Recovery media 2 Access BIOS For computers or tablets with keyboards attached Turn on or restart the computer or tablet quickly press esc and then press f9 for boot options For tablets without keyboards Turn on or restart the tablet and then quickly hold down the volume down button then select f9 or Turn on or restart the tablet and...

Страница 46: ...overy partition So before you remove the Recovery partition create HP Recovery media see Creating HP Recovery media select products only on page 35 NOTE The Remove Recovery Partition option is only available on products that support this function Follow these steps to remove the HP Recovery partition 1 Type recovery in the taskbar search box and then select HP Recovery Manager 2 Select Remove Reco...

Страница 47: ...om the Network adapters list The listing for a WLAN device may include the term wireless wireless LAN WLAN or 802 11 If no WLAN device is listed either your Sprout does not have an integrated WLAN device or the driver for the WLAN device is not properly installed For more information about troubleshooting WLANs see the website links provided in Help and Support Cannot connect to a preferred networ...

Страница 48: ...f you have previously connected to that network follow the steps below to reconnect to the network 1 Right click the network status icon at the far right of the taskbar A list showing the available WLANs is displayed If you are in a hotspot where several WLANs are active several will be displayed 2 Right click the network and then select Properties NOTE If the network you want is not listed check ...

Страница 49: ...btaining a replacement power cord Hard drive error 1 Press the ctrl alt delete keys simultaneously 2 Select the Power icon in the lower right corner of the screen and then select Restart or Press and hold the power button on Sprout for 5 or more seconds to turn off Sprout and then press the power button to turn on Sprout 3 If Windows opens immediately back up all important information to an extern...

Страница 50: ...lect Control Panel 2 Select Appearance and Personalization 3 Under Display select Adjust Screen Resolution 4 Adjust resolution as necessary and then select Apply Keyboard and mouse problems Be sure that you are using the keyboard or mouse within range of the receiver Be sure that the mouse is not in Suspend mode which occurs after 20 minutes of inactivity Click the left mouse button to reactivate ...

Страница 51: ...hold the Connect button 3 for 5 to 10 seconds until the light on the mouse 2 lights up or stops flashing To confirm the connection move the mouse and check for a response on the screen Touch mat problems Projection remains when the touch mat is removed 1 Restart HPPCSERVICE Touch mat problems 45 ...

Страница 52: ...nnector that would interrupt the connection or Clean the touch mat and the connector with a cloth 3 Select the Power icon and then click Restart or Press and hold the power button on Sprout for 5 or more seconds to turn off Sprout and then press the power button to turn on Sprout The touch mat is not registering touches 1 If the touch mat workspace icon is amber touch the icon to enable the projec...

Страница 53: ...hen select Sound 3 When the Sound window opens select the Sounds tab Under Program Events select any sound event such as a beep or alarm and then select Test You should hear sound through the speakers To check the recording functions on your Sprout follow these steps 1 Type sound in the taskbar search box and then select Sound Recorder 2 Select Start Recording and speak into the microphone Save th...

Страница 54: ...mputer s ratings label located on the outside of the computer to determine the exact electrical rating Factor Metric U S Operating temperature 5 C to 35 C 41 F to 95 F Storage temperature 30 C to 65 C 22 F to 149 F Operating humidity 15 to 80 26 C 15 to 80 78 F Operating altitude 0 m to 2000 m 0 ft to 6561 ft Storage altitude 0 m to 4572 m 0 ft to 15 000 ft 48 Chapter 10 Specifications ...

Страница 55: ...puter damage to a drive or loss of information observe these precautions If removal or installation instructions direct you to unplug the computer first be sure that it is properly grounded Keep components in their electrostatic safe containers until you are ready to install them Avoid touching pins leads and circuitry Handle electronic components as little as possible Use nonmagnetic tools Before...

Страница 56: ...ort Assistant app 2 Select My computer and then select User guides or Go to http www hp com ergo Proper workstation setup Guidelines for posture and work habits that increase your comfort and decrease your risk of injury Electrical and mechanical safety information Regulatory Safety and Environmental Notices To access this document 1 Type support in the taskbar search box and then select the HP Su...

Страница 57: ...untries or regions HP may provide a printed warranty in the box For countries or regions where the warranty is not provided in printed format you can request a copy from http www hp com go orderdocuments For products purchased in Asia Pacific you can write to HP at POD PO Box 161 Kitchener Road Post Office Singapore 912006 Include your product name and your name phone number and postal address 51 ...

Страница 58: ... a particular assistive technology product contact customer support for that product Contacting support We are constantly refining the accessibility of our products and services and welcome feedback from users If you have an issue with a product or would like to tell us about accessibility features that have helped you please contact us at 1 888 259 5707 Monday through Friday 6 a m to 9 p m North ...

Страница 59: ...nts such as eye or muscle twitching Nausea Convulsions Loss of awareness Confusion Cramps Disorientation Resume Sprout usage only on approval of your physician Parents should monitor and ask their children if they have any of the above symptoms Children and teenagers may be more likely than adults to experience these symptoms The vision of young children especially children under the age of 6 is s...

Страница 60: ...nup software 15 Disk Defragmenter software 15 drive light 5 drive media 12 DriveLock description 23 disabling 25 enabling 24 DriveLock master password changing 25 DriveLock password changing 25 entering 25 setting 24 E electrical ratings 48 electrostatic discharge 49 F fingerprint reader 28 fingerprints registering 26 firewall software 26 G GPS 10 H HDMI port identifying 4 Hibernation exiting 12 i...

Страница 61: ...akeup 13 setup utility navigating and selecting 29 restoring factory settings 29 shutdown 14 Sleep exiting 12 initiating 12 slots memory card reader 5 software antivirus 26 Disk Cleanup 15 Disk Defragmenter 15 firewall 26 HP 3D DriveGuard 15 software updates installing 27 speakers identifying 2 specifications 48 Sprout Illuminator 3 supported discs recovery 36 Sure Start using 32 system recovery 3...

Страница 62: ...WWAN device 8 9 56 Index ...

Отзывы: