


Diagnostic tools 76
Field
Description
PCI Express Configuration
Use this screen to select options for PCI Express Devices.
Press
Enter
to access the related submenu.
USB Configuration
Displays the settings related to the USB function.
Press
Enter
to access the related submenu.
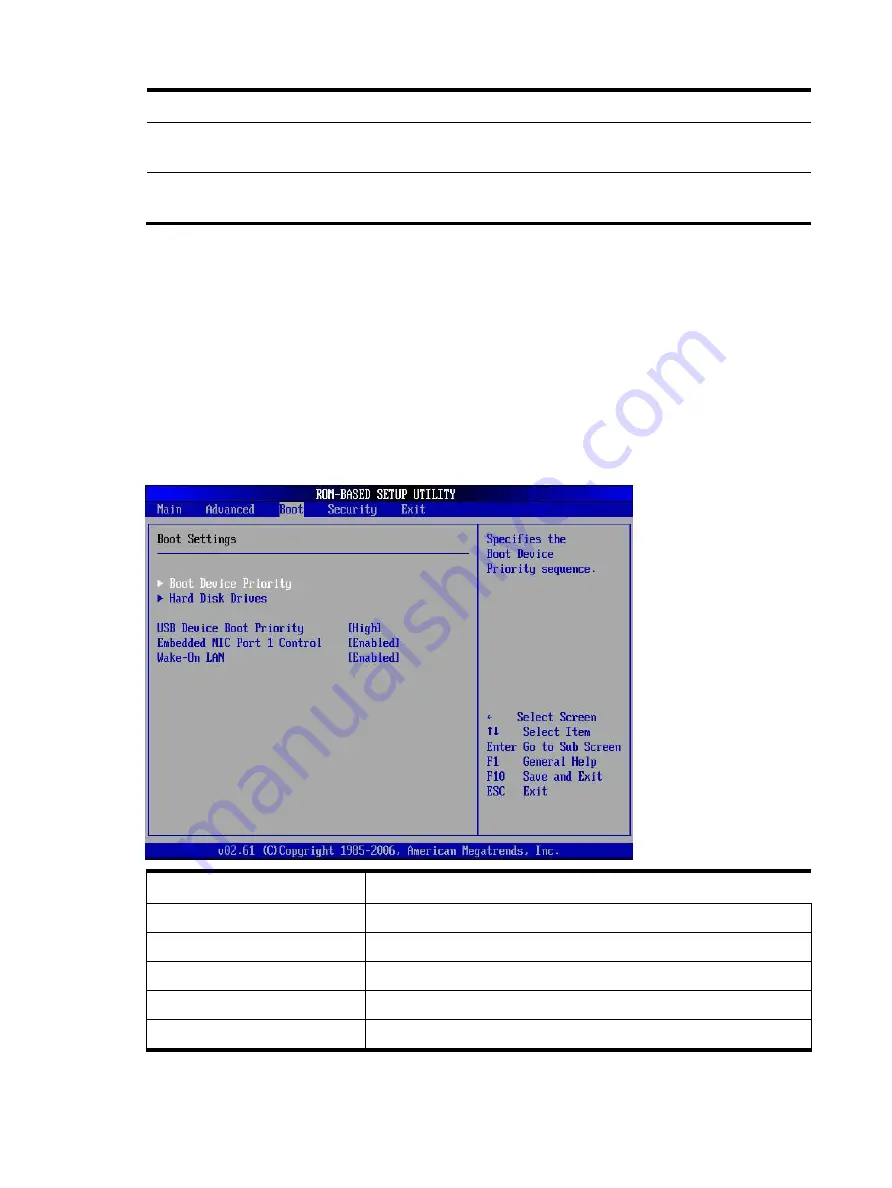
Boot menu
Use this menu to set the preferred drive sequence in which the Setup Utility attempts to boot the
operating system.
By default, the server searches for boot devices in the following order:
•
CD-ROM/DVD-ROM drive
•
Removable device
•
Hard drive
•
Embedded NIC
To implement the PXE boot option, you need to first set the
Embedded NIC Port1 Control
field to
Enabled
.
Field
Description
Boot Device Priority
Specifies the Boot Device Priority sequence
Hard Disk Drives
Specifies the Boot Device Priority sequence from available
USB Device Boot Priority
Control the listed USB functions by setting the item to the desired value.
Embedded NIC Port 1 Control
Disable and enable embedded NIC1
Wake-On LAN
Disabled and Enable the WOL function
Содержание ProLiant MicroServer
Страница 12: ...Customer self repair 12 ...
Страница 13: ...Customer self repair 13 ...
Страница 14: ...Customer self repair 14 ...
Страница 15: ...Customer self repair 15 ...
Страница 16: ...Illustrated parts catalog 16 Illustrated parts catalog Mechanical components ...
Страница 20: ...Illustrated parts catalog 20 ...
Страница 21: ...Illustrated parts catalog 21 System components ...
Страница 38: ...Removal and replacement procedures 38 6 Perform the post installation procedure ...
Страница 50: ...Removal and replacement procedures 50 5 Perform the post installation procedure ...
Страница 63: ...Diagnostic tools 63 iii Click Choose what the power buttons do iv Choose shut down and then choose apply ...
Страница 65: ...Diagnostic tools 65 3 Click Next 4 Select I accept the terms of the license agreement and click Next ...
Страница 66: ...Diagnostic tools 66 5 Click Browse to select folder and then click Next 6 Click Next ...
Страница 67: ...Diagnostic tools 67 7 Click Install 8 Click Finish ...
Страница 69: ...Diagnostic tools 69 11 Select if remember the passwords 12 Click in front of Physical Drive View ...
Страница 70: ...Diagnostic tools 70 13 Click options Enable or Disable to change Write cache and NCQ status ...


