2-14
Removal and Replacement
HP OmniBook 900
Removing the CPU Module
(HP Authorized Service Providers Only)
Required Equipment
•
Small Phillips screwdriver.
•
Small plastic blade for prying, such as an angled plastic tweezers (OmniBook 900† only).
•
Small flat-blade screwdriver: 4.0-4.5 mm blade (OmniBook 900B only).
Removal Procedure
Warning
Do not touch the heatsink until it has cooled. It could be hot if the computer was running recently.
1.
Unplug the ac adapter, if present, and remove the battery.
2.
Remove the keyboard (page 2-12)—but you don’t have to release the flex cables.
3.
Remove the eight screws (OmniBook 900†) or six screws and springs (OmniBook 900B) from
the heatsink and lift off the heatsink.
Caution
Do not spin the fan blade with your finger. Pressure on the fan blade can damage the bearings.
Caution: OmniBook 900†
Follow these precautions to prevent damage to the CPU connector:
•
Use only a non-metallic tool for releasing the CPU module. A metal tool may damage the
motherboard.
•
Do not raise the front end or the CPU module higher than the back end during removal.
To reinstall the CPU assembly, see the precautions under “Reassembly Notes.”
4.
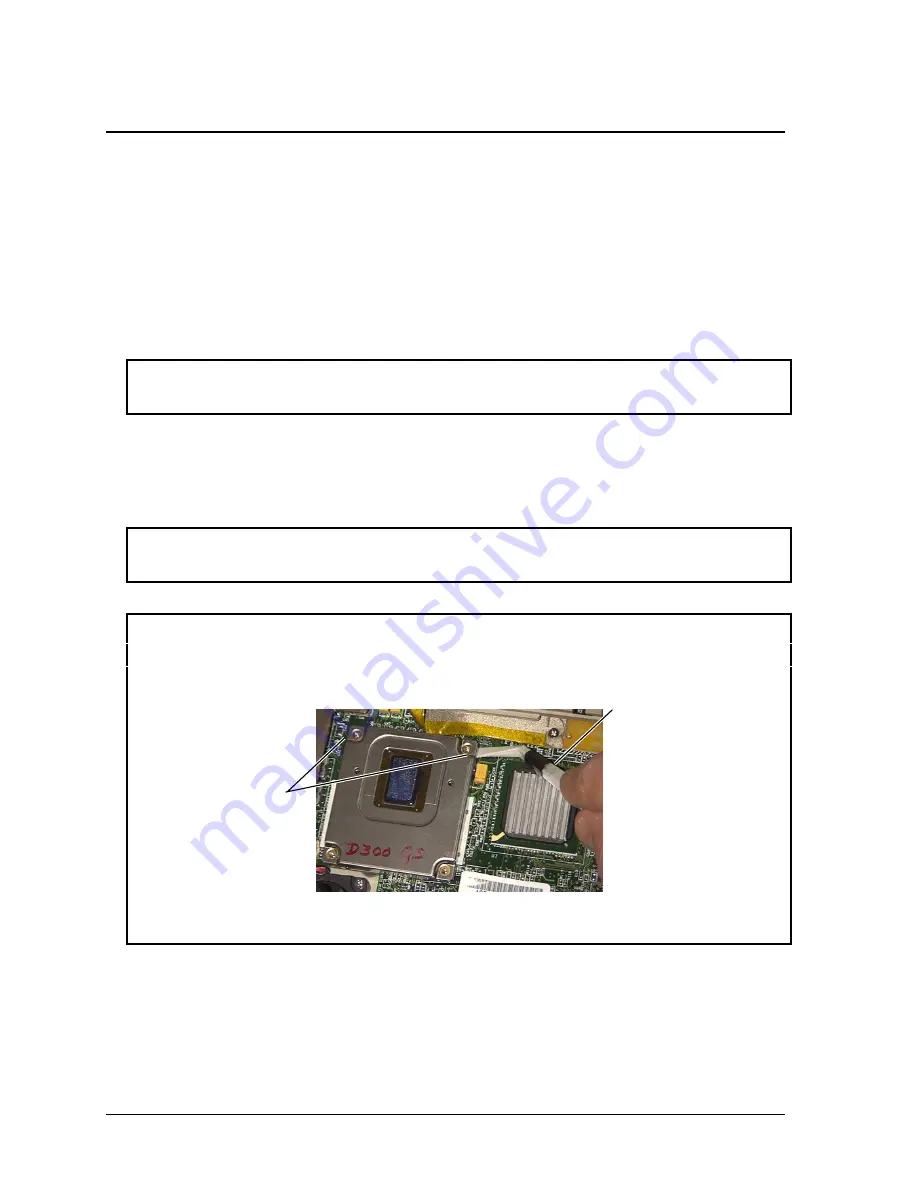
For an OmniBook 900†, to release the CPU module, at the side of the CPU module near the
back-right corner, pry up the corner of the CPU module about 1-2 mm. Then pry up the back-left
corner. Lift off the CPU module.
Pry up at these two
places.
Содержание HP OmniBook 900
Страница 1: ... HP OmniBook 900 Service Manual ...
Страница 78: ...4 2 Replaceable Parts HP OmniBook 900 Figure 4 1 Exploded View Display components see page 4 5 ...
Страница 90: ......
Страница 96: ......
Страница 97: ......


