background image

HP watermark and image retention policy

The wide viewing angle monitor models are designed with wide viewing angle display technology
which provides ultra-wide viewing angles and advanced image quality. Wide viewing angle monitors
are suitable for a wide variety of advanced image quality applications. This panel technology,
however, is not suitable for applications that exhibit static, stationary or fixed images for long periods
of time without the use of screen savers. These types of applications may include camera
surveillance, video games, marketing logos, and templates that are displayed on the screen for a
prolonged period of time. Static images may cause image retention damage that could look like stains
or watermarks on the monitor's screen.

Monitors in use for 24 hours per day that result in image retention damage are not covered under the
HP warranty. To avoid image retention damage, always turn off the monitor when it is not in use or
use the power management setting, if supported on your system, to turn off the display when the
system is idle.

Using the touchscreen

A touch screen device allows you to control items on the screen directly with your fingers.

TIP:

On touch screen devices, you can also perform on-screen actions with a keyboard and mouse.

One-finger slide

The one-finger slide is mostly used to pan or scroll through lists and pages, but you can use it for
other interactions, such as moving an object.

To scroll across the screen, lightly slide one finger across the screen in the direction you want to
move.

To drag, press and hold an object, and then drag the object to move it.

Tapping

To make an on-screen selection, use the tap function. Use one finger to tap an object on the screen
to select it. Double-tap an item to open it.

HP watermark and image retention policy

11

Содержание EliteDisplay S230tm

Страница 1: ...HP EliteDisplay S230tm Touch Monitor User Guide ...

Страница 2: ...companying such products and services Nothing herein should be construed as constituting an additional warranty HP shall not be liable for technical or editorial errors or omissions contained herein This document contains proprietary information that is protected by copyright No part of this document may be photocopied reproduced or translated to another language without the prior written consent ...

Страница 3: ...er indicates that failure to follow directions could result in bodily harm or loss of life CAUTION Text set off in this manner indicates that failure to follow directions could result in damage to equipment or loss of information NOTE Text set off in this manner provides important supplemental information TIP Text set off in this manner provides helpful hints iii ...

Страница 4: ...iv About this guide ...

Страница 5: ...uchscreen 11 One finger slide 11 Tapping 11 Scrolling 12 Pinching stretching 12 Rotating 12 Edge swipes Windows 8 only 12 Right edge swipe 13 Left edge swipe 13 Top edge and bottom edge swipe 13 Cleaning the monitor 14 Removing the monitor stand 14 Mounting the monitor 15 Locating the rating label 16 Installing a cable lock 16 3 Using the webcam 17 Installing YouCam from the disc 17 Capturing webc...

Страница 6: ...re information 19 Reference guides 19 Product support 19 Appendix A Technical specifications 20 HP S230tm 20 Recognizing preset display resolutions 21 HP S230tm 21 Entering user modes 22 Energy saver feature 22 vi ...

Страница 7: ...l mounting solutions with VESA Standard 100 x 100 mounting pattern Video signal input to support DVI digital with DVI D signal cable provided Video signal input to support DisplayPort digital with DisplayPort signal cable provided USB cable provided to connect the monitor s touch controller to the computer required for webcam and touch functionality Audio input jack with audio cable included Integ...

Страница 8: ...cumentation Energy saver feature to meet requirements for reduced power consumption Safety guidelines certifications and regulatory notices for these products are available in the HP LCD Monitors Reference Guide on the disc included with this monitor 2 Chapter 1 Product features ...

Страница 9: ...r cable to the monitor 2 DisplayPort connector Connects the DisplayPort cable to the monitor 3 DVI D connector Connects the DVI D cable to the monitor 4 Audio In connector Connects the audio cable from a host computer to the monitor 5 USB upstream connector Connects the USB cable to the monitor s touch screen USB connector and to a host USB port hub NOTE A USB connection between the monitor and co...

Страница 10: ...eo mode is determined by the video cable used The monitor will automatically determine which inputs have valid video signals The inputs can be selected by pressing the Input button on the side panel or through the On Screen Display OSD feature by pressing the Menu button For DisplayPort digital operation connect the DisplayPort signal cable to the DisplayPort connector on the rear of the monitor a...

Страница 11: ...e DVI connector on your input device cable provided 4 Connect one end of the provided USB cable to a USB connector on the rear panel of the computer and the other end to the USB connector on the monitor NOTE You must connect the USB cable between the computer and monitor for webcam and touch functionality Connecting the cables 5 ...

Страница 12: ...electric shock or damage to the equipment Do not disable the power cord grounding plug The grounding plug is an important safety feature Plug the power cord into a grounded earthed electrical outlet that is easily accessible at all times Disconnect power from the equipment by unplugging the power cord from the electrical outlet For your safety do not place anything on power cords or cables Arrange...

Страница 13: ...f the cover into the slots on the top of the cable connection recess 1 then rotate the cover down and snap into the recess 2 so that it is securely fastened to the rear of the monitor 8 Place the monitor upright and pull the easel stand out to support the monitor Connecting the cables 7 ...

Страница 14: ...upward hold the top of the monitor with two hands and rotate the monitor upward and forward To adjust the tilt downward hold the top of the monitor with two hands and rotate the monitor back and down The monitor tilt range is 15 to 70 degrees 8 Chapter 2 Setting up and using the monitor ...

Страница 15: ...ard through the OSD menu and increase adjustment levels If the OSD menu is inactive press to activate the input button that chooses the video signal input DVI or DisplayPort 6 Minus volume button If the OSD menu is on press to navigate backward through the OSD menu and decrease adjustment levels If the OSD menu is inactive press to activate the volume adjustment menu 7 Menu button Opens selects fr...

Страница 16: ...an disable the power LED in the OSD menu Press the Menu button on the front of the monitor then select Management Bezel Power LED Off When the monitor is powered on a status message is displayed for five seconds The message shows which input DVI or DisplayPort is the current active signal the status of the auto switch source setting On or Off factory default is On the default source signal factory...

Страница 17: ...ult in image retention damage are not covered under the HP warranty To avoid image retention damage always turn off the monitor when it is not in use or use the power management setting if supported on your system to turn off the display when the system is idle Using the touchscreen A touch screen device allows you to control items on the screen directly with your fingers TIP On touch screen devic...

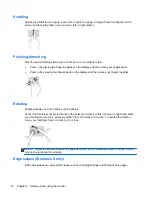
Страница 18: ...ur fingers together Rotating Rotating allows you to turn items such as photos Anchor the forefinger of your left hand on the object you want to rotate Using your right hand slide your forefinger around in a sweeping motion from 12 o clock to 3 o clock To reverse the rotation move your forefinger from 3 o clock to 12 o clock NOTE Rotate is intended for specific apps where you can manipulate an obje...

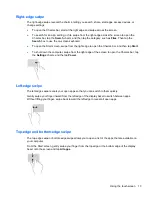
Страница 19: ... To shut down the computer swipe from the right edge of the screen to open the Charms bar tap the Settings charm and the tap Power Left edge swipe The left edge swipe reveals your open apps so that you can switch to them quickly Gently swipe your finger inward from the left edge of the display bezel to switch between apps Without lifting your finger swipe back toward the left edge to reveal all op...

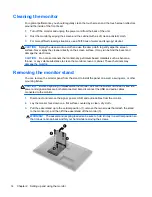
Страница 20: ... the monitor screen or cabinet These chemicals may damage the monitor Removing the monitor stand You can remove the monitor panel from the stand to install the panel on a wall a swing arm or other mounting fixture CAUTION Before beginning to disassemble the monitor be sure the monitor is turned off and the power and signal cables are both disconnected Also disconnect the USB and audio cables conne...

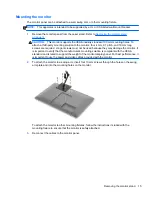
Страница 21: ...ust not be used because they may damage the monitor It is important to verify that the manufacturer s mounting solution is compliant with the VESA standard and is rated to support the weight of the monitor display panel For best performance it is important to use the power and video cables provided with the monitor 2 To attach the monitor to a swing arm insert four 10 mm screws through the holes o...

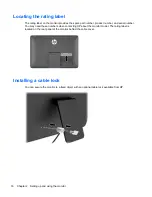
Страница 22: ...mber You may need these numbers when contacting HP about the monitor model The rating label is located on the rear panel of the monitor behind the cable cover Installing a cable lock You can secure the monitor to a fixed object with an optional cable lock available from HP 16 Chapter 2 Setting up and using the monitor ...

Страница 23: ...Insert the disc that came with your monitor into the computer s optical drive 2 Select Install YouCam and run the setup file 3 Follow the instructions on the screen Capturing webcam video and snapshots To use CyberLink YouCam after you install it from the provided disc 1 Click the Start button 2 Click All Programs CyberLink YouCam and then click CyberLink YouCam again 3 Click Tutorials to view an ...

Страница 24: ...senger or video phone call program Make sure the person you are calling has compatible video calling software 2 Enable your webcam as the default video input This is usually done through the video setup in the Tools menu in the software program you are using 3 Send your video call by following the instructions for the video calling software program 18 Chapter 3 Using the webcam ...

Страница 25: ...r country or region select Troubleshooting and then enter your model in the search window and click the Go button NOTE The monitor user guide reference guide and drivers are available at http www hp com support If the information provided in the guide or in the HP LCD Monitors Reference Guide do not address your questions you can contact support For U S support go to http www hp com go contactHP F...

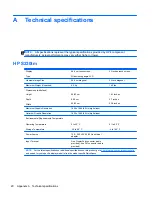
Страница 26: ...2 7 inches 23 6 inches Maximum Graphic Resolution 1920 x 1080 60 Hz digital input Optimum Graphic Resolution 1920 x 1080 60 Hz digital input Environmental Requirements Temperature Operating Temperature Storage Temperature 5 to 35 C 20 to 60 C 41 to 95 F 4 to 140 F Power Source 100 240 VAC 50 60 Hz external adapter Input Terminal One DisplayPort connector cable provided one DVI connector cable prov...

Страница 27: ...Hz 1 640 480 31 469 59 940 2 720 400 31 469 70 087 3 800 600 37 879 60 317 4 1024 768 48 363 60 004 5 1280 720 45 00 60 00 6 1280 1024 63 981 60 02 7 1440 900 55 935 59 887 8 1600 x 900 60 00 60 00 9 1680 1050 65 29 59 954 10 1920 1080 67 50 60 00 Table A 2 High Definition video formats Preset Timing name Pixel format Horz freq kHz Vert freq Hz 1 480p 720 480 31 469 59 94 2 576p 720 576 31 25 50 3...

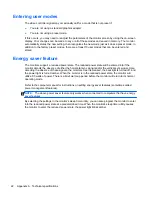
Страница 28: ...er the horizontal sync signal and or the vertical sync signal Upon detecting the absence of these signals the monitor screen is blanked the backlight is turned off and the power light is turned amber When the monitor is in the reduced power state the monitor will utilize 0 5 watts of power There is a brief warm up period before the monitor will return to its normal operating mode Refer to the comp...

Отзывы: