background image

Component

Description

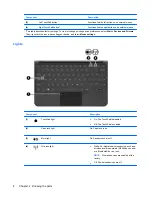
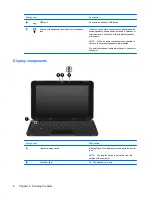
(3)


Left TouchPad button*

Functions like the left button on an external mouse.

(4)


Right TouchPad button*

Functions like the right button on an external mouse.

*This table describes factory settings. To view or change pointing device preferences, select 

Start


>


Devices and Printers

.

Then, right-click the icon representing your device, and select 

Mouse settings

.

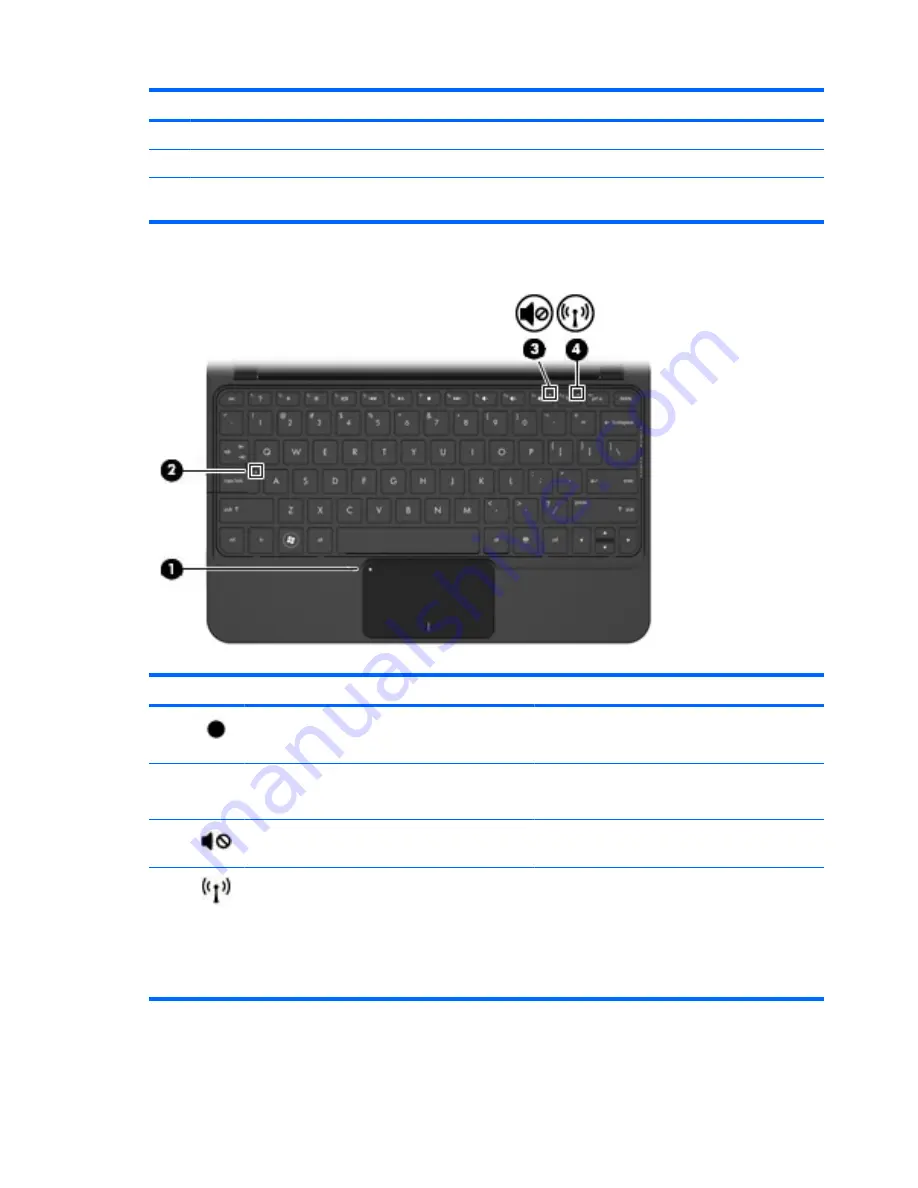
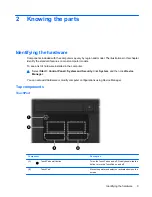
Lights

Component

Description

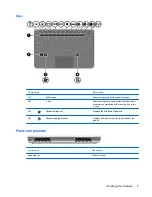
(1)

TouchPad light

On: The TouchPad is disabled.

Off: The TouchPad is enabled.

(2)


Caps lock light

On: Caps lock is on.

(3)

Mute light

On: Speaker sound is off.

(4)

Wireless light

White: An integrated wireless device, such as a
wireless local area network (WLAN) device and/
or a Bluetooth® device, is on.

NOTE:

Wireless devices are enabled at the

factory.

Off: All wireless devices are off.

4

Chapter 2   Knowing the parts

Содержание Compaq Mini 110

Страница 1: ...Mini User Guide ...

Страница 2: ...d services are set forth in the express warranty statements accompanying such products and services Nothing herein should be construed as constituting an additional warranty HP shall not be liable for technical or editorial errors or omissions contained herein Second Edition May 2010 First Edition December 2009 Document Part Number 584528 002 Product notice This user guide describes features that ...

Страница 3: ...llow another hard surface such as an adjoining optional printer or a soft surface such as pillows or rugs or clothing to block airflow Also do not allow the AC adapter to contact the skin or a soft surface such as pillows or rugs or clothing during operation The computer and the AC adapter comply with the user accessible surface temperature limits defined by the International Standard for Safety o...

Страница 4: ...iv Safety warning notice ...

Страница 5: ...ower management Setting power options 15 Using power saving states 15 Initiating and exiting Sleep 15 Initiating and exiting Hibernation 16 Using power plans 16 Viewing the current power plan 16 Selecting a different power plan 16 Customizing power plans 17 Setting password protection upon exiting Sleep or Hibernation 17 Using external AC power 17 Connecting the AC adapter 18 Using battery power 1...

Страница 6: ...uter 25 4 Internet Connecting to a wired network 28 Connecting to a wireless network 29 Using wireless devices 29 Identifying wireless and network icons 29 Using the wireless controls 30 Using the wireless action key 30 Using HP Connection Manager select models only 30 Using Wireless Assistant software 31 Using operating system controls 31 Using a WLAN 31 Setting up a WLAN 32 Protecting your WLAN ...

Страница 7: ...assword 51 Using antivirus software 52 Using firewall software 53 Installing critical updates 54 7 Digital cards Inserting a digital card 55 Removing a digital card 56 8 USB devices Using a USB device 57 Connecting a USB device 57 Removing a USB device 57 9 Pointing devices and keyboard Setting pointing device preferences 59 Using the TouchPad 59 Scrolling 59 Pinching 60 Rotating 60 Connecting an ...

Страница 8: ...ams and drivers 76 13 Changing QuickWeb settings Disabling and enabling QuickWeb 77 14 Setup Utility Starting Setup Utility 78 Using Setup Utility 78 Changing the language of Setup Utility 78 Navigating and selecting in Setup Utility 78 Displaying system information 79 Restoring default settings in Setup Utility 79 Exiting Setup Utility 79 Setup Utility menus 80 Main menu 80 Security menu 80 Syste...

Страница 9: ...your computer includes QuickWeb it allows you to quickly browse the Internet view digital photos listen to music or keep in touch using e mail instant messages or Skype select models only without having to start your main operating system QuickWeb is also referred to as Instant On Software IOS NOTE To disable or reenable QuickWeb refer to the Changing QuickWeb settings chapter You can access the s...

Страница 10: ...uickWeb Home screen to launch a program To start QuickWeb from Microsoft Windows Select Start click the arrow next to the Shut down button and then click Restart Your computer restarts and displays the HP QuickWeb Home screen NOTE To learn more about HP QuickWeb refer to the software Help included with QuickWeb 2 Chapter 1 Getting started ...

Страница 11: ... computer Select Start Control Panel System and Security Click System and then click Device Manager You can also add hardware or modify computer configurations using Device Manager Top components TouchPad Component Description 1 TouchPad on off button Turns the TouchPad on and off Quickly double tap the button to turn the TouchPad on and off 2 TouchPad Moves the pointer and selects or activates it...

Страница 12: ...n right click the icon representing your device and select Mouse settings Lights Component Description 1 TouchPad light On The TouchPad is disabled Off The TouchPad is enabled 2 Caps lock light On Caps lock is on 3 Mute light On Speaker sound is off 4 Wireless light White An integrated wireless device such as a wireless local area network WLAN device and or a Bluetooth device is on NOTE Wireless d...

Страница 13: ...y used system functions when pressed in combination with a function key or the esc key 3 Windows logo key Displays the Windows Start menu 4 Windows applications key Displays a shortcut menu for items beneath the pointer Front components Component Description Speakers 2 Produce sound Identifying the hardware 5 ...

Страница 14: ...en the computer is in the Sleep state briefly slide the switch to exit Sleep When the computer is in Hibernation briefly slide the switch to exit Hibernation If the computer has stopped responding and Windows shutdown procedures are ineffective slide and hold the power switch for at least five seconds to turn off the computer To learn more about your power settings select Start Control Panel Syste...

Страница 15: ...ror When the battery reaches a critical battery level the battery light begins blinking rapidly Amber A battery is charging White The computer is connected to external power and the battery is fully charged 3 External monitor port Connects an optional external display such as a monitor or projector to the computer 4 Vent Enables airflow to cool internal components NOTE The computer fan starts up a...

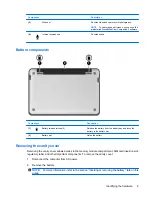
Страница 16: ...n optional headset microphone NOTE When an audio component is connected to the jack the computer speakers are disabled The audio component cable must have a 4 conductor connector Display components Component Description 1 Internal display switch Initiates Sleep if the display is closed while the power is on NOTE The display switch is not visible from the outside of the computer 2 Webcam light On T...

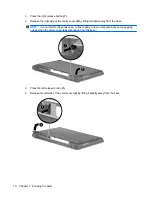
Страница 17: ... battery from the battery bay and locks the battery in the battery bay 2 Battery bay Holds the battery Removing the vanity cover Removing the vanity cover allows access to the memory module compartment SIM card insertion slot regulatory label and other important components To remove the vanity cover 1 Disconnect the computer from AC power 2 Remove the battery NOTE For more information refer to the...

Страница 18: ...om the base NOTE It is normal for the vanity cover to flex slightly and you may also hear some popping noises when the vanity cover tabs disengage from the base 5 Press the left release button 1 6 Release the left side of the vanity cover 2 by lifting it slightly away from the base 10 Chapter 2 Knowing the parts ...
Страница 19: ...nsertion slot regulatory label and other important components To replace the vanity cover 1 Place the vanity cover 1 above the computer at an angle with the front edge toward the front of the computer 2 Seat the back edge of the vanity cover in the back edge of the computer by aligning the six tabs on the vanity cover over the slots in the base and then inserting the tabs into the slots 2 Identify...

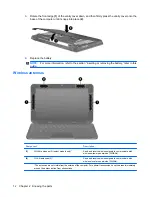
Страница 20: ... guide Wireless antennas Component Description 1 WWAN antennas 2 select models only Send and receive wireless signals to communicate with wireless wide area networks WWANs 2 WLAN antennas 2 Send and receive wireless signals to communicate with wireless local area networks WLANs The antennas are not visible from the outside of the computer For optimal transmission keep the areas immediately around ...

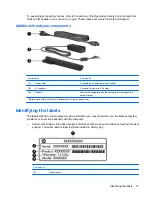
Страница 21: ...wer 3 Battery Powers the computer when the computer is not plugged into external power Batteries and power cords vary in appearance by region and country Identifying the labels The labels affixed to the computer provide information you may need when you troubleshoot system problems or travel internationally with the computer Serial number label Provides important information that you may need when...

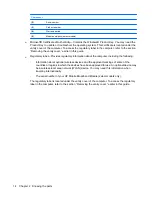
Страница 22: ...ovides regulatory information about the computer including the following Information about optional wireless devices and the approval markings of some of the countries or regions in which the devices have been approved for use An optional device may be a wireless local area network WLAN device You may need this information when traveling internationally The serial number of your HP Mobile Broadban...

Страница 23: ...g to a disc or an external media card NOTE You cannot initiate any type of networking connection or perform any computer functions while the computer is in the Sleep state or in Hibernation Initiating and exiting Sleep The system is set at the factory to initiate Sleep after 15 minutes of inactivity when running on battery power and 30 minutes of inactivity when running on external power Power set...

Страница 24: ...enter your Windows password before your work returns to the screen Using power plans A power plan is a collection of system settings that manages how the computer uses power Power plans can help you conserve power and maximize computer performance The following power plans are available HP recommended High performance Power saver You can change the settings of these power plans through Power Optio...

Страница 25: ...wer is supplied through an approved AC adapter WARNING To reduce potential safety issues use only the AC adapter provided with the computer a replacement AC adapter provided by HP or a compatible AC adapter purchased from HP Connect the computer to external AC power under any of the following conditions WARNING Do not charge the battery while you are onboard aircraft When you are charging or calib...

Страница 26: ...tlet 3 Using battery power When a charged battery is in the computer and the computer is not plugged into external power the computer runs on battery power When the computer is plugged into external AC power the computer runs on AC power If the computer contains a charged battery and is running on external AC power supplied through the AC adapter the computer switches to battery power if the AC ad...

Страница 27: ...capacity To access battery information Select Start Control Panel Hardware and Sound Power Options Tell me more about power plans Using Battery Check Help and Support provides information on the status of the battery installed in the computer To run Battery Check 1 Connect the AC adapter to the computer NOTE The computer must be connected to external power for Battery Check to function properly 2 ...

Страница 28: ...own on a flat surface 2 Slide the battery release latches 1 to release the battery and then remove the battery 2 Charging a battery WARNING Do not charge the computer battery while you are onboard aircraft The battery charges whenever the computer is plugged into external power through an AC adapter The battery charges whether the computer is off or in use but it charges faster when the computer i...

Страница 29: ...aches a critical battery level the battery light begins blinking rapidly Amber A battery is charging White The computer is connected to external power and the battery is fully charged Maximizing battery discharge time Battery discharge time varies depending on the features you use while on battery power Maximum discharge time gradually shortens as the battery storage capacity naturally degrades Ti...

Страница 30: ... battery 3 Turn on the computer Resolving a low battery level when no power source is available Initiate Hibernation or Save your work and shut down the computer Resolving a low battery level when the computer cannot exit Hibernation When the computer lacks sufficient power to exit Hibernation follow these steps 1 Insert a charged battery or plug the computer into external power 2 Exit Hibernation...

Страница 31: ...ings 6 Click the plus sign next to Sleep and then click the plus sign next to Hibernate after 7 Record the On battery setting under Hibernate after so that you can reset it after the calibration 8 Change the On battery setting to Never 9 Click OK 10 Click Save changes Step 3 Discharge the battery The computer must remain on while the battery is being discharged The battery can discharge whether or...

Страница 32: ...rnation after calibration may result in a full battery discharge and information loss if the computer reaches a critical battery level 1 Click the Battery Meter icon in the notification area and then click Power options or Select Start Control Panel System and Security Power Options 2 Under the current power plan click Change plan settings 3 Reenter the settings that you recorded for the items in ...

Страница 33: ...in fire or water Refer to the Regulatory Safety and Environmental Notices for battery disposal information Shutting down the computer CAUTION Unsaved information will be lost when the computer is shut down The Shut down command closes all open programs including the operating system and then turns off the display and computer Shut down the computer under any of the following conditions When you ne...

Страница 34: ...n procedures try the following emergency procedures in the sequence provided Press ctrl alt delete and then click the Power button Slide and hold the power switch for at least 5 seconds Disconnect the computer from external power and remove the battery 26 Chapter 3 Power management ...

Страница 35: ...he Internet by connecting to a broadband network using the RJ 45 network jack Wireless For mobile Internet access you can use a wireless connection To learn about setting up a wireless network or adding your computer to an existing network refer to the Connecting to a wireless network section 27 ...

Страница 36: ...e from TV and radio reception orient the circuitry end of the cable 2 toward the computer To connect the network cable WARNING To reduce the risk of electric shock fire or damage to the equipment do not plug a modem cable or telephone cable into an RJ 45 network jack 1 Plug the network cable into the network jack 1 on the computer 2 Plug the other end of the cable into a network wall jack 2 28 Cha...

Страница 37: ...rs and cameras In a PAN each device communicates directly with other devices and devices must be relatively close together typically within 10 meters approximately 33 feet of each other The computer supports the following IEEE industry standards 802 11b the first popular standard supports data rates of up to 11 Mbps and operates at a frequency of 2 4 GHz 802 11g supports data rates of up to 54 Mbp...

Страница 38: ... and one wireless light All of the wireless devices on your computer are enabled at the factory The wireless light indicates the overall power state of your wireless devices not the status of individual devices If the wireless light is white at least one wireless device is on If the wireless light is off all wireless devices are off Because the wireless devices are enabled at the factory you can u...

Страница 39: ... notification area 2 Click the Help button You can use the properties dialog box in Wireless Assistant to show the on off controls for each installed wireless device and control the devices separately To show the on off controls 1 Double click the Wireless Assistant icon in the notification area at the far right of the taskbar 2 Click Properties 3 Select the Independent controls for installed wire...

Страница 40: ...rows additional wireless and wired devices can be connected to the network to access the Internet For help in setting up your WLAN refer to the information provided by your router manufacturer or your ISP Protecting your WLAN It is essential to understand that because the WLAN standard was designed with only limited security capabilities basically to foil casual eavesdropping rather than more powe...

Страница 41: ...curity settings to encrypt and decrypt data that is transmitted over the network However instead of using one static security key for encryptions as WEP does WPA uses temporal key integrity protocol TKIP to dynamically generate a new key for every packet It also generates different sets of keys for each device on the network Connecting to a WLAN To connect to the WLAN follow these steps 1 Be sure ...

Страница 42: ...ou contact your ISP or search the Web Web sites that list public WLANs include Cisco Internet Mobile Office Wireless Locations Hotspotlist and Geektools Check with each public WLAN location for cost and connection requirements For additional information on connecting your computer to a corporate WLAN contact your network administrator or IT department Roaming to another network When you move your ...

Страница 43: ...rs require the use of a subscriber identity module SIM A SIM contains basic information about you such as a personal identification number PIN as well as network information Some computers include a SIM that is preinstalled in the battery bay If the SIM is not preinstalled it may be provided in the packet of HP Mobile Broadband information provided with your computer or the mobile network operator...

Страница 44: ...Inserting or removing the battery earlier in this guide 7 Insert the SIM into the SIM slot and gently push the SIM into the slot until it is firmly seated 8 Replace the battery NOTE If the battery is not replaced HP Mobile Broadband is disabled 9 Turn the computer right side up and then reconnect external power and external devices 10 Turn on the computer Removing a SIM To remove a SIM 1 Shut down...

Страница 45: ...ery 7 Press in on the SIM and then remove it from the slot 8 Replace the battery NOTE For more information refer to the section Inserting or removing the battery earlier in this guide 9 Turn the computer right side up and then reconnect external power and external devices 10 Turn on the computer Using HP Mobile Broadband select models only 37 ...

Страница 46: ...oth and Internet Connection Sharing ICS HP does not recommend setting up one computer with Bluetooth as a host and using it as a gateway through which other computers may connect to the Internet When two or more computers are connected using Bluetooth and Internet Connection Sharing ICS is enabled on one of the computers the other computers may not be able to connect to the Internet using the Blue...

Страница 47: ...ng to music Integrated webcam that allows you to capture photographs and videos Preinstalled multimedia software that allows you to play and manage your music movies and pictures The following sections explain how to identify and use the multimedia components included with your computer Identifying your multimedia components The following illustration and table describe the multimedia features of ...

Страница 48: ...lume up action key f10 Increases speaker volume 7 Volume down action key f9 Decreases speaker volume 8 Audio out headphone jack Audio in microphone jack Produces sound when connected to optional powered stereo speakers headphones earbuds a headset or television audio Also connects an optional headset microphone WARNING To reduce the risk of personal injury adjust the volume before putting on headp...

Страница 49: ...akers icon in the notification area at the far right of the taskbar b Increase or decrease the volume by moving the slider up or down Click the Mute Speakers icon to mute the volume or a Right click the Speakers icon in the notification area and then click Open Volume Mixer b In the Speakers column increase or decrease the volume by moving the slider up or down You can also mute the volume by clic...

Страница 50: ...c Under Behaviors select Show icon and notifications for the Speakers icon d Click OK Program volume control Volume can also be adjusted within some programs 42 Chapter 5 Multimedia ...

Страница 51: ...hapter of a DVD or BD press the previous track action key f5 1 To pause or resume playing the disc press the play pause action key f6 2 To stop the disc press the stop action key f7 3 To play the next track of an audio CD or the next chapter of a DVD or BD press the next track action key f8 4 Multimedia software Your computer includes preinstalled multimedia software Depending on the hardware and ...

Страница 52: ...Player select models only click Windows Media Player NOTE Some programs may be located in subfolders Installing multimedia software from the Internet To install multimedia software from the Internet go to the software manufacturer s Web site and follow the instructions NOTE Software downloaded from the Internet may contain viruses Refer to the Security chapter for more information 44 Chapter 5 Mul...

Страница 53: ...dphone and audio in microphone Be sure that the external device cable is securely connected to the jack on your computer Be sure to install any drivers required by the external device NOTE A driver is a required program that acts like a translator between the device and the programs that use the device Checking your audio functions To check the system sound on your computer follow these steps 1 Se...

Страница 54: ... connect an external display such as a monitor or projector to the external monitor port on the computer To connect an external monitor or projector 1 Connect the optional VGA cable to the external monitor port on the computer 2 Connect the external monitor or projector to the other end of the cable NOTE If a properly connected external monitor or projector does not display a screen image press th...

Страница 55: ...still photographs NOTE To record and edit videos you can use the preinstalled Arcsoft WebCam Companion 3 To access the webcam using Arcsoft WebCam Companion 3 software 1 Select Start All Programs Arcsoft WebCam Companion 3 2 You may choose Capture or Edit from the dialog box NOTE For more information refer to Arcsoft WebCam Companion 3 software Help Webcam 47 ...

Страница 56: ...authorized access to data Firewall software Windows updates Unauthorized access to Setup Utility BIOS settings and other system identification information Administrator password Ongoing or future threats to the computer Critical security updates from Microsoft Unauthorized access to a Windows user account User password Using passwords A password is a group of characters that you choose to secure y...

Страница 57: ...or additional information about Windows passwords such as screen saver passwords select Start Help and Support Setting passwords in Windows Password Function Administrator password Protects administrator level access to computer contents NOTE This password cannot be used to access Setup Utility contents User password Protects access to a Windows user account It also protects access to the computer...

Страница 58: ...nter New Password and Confirm New Password fields and then press enter To change an administrator password type your current password in the Enter Current Password field type a new password in the Enter New Password and Confirm New Password fields and then press enter To delete an administrator password type your current password in the Enter Password field and then press enter 4 times 3 To save y...

Страница 59: ...hange a power on password type your current password in the Enter Current Password field type a new password in the Enter New Password and Confirm New Password fields and then press enter To delete a power on password type your current password in the Enter Current Password field and then press enter 4 times 3 To save your changes and exit Setup Utility use the arrow keys to select Exit Exit Savin...

Страница 60: ...omputer Your version of Norton Internet Security includes 60 days of free updates It is strongly recommended that you protect the computer against new viruses beyond 60 days by purchasing extended update service Instructions for using and updating Norton Internet Security software and for purchasing extended update service are provided within the program To access Norton Internet Security or to ge...

Страница 61: ...vity and automatic monitoring of all incoming and outgoing traffic Refer to the firewall user guide or contact your firewall manufacturer for more information NOTE Under some circumstances a firewall can block access to Internet games interfere with printer or file sharing on a network or block authorized e mail attachments To temporarily resolve the problem disable the firewall perform the task t...

Страница 62: ... available after the computer was shipped To be sure that all available updates are installed on the computer observe these guidelines Run Windows Update as soon as possible after you set up your computer Use the update link at Start All Programs Windows Update Run Windows Update at regular intervals such as once a month Obtain updates to Windows and other Microsoft programs as they are released f...

Страница 63: ... xD Picture card Inserting a digital card CAUTION To avoid damaging the digital card or the computer do not insert any type of adapter into the Digital Media Slot CAUTION To prevent damage to the digital card connectors use minimal force to insert a digital card 1 Hold the digital card label side up with the connectors toward the computer 2 Insert the card into the Digital Media Slot and then push...

Страница 64: ...w 2 To remove a digital card a Click the Safely Remove Hardware and Eject Media icon in the notification area at the far right of the taskbar NOTE To display the Safely Remove Hardware and Eject Media icon click the Show hidden icons icon the arrow at the left side of the notification area b Click the name of the digital card in the list NOTE You are prompted that it is safe to remove the hardware...

Страница 65: ...B 1 0 USB 1 1 and USB 2 0 devices An optional USB hub provides additional USB ports that can be used with the computer Connecting a USB device CAUTION To prevent damage to a USB connector use minimal force to connect a USB device To connect a USB device connect the USB cable for the computer to the USB port You will hear a sound when the device has been detected NOTE When you connect a USB device ...

Страница 66: ...ct Media icon in the notification area at the far right of the taskbar NOTE To display the Safely Remove Hardware and Eject Media icon click the Show hidden icons icon the arrow at the left of the notification area 2 Click the name of the device in the list NOTE You are informed that it is safe to remove the device 3 Remove the device 58 Chapter 8 USB devices ...

Страница 67: ...g the TouchPad components refer to the Touchpad section earlier in this guide The TouchPad supports a variety of TouchPad gestures To activate the TouchPad gestures place two fingers on the TouchPad as described in the following sections The TouchPad gestures described in this section are enabled at the factory To disable or reenable these gestures 1 Double click the Synaptics icon in the notifica...

Страница 68: ...part to increase an object s size Zoom out by holding two fingers apart on the TouchPad and then pull the fingers together to decrease an object s size Rotating Rotating allows you to rotate items such as photos and pages To rotate anchor your thumb on the TouchPad and then move your forefinger in a semicircular motion around your thumb 60 Chapter 9 Pointing devices and keyboard ...

Страница 69: ...the action keys opens a specific shortcut menu within that program NOTE The action key feature is enabled at the factory You can disable this feature in Setup Utility to require pressing the fn key and one of the action keys to activate the assigned function Refer to the Setup Utility chapter for additional information Icon Description Opens Help and Support which provides information about your W...

Страница 70: ...are receiving video information from the computer Plays the previous track of a CD or the previous section of a DVD or a BD Plays a track of an audio CD or a section of a DVD or a BD Stops audio playback of a CD a DVD or a BD Plays the next track of an audio CD or the next section of a DVD or a BD Decreases speaker volume incrementally when you hold down this key Increases speaker volume increment...

Страница 71: ...BIOS version number To use a hotkey command on the computer keyboard follow either of these steps Briefly press the fn key and then briefly press the second key of the hotkey command or Press and hold down the fn key briefly press the second key of the hotkey command and then release both keys at the same time Using the keyboard 63 ...

Страница 72: ...r until the operating system draws a circle around the area you are touching and then the context menu appears Flicking Touch the screen in a light quick flicking motion up down left or right to navigate through screens or quickly scroll through documents NOTE For the flick movement to work a scrollbar must be present and in the active window Dragging Press your finger on an item on the screen and...

Страница 73: ...r thumb Pinching Pinching allows you to zoom in or out on items such as PDFs images and photos To pinch Zoom out by holding two fingers apart on the screen and then pull the fingers together to decrease an object s size Zoom in by holding two fingers together on the screen and then pull the fingers apart to increase an object s size Using the touch screen select models only 65 ...

Страница 74: ...ices and Printers Then right click the device representing your computer and select Mouse settings These preferences apply to any pointing device in the system To change or test click settings 1 Select Start Control Panel Hardware and Sound Pen and Touch Pen Options tab 2 Under Pen Actions select the action and then click Settings 3 After making any changes or testing the settings click OK To chan...

Страница 75: ...computer select Start Computer Handling drives Drives are fragile computer components that must be handled with care Refer to the following cautions before handling drives Additional cautions are included with the procedures to which they apply Identifying installed drives 67 ...

Страница 76: ...ort on the computer not to a USB port on another external device such as a hub When the battery is the only source of power be sure that the battery is sufficiently charged before writing to media Avoid exposing a drive to temperature or humidity extremes Avoid exposing a drive to liquids Do not spray the drive with cleaning products Remove media from a drive before removing the drive from the dri...

Страница 77: ...connecting a powered device be sure that the computer is turned off and the AC power cord is unplugged 1 Connect the device 2 If you are connecting a powered device plug the device power cord into a grounded AC outlet 3 Turn on the computer To disconnect an unpowered external device turn off the computer and then disconnect it To disconnect a powered external device turn off the computer disconnec...

Страница 78: ...icity by touching a grounded metal object To add or replace a memory module 1 Save your work 2 Shut down the computer and close the display If you are not sure whether the computer is off or in Hibernation turn the computer on by sliding the power switch Then shut down the computer through the operating system 3 Disconnect all external devices connected to the computer 4 Follow the instructions in...

Страница 79: ... a Align the notch 1 in the memory module with the tab in the memory module slot b With the memory module at a 45 degree angle from the surface of the memory module compartment press the module 2 into the memory module slot until it is seated c Gently press the memory module 3 down applying pressure to both the left and right edges of the memory module until the retention clips snap into place CAU...

Страница 80: ...8 Turn the computer right side up and then reconnect external power and external devices 9 Turn on the computer 72 Chapter 11 Memory modules ...

Страница 81: ...dentify your computer model product category and series or family Prepare for a system BIOS update by identifying the BIOS version currently installed on the computer If your computer is connected to a network consult the network administrator before installing any software updates especially system BIOS updates NOTE The computer system BIOS is stored on the system ROM The BIOS initializes the ope...

Страница 82: ...able external power using the AC adapter Do not download or install a BIOS update while the computer is running on battery power or connected to an optional power source During the download and installation follow these instructions Do not disconnect power from the computer by unplugging the power cord from the AC outlet Do not shut down the computer or initiate Sleep or Hibernation Do not insert ...

Страница 83: ... selecting Start Computer 2 Double click your hard drive designation The hard drive designation is typically Local Disk C 3 Using the hard drive path you recorded earlier open the folder on your hard drive that contains the update 4 Double click the file that has an exe extension for example filename exe The BIOS installation begins 5 Complete the installation by following the instructions on the ...

Страница 84: ...e software is to be downloaded You will need to access this path when you are ready to install the software 4 When the download is complete open Windows Explorer by selecting Start Computer 5 Double click your hard drive designation The hard drive designation is typically Local Disk C 6 Using the hard drive path you recorded earlier open the folder on your hard drive that contains the update 7 Dou...

Страница 85: ...The HP QuickWeb Installer folder is displayed Click HP QuickWeb Configuration Tool 2 Select the Enable QuickWeb check box 3 Click OK NOTE The HP QuickWeb Configuration Tool can also be accessed by selecting Start Control Panel and then clicking the View by arrow Select Large icons or Small icons to locate the HP QuickWeb Configuration Tool Disabling and enabling QuickWeb 77 ...

Страница 86: ...tep 2 1 Open Setup Utility by turning on or restarting the computer and then pressing f10 while the F10 BIOS Setup Options message is displayed in the lower left corner of the screen 2 Use the arrow keys to select System Configuration Language and then press enter 3 Use the arrow keys to select a language and then press enter 4 When a confirmation prompt with your language selected is displayed pr...

Страница 87: ...n at step 2 1 Open Setup Utility by turning on or restarting the computer and then pressing f10 while the F10 BIOS Setup Options message is displayed in the lower left corner of the screen 2 Use the arrow keys to select Exit Load Setup Defaults and then press enter 3 When the Setup Confirmation is displayed press enter 4 To save your change and exit Setup Utility use the arrow keys to select Exit ...

Страница 88: ...ord Power On Password Enter change or delete a power on password System Configuration menu Select To do this Language Support Change the Setup Utility language Processor C4 State Enable disable the processor C4 sleep state Boot Options Set the following boot options f10 and f12 Delay sec Set the delay for the f10 and f12 functions of Setup Utility in intervals of 5 seconds each 0 5 10 15 20 HP Qui...

Страница 89: ...he devices attached to the system appear in the boot order menu Diagnostics menu Select To do this Hard Disk Self Test select models only Run a comprehensive self test on the hard drive Memory Test Run a diagnostic test on the system memory Setup Utility menus 81 ...

Страница 90: ...ng Setup Utility language 78 charging batteries 20 22 checking audio functions 45 components additional hardware 13 bottom 9 display 8 front 5 left side 7 right side 6 TouchPad 3 connecting to a WLAN 33 Connection Manager icon 29 connection external power 18 cord power 13 corporate WLAN connection 33 critical battery level 22 D Diagnostics menu 81 digital card inserting 55 removing 56 Digital Medi...

Страница 91: ...etting preferences 59 multimedia components identifying 39 multimedia software installing 44 using 44 mute action key identifying 40 N navigating in Setup Utility 78 network cable connecting 28 noise suppression circuitry 28 network icon 29 network jack identifying 7 noise suppression circuitry network cable 28 O operating system 25 optical drive 68 P passwords administrator 50 power on 50 set in ...

Страница 92: ... ports identifying 6 8 57 V vanity cover removing 9 replacing 11 vents identifying 7 volume down action key identifying 40 volume up action key identifying 40 volume adjusting 41 W webcam light identifying 8 40 webcam identifying 9 40 Windows applications key identifying 5 Windows logo key identifying 5 Windows passwords set in 49 wired network icon 29 wireless action key identifying 30 wireless a...

Страница 93: ......

Отзывы: