background image


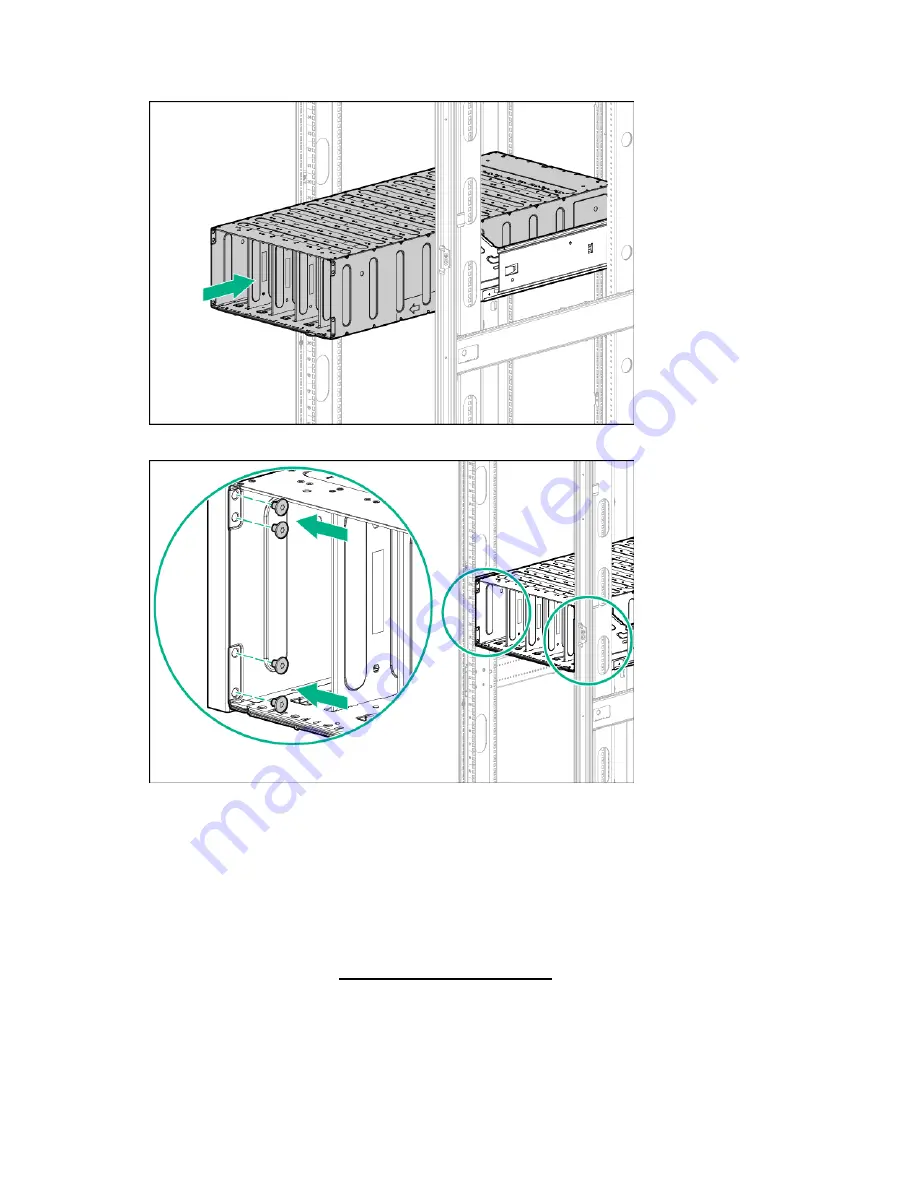
Installing the chassis  17 

1. 

Install the chassis into the rack. 


2. 

Secure the chassis to the rack. 


Installing the system components 

If components were removed during the chassis installation or additional components were ordered, 

install each device using the procedures in this section. 
If you perform any of the procedures in this section after powering on the chassis, ensure proper airflow by 

ensuring that each bay inside the chassis and at the rear of the chassis is populated with either a 

component or a blank. For component-specific replacement information, see the 

Apollo a6000 Chassis 

Maintenance and Service Guide 

or the server-specific user and maintenance guides on the Hewlett 

Packard Enterprise website (

http://www.hpe.com/info/docs

). 


Installing a server tray blank 


Содержание Apollo a6000

Страница 1: ... for the HPE Apollo a6000 Chassis This document is for the person who installs administers and troubleshoots the system Hewlett Packard Enterprise assumes you are qualified in the servicing of computer equipment and trained in recognizing hazards in products with hazardous energy levels Part Number 752046 004 September 2016 Edition 4 ...

Страница 2: ...s and services are set forth in the express warranty statements accompanying such products and services Nothing herein should be construed as constituting an additional warranty Hewlett Packard Enterprise shall not be liable for technical or editorial errors or omissions contained herein Microsoft Windows and Windows Server are U S registered trademarks of the Microsoft group of companies ...

Страница 3: ...EDs 14 Installing the chassis 15 Installation overview 15 Unpacking the system 15 Determining the chassis rack spacing 15 Installing the rack rails 15 Installing the chassis in the rack 15 Installing the system components 17 Installing a server tray blank 17 Installing a server 18 Installing an I O module 19 Installing the fans 20 Installing a power cage 20 Installing the management module 22 Inst...

Страница 4: ...nt declaration 39 Ukraine RoHS material content declaration 39 Specifications 40 Chassis environmental specifications 40 Chassis specifications 40 Power shelf specifications 40 Power specifications 41 DC power 41 Single phase power 41 Three phase power North America Japan 41 Three phase power International 42 Hot plug power supply calculations 42 Support and other resources 43 Accessing Hewlett Pa...

Страница 5: ...ctrical power ratings on options refer to the product rating label or the user documentation supplied with that option WARNING To reduce the risk of personal injury fire or damage to the equipment do not overload the AC supply branch circuit that provides power to the rack Consult the electrical authority having jurisdiction over wiring and installation requirements of your facility CAUTION Protec...

Страница 6: ... than one component is extended a rack might become unstable WARNING The chassis is very heavy To reduce the risk of personal injury or damage to the equipment Observe local occupational health and safety requirements and guidelines for manual material handling Remove all installed components from the chassis before installing or moving the chassis Use caution and get help to lift and stabilize th...

Страница 7: ...nt do not block the ventilation openings When vertical space in the rack is not filled by a server or rack component the gaps between the components cause changes in airflow through the rack and across the servers Cover all gaps with blanking panels to maintain proper airflow CAUTION Always use blanking panels to fill empty vertical spaces in the rack This arrangement ensures proper airflow Using ...

Страница 8: ...ack temperature beyond the maximum allowable limits Do not exceed the manufacturer s TMRA Grounding requirements The building installation must provide a means of connection to protective earth The equipment must be connected to that means of connection A service person must check whether the socket outlet from which the equipment is to be powered provides a connection to the building protective e...

Страница 9: ...escription 1 HPE Apollo a6000 Chassis 2 Server tray blank 3 Server tray 4 Fan assembly 5 5 I O module 6 Power cage right 7 Management module 8 Power cage left 9 Power management cable 10 Apollo a6000 Chassis Rail kit 11 Service tray The quantity depends on the configuration ordered Not shown ...

Страница 10: ...Identifying components and LEDs 10 Server tray bay numbering Rear panel components Item Description 1 I O modules 10 2 Fan assemblies 5 3 Power cage Right 4 Management module 5 Power cage Left ...

Страница 11: ...y numbering The chassis has five fan assemblies located in the rear of the chassis The following figure identifies the fan assemblies by device number Fan LED Status Description Off The fan is working or the power is off Solid amber The fan has failed ...

Страница 12: ...t the same time Only one iLO port can be connected to the network while the other iLO port can be used only as a connection to a second enclosure Having both ports connected at the same time results in a loopback condition IMPORTANT If you have an APM connected to an Apollo a6000 Chassis do not connect the iLO port of the APM and the iLO port of the enclosure to the network at the same time Having...

Страница 13: ...ic to each server and are installed in the rear of the chassis The chassis has ten I O module bays located in the rear of the chassis For more information about product features specifications options configurations and compatibility see the product QuickSpecs on the Hewlett Packard Enterprise website http www hpe com info qs Power shelf rear panel components NOTE The single phase power shelf is s...

Страница 14: ...ption 1 Power management connectors 6 2 APM module connector PDM 3 AC input module power connectors 6 Power supply LEDs Power LED 1 green Fault LED 2 amber Condition Off Off No AC power to the power supply On Off Normal Off On Power supply failure ...

Страница 15: ...tion HPE Apollo 6000 System Accessory kit HPE Apollo a6000 Chassis Rail Kit HPE Apollo 6000 Power Shelf Rack Rail Kit HPE Apollo 6000 Power Shelf The following documents also ship with the Apollo a6000 Chassis Start Here for Important Setup Information Safety Compliance and Warranty Information Determining the chassis rack spacing When planning rack spacing allow enough space for the 5U chassis an...

Страница 16: ...coupled together in multiple rack installations Only one component is extended at a time If more than one component is extended a rack might become unstable CAUTION Always plan the rack installation so that the heaviest item is on the bottom of the rack Install the heaviest item first and continue to populate the rack from the bottom to the top CAUTION Be sure to keep the product parallel to the f...

Страница 17: ...f you perform any of the procedures in this section after powering on the chassis ensure proper airflow by ensuring that each bay inside the chassis and at the rear of the chassis is populated with either a component or a blank For component specific replacement information see the Apollo a6000 Chassis Maintenance and Service Guide or the server specific user and maintenance guides on the Hewlett ...

Страница 18: ... or a blank Install the component as indicated Installing a server CAUTION To prevent improper cooling and thermal damage operate servers only when the open side of the server is enclosed by either another server a divider or the chassis wall When installing servers in the chassis observe the following guidelines to ensure proper air flow Always populate the enclosure from right to left beginning ...

Страница 19: ...elease lever will close completely without resistance Installing an I O module CAUTION To prevent electrical damage always power down the server associated with the I O module before installing the I O module CAUTION Remove the server from the enclosure before installing the I O module Failure to do so can result in damage to both components After the I O module is installed install the server ...

Страница 20: ...ebsite http www hpe com info qs For more information about installing the options for your server see the server user guide on the Hewlett Packard Enterprise website http www hpe com info Apollo_6000 docs Installing the fans Install the component as indicated Installing a power cage CAUTION To prevent damage to the component power down the chassis and disconnect all power cords before removing or ...

Страница 21: ...hassis 21 CAUTION Do not overtighten the screws Hewlett Packard Enterprise recommends using a torque of only 2 4 in lb To install the component 1 Remove the power cage cover 2 Install the power cables in the power cage ...

Страница 22: ...ge a Insert the power cage into the correct power cage bay b Close the release lever c Tighten the screw to secure the power cage to the chassis Installing the management module IMPORTANT Always complete the installation of both power cages before installing the management module ...

Страница 23: ...omponent power down the chassis and disconnect all power cords before removing or installing the component To install the component 1 Install the power shelf rack rails into the rack For more information see the HPE Power Shelf Rack Rail Kit for HPE and Third Party Racks Installation Instructions 2 Install the power shelf ...

Страница 24: ...e power shelf if needed NOTE If additional clearance is required to install power cables loosen the thumb screw on either side of the shelf and slide the shelf out while installing the cables Use caution to avoid bending the shelf 5 Remove the power supply vent cover 6 Install the 12V DC power cables ...

Страница 25: ...de opening on either end of the power shelf and then connect it to the appropriate connector b Slide the cables toward the center allowing them to straighten and hang from the rear of the power shelf 7 Install the cable guard NOTE Cables are removed for clarity ...

Страница 26: ...Installing the chassis 26 8 Install the power supply vent cover to protect the power supply vents ...

Страница 27: ...er or edge CAUTION To avoid damaging the cable squeeze the thermal boot on the cable before disconnecting from the connector After the hardware is installed complete the following cabling procedures 1 Connecting the chassis to a power shelf on page 27 2 Connecting the chassis to the network by doing one of the following o Connecting the chassis to the top of rack switch on page 30 o Connecting the...

Страница 28: ... CAUTION To prevent damage to the power management cable release the cable by pressing the latches when disconnecting instead of pulling directly IMPORTANT When connecting the power management cable to the chassis management module and the power shelf be sure to install the cable with the plastic tab on the top of the connector Failure to install the cable properly can result in performance and re...

Страница 29: ...ted using the HPE Power Advisor Tool http www hpe com info poweradvisor online This tool is designed for facilities planning purposes only Values obtained from the tool are based on worst case loads Whenever possible Hewlett Packard Enterprise recommends using actual measurements in configuration planning Measurements must be made with the intended configuration application loading and ambient env...

Страница 30: ...ing 30 Connecting the chassis to the top of rack switch Connect the chassis to the top of rack switch using one of the following configurations Connect one RJ 45 from each chassis to the top of rack switch ...

Страница 31: ...tional HPE APM module IMPORTANT If you have an APM connected to an Apollo a6000 Chassis do not connect the iLO port of the APM and the iLO port of the enclosure to the network at the same time Having both ports connected at the same time results in a loopback condition 1 Connect the APM to the network shown in green 2 Connect the APM to the chassis shown in red ...

Страница 32: ...to the power shelf shown in blue Connecting power cables and applying power to the chassis 1 Connect the DC power cable to the power shelf 2 Connect the AC power cables to the power source UPS or wall outlet or to an installed PDU ...

Страница 33: ... power draw from the chassis attempts to exceed the load supported by the active power supplies In this mode the system is expected to survive with degraded performance an unexpected power loss to one or more of the power supplies Mode 2 Full AC DC Redundancy Mode Power capping is enforced such that system has N 1 power redundancy In this mode the system will throttle the nodes allowing for one of...

Страница 34: ...he server and then run the PPIC utility 3 To set the power capacity mode perform one of the following steps o To set mode 0 1 and 2 enter the following command at the prompt s mmode The following example sets the power capacity to mode 0 s m0 o To set mode 3 enter the following command at the prompt s mmode lpower The following example sets the power capacity to mode 3 with a 1500W maximum power l...

Страница 35: ... multiplied against each chassis maximum wattage value to arrive at an appropriate cap value for that individual chassis If NONE is specified instead of a cap wattage value then APM removes all or the specified zone of the power caps To remove baseline data from the EEPROM and to remove the power cap setting enter the following command SET POWER BASELINE NONE After this command is issued the only ...

Страница 36: ...isolation and identification issue resolution and software maintenance on ProLiant servers and server blades To view the guide select a language English http www hpe com support Gen9_TSG_en French http www hpe com support Gen9_TSG_fr Spanish http www hpe com support Gen9_TSG_es German http www hpe com support Gen9_TSG_de Japanese http www hpe com support Gen9_TSG_ja Simplified Chinese http www hpe...

Страница 37: ...ic sensitive component or assembly Grounding methods to prevent electrostatic discharge Several methods are used for grounding Use one or more of the following methods when handling or installing electrostatic sensitive parts Use a wrist strap connected by a ground cord to a grounded workstation or computer chassis Wrist straps are flexible straps with a minimum of 1 megohm 10 percent resistance i...

Страница 38: ...g Warranties Regulatory information Safety and regulatory compliance For important safety environmental and regulatory information see Safety and Compliance Information for Server Storage Power Networking and Rack Products available at the Hewlett Packard Enterprise website http www hpe com support Safety Compliance EnterpriseProducts Belarus Kazakhstan Russia marking Manufacturer and Local Repres...

Страница 39: ...clude YWW where Y indicates the year counting from within each new decade with 2000 as the starting point for example 238 2 for 2002 and 38 for the week of September 9 In addition 2010 is indicated by 0 2011 by 1 2012 by 2 2013 by 3 and so forth YYWW where YY indicates the year using a base year of 2000 for example 0238 02 for 2002 and 38 for the week of September 9 Turkey RoHS material content de...

Страница 40: ...able No direct sunlight allowed Upper operating limit is 3 048 m 10 000 ft or 70 kPa 10 1 psia Upper nonoperating limit is 9 144 m 30 000 ft Storage maximum humidity of 95 is based on a maximum temperature of 45 C 113 F Altitude maximum for storage corresponds to a pressure minimum of 70 kPa 10 1 psia Chassis specifications Specification Value Height 22 02 cm 8 67 in Depth 86 23 cm 33 95 in Width ...

Страница 41: ...pply Input requirements Rated input voltage 200 VAC to 240 VAC 200 VAC to 240 VAC Rated input frequency 50 Hz to 60 Hz 50 Hz to 60 Hz Rated input current per power supply maximum 13 2 A at 200 VAC 12 7 A at 208 VAC 12 2 A at 220 VAC 14 4 A at 200 VAC 13 8 A at 208 VAC 13 1 A at 220 VAC Rated input power per power supply maximum 2640 VA 2880 VA Three phase power North America Japan Specification 24...

Страница 42: ...AC to 415 VAC line to line 220 VAC to 240 VAC line to neutral 3 phase WYE Rated input frequency 50 Hz to 60 Hz 50 Hz to 60 Hz Maximum input current per line cord 12 2 A at 220 380 VAC 11 2 A at 240 415 VAC 13 1 A at 220 380 VAC 12 A at 240 415 VAC Maximum input power per line cord 8064 VA 8646 VA Rated 220 VAC to 240 VAC line to neutral The enclosure does not operate from higher line to line volta...

Страница 43: ...cumentation to identify the recommended software update method To download product updates go to either of the following o Hewlett Packard Enterprise Support Center Get connected with updates page http www hpe com support e updates o Software Depot website http www hpe com support softwaredepot To view and update your entitlements and to link your contracts and warranties with your profile go to t...

Страница 44: ...spock Storage white papers and analyst reports http www hpe com storage whitepapers Remote support Remote support is available with supported devices as part of your warranty or contractual support agreement It provides intelligent event diagnosis and automatic secure submission of hardware event notifications to Hewlett Packard Enterprise which will initiate a fast and accurate resolution based o...

Страница 45: ... ESD electrostatic discharge HPE APM HPE Apollo Platform Manager formerly named HPE Advanced Power Manager iLO Integrated Lights Out PDU power distribution unit PPIC HPE ProLiant Power Interface Control Utility TMRA recommended ambient operating temperature UID unit identification UPS uninterruptible power system ...

Страница 46: ...tion send any errors suggestions or comments to Documentation Feedback mailto docsfeedback hpe com When submitting your feedback include the document title part number edition and publication date located on the front cover of the document For online help content include the product name product version help edition and publication date located on the legal notices page ...

Страница 47: ...e chassis rack spacing 15 diagnosing problems 36 dimensions and weight 40 disposal battery 5 documentation 6 46 documentation feedback 46 downloading files 43 drive cabling 27 E earth leakage current 8 electrical 37 electrostatic discharge 37 environmental requirements 40 European Union notice 5 F fan LED 11 fan module location 11 fan installing 20 fans 11 Federal Communications Commission FCC not...

Страница 48: ...rmation 38 required cables 27 requirements airflow 7 8 requirements environmental 8 requirements minimum 7 requirements power 5 8 requirements space 7 8 requirements temperature 7 8 resources 43 RoHS 39 S safety considerations 5 37 safety information 5 series number 5 server bay numbering 10 server specifications 40 server tray blank installation 17 server installation 18 space and airflow require...

Страница 49: ...Index 49 weight 40 ...

Отзывы: