background image

BIOS administrator, power-on, and DriveLock passwords are set in Computer Setup and are managed by 

the system BIOS.

Windows passwords are set only in the Windows operating system.

If you forget both the DriveLock user password and the DriveLock master password set in Computer 

Setup, the hard drive that is protected by the passwords is permanently locked and can no longer be 

used.

You can use the same password for a Computer Setup feature and for a Windows security feature.
Use the following tips for creating and saving passwords:

When creating passwords, follow requirements set by the program.

Do not use the same password for multiple applications or websites, and do not reuse your Windows 

password for any other application or website.

Use the Password Manager feature of HP Client Security to store your user names and passwords for 

your websites and applications. You can securely read them in the future if they cannot be remembered.

Do not store passwords in a file on the computer.

The following tables list commonly used Windows and BIOS administrator passwords and describe their 

functions.

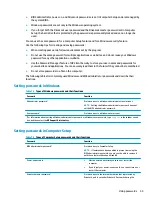
Setting passwords in Windows

Table 7-2

  Types of Windows passwords and their functions

Password

Function

Administrator password*

Protects access to a Windows administrator-level account.

NOTE:

Setting the Windows administrator password does not 

set the BIOS administrator password.

User password*

Protects access to a Windows user account.

*For information about setting a Windows administrator password or a Windows user password, type 

support

 in the taskbar search 

box, and then select the HP Support Assistant app.

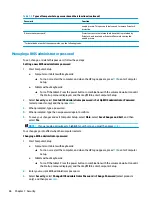
Setting passwords in Computer Setup

Table 7-3

  Types of Computer Setup passwords and their functions

Password

Function

BIOS administrator password*

Protects access to Computer Setup.

NOTE:

If features have been enabled to prevent removing the 

BIOS administrator password, you may not be able to remove it 

until those features have been disabled.

Power-on password

Must be entered each time you turn on or restart the 

computer.

If you forget your power-on password, you cannot turn on or 

restart the computer.

DriveLock master password*

Protects access to the internal hard drive that is protected by 

DriveLock, and is set under DriveLock Passwords during the 

Using passwords

45

Содержание 6TP59EA

Страница 1: ...User Guide ...

Страница 2: ...at are common to most models Some features may not be available on your computer Not all features are available in all editions or versions of Windows Systems may require upgraded and or separately purchased hardware drivers software or BIOS update to take full advantage of Windows functionality Windows 10 is automatically updated which is always enabled ISP fees may apply and additional requireme...

Страница 3: ...ther hard surface such as an adjoining optional printer or a soft surface such as pillows or rugs or clothing to block airflow Also do not allow the AC adapter to come into contact with the skin or a soft surface such as pillows or rugs or clothing during operation The computer and the AC adapter comply with the user accessible surface temperature limits defined by the International Standard for S...

Страница 4: ...iv Safety warning notice ...

Страница 5: ...a Celeron N28xx N29xx N30xx N31xx series processor and a Windows operating system If your computer is configured as described do not change the processor configuration setting in msconfig exe from 4 or 2 processors to 1 processor If you do so your computer will not restart You will have to perform a factory reset to restore the original settings v ...

Страница 6: ...vi Processor configuration setting select products only ...

Страница 7: ...3 Network connections 19 Connecting to a wireless network 19 Using the wireless controls 19 Wireless button 19 Operating system controls 19 Connecting to a WLAN 20 Using HP Mobile Broadband select products only 20 Using GPS select products only 21 Using Bluetooth wireless devices select products only 21 Connecting Bluetooth devices 21 Using NFC to share information select products only 21 Sharing ...

Страница 8: ...ng a camera select products only 30 Using audio 30 Connecting speakers 30 Connecting headphones 30 Connecting headsets 31 Using sound settings 31 Using video 31 Connecting a DisplayPort device using a USB Type C cable select products only 32 Connecting a Thunderbolt device using a USB Type C cable select products only 33 Connecting video devices using an HDMI cable select products only 34 Setting ...

Страница 9: ...ning on external power 42 7 Security 44 Protecting the computer 44 Using passwords 44 Setting passwords in Windows 45 Setting passwords in Computer Setup 45 Managing a BIOS administrator password 46 Entering a BIOS administrator password 47 Using DriveLock Security Options 47 Selecting Automatic DriveLock select products only 48 Enabling Automatic DriveLock 48 Disabling Automatic DriveLock 48 Ente...

Страница 10: ...king up restoring and recovering 59 Backing up information and creating recovery media 59 Using Windows tools 59 Using the HP Cloud Recovery Download Tool to create recovery media select products only 59 Restoring and recovery 60 Restoring resetting and refreshing using Windows tools 60 Recovering using HP Recovery media 60 Changing the computer boot order 60 10 Computer Setup BIOS TPM and HP Sure...

Страница 11: ...dware Diagnostics UEFI settings select products only 68 Downloading Remote HP PC Hardware Diagnostics UEFI 68 Downloading the latest Remote HP PC Hardware Diagnostics UEFI version 68 Downloading Remote HP PC Hardware Diagnostics UEFI by product name or number 68 Customizing Remote HP PC Hardware Diagnostics UEFI settings 68 12 Specifications 70 Input power 70 Operating environment 71 13 Electrosta...

Страница 12: ...pe 77 United Kingdom 77 Australia 77 Worldwide 77 Useful accessibility resources and links 78 Organizations 78 Educational institutions 78 Other disability resources 78 HP links 78 Contacting support 79 Index 80 xii ...

Страница 13: ...ions on page 19 Update your antivirus software Protect your computer from damage caused by viruses The software is preinstalled on the computer For more information see Using antivirus software on page 52 Get to know your computer Learn about your computer features See Components on page 3 and Navigating the screen on page 25 for additional information Find installed software Access a list of the ...

Страница 14: ...gulatory Safety and Environmental Notices To access this document Select the Start button select HP Help and Support and then select HP Documentation Important regulatory notices including information about proper battery disposal if needed Limited Warranty To access this document Select the Start button select HP Help and Support and then select HP Documentation or Go to http www hp com go orderd...

Страница 15: ...ter Type device manager in the taskbar search box and then select the Device Manager app A list displays all the devices installed on your computer For information about system hardware components and the system BIOS version number press fn esc select products only Locating software To find out what software is installed on your computer Right click the Start button and then select Apps and Featur...

Страница 16: ...nd then select HP Documentation NOTE When a device is connected to the jack the computer speakers are disabled 3 USB SuperSpeed port Connects a USB device such as a cell phone camera activity tracker or smartwatch and provides high speed data transfer 4 HDMI port Connects an optional video or audio device such as a high definition television any compatible digital or audio component or a high spee...

Страница 17: ...smartwatch and provides high speed data transfer and Connects a display device that has a USB Type C connector providing DisplayPort output NOTE Your computer may also support a Thunderbolt docking station NOTE Cables and or adapters purchased separately may be required 9 Power connector Connects an AC adapter 10 Battery light When AC power is connected White The battery charge is greater than 90 ...

Страница 18: ...flow to cool internal components NOTE The computer fan starts up automatically to cool internal components and prevent overheating It is normal for the internal fan to cycle on and off during routine operation 3 USB SuperSpeed port with HP Sleep and Charge Connects a USB device provides high speed data transfer and even when the computer is off charges most products such as a cell phone camera act...

Страница 19: ...tion logon to Windows instead of a password logon For more information see Windows Hello select products only on page 52 NOTE Camera functions vary depending on the camera hardware and software installed on your product 6 Camera privacy switch select products only Turns the camera off and on NOTE For more information see Using a camera select products only on page 30 7 WLAN antennas select product...

Страница 20: ...ternal mouse 5 Near Field Communications NFC tapping area and antenna select products only Allows you to wirelessly share information when you tap it with an NFC enabled device The antenna is not visible from the outside of the computer For optimal transmission keep the area immediately around the antenna free from obstructions For wireless regulatory notices see the section of the Regulatory Safe...

Страница 21: ... Mute light On Computer sound is off Off Computer sound is on 3 Microphone mute light On Microphone is off Off Microphone is on 4 Num lk light On Num lock is on 5 Wireless light On An integrated wireless device such as a wireless local area network WLAN device and or a Bluetooth device is on NOTE On some models the wireless light is amber when all wireless devices are off 6 Sharing or presenting l...

Страница 22: ...computer is off press the button to turn on the computer When the computer is on press the button briefly to initiate Sleep When the computer is in the Sleep state press the button briefly to exit Sleep select products only When the computer is in Hibernation press the button briefly to exit Hibernation CAUTION Pressing and holding down the power button results in the loss of unsaved information I...

Страница 23: ...print reader select products only Allows a fingerprint logon to Windows instead of a password logon Swipe down across the fingerprint reader See Windows Hello select products only on page 52 for details IMPORTANT To prevent fingerprint logon issues make sure when you register your fingerprint that all sides of your finger are registered by the fingerprint reader Special keys NOTE Refer to the illu...

Страница 24: ...ction indicated by the icon in the upper right corner of the key NOTE If the keypad function is active when the computer is turned off that function is reinstated when the computer is turned back on 6 num lk key Turns the embedded numeric keypad on and off or Alternates between the navigational and numeric functions on the integrated numeric keypad 7 Windows application key select products only Di...

Страница 25: ...tness of the keyboard backlight Press the key repeatedly to adjust the brightness from high when you first start up the computer to low to off After you adjust the keyboard backlight setting the backlight will revert to your previous setting each time you turn on the computer The keyboard backlight will turn off after 30 seconds of inactivity To turn the keyboard backlight back on press any key or...

Страница 26: ...rovides quick access to your Skype for Business calendar NOTE This feature requires Skype for Business or Lync 2013 running on Microsoft Exchange or Office 365 servers Turns the screen sharing function on or off NOTE This feature requires Skype for Business or Lync 2013 running on Microsoft Exchange or Office 365 servers Answers a call Starts a call during a 1 on 1 chat Places a call on hold NOTE ...

Страница 27: ...C Turns on scroll lock E Turns on the insert function R Breaks the operation S Sends a programing query W Pauses the operation Bottom Table 2 10 Bottom components and their descriptions Component Description Vent Enables airflow to cool internal components NOTE The computer fan starts up automatically to cool internal components and prevent overheating It is normal for the internal fan to cycle on...

Страница 28: ...t uses the least amount of power 2 Wireless light On An integrated wireless device such as a wireless local area network WLAN device and or a Bluetooth device is on NOTE On some models the wireless light is amber when all wireless devices are off 3 Drive light Blinking white The hard drive is being accessed Amber HP 3D DriveGuard has temporarily parked the hard drive NOTE For more information abou...

Страница 29: ... of a tablet kickstand Service label Provides important information to identify your computer When contacting support you may be asked for the serial number the product number or the model number Locate this information before you contact support Your service label will resemble one of the examples shown below Refer to the illustration that most closely matches the service label on your computer T...

Страница 30: ...IM card or the connectors use minimal force when inserting or removing a SIM card NOTE Before purchasing a SIM card follow these instructions to determine the correct SIM card size for your computer 1 Go to http www hp com support and then search for your computer by product name or number 2 Select Product Information 3 Refer to the listed options to determine which card to purchase To insert a SI...

Страница 31: ...n countries Bluetooth device Creates a personal area network PAN to connect to other Bluetooth enabled devices such as computers phones printers headsets speakers and cameras In a PAN each device communicates directly with other devices and devices must be relatively close together typically within 10 meters approximately 33 feet of each other Using the wireless controls You can control the wirele...

Страница 32: ...elect Set up a new connection or network A list of options is displayed allowing you to manually search for and connect to a network or to create a new network connection 3 Follow the on screen instructions to complete the connection After the connection is made select the network status icon at the far right of the taskbar to verify the name and status of the connection NOTE The functional range ...

Страница 33: ...hat traditionally link electronic devices such as the following Computers desktop notebook Phones cellular cordless smartphone Imaging devices printer camera Audio devices headset speakers Mouse External keyboard Connecting Bluetooth devices Before you can use a Bluetooth device you must establish a Bluetooth connection 1 Type bluetooth in the taskbar search box and then select Bluetooth and other...

Страница 34: ... uses a telephone cable Both cables are sold separately WARNING To reduce the risk of electric shock fire or damage to the equipment do not plug a modem cable or telephone cable into an RJ 45 network jack Connecting to a local area network LAN select products only Use a LAN connection if you want to connect the computer directly to a router in your home instead of working wirelessly or if you want...

Страница 35: ...mputer or on an optional docking device or expansion product 2 Start Computer Setup BIOS Computers or tablets with keyboards Turn on or restart the computer and when the HP logo appears press f10 to enter Computer Setup Tablets without keyboards Turn on or restart the tablet and then quickly hold down the volume down button until the Startup menu is displayed Tap f10 to enter Computer Setup 3 Sele...

Страница 36: ...kly hold down the volume down button until the Startup menu is displayed Tap f10 to enter Computer Setup 2 Select Advanced and then select MAC Address Pass Through 3 In the box to the right of Host Based MAC Address select either System Address to enable MAC address Pass Through or Custom Address to customize the address 4 If you selected Custom select MAC ADDRESS enter your customized system MAC ...

Страница 37: ...lect products only touch the screen directly using gestures described in this chapter To customize gestures and see videos of how they work type control panel in the taskbar search box select Control Panel and then select Hardware and Sound Under Devices and Printers select Mouse Some products include a Precision TouchPad which provides enhanced gesture functionality To determine if you have a Pre...

Страница 38: ...n and then moving your fingers apart Two finger slide TouchPad and Precision TouchPad Place two fingers slightly apart on the TouchPad zone and then drag them up down left or right to move up down or sideways on a page or image Two finger tap TouchPad and Precision TouchPad Tap two fingers on the TouchPad zone to open the options menu for the selected object NOTE The two finger tap performs the sa...

Страница 39: ...and then select Touchpad Under Three finger gestures in the Taps box select a gesture setting Four finger tap TouchPad and Precision TouchPad By default the four finger tap opens the Action Center Tap four fingers on the TouchPad zone to perform the gesture To change the function of this gesture on a Precision TouchPad select Start select Settings select Devices and then select Touchpad Under Four...

Страница 40: ... select Devices and then select Touchpad Under Three finger gestures in the Swipes box select a gesture setting Four finger swipe Precision TouchPad By default the four finger swipe switches between open desktops Swipe 4 fingers away from you to see all open windows Swipe 4 fingers toward you to show the desktop Swipe 4 fingers left or right to switch between desktops To change the function of thi...

Страница 41: ...ouse allows you to type select items scroll and perform the same functions as you do using touch gestures The keyboard also allows you to use action keys and hot keys to perform specific functions Using an on screen keyboard select products only 1 To display an on screen keyboard tap the keyboard icon in the notification area at the far right of the taskbar 2 Begin typing NOTE Suggested words may ...

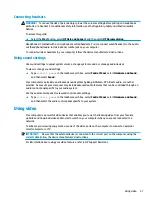
Страница 42: ... enhance your listening enjoyment attach headphones or speakers Connecting speakers You can attach wired speakers to your computer by connecting them to a USB port or to the audio out headphone audio in microphone combo jack on your computer or on a docking station To connect wireless speakers to your computer follow the device manufacturer s instructions To connect high definition speakers to the...

Страница 43: ...ter may include an enhanced sound system by Bang Olufsen DTS Beats audio or another provider As a result your computer may include advanced audio features that can be controlled through an audio control panel specific to your audio system Use the audio control panel to view and control audio settings Type control panel in the taskbar search box select Control Panel select Hardware and Sound and th...

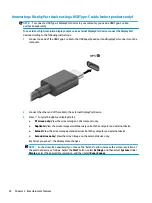
Страница 44: ...ayPort device 3 Press f1 to cycle through four display states PC screen only View the screen image on the computer only Duplicate View the screen image simultaneously on both the computer and external device Extend View the screen image extended across both the computer and external device Second screen only View the screen image on the external device only Each time you press f1 the display state...

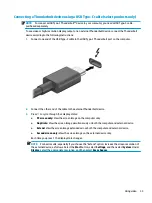
Страница 45: ...nderbolt device 3 Press f1 to cycle through four display states PC screen only View the screen image on the computer only Duplicate View the screen image simultaneously on both the computer and external device Extend View the screen image extended across both the computer and external device Second screen only View the screen image on the external device only Each time you press f1 the display sta...

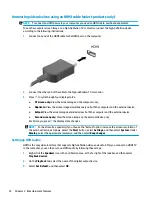
Страница 46: ... the computer and the external device Second screen only View the screen image on the external device only Each time you press f1 the display state changes NOTE For best results especially if you choose the Extend option increase the screen resolution of the external device as follows Select the Start button select Settings and then select System Under Display select the appropriate resolution and...

Страница 47: ...AC power 2 Connect your external display devices to the VGA port or DisplayPort connectors on the hub 3 To see all of your connected display devices type device manager in the taskbar search box and then select the Device Manager app If you don t see all of your connected displays be sure that each is connected to the correct port on the hub NOTE Multiple display choices include Duplicate which mi...

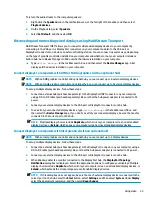
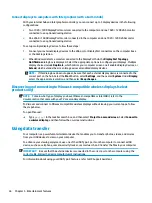
Страница 48: ... Select the Start button select Settings and then select System Under Display select the appropriate resolution and then select Keep changes Discovering and connecting to Miracast compatible wireless displays select products only NOTE To learn what type of display you have Miracast compatible or Intel WiDi refer to the documentation that came with your TV or secondary display To discover and conne...

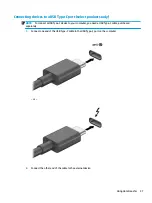
Страница 49: ...E To connect a USB Type C device to your computer you need a USB Type C cable purchased separately 1 Connect one end of the USB Type C cable to the USB Type C port on the computer or 2 Connect the other end of the cable to the external device Using data transfer 37 ...

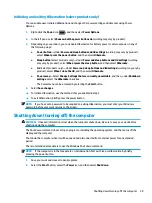
Страница 50: ...d to memory allowing you to resume your work very quickly You can also initiate Sleep manually For more information see Initiating and exiting Sleep on page 38 Hibernation The Hibernation state is automatically initiated if the battery reaches a critical level or the computer has been in the Sleep state for an extended period of time In the Hibernation state your work is saved to a hibernation fil...

Страница 51: ...able and then under Shutdown settings select the Hibernate check box The Power menu can be accessed by selecting the Start button 4 Select Save changes To initiate Hibernation use the method that you enabled in step 3 To exit Hibernation briefly press the power button NOTE If you have set a password to be required on exiting Hibernation you must enter your Windows password before your work returns...

Страница 52: ... computer and the computer is not plugged into external power the computer runs on battery power When the computer is off and unplugged from external power the battery in the computer slowly discharges The computer displays a message when the battery reaches a low or critical battery level Computer battery life varies depending on power management settings programs running on the computer screen b...

Страница 53: ...em Disconnect unused external devices that are not plugged into an external power source such as an external hard drive connected to a USB port Stop disable or remove any external media cards that you are not using Before you leave your work initiate Sleep or shut down the computer Identifying low battery levels When a battery that is the sole power source for the computer reaches a low or critica...

Страница 54: ...select HP Battery Check If HP Battery Check indicates that your battery should be replaced contact support The battery ies in this product cannot be easily replaced by users themselves Removing or replacing the battery could affect your warranty coverage If a battery is no longer holding a charge contact support Running on external power For information about connecting to external power refer to ...

Страница 55: ...computer to external power The battery begins to charge The screen brightness increases The Power icon changes appearance When you disconnect external power The computer switches to battery power The screen brightness automatically decreases to conserve battery charge The Power icon changes appearance Running on external power 43 ...

Страница 56: ...s card registered fingerprints or other authentication credential BIOS power on password Unauthorized access to Computer Setup BIOS BIOS administrator password in Computer Setup Unauthorized access to the contents of a hard drive DriveLock password select products only in Computer Setup Unauthorized startup from an optional external optical drive select products only optional external hard drive s...

Страница 57: ...nd BIOS administrator passwords and describe their functions Setting passwords in Windows Table 7 2 Types of Windows passwords and their functions Password Function Administrator password Protects access to a Windows administrator level account NOTE Setting the Windows administrator password does not set the BIOS administrator password User password Protects access to a Windows user account For in...

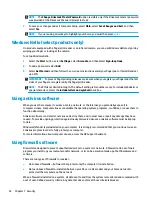
Страница 58: ...omputer Setup 2 Select Security select Create BIOS administrator password or Set Up BIOS administrator Password select products only and then press enter 3 When prompted type a password 4 When prompted type the new password again to confirm 5 To save your changes and exit Computer Setup select Main select Save Changes and Exit and then select Yes NOTE If you are using arrow keys to highlight your ...

Страница 59: ...prompted for the new password leave the field empty and then press enter 6 When prompted to type your new password again leave the field empty and then press enter 7 To save your changes and exit Computer Setup select Main select Save Changes and Exit and then select Yes NOTE If you are using arrow keys to highlight your choice you must then press enter Your changes go into effect when the compute...

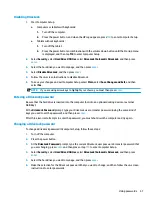
Страница 60: ...ts with keyboards 1 Turn off the computer 2 Press the power button and when the HP logo appears press f10 to enter Computer Setup Tablets without keyboards 1 Turn off the tablet 2 Press the power button in combination with the volume down button until the Startup menu is displayed and then tap f10 to enter Computer Setup 2 At the BIOS administrator password prompt enter the BIOS administrator pass...

Страница 61: ...for the original computer using the same kind of keys you used to set the password and then press enter to unlock the drive After three incorrect attempts to enter the password you must shut down the computer and try again Selecting manual DriveLock IMPORTANT To prevent a DriveLock protected hard drive from becoming permanently unusable record the DriveLock user password and the DriveLock master p...

Страница 62: ...n select Yes NOTE If you are using arrow keys to highlight your choice you must then press enter Enabling DriveLock and setting a DriveLock user password To enable DriveLock and set a DriveLock user password follow these steps 1 Start Computer Setup Computers or tablets with keyboards 1 Turn off the computer 2 Press the power button and when the HP logo appears press f10 to enter Computer Setup Ta...

Страница 63: ...er Entering a DriveLock password Be sure that the hard drive is inserted into the computer not into an optional docking device or external MultiBay At the DriveLock Password prompt type your DriveLock user or master password using the same kind of keys you used to set the password and then press enter After three incorrect attempts to enter the password you must shut down the computer and try agai...

Страница 64: ...er to access e mail a network or the Internet you potentially expose it to computer viruses Computer viruses can disable the operating system programs or utilities or cause them to function abnormally Antivirus software can detect most viruses destroy them and in most cases repair any damage they have caused To provide ongoing protection against newly discovered viruses antivirus software must be ...

Страница 65: ...ts only HP Client Security software is preinstalled on your computer This software can be accessed through the HP Client Security icon at the far right of the taskbar or Windows Control Panel It provides security features that help protect against unauthorized access to the computer networks and critical data For more information see the HP Client Security software Help Using HP Device as a Servic...

Страница 66: ...ng the fingerprint reader The fingerprint reader is a small metallic sensor that is located in one of the following areas of your computer Near the bottom of the TouchPad On the right side of the keyboard On the upper right side of the display On the left side of the display On the back of the display Depending on your product the reader may be oriented horizontally or vertically 54 Chapter 7 Secu...

Страница 67: ...using Disk Defragmenter to defragment your hard drive at least once a month NOTE It is not necessary to run Disk Defragmenter on solid state drives To run Disk Defragmenter 1 Connect the computer to AC power 2 Type defragment in the taskbar search box and then select Defragment and optimize your drives 3 Follow the on screen instructions For additional information access the Disk Defragmenter soft...

Страница 68: ...drivers HP recommends that you update your programs and drivers on a regular basis Updates can resolve issues and bring new features and options to your computer For example older graphics components might not work well with the most recent gaming software Without the latest driver you would not be getting the most out of your equipment Go to http www hp com support to download the latest versions...

Страница 69: ... a display is dry before you close the computer Cleaning the sides or cover To clean the sides or cover use a soft microfiber cloth or chamois moistened with one of the cleaning solutions listed previously or use an acceptable disposable wipe NOTE When cleaning the cover of the computer use a circular motion to aid in removing dirt and debris Cleaning the TouchPad keyboard or mouse select products...

Страница 70: ...e airline If you are shipping the computer or a drive use suitable protective packaging and label the package FRAGILE The use of wireless devices may be restricted in some environments Such restrictions may apply aboard aircraft in hospitals near explosives and in hazardous locations If you are uncertain of the policy that applies to the use of a wireless device in your computer ask for authorizat...

Страница 71: ...t with a detachable keyboard connect the tablet to the keyboard base before beginning any recovery process Backing up information and creating recovery media Using Windows tools IMPORTANT Windows is the only option that allows you to back up your personal information Schedule regular backups to avoid information loss You can use Windows tools to back up personal information and create system resto...

Страница 72: ...structions To recover your system Insert the HP Recovery media and then restart the computer Changing the computer boot order If your computer does not restart using the HP Recovery media you can change the computer boot order This is the order of devices listed in BIOS where the computer looks for startup information You can change the selection to an optical drive or a USB flash drive depending ...

Страница 73: ...row key or the down arrow key on the keyboard To close open dialog boxes and return to the main Computer Setup screen press esc and then follow the on screen instructions To exit Computer Setup choose one of the following methods To exit Computer Setup menus without saving your changes select Main select Ignore Changes and Exit and then select Yes NOTE If you are using arrow keys to highlight your...

Страница 74: ... changes select Main select Ignore Changes and Exit and then select Yes NOTE If you are using arrow keys to highlight your choice you must then press enter To check for later BIOS versions see Downloading a BIOS update on page 62 Downloading a BIOS update CAUTION To reduce the risk of damage to the computer or an unsuccessful installation download and install a BIOS update only when the computer i...

Страница 75: ... on screen instructions NOTE After a message on the screen reports a successful installation you can delete the downloaded file from your hard drive Changing the boot order using the f9 prompt To dynamically choose a boot device for the current startup sequence follow these steps 1 Access the Boot Device Options menu Turn on or restart the computer and when the HP logo appears press f9 to enter th...

Страница 76: ...res the BIOS to its previously safe state without user intervention HP Sure Start is configured and already enabled so that most users can use the HP Sure Start default configuration The default configuration can be customized by advanced users To access the latest documentation on HP Sure Start go to http www hp com support Select Find your product and then follow the on screen instructions 64 Ch...

Страница 77: ...m HP Support Assistant a Type support in the taskbar search box and then select the HP Support Assistant app or Select the question mark icon in the taskbar b Select Troubleshooting and fixes c Select Diagnostics and then select HP PC Hardware Diagnostics Windows 2 When the tool opens select the type of diagnostic test you want to run and then follow the on screen instructions NOTE If you need to ...

Страница 78: ...er on your computer or the USB flash drive where the exe file was downloaded double click the exe file and then follow the on screen instructions Using HP PC Hardware Diagnostics UEFI NOTE For Windows 10 S computers you must use a Windows computer and a USB flash drive to download and create the HP UEFI support environment because only exe files are provided For more information see Downloading HP...

Страница 79: ...h drive can be useful in the following situations HP PC Hardware Diagnostics UEFI is not included in the preinstall image HP PC Hardware Diagnostics UEFI is not included in the HP Tool partition The hard drive is damaged NOTE The HP PC Hardware Diagnostics UEFI download instructions are provided in English only and you must use a Windows computer to download and create the HP UEFI support environm...

Страница 80: ...ote Diagnostics and then select Run Downloading Remote HP PC Hardware Diagnostics UEFI by product name or number NOTE For some products it may be necessary to download the software by using the product name or number To download HP Remote PC Hardware Diagnostics UEFI by product name or number follow these steps 1 Go to http www hp com support 2 Select Get software and drivers select your type of p...

Страница 81: ...iagnostics UEFI settings follow these steps 1 Turn on or restart the computer and when the HP logo appears press f10 to enter Computer Setup 2 Select Advanced and then select Settings 3 Make your customization selections 4 Select Main and then Save Changes and Exit to save your settings Your changes take effect when the computer restarts Using Remote HP PC Hardware Diagnostics UEFI settings select...

Страница 82: ...ecifications Input Power Rating Operating voltage and current 5 V dc 2 A 12 V dc 3 A 15 V dc 3 A 45 W USB C 5 V dc 3 A 9 V dc 3 A 12 V dc 3 75 A 15 V dc 3 A 45 W USB C 5 V dc 3 A 9 V dc 3 A 10 V dc 3 75 A 12 V dc 3 75 A 15 V dc 3 A 20 V dc 2 25 A 45 W USB C 5 V dc 3 A 9 V dc 3 A 12 V dc 5 A 15 V dc 4 33 A 20 V dc 3 25 A 65 W USB C 5 V dc 3 A 9 V dc 3A 10 V dc 5 A 12 V dc 5 A 15 V dc 4 33 A 20 V dc...

Страница 83: ... to optical disc 5 C to 35 C 41 F to 95 F Nonoperating 20 C to 60 C 4 F to 140 F Relative humidity noncondensing Operating 10 to 90 10 to 90 Nonoperating 5 to 95 5 to 95 Maximum altitude unpressurized Operating 15 m to 3 048 m 50 ft to 10 000 ft Nonoperating 15 m to 12 192 m 50 ft to 40 000 ft Operating environment 71 ...

Страница 84: ...to a drive or loss of information observe these precautions If removal or installation instructions direct you to unplug the computer first be sure that it is properly grounded Keep components in their electrostatic safe containers until you are ready to install them Avoid touching pins leads and circuitry Handle electronic components as little as possible Use nonmagnetic tools Before handling com...

Страница 85: ...ompany All HP managers and employees are expected to support these objectives and their implementation in accordance with their roles and responsibilities Raise the level of awareness of accessibility issues within our company and provide our employees with the training they need to design produce market and deliver accessible products and services Develop accessibility guidelines for products and...

Страница 86: ...ow you to evaluate several products answer your questions and facilitate your selection of the best solution for your situation You will find that professionals qualified to do AT assessments come from many fields including those licensed or certified in physical therapy occupational therapy speech language pathology and other areas of expertise Others while not certified or licensed may also prov...

Страница 87: ...nt Accessibility Guidelines WCAG Web Content Accessibility Guidelines WCAG from the W3C s Web Accessibility Initiative WAI helps web designers and developers create sites that better meet the needs of people with disabilities or age related limitations WCAG advances accessibility across the full range of web content text images audio and video and web applications WCAG can be precisely tested is e...

Страница 88: ...more information go to Federal Communication Commission Section 255 information 21st Century Communications and Video Accessibility Act CVAA The CVAA updates federal communications law to increase the access of persons with disabilities to modern communications updating accessibility laws enacted in the 1980s and 1990s to include new digital broadband and mobile innovations Regulations are enforce...

Страница 89: ...nd at the Special Task Force 333 The parts relating to the assessment of suitable testing and conformity schemes were carried out by a parallel project detailed in CEN BT WG185 PT For further information go to the CEN project team website The two projects are closely coordinated CEN project team European Commission mandate for e accessibility PDF 46KB United Kingdom The Disability Discrimination A...

Страница 90: ...TTATC Lighthouse International National Association of the Deaf National Federation of the Blind Rehabilitation Engineering Assistive Technology Society of North America RESNA Telecommunications for the Deaf and Hard of Hearing Inc TDI W3C Web Accessibility Initiative WAI Educational institutions California State University Northridge Center on Disabilities CSUN University of Wisconsin Madison Tra...

Страница 91: ...656 7058 Monday through Friday 6 a m to 9 p m Mountain Time Customers with other disabilities or age related limitations who have questions about technical support or accessibility of HP products choose one of the following options Call 888 259 5707 Monday through Friday 6 a m to 9 p m Mountain Time Complete the Contact form for people with disabilities or age related limitations Contacting suppor...

Страница 92: ...etooth device 19 21 Bluetooth label 18 boot order changing using the f9 prompt 63 boot order changing 60 bottom 18 buttons left TouchPad 8 power 10 right TouchPad 8 C call answer light 10 call end light 10 camera 7 identifying 7 using 30 camera light identifying 7 camera privacy switch identifying 7 caps lock light identifying 9 caring for your computer 56 cleaning your computer 56 components bott...

Страница 93: ...fying 12 internal microphones identifying 7 16 International Association of Accessibility Professionals 73 J jacks audio out headphone audio in microphone combo 4 network 4 RJ 45 network 4 K keyboard and optional mouse using 29 keyboard backlight action key 13 keypad embedded numeric 12 integrated numeric 12 keys action 13 esc 11 fn 12 num lock 12 Windows 12 Windows application 12 L labels Bluetoo...

Страница 94: ...ng 61 restoring factory settings 61 sharing or presenting light identifying 9 shipping the computer 57 shutdown 39 SIM card slot identifying 4 SIM card inserting 18 Sleep exiting 38 initiating 38 Sleep and Hibernation initiating 38 slots security cable 6 SIM card 4 smart card 6 smart card slot identifying 6 software antivirus 52 Disk Cleanup 55 Disk Defragmenter 55 firewall 52 software installed l...

Страница 95: ...ice 33 USB Type C 32 33 wireless displays 36 volume adjusting 13 mute 14 W Windows backup 59 recovery media 59 system restore point 59 Windows application key identifying 12 Windows Hello using 52 Windows key identifying 12 Windows tools using 59 wireless action key 14 wireless antennas identifying 7 wireless button 19 wireless certification label 18 wireless controls button 19 operating system 19...

Отзывы: