background image

Function

Keyboard shortcut

Show the Home Screen.

Home key

– or –

ctrl+alt+d

Show the Start New Program window.

Program Switcher key

– or –

alt+tab

Show the panel menu.

alt+f1

Start a program.

alt+f2

Close a window.

alt+f4

Unmaximize a window.

alt+f5

Move a window.

alt+f7

Resize a window.

alt+f8

Minimize a window.

alt+f9

Maximize a window.

alt+f10

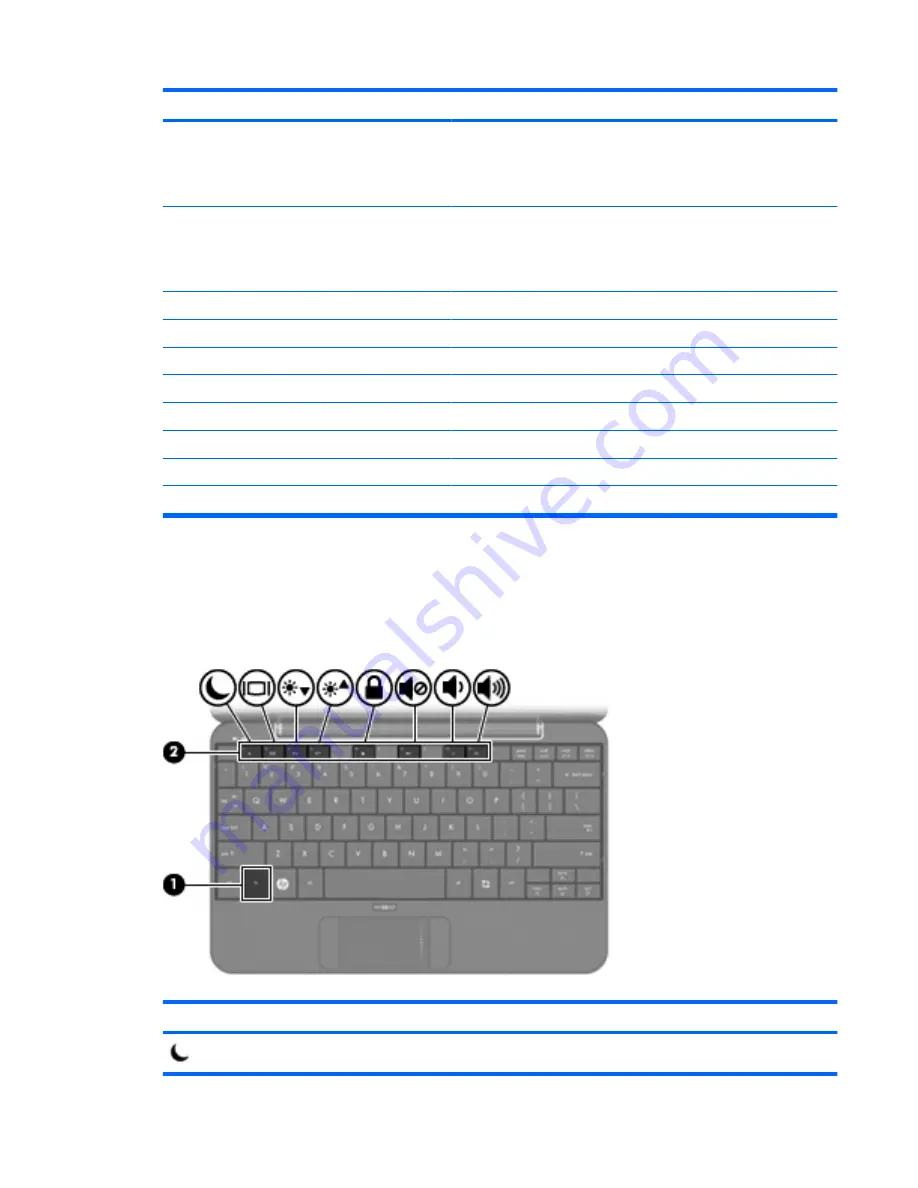
Using hotkeys

Hotkeys are combinations of the 

fn

 key 

(1)

 and one of the function keys 

(2)

.

The icons on the 

f1

 through 

f4

, and 

f6

f8

f10

, and 

f11

 keys represent the hotkey functions. Hotkey

functions and procedures are discussed in the following sections.

Function

Hotkey

Initiate Suspend.

fn+f1

Using the keyboard

65

Содержание 1022 - LaserJet B/W Laser Printer

Страница 1: ...HP MINI User Guide User Guide ...

Страница 2: ...tatements accompanying such products and services Nothing herein should be construed as constituting an additional warranty HP shall not be liable for technical or editorial errors or omissions contained herein First Edition January 2009 Document Part Number 503591 001 Product notice This user guide describes features that are common to most models Some features may not be available on your device...

Страница 3: ...w another hard surface such as an adjoining optional printer or a soft surface such as pillows or rugs or clothing to block airflow Also do not allow the AC adapter to contact the skin or a soft surface such as pillows or rugs or clothing during operation The device and the AC adapter comply with the user accessible surface temperature limits defined by the International Standard for Safety of Inf...

Страница 4: ...iv Safety warning notice ...

Страница 5: ...om components 10 Wireless antennas 11 Additional hardware components 11 Identifying the labels 12 3 Programs Identifying installed programs 15 Installing programs 18 4 Internet Connecting to a wireless network 20 Using wireless devices 20 Identifying wireless network icons 20 Using the wireless controls 20 Using the wireless switch 20 Using a WLAN 21 Setting up a WLAN 21 Protecting your WLAN 21 Co...

Страница 6: ... Hibernation 33 Using the Power icon 34 Finding battery information 34 Displaying remaining battery charge 34 Using power management 34 Viewing the current power management settings 34 Changing the current power management settings 35 Using external AC power 35 Connecting the AC adapter 35 Using battery power 36 Displaying the remaining battery charge 36 Inserting or removing the battery 36 Chargi...

Страница 7: ...references 45 Music 46 Adding music to your library 46 Downloading music 47 Playing music 47 Using the mini player 47 Listening to the playlists 48 Customizing your music favorite links 48 Changing music favorites 48 Deleting music favorites 49 Photos 50 Adding photos to your library 50 Downloading photos 50 Viewing your photo collection 51 Customizing your photo favorite links 51 Changing your ph...

Страница 8: ...ve 62 12 Pointing devices and keyboard Using pointing devices 64 Setting pointing device preferences 64 Using the TouchPad 64 Connecting an external mouse 64 Using the keyboard 64 Using keyboard shortcuts 64 Using hotkeys 65 Initiating Suspend fn f1 66 Switching the screen image fn f2 66 Decreasing screen brightness fn f3 67 Increasing screen brightness fn f4 67 Initiating QuickLock fn f6 67 Mutin...

Страница 9: ... Performing interim updates 77 17 Backing up and restoring Backing up your information 79 When to back up 79 Restoring your information 79 Using System Restore 79 Using HP MIE Restore Image Creator 80 Restoring using a Windows computer 80 Restoring using a Linux computer 81 18 Routine Care Cleaning the display 83 Cleaning the TouchPad and keyboard 83 Traveling and shipping 84 Index 85 ix ...

Страница 10: ...x ...

Страница 11: ... and provides an array of exciting features Browsing the Internet Chatting with friends Checking e mail Listening to music Creating and watching videos Taking and viewing photos Playing games Creating documents spreadsheets and presentations 1 ...

Страница 12: ...os and create links to your favorite photo albums Program Launcher Click the Start New Program button to open a new program or to view all of the programs that are installed on your device You can also see what programs are currently running Navigating the Home Screen The following features make it easy to access the different areas of the Home Screen Component Description Click the Mail icon to c...

Страница 13: ...s the power management features such as Suspend restart Hibernate log out lock the screen and shutdown Click the Settings button to view and customize basic and advanced system settings Click the Files button to open the file manager so you can view and manage your files Click the Wireless Network icon to open the Wireless Network and create manage and use wireless connections Indicates that one o...

Страница 14: ... and off 2 Left TouchPad button Functions like the left button on an external mouse 3 TouchPad Moves the pointer and selects or activates items on the screen 4 TouchPad scroll zone Scrolls up or down 5 Right TouchPad button Functions like the right button on an external mouse 6 TouchPad on off light White TouchPad is on Amber TouchPad is off This table describes factory settings To view or change ...

Страница 15: ...Light Component Description Caps lock light On Caps lock is on Keys Identifying the hardware 5 ...

Страница 16: ...ower switch When the device is off slide the switch to the left to turn on the device When the device is on briefly slide the switch to the left to initiate Hibernation When the device is in Suspend briefly slide the switch to the left to exit Suspend When the device is in Hibernation briefly slide the switch to the left to exit Hibernation If the device has stopped responding and shutdown procedu...

Страница 17: ...ess device such as a wireless local area network WLAN device is on Amber All wireless devices are off 6 Wireless switch Turns the wireless feature on or off but does not establish a wireless connection NOTE A wireless network must be set up in order to establish a wireless connection Right side components Component Description 1 Vent Enables airflow to cool internal components NOTE The device fan ...

Страница 18: ...ent overheating It is normal for the internal fan to cycle on and off during routine operation 4 Expansion port Connects an optional VGA cable which allows you to connect an external VGA monitor or projector 5 Audio out headphone jack Audio in microphone jack Produces sound when connected to optional powered stereo speakers headphones earbuds a headset or television audio Also connects an optional...

Страница 19: ...witch Turns off the display if the display is closed while the power is on 2 Speakers 2 Produce sound 3 Internal microphone Records and captures sound 4 Webcam Captures still photographs and videos 5 Webcam light On The webcam is in use Identifying the hardware 9 ...

Страница 20: ...battery bay 3 Memory module compartment Contains the memory module slot 4 Vents 2 Enable airflow to cool internal components NOTE The device fan starts up automatically to cool internal components and prevent overheating It is normal for the internal fan to cycle on and off during routine operation 10 Chapter 2 Knowing the parts ...

Страница 21: ...ep the areas immediately around the antennas free from obstructions To see wireless regulatory notices refer to the section of the Regulatory Safety and Environmental Notices that applies to your country or region To access these notices refer to the User Guides disc that is included with the device Additional hardware components Component Description 1 Power cord Connects an AC adapter to an AC o...

Страница 22: ...scription 4 This is the number you use to locate documents drivers and support for your device Warranty period 5 This number describes the duration in years of the warranty period for this device Have this information available when you contact technical support The service tag label is affixed to the bottom of the device Regulatory label Provides regulatory information about the device The regula...

Страница 23: ...e NOTE To learn about adding or removing programs refer to Installing programs on page 18 Programs with similar purposes are grouped together using the following categories Internet Programs that access and work through the Internet Media Programs that play music and videos Utilities Maintenance programs Work Spreadsheet word processor and presentation programs Play Fun programs like games All Eve...

Страница 24: ...her opens or Click the Program Switcher icon to display the Start New Program button and open the Program Launcher 2 Click the program you want to open NOTE To exit the Program Launcher click the Home icon in the bottom left corner of the screen 14 Chapter 3 Programs ...

Страница 25: ...s Thunderbird Send receive view and manage e mail Web Browser Access the Internet Media programs HP MediaStyle Listen to music view photos and watch movies Cheese Take photos and videos with the integrated webcam Utilities Calculator Perform basic and advanced calculator functions gEdit Create and edit text files Nautilus Manage your files and programs About Me View and modify user information Ide...

Страница 26: ... OpenOffice Writer Design and produce text documents that include graphics tables or charts OpenOffice Impress Create presentations OpenOffice Draw Create simple and complex drawings and export them into a number of common image formats OpenOffice Calc Calculate analyze and manage information Adobe Reader View PDF files Play programs AisleRiot Solitaire Play a card game Chess Play chess 16 Chapter...

Страница 27: ...Gnometrics Play a falling block game Sudoku Solve logic puzzles Identifying installed programs 17 ...

Страница 28: ... install programs using the Add Remove Applications program NOTE If your device is password protected you will be prompted to enter your password before adding or removing programs To add or remove programs 1 Click the Settings button at the top right of the Home Screen and then click the System tab 2 Click Add Remove The Add Remove Applications window opens 3 Select the program that you want to a...

Страница 29: ...a wireless connection To learn about setting up a wireless network or connecting to an existing network refer to Connecting to a wireless network on page 20 Wired For broadband network access use the RJ 45 network jack To learn about connecting to a broadband network refer to Connecting to a wired network on page 24 19 ...

Страница 30: ...k icons Name Description Wireless network connected Indicates that one or more of your wireless devices are connected to the network NOTE The number of bars shown indicates the signal strength The greater the number of bars the stronger the signal Wireless network disconnected Indicates that one or more of your WLAN devices are not connected to the network Using the wireless controls You can contr...

Страница 31: ...le 1 and high speed Internet service purchased from an Internet service provider ISP A wireless router purchased separately 2 Your HP MINI 3 The illustration below shows an example of a wireless network installation that is connected to the Internet As your network grows additional wireless and wired computers can be connected to the network to access the Internet For help in setting up your WLAN ...

Страница 32: ...ta before it is transmitted using a WEP key Usually you can allow the network to assign the WEP key Alternatively you can set up your own key generate a different key or choose other advanced options Without the correct key others will not be able to use the WLAN WPA Wi Fi Protected Access like WEP uses security settings to encrypt and decrypt data that is transmitted over the network However inst...

Страница 33: ...onnection icon in the notification area at the bottom of the Home Screen to verify the name speed strength and status of the connection NOTE The functional range how far your wireless signals travel depends on WLAN implementation router manufacturer and interference from other electronic devices or structural barriers such as walls and floors More information about using a WLAN is available throug...

Страница 34: ...rference from TV and radio reception orient the circuitry end of the cable 2 toward the device To connect the network cable WARNING To reduce the risk of electric shock fire or damage to the equipment do not plug a modem cable or telephone cable into an RJ 45 network jack 1 Plug the network cable into the network jack 1 of the device 2 Plug the other end of the cable into a network wall jack 2 24 ...

Страница 35: ...esktop notebook Internet devices PDA Phones cellular cordless smart phone Imaging devices printer camera Audio devices headset speakers Keyboard and mouse devices Bluetooth devices provide peer to peer capability that allows you to set up a personal area network PAN of Bluetooth devices For information on configuring and using Bluetooth devices refer to the Bluetooth software Help Using Bluetooth ...

Страница 36: ...nt NOTE You must set up your e mail account before you can send and receive e mail Refer to Setting up an e mail account on page 26 for additional information Setting up an e mail account In order to send and receive e mail you must set up your e mail account The Thunderbird Account wizard collects the information necessary to set up your account With the Thunderbird Account Wizard you can set up ...

Страница 37: ...about Mozilla Thunderbird refer to the Mozilla Thunderbird software Help Checking for new e mail To check for new e mail click the Mail icon in the Mail section of the Home Screen Thunderbird opens After you check for new e mail your new messages will appear in the Mail section of the Home Screen Viewing e mail To view your messages click the message you want to open in the Mail section of the Hom...

Страница 38: ...cific topic Type the topic in the search box and then click the search button The Web Browser opens with a list of Web sites related to the topic Using the Bookmarks Menu The Bookmarks Menu in the Web section of the Home Screen provides convenient access to your favorite Web sites so you can easily revisit them without having to remember the Web address or perform a search NOTE To access Web sites...

Страница 39: ...to the Web Browser software Help 1 Right click an unassigned Web favorite link and then click Assign Favorite The Change Website window opens 2 Click the arrow next to the Bookmarks Menu and then double click the bookmarked Web site that you want to appear as your favorite Web site The Web site appears as a favorite Web site link on the Home Screen Changing Web favorites You can easily change one ...

Страница 40: ...e Web site or Right click the Web favorite link that you want to open and then click Open The Web Browser opens to your favorite Web site Removing Web favorites To remove a Web favorite link on the Home Screen Right click the Web favorite link that you want to remove and then click Remove Favorite 30 Chapter 4 Internet ...

Страница 41: ... messaging programs simultaneously NOTE To create instant messages you must have an Internet connection NOTE For additional information about Pidgin go to http www pidgin im To open Pidgin follow these steps 1 Click Start New Program Internet Pidgin 2 Follow the on screen instructions to enable your Pidgin account and start creating instant messages 31 ...

Страница 42: ... reading from or writing to a disc or an external media card NOTE You cannot initiate any type of networking connection or perform any functions while the device is in Suspend or in Hibernation Initiating and exiting Suspend The system is set at the factory to initiate Suspend after 10 minutes of inactivity when running on battery power and 25 minutes of inactivity when running on external power N...

Страница 43: ...g on external power NOTE To reduce the risk of information loss periodically save your work To change power settings and timeouts 1 Click the Settings button at the top right of the Home Screen and then click the System tab 2 Click Power Management The Power Management Preferences window opens 3 Modify your power settings and then click Close To initiate Hibernation Click Logout Hibernate Click th...

Страница 44: ... Technology Model Capacity Current charge Last full charge Design charge Displaying remaining battery charge Move the pointer over the Power icon in the notification area at the bottom of the Home Screen The time shown indicates the approximate running time remaining on the battery if the battery continues to provide power at the current level For example the time remaining will decrease when a CD...

Страница 45: ...ng events occur The battery begins to charge If the device is turned on the battery meter icon in the notification area changes appearance When you disconnect external AC power the following events occur The device switches to battery power The display brightness is automatically decreased to save battery life To increase display brightness press the fn f4 hotkey or reconnect the AC adapter Connec...

Страница 46: ...ery in the device slowly discharges when the device is off and unplugged from external power WARNING To reduce potential safety issues use only the battery provided with the device a replacement battery provided by HP or a compatible battery purchased from HP Device battery life varies depending on power management settings programs running on the device display brightness external devices connect...

Страница 47: ... battery release latches 1 to release the battery 3 Pivot the battery 2 upward and remove the battery from the device 3 Charging a battery WARNING Do not charge the device battery while you are onboard aircraft The battery charges whenever the device is plugged into external power through an AC adapter an optional power adapter an optional docking device or an optional expansion product The batter...

Страница 48: ...reaches a critical battery level the battery light begins blinking rapidly Off The battery is fully charged in use or not installed Maximizing battery discharge time Battery discharge time varies depending on the features you use while on battery power Maximum discharge time gradually shortens as the battery storage capacity naturally degrades Tips for maximizing battery discharge time Lower the b...

Страница 49: ...battery level when a charged battery is available 1 Turn off the device or initiate Hibernation 2 Remove the discharged battery and then insert a charged battery 3 Turn on the device Resolving a low battery level when no power source is available Initiate Hibernation or Save your work and shut down the device Resolving a low battery level when the device cannot exit Hibernation When the device lac...

Страница 50: ...the On AC Power and On Battery Power tabs record the current values for the following settings Put the display to sleep when the computer is inactive for Put the computer to sleep when it is inactive for 3 Move the slider all the way to the right to change all 4 of these settings to Never 4 Click Close Step 3 Discharge the battery The device must remain on while the battery is being discharged The...

Страница 51: ...tion after calibration may result in a full battery discharge and information loss if the device reaches a critical battery level 1 Right click the Power icon in the notification area at the bottom of the Home Screen and then click Preferences or Select Settings System tab Power Management 2 Under the On AC Power and On Battery Power tabs reset the previous values for the following settings Put th...

Страница 52: ... operating system and then turns off the display and device Shut down the device under any of the following conditions When you need to replace the battery or access components inside the device When you are connecting an external hardware device that does not connect to a USB port When the device will be unused and disconnected from external power for an extended period To shut down the device fo...

Страница 53: ...that allows you to capture photographs and videos Preinstalled multimedia software that allows you to play and manage your music movies and photos NOTE Your device may not include all of the components listed The following sections explain how to identify and use the multimedia components included with your device Identifying your multimedia components The following illustration and table describe...

Страница 54: ...Mutes device sound when pressed in combination with the fn key 8 Audio out headphone jack Audio in microphone jack Produces sound when connected to optional powered stereo speakers headphones earbuds a headset or television audio Also connects an optional headset microphone WARNING To reduce the risk of personal injury adjust the volume before putting on headphones earbuds or a headset For additio...

Страница 55: ...e press fn f11 Operating system volume control a Click the Volume icon in the notification area at the bottom of the Home Screen b Increase or decrease the volume by moving the slider up or down Program volume control Volume can also be adjusted within some programs Adjusting sound preferences You can turn device sounds on and off using the Sound Preferences utility You can also specify which soun...

Страница 56: ...d manage your music collection by artist album song genre or playlist NOTE For additional information go to http elisa fluendo com Adding music to your library When you connect an external device or save music to the Music folder in the file manager HP MediaStyle automatically detects the files that are in the Music folder NOTE The following file formats are supported mp3 acc wma ogg flac wav and ...

Страница 57: ...n page 48 for more information NOTE To exit HP MediaStyle click the Home icon in the top right of the screen To play an album or playlist from the Home Screen Double click a music favorite link on the Home Screen The music begins playing NOTE Use the mini player to control the music that is currently playing To play music in HP MediaStyle 1 Click Start New Program Media HP MediaStyle HP MediaStyle...

Страница 58: ...dded tracks To open and listen to the playlists 1 Click Start New Program Media HP MediaStyle 2 Click the Music icon and then click Playlists 3 Click the playlist to begin listening to the music Customizing your music favorite links The music favorite links allow you to create two customized links to your favorite albums or playlists These links are actual images of your album covers that appear o...

Страница 59: ... 2 Browse for the album or playlist that you want to change and then double click the album or playlist The album or playlist appears as a favorite music link on the Home Screen Deleting music favorites To delete a music favorite from the Home Screen Right click the music favorite link that you want to remove and then click Remove Favorite Music 49 ...

Страница 60: ...are in the Pictures folder NOTE The following file formats are supported jpg png gif tiff and raw Add photos to your photo library on the device in any of the following ways Use a Secure Digital SD Memory Card a MultiMediaCard MMC or a USB device to easily transfer photos Download photos from the Web to your device Connect a digital camera select models only by using the transfer cable that came w...

Страница 61: ...deshow to begin viewing your photos To view your photos in HP MediaStyle 1 Click Start New Program Media HP MediaStyle HP MediaStyle opens 2 Click the Photo icon 3 Browse for the photo or photo album you want to view and then click Play Slideshow or View Photo Customizing your photo favorite links The photo favorite links allow you to create three customized links to your favorite photo albums The...

Страница 62: ...messaging programs Connecting external audio devices WARNING To reduce the risk of personal injury adjust the volume before putting on headphones earbuds or a headset For additional safety information refer to the Regulatory Safety and Environmental Notices To connect external devices such as external speakers headphones or a microphone refer to the information provided with the device For best re...

Страница 63: ...ector To connect an external monitor or projector 1 Connect the optional VGA cable to the expansion port on the device 2 Connect the display device to the other end of the cable NOTE If a properly connected external display device does not display an image press fn f2 to transfer the image to the device Repeatedly pressing fn f2 alternates the screen image between the device display and the device...

Страница 64: ...Card MultiMediaCard or USB device that contains your videos or Download your videos from the Web 2 Save the videos in the Videos folder in the file manager Watching videos After you download your videos follow these steps to begin watching videos NOTE To exit HP MediaStyle click the Home icon in the top right of the screen 1 Click Start New Program Media HP MediaStyle HP MediaStyle opens 2 Click t...

Страница 65: ...ing games are installed on the device AisleRiot Solitaire Chess Gnometrics Sudoku To open a game 1 Click Start New Program and then click the Play tab 2 Click the game that you want to play NOTE For additional information on the games refer to the game software Help 55 ...

Страница 66: ...ations program 1 Click the Settings button at the top right of the Home Screen and then click the System tab 2 Click Add Remove The Add Remove Applications window opens 3 Click Games in the left column and then select the game that you want to install 4 Click Apply Changes 56 Chapter 8 Games ...

Страница 67: ... To take a photo click Photo and then click Take a photo or To record a video click Video and then click Start recording The webcam software enables you to experiment with the following features Video Record and play back webcam video and create special effects Audio Record and play back audio Streaming video Use with instant message software solutions that support UVC Universal Video Class camera...

Страница 68: ... more people at a time NOTE To set up a conference call or video chat you must have an Internet connection To start a conference call or video chat with Skype if you already have a Skype account set up 1 Click Start New Program Internet Skype 2 Type your Skype name and password and then click Sign in 3 Follow the on screen instructions to begin your conference call or video chat To start a confere...

Страница 69: ...card CAUTION To avoid damaging the digital card or the device do not insert any type of adapter into the SD Card Reader CAUTION To prevent damage to the digital card connectors use minimal force to insert a digital card 1 Hold the digital card label side up with the connectors facing the device 2 Insert the card into the SD Card Reader and then push in on the card until it is firmly seated NOTE Wh...

Страница 70: ...an unresponsive system do not remove a digital card while it is being accessed 1 Save your information and close all programs associated with the digital card 2 Press in on the digital card 1 and then remove the card from the slot 2 60 Chapter 10 Digital cards ...

Страница 71: ...SB 1 1 and USB 2 0 devices Depending on the model the device may also have a HP Mini Mobile Drive Bay which supports an optional HP Mini Mobile Drive An optional USB hub optional docking device or an optional expansion product provides additional USB ports that can be used with the device Connecting a USB device CAUTION To prevent damage to a USB connector use minimal force to connect a USB device...

Страница 72: ... the HP Mini Mobile Drive Insert the HP Mini Mobile Drive into the HP Mini Mobile Drive Bay and then push in until firmly seated NOTE When the HP Mini Mobile Drive is detected the file manager opens and displays the content of the drive Removing the HP Mini Mobile Drive CAUTION To prevent loss of information or an unresponsive system do not remove the HP Mini Mobile Drive while it is being accesse...

Страница 73: ...Using the HP Mini Mobile Drive Bay select models only 63 ...

Страница 74: ... TouchPad to move the pointer you must lift your finger off the TouchPad before moving it to the scroll zone Simply sliding your finger from the TouchPad to the scroll zone will not activate the scrolling function Connecting an external mouse You can connect an external USB mouse to the device using one of the USB ports on the device Using the keyboard Using keyboard shortcuts A shortcut key is a ...

Страница 75: ...e a window alt f5 Move a window alt f7 Resize a window alt f8 Minimize a window alt f9 Maximize a window alt f10 Using hotkeys Hotkeys are combinations of the fn key 1 and one of the function keys 2 The icons on the f1 through f4 and f6 f8 f10 and f11 keys represent the hotkey functions Hotkey functions and procedures are discussed in the following sections Function Hotkey Initiate Suspend fn f1 U...

Страница 76: ... your work before initiating Suspend The device must be on before you can initiate Suspend NOTE If a critical battery level occurs while the device is in Suspend the device initiates Hibernation and the information stored in memory is saved to the hard drive The factory setting for critical battery action is Hibernate but this setting can be changed in advanced power settings To exit Suspend brief...

Страница 77: ...ss level incrementally Initiating QuickLock fn f6 Press fn f6 to initiate the QuickLock security feature QuickLock protects your information by displaying the operating system Log On window While the Log On window is displayed the device cannot be accessed until a password is entered To use QuickLock press fn f6 to display the Log On window and lock the device Then follow the instructions on the s...

Страница 78: ... the device on and then shut it down through the operating system Do not use excessive force when inserting a drive into a drive bay Do not type on the keyboard or move the device while an optional optical drive is writing to a disc The write process is sensitive to vibration When the battery is the only source of power be sure that the battery is sufficiently charged before writing to media Avoid...

Страница 79: ... or to learn which device port to use refer to the manufacturer s instructions To connect an external device CAUTION To reduce the risk of damage to the equipment when connecting a powered device be sure that the device is turned off and the AC power cord is unplugged 1 Connect the device 2 If you are connecting a powered device plug the device power cord into a grounded AC outlet 3 Turn on the de...

Страница 80: ...that you are discharged of static electricity by touching a grounded metal object To add or replace a memory module 1 Save your work 2 Shut down the device and close the display If you are not sure whether the device is off or in Hibernation turn the device on by sliding the power switch Then shut down the device through the operating system 3 Disconnect all external devices connected to the devic...

Страница 81: ... memory module tilts up CAUTION To prevent damage to the memory module hold the memory module by the edges only Do not touch the components on the memory module b Grasp the edge of the memory module 2 and gently pull the module out of the memory module slot To protect a memory module after removal place it in an electrostatic safe container 10 Insert a new memory module 71 ...

Страница 82: ...e 2 into the memory module slot until it is seated c Gently press the memory module 3 down applying pressure to both the left and right edges of the memory module until the retention clips snap into place CAUTION To prevent damage to the memory module be sure that you do not bend the memory module 11 Align the tabs 1 on the memory module compartment cover with the notches on the device 12 Close th...

Страница 83: ...15 Settings 73 ...

Страница 84: ...e Home Screen The following are some of the system settings that you can customize Add and remove software Change power management settings Set printer configurations Set appearance and screen saver preferences Configure time and date settings Configure sound preferences Configure network settings Install software updates Change accessibility options View and modify keyboard shortcuts 74 Chapter 1...

Страница 85: ...t the bottom of the Home Screen and then click Adjust Date Time The Time and Date Settings window opens 2 Modify the time and date settings and then click Close Changing the Clock Preferences You can change the following time and date settings with the Clock Preferences Clock type Show seconds Show date Add weather Use Universal Coordinated Time UTC Manage the different time zones To change the cl...

Страница 86: ...date only when the device is connected to reliable external power using the AC adapter Do not download or install a BIOS update while the device is running on battery power or connected to an optional power source During the download and installation follow these instructions Do not shut down the device or initiate Suspend or Hibernation Do not insert remove connect or disconnect any device cable ...

Страница 87: ...tect the device from security breaches and device viruses so install all critical updates as soon as you see the Critical Update Manager icon in the notification area at the bottom of the Home Screen To install critical updates 1 Click the Critical Update Manager icon to open Update Manager 2 Follow the on screen instructions Performing interim updates When new updates become available the Update ...

Страница 88: ...our files and folders Then if the system fails you can restore your important files from copies You can also use the options listed in this appendix to restore the operating system and programs that were installed at the factory 78 Chapter 17 Backing up and restoring ...

Страница 89: ...rating system software and drivers Software drivers and updates not installed with the factory image must be reinstalled using Update Manager The device provides the following restore options System Restore installed on the device You can use the System Restore utility to restore the original operating system and programs HP MIE Restore Image Creator USB flash drive If you are unable to boot start...

Страница 90: ... reboot your device and restore the system Follow the specific operating system instructions in this section to restore your system Restoring using a Windows computer To download the files on another computer running a Windows operating system and restore your device follow these steps 1 From your Windows computer go to http www hpmini com and follow the steps to download the HP MIE Restore Image ...

Страница 91: ...d refer to your Linux operating system documentation for information on how to enable this password The HP MIE Restore Image Creator utility opens 5 Click the Browse button and select the HP Mini MIE recovery image or Select HP Netbook Recovery Image to automatically download the latest HP Mini MIE recovery image from http www hpmini com 6 Click Start 7 When the process is complete remove the USB ...

Страница 92: ...18 Routine Care 82 Chapter 18 Routine Care ...

Страница 93: ...jump around on the screen To avoid this clean the TouchPad with a damp cloth and wash your hands frequently when using the device WARNING To reduce the risk of electric shock or damage to internal components do not use a vacuum cleaner attachment to clean the keyboard A vacuum cleaner can deposit household debris on the keyboard surface Clean the keyboard regularly to prevent keys from sticking an...

Страница 94: ...ng a flight check with the airline in advance If the device will be unused and disconnected from external power for more than 2 weeks remove the battery pack and store it separately If you are shipping the device or a drive use suitable protective packaging and label the package FRAGILE If your device is equipped with an 802 11b g device a Global System for Mobile Communications GSM device or a Ge...

Страница 95: ...d 4 right TouchPad 4 TouchPad on off 4 C cables LAN 24 USB 61 VGA 53 calculator 15 calibrating battery 39 caps lock light identifying 5 CD drive 69 charging batteries 37 40 checking audio functions 52 Cheese 15 Chess 16 cleaning display 83 keyboard 83 TouchPad 83 clock preferences changing 75 compartments memory module 10 components additional hardware 11 bottom 10 display 9 front 6 left side 8 ri...

Страница 96: ...er 77 Help 3 Home 2 Mail 2 Program Switcher 2 Update Manager 77 wireless network 20 installing software updates 76 instant messages creating 31 Instant Messenger configuring 31 opening 31 internal display switch identifying 9 internal microphone identifying 9 44 Internet browsing 28 connecting 19 searching 28 Internet connection setup 21 Internet programs 15 J jacks audio in microphone 8 44 audio ...

Страница 97: ... product name and number device 12 program launcher 13 Program Switcher key 6 program start new 13 programs finding 13 installing 18 Instant Messenger 31 projector connecting 53 public WLAN connection 22 Q QuickLock hotkey 67 R readable media 32 regulatory information regulatory label 12 wireless certification labels 12 release latches battery 10 37 memory module compartment cover 70 restoring HP ...

Страница 98: ...downloading 54 watching 54 volume down hotkey identifying 44 volume up hotkey identifying 44 W Web browsing 28 searching 28 using bookmarks 28 Web Browser 15 Web favorites changing 29 creating new 29 customizing 29 opening 29 removing 30 webcam conference call 58 identifying 57 tips 58 using 57 video chat 58 webcam light identifying 9 44 webcam identifying 9 44 wireless antennas 11 wireless certif...

Страница 99: ......

Отзывы: