Please read this leaflet carefully and keep it in a safe
place
POLYSPRAY 2/ WEEDSPRAY
2 PRESSURE SPRAYER
4075/4076
2 pint 1.25 litre
OPERATING INSTRUCTIONS
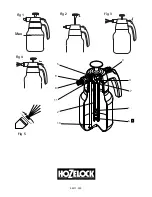
1. Unscrew the container (Figure 1). Fill it to the
maximum (Figure 2). Screw the head assembly unit
firmly into place.
2. Pressurise the sprayer by pumping about 40 strokes
(Figure 3). The sprayer has a built-in device to
prevent over-pressurisation.
3. For small areas ‘Spot Spray’ by depressing the lever
(Figure 4).
4. For larger areas spray continuously by pushing
forward lock-on button (Figure 5).
5. Adjust the nozzle as required (Figure 6). Turn anti-
clockwise for jet, or push in nozzel and turn
clockwise for spray,
6. After a short time, pressure will drop. Restore
pressure by pumping.
7.
After use, release excess pressure by slowly
unscrewing the head assembly. This will allow air to
escape.
8. If you have used chemicals in the sprayer, discard any
unused solution safely. Fill the sprayer with warm
(not hot) water and a little detergent. Spray this
through the unit. Repeat with clean cold water.
Check that the nozzle and the grooves in the nozzle
spindle are free from sediment.
SPRAYING CHEMICALS
This sprayer is intended for water solutions of
proprietary insecticides, fungicides, weed-killers and
foliar feeds.
Follow these instructions carefully.
•
Wear protective clothing, goggles, face-masks and
gloves.
•
Do not inhale spray mist.
•
Avoid skin contact with chemical sprays.
•
Work in a well-ventilated area.
•
Take care to protect children, pets and fish from
exposure to chemicals.
•
Seek medical attention if spray gets in your eyes or if
you develop any symptoms after spraying.
•
Wash your hands thoroughly after using the sprayer,
especially before eating.
•
Wash contaminated clothing.
•
Do not spray over food or food preparation areas.
•
When spraying crops, follow the chemical
manufacturer’s advice on how soon you can pick or
eat the crops after spraying.
•
Do not spray any solvent-based material such as
white spirit.
USING POWDERED CHEMICALS
•
Spray only thin watery solutions. Thicker mixtures
will clog the nozzle.
•
Powdered chemicals that are completely soluble in
water can be sprayed easily. If they are not fully
soluble, and tend to settle, keep shaking the bottle.
•
If the solution contains sediment, strain the liquid
into the sprayer bottle.
CLEANING THE SPRAYER
•
After use, clean thoroughly with warm water and
detergent, then rinse, as in instruction 8. Repeat if
necessary.
NOTE
Your sprayer is made from several different types of
plastic. Even if the liquid you wish to use is packed in a
plastic container, it may damage the sprayer. If you are
in any doubt about the material you intend to spray,
write to our Consumer Services Department at the
address below.
TIPS ON MAINTENANCE
A. Plunger Assembly
Keep the plunger ‘o’ ring lubricated.
To gain access, unscrew the container from the sprayer
head and expose the barrel.
Unscrew and remove the barrel, making sure you do not
displace the ‘o’ ring seal on the thread.
After lubricating, or fitting a new part, replace the
barrel carefully, and ensure that grease does not enter
either of the small holes in the plunger.
B. Replacing the valve seals and springs
Remove:
(1) the pump barrel, as above
(2) the nozzle retaining cap, using a screwdriver
(3) the nozzle.
Raise the pump knob fully.
Lift off the top of the sprayer and also the operating
lever/lock.
You can now get at the springs and valve seals. Remove
the springs and slide the valve backwards.
Always lubricate the seals on re-assembly.
C. Pump non-return valve
To remove the valve, insert a small screwdriver under
the outer edge of the valve, making sure you do not
damage the barrel, and lever it outwards. To re-fit,
position the pip on the back of the valve over the hole
in the bottom of the pump barrel. Snap it in by pushing
the front centre of the valve with a blunt tool.
D. Sealing washer
This is fitted to ensure an airtight seal between the
sprayer head and the container. To check this part, fill
the sprayer with water, pressurise the container, and
turn it upside down. If there is a leak, liquid will be
forced from the joint.
GB

