Hoymiles DTU-MI Скачать руководство пользователя страница 3


                                                              ©  2019 Hoymiles Converter Technology Co., Ltd. All rights reserved.


3


DTU-MI-GPRS 

1. Important Safety Information
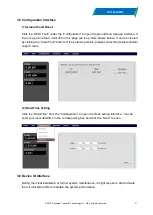
 

1.1 

  Read this First 

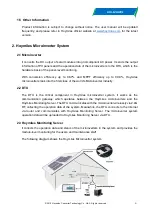
This manual includes important instructions for installing and maintaining the Hoymiles Data 
Transfer Unit (DTU-MI-GPRS). 

1.2 

  Safety Instructions 


Note that only professionals can install or replace DTU. 


Do not try to repair DTU without Hoymiles’ approval. If DTU is damaged, please send the DTU 
back to your installer for repairing/replacing. Disassembling DTU without Hoymiles’ approval will 
invalidate remaining of the warranty period. 


Please read all instructions and warnings on the technical specifications carefully. 


Do not use Hoymiles products in a way that is not suggested by manufacture. If doing so, it 
may cause death or injury to persons or damage to equipment. 
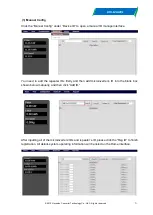
 

1.3 

  User 

This manual is only for professional installation and maintenance personnel to use.


1.4 

  Support and Contact Information 

If you have technical queries concerning our products, please contact your system’s installer. 
If further support is required, please contact Hoymiles’ support at this link. 


www.hoymiles.com 


Hoymiles’ customer service center

[email protected]


Symbol


Usage 


Indicate a hazardous situation that can result in deadly electric shock hazards, 

other physical severe injuries, or fire hazards.


Indicate directions that must be fully understood and followed in entirety to avoid 

potential safety hazards, including equipment damage or personal injury.


Indicate that the described operation must not be carried out. The reader should 

stop,  use  caution,  and  fully  understand  the  processes  explained  before 

proceeding.


Содержание DTU-MI

Страница 1: ...Version D 4 1 0 2019...

Страница 2: ...itoring Server 4 3 Introduction to DTU Interface 5 3 1 DTU Screens 5 3 2 DTU Local Interface 5 3 3 DTU Home Interface 6 3 4 DTU View Interface 6 3 5 Configuration Interface 8 3 6 Device ID Interface 8...

Страница 3: ...ufacture If doing so it may cause death or injury to persons or damage to equipment 1 3 User This manual is only for professional installation and maintenance personnel to use 1 4 Support and Contact...

Страница 4: ...miles microinverters rank into the first class of the world s Microinverter industry 2 2 DTU The DTU is the critical component in Hoymiles microinverter system It works as the communication gateway wh...

Страница 5: ...e ID of the current search 4 Local IP address e g 192 168 1 XXX Page 2 5 It indicates data on the real time output power in kilowatts e g 0 16kW 6 It indicates data on today s output energy of the sys...

Страница 6: ...ystem including Total Output Power Total Energy Today Energy and CO2 Saved On the right side shows the operation data of each microinverter including PV Voltage Grid Voltage Grid Frequency Grid Power...

Страница 7: ...The System channel can be amended on the Configure System under the Configure function on the top functional bar The setting range is 0 25 If there is more than one DTU in the same installation area p...

Страница 8: ...ow It can be cleared by clicking the Clear Fault bottom If the problem persists please contact Hoymiles technical support team 2 Date Time Setting Click the Date Time from the Configuration to open th...

Страница 9: ...al ID manage interface You need to add the repeater IDs firstly and then add microinverter s ID into the blank box shown below manually and then click Add ID After inputting all of the microinverters...

Страница 10: ...pacity The DTU is capable of monitoring up to 499 MI 250 MI 300 MI 350 microinverters or 249 MI 500 MI 600 MI 700 microinverters or 124 MI 1000 M 1200 MI 1500 Note Max Monitoring quantity is for open...

Страница 11: ...m Installation Sequence 1 Install the PV modules and microinverters and repeater 2 Locate the DTU 9 Wall mount the DTU optional 4 Start procedure 5 Normal operation 7 Add Microinverter ID 8 Check the...

Страница 12: ...h will reduce the communication distance The range of signal reduction for possible obstacles at the site has been shown below Material Relative signal range reductions Wood Glass 0 10 Stone Pressed c...

Страница 13: ...e cable into a spare port on the broadband router c Plug one end of the DTU power adapter into the socket and the other end into the DTU power interface 2 SIM Card Place the SIM Card to the tray inser...

Страница 14: ...s NC minutes after connecting to the broadband router please refer to Troubleshooting on page 20 4 56 Log in the local interface of the DTU 1 Connect both DTU and laptop to the local house network 2 O...

Страница 15: ...nverters linked is less than the number of all microinverters installed see Troubleshooting on page 20 4 59 Wall Mounting optional After the DTU detecting all microinverters in the system please mount...

Страница 16: ...e and password If you are a new installer with Hoymiles please apply an Installer account from Hoymiles Technical and Service Support Team at service hoymiles com in advance c Add Station select the S...

Страница 17: ...eated m Please wait about 30 minutes the station will show online and all the MI IDs are detected 7 Customer Login a Please download the End User App You can search Hoymiles at the App Store IOS or Pl...

Страница 18: ...o the Internet successfully B The Link Number is less than Total Number of Microinverters LINK XX indicated the number of connected microinverters If this number is less than the total microinverters...

Страница 19: ...ernet 10M 100M GPRS communication GSM four frequency band 850 900 1800 1900MHz Power Supply Type External plug in adapter Adapter input voltage frequency 100 to 240 V AC 50 or 60Hz Adapter output volt...

Отзывы: