background image

17


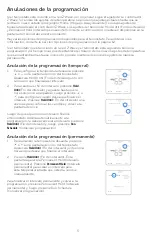
Con el tiempo, su termostato T6 Pro Z-Wave recordará 

cuánto tarda su sistema en alcanzar la temperatura 

deseada. Luego, puede encender su equipo de 

calefacción o refrigeración en el momento justo para 

asegurarse de que su hogar esté cómodo cuando 

así lo espera. Esta función solo está disponible si la 

programación del termostato está habilitada en el 

menú Installer setup (Configuración del instalador) del 

termostato y está activada. Para deshabilitarla, siga los 

pasos a continuación:

Presione 

Menu

 (Menú) en la pantalla de inicio del 

termostato. 

Presione las flechas   o    hasta que vea 

RECOVERY (RECUPERACIÓN) y, luego, presione 

Select

 (Seleccionar). 

Presione las flechas   o   para seleccionar 

RECOVERY ON (RECUPERACIÓN ENCENDIDA) 

o RECOVERY OFF (RECUPERACIÓN APAGADA) y, 

luego, presione 

Done

 (Listo) para confirmar. 

Cuando la función de recuperación inteligente de 

adaptación esté activa, verá el símbolo de recuperación 

en la esquina superior derecha de la pantalla del 

termostato.

Habilitar/deshabilitar la función de recuperación 

inteligente de adaptación

Back

Select

Done

Cancel

Recovery

AM

Menu

Fan

Mode

Fan

Auto

Mode

Heat

Away Home Sleep

Following Schedule

Recovery

Configurar la fecha y la hora

Back

Select

PM

Done

Cancel 

Back

Select

Configurar la hora

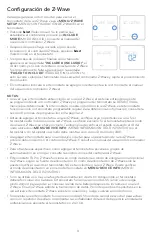
Presione 

Menu

 (Menú) en la pantalla de inicio del 

termostato. 

Presione las flechas   o   hasta que vea CLOCK 

(RELOJ) y, luego, presione 

Select

 (Seleccionar). 

Presione las flechas   o   hasta que vea SET 

TIME (CONFIGURAR HORA) y, luego, presione 

Select

 (Seleccionar). 

Presione   o   para configurar la hora (o 

mantenga presionados los botones para hacerlo 

más rápido). Cuando termine, presione Done 

(Listo). 

Seleccione el formato del reloj (de 12 o 24 horas) y 

el tiempo de ahorro durante las horas de luz en el 

mismo submenú CLOCK (RELOJ). 

Configurar la fecha

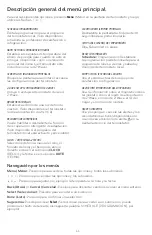
Presione 

Menu

 (Menú) en la pantalla de inicio del 

termostato. 

Presione las flechas   o   hasta que vea DATE 

(FECHA) y, luego, presione 

Select

 (Seleccionar). 

Presione   o   para seleccionar el mes y, luego, 

presione Select (Seleccionar) para confirmar. 

Configure el día y el año de la misma forma. 

Presione 

Select

 (Seleccionar) para guardar los 

cambios. 

Back

Select

Содержание T6 Pro Z-Wave

Страница 1: ... 4 09 x 4 09 x 1 06 This user guide is designed to help you get acquainted with your new T6 Pro Z Wave thermostat Check out the table of contents on page 2 to browse by topic Welcome Web yourhome honeywell com Phone 1 800 468 1502 Social Twitter HoneywellHome Facebook Honeywell Home Need help Get in touch ...

Страница 2: ...us 10 Main menu overview 11 Scheduling options 12 Setting a schedule 14 Reset schedule 15 Screen lock settings 15 Adjusting backlight brightness 16 Enabling disabling Adaptive Intelligent Recovery 17 Setting the time and date 17 Cleaning the thermostat screen 18 Choosing Fahrenheit or Celsius 18 Viewing equipment status 19 Viewing thermostat information 19 Battery replacement 20 Alerts and mainten...

Страница 3: ...Home Sleep The thermostat scheduling options available differ depending on whether the thermostat is included or excluded from Z Wave network on capability of your Z Wave controller and app to program thermostat Displays ambient air temperature relative indoor humidity and reports HVAC system status You can display actual temperature or relative humidity or to see whether your cooling heating syst...

Страница 4: ...elative indoor humidity Z Wave connection status Shows Z Wave connection status Adjust temperature Touch or to set your desired temperature PM Menu Fan Mode Fan Auto Mode Heat Thermostat overview Adjusting the temperature To adjust the desired temperature up or down touch or on the thermostat home screen How long the change will be held depends on whether your thermostat is included or excluded in...

Страница 5: ...at time the new temperature setting will be held until or you can hold the new temperature setting permanently Program schedule override temporary 1 Touch or on the thermostat home screen to set your desired temperature Hold Until will appear together with the time the hold will end 2 To change when the hold will end touch Hold Until and wait until the time starts blinking Then touch or to set whe...

Страница 6: ...preferred temperature setting for the mode that s currently active heating or cooling 2 Next touch the text area where the active mode is displayed to switch to the inactive mode 3 Touch or to choose your preferred temperature in the other mode After 5 seconds of inactivity your setting will take effect and the thermostat screen will show the set point of the active mode Auto Chg On AM Heat On Men...

Страница 7: ...trols auxiliary or emergency heat only available on systems with a heat pump Notes Em Heat is only available if the thermostat is configured to control a heat pump and an auxiliary emergency heat stage When Auto mode is selected Auto Chg On will appear in the upper right corner of the thermostat home screen and the active mode Heat or Cool will display under Mode To set your temperature preference...

Страница 8: ...AC power loss occurs Built in compressor protection Setting the fan Touch Fan on the thermostat home screen to cycle through available fan modes until the desired mode is displayed Your changes will save automatically Available fan modes On The fan will run continuously Auto The fan will run only when the heating or cooling system is on Circ The fan will run at random intervals at least 35 of the ...

Страница 9: ...ers to exclude If the thermostat is excluded from Z Wave network it offers to include You can also check the status by viewing the Node ID located in the thermostat MENU DEVICE INFO An excluded thermostat should show zero for the Node ID 000 Whether you are adding the thermostat for inclusion or removing for exclusion from Z Wave network first you have to initiate it on your Z Wave controller Plea...

Страница 10: ...e the power mode It can be done via excluding thermostat from Z Wave network and including again in battery power mode where batteries are used as main power source You can check the actual power mode in the thermostat MENU DEVICE INFO Z Wave connection status Wifi is on and connected Wifi is disconnected or wifi is not setup Wifi is off Wifi is on and connected Wifi is disconnected or wifi is not...

Страница 11: ...or Cancel Touch to discard changes or go back to the previous menu Select Touch to access a sub menu Done Touch to confirm selection Tip You can touch Select to access a sub menu or you can touch the text in the message area the word SCHEDULE for example SCHEDULE Edit local thermostat program schedule Available only if enabled by your local heating or cooling professional AWAY SETTING Set energy s...

Страница 12: ...d by Z Wave controller AM Menu Fan Mode Fan Auto Mode Heat Away Home Following Schedule Back Sched On Off Enabling thermostat schedule when thermostat is included in Z Wave network optional Z Wave controllers from various manufacturers may or may not support the Z Wave Thermostat General V2 Device class used by the Honeywell T6 Pro Z Wave Thermostat If your controller does not support full thermos...

Страница 13: ...cluded in Z Wave network not operated by Z Wave controller The Honeywell T6 Pro Z Wave thermostat will function as fully programmable thermostat when not operated by your controller Each day can be programmed for different heating and cooling settings in 4 unique periods Wake Away Home Sleep in the thermostat MENU SCHEDULE Make sure that thermostat schedule is enabled by your heating or cooling pr...

Страница 14: ...ch the or arrows to select a period in a day or set of days then touch Select on the period you want to edit 4 Touch the time area then touch or to adjust when the period starts Touch Select to confirm 5 Touch the temperature area then touch or to adjust your preferred temperature for the mode that s currently active either heating or cooling Touch Select to confirm Then touch or to adjust your pr...

Страница 15: ...t changes to the system settings there are two screen lock settings you can apply Partial lock Only the temperature can be changed Full lock No access is allowed without a PIN number Screen lock settings Back Select Back Select No Yes Back Select Applying a screen lock setting 1 Touch Menu on the thermostat home screen 2 Touch the or arrows until you see SCREEN LOCK then touch Select 3 Touch the o...

Страница 16: ...t is in idle mode you can adjust how bright you d like the screen You can choose a brightness level from 00 display backlight is off which is the default up to 05 maximum brightness To adjust backlight brightness follow the steps below 1 Touch Menu on the thermostat home screen 2 Touch the or arrows until you see BRIGHTNESS then touch Select 3 Touch or to adjust the brightness level which will cha...

Страница 17: ...nges Back Select Over time your T6 Pro Z Wave thermostat will learn how long it takes your system to reach the desired temperature It can then turn on your heating or cooling equipment at the right time to make sure your home is comfortable by the time you expect This feature is is available only if thermostat schedule is enabled in the thermostat Installer setup menu and turned On To disable it f...

Страница 18: ...on Tip To clean the thermostat screen spray water or household cleaner onto a cloth then use the cloth to clean the screen Avoid abrasive cleaners and do NOT spray liquid directly on the thermostat Cleaning the thermostat screen Back Select To select a temperature scale follow the steps below 1 Touch Menu on the thermostat home screen 2 Touch the or arrows until you see TEMP SCALE then touch Selec...

Страница 19: ...ve library Viewing thermostat information Back Select You can check the status of your heating or cooling equipment and fan by following the steps below Please note that system data may vary depending on thermostat model and how the thermostat was installed 1 Touch Menu on the thermostat home screen 2 Touch the or arrows until you see EQMT STATUS then touch Select 3 Touch the or arrows to select w...

Страница 20: ...reset All other settings are permanently stored in memory and do not require battery power NOTES When replacing batteries alkaline batteries are recommended When the battery power is low the thermostat s backlight is disabled to save battery power When battery power is critically low only the alert icon and the battery icon are displayed and the thermostat cannot control your HVAC system Batteries...

Страница 21: ...erts and follow steps 1 and 2 above To see what each 3 digit alert code means and the action you should take refer to the chart below Number Alert Reminder Definition 54 Thermostat Humidity Sensor Error The sensor of the thermostat has encountered an error Please contact dealer to replace the thermostat 164 Heat Pump Needs Service Heat pump needs service Contact dealer to diagnose and service heat...

Страница 22: ...Lost If batteries used as backup power it will drain batteries quickly and Z Wave communication needs to be turned off The working power mode can only be changed when thermostat is NOT included in a Z Wave network Either to exclude and include thermostat into Z Wave network to change the power mode to LSS power save sleep mode or to resume AC power You can check the actual power mode in the thermo...

Страница 23: ...temperature is set higher than the Inside temperature Touch Mode to set system to Cool Make sure the temperature is set lower than the Inside temperature Check circuit breaker and reset if necessary Make sure power switch at heating cooling system is on Make sure furnace door is closed securely Temperature settings do not change Your installer may have set a range stop setting for heat or cooling ...

Страница 24: ...ccurred while the product was in the possession of a consumer Honeywell s sole responsibility shall be to repair or replace the product within the terms stated above HONEYWELL SHALL NOT BE LIABLE FOR ANY LOSS OR DAMAGE OF ANY KIND INCLUDING ANY INCIDENTAL OR CONSEQUENTIAL DAMAGES RESULTING DIRECTLY OR INDIRECTLY FROM ANY BREACH OF ANY WARRANTY EXPRESS OR IMPLIED OR ANY OTHER FAILURE OF THIS PRODUC...

Страница 25: ... may not cause harmful interference and This device must accept any interference received including interference that may cause undesired operation IC REGULATIONS RSS GEN This device complies with Industry Canada s license exempt RSSs Operation is subject to the following two conditions This device may not cause interference and This device must accept any interference including interference that ...

Страница 26: ...es In the U S Honeywell International Inc 715 Peachtree Street NE Atlanta GA 30308 http customer honeywell com U S Registered Trademark 2018 Honeywell International Inc 33 00296EFS 02 M S Rev 03 18 Printed in U S A 33 00296EFS 02 ...

Страница 27: ...rogrammable Ce guide de l utilisateur est conçu pour vous aider à vous familiariser avec votre nouveau thermostat Z Wave Pro T6 Veuillez consulter la table des matières à la page 2 pour effectuer une recherche par sujet Bienvenue Site Web yourhome honeywell com Téléphone 1 800 468 1502 Réseaux sociaux Twitter HoneywellHome Facebook Honeywell Home Besoin d aide Communiquez avec nous ...

Страница 28: ... 11 Options de programmation 12 Réglage d une programmation 14 Réinitialisation du programme 15 Paramètres de verrouillage de l écran 15 Réglage de la luminosité du rétroéclairage 16 Activation et désactivation de la reprise intelligente adaptative 17 Réglage de l heure et de la date 17 Nettoyage de l écran du thermostat 18 Sélection des degrés Fahrenheit ou Celsius 18 Affichage de l état de l équ...

Страница 29: ...on de thermostat offertes dépendent de l inclusion ou l exclusion du thermostat d un réseau Z Wave des capacités de votre contrôleur Z Wave et des capacités de programmation de l application Affiche la température de l air ambiant et le pourcentage d humidité intérieure relative et indique l état du système de CVCA Vous pouvez voir la température réelle ou le pourcentage d humidité relative ou enc...

Страница 30: ...ntérieure actuelle ou le pourcentage d humidité relative intérieure État de la connexion Z Wave Affiche l état de la connexion Z Wave Réglage de la température Appuyez sur ou sur pour sélectionner la température souhaitée PM Menu Fan Mode Fan Auto Mode Heat Présentation du thermostat Réglage de la température Pour régler la température souhaitée vers le haut ou vers le bas appuyez sur la touche ou...

Страница 31: ...empérature souhaitée appuyez sur la touche ou de l écran d accueil du thermostat Le message Hold Until Maintenir jusqu à s affiche en même temps que l heure à laquelle le maintien se termine 2 Pour modifier l heure de la fin de la suspension appuyez sur Hold Until Maintenir jusqu à jusqu à ce que l heure commence à clignoter Ensuite appuyez sur ou pour définir l heure à laquelle vous souhaitez que...

Страница 32: ... d accueil du thermostat jusqu à ce que le message Auto s affiche Appuyez ensuite sur ou afin de choisir la température souhaitée pour le mode en cours chauffage ou climatisation 2 Appuyez ensuite sur la zone de texte où le mode actif est affiché pour passer au mode inactif 3 Appuyez sur ou afin de choisir la température souhaitée pour l autre mode Après 5 secondes d inactivité votre réglage s act...

Страница 33: ... Em Heat Chauffage d urgence commande le chauffage d urgence ou auxiliaire uniquement disponible sur les systèmes équipés d une thermopompe Remarques Le mode Chauffage urg est seulement disponible si le thermostat est configuré pour contrôler une thermopompe et une phase de chauffage d urgence auxiliaire Lorsque le mode Auto Automatique est sélectionné l option Auto Chg On Chargement automatique e...

Страница 34: ...intégrée Réglage du ventilateur Pour parcourir les modes disponibles du ventilateur appuyez sur Fan Ventilateur à l écran d accueil du thermostat jusqu à ce que le mode de ventilateur souhaité s affiche Vos modifications seront automatiquement enregistrées Modes de ventilateur disponibles On Marche le ventilateur fonctionne de façon continue Auto Automatique le ventilateur fonctionne uniquement lo...

Страница 35: ... aussi en vérifier l état en affichant le Node ID ID de nœud dans le menu du thermostat sous MENU DEVICE INFO menu infos du dispositif L ID de nœud d un thermostat exclus devrait indiquer zéro 000 Peu importe si vous ajoutez le thermostat au réseau Z Wave ou si vous l en excluez vous devez amorcer la démarche sur le contrôleur Z Wave Veuillez vous reporter au manuel de l utilisateur de votre contr...

Страница 36: ... d alimentation Vous pouvez procéder en excluant le thermostat du réseau Z Wave avant de l inclure de nouveau en mode alimentation par piles où les piles constituent la principale source d alimentation Vous pouvez vérifier le mode d alimentation actuel dans le menu du thermostat sous MENU DEVICE INFO menu infos du dispositif État de la connexion Z Wave Wifi is on and connected Wifi is disconnected...

Страница 37: ... Annuler Appuyez pour annuler les modifications ou revenir au menu précédent Select Sélectionner Appuyez pour accéder à un sous menu Done Terminé Appuyez pour confirmer la sélection Astuce Vous pouvez appuyer sur Select sélectionner pour accéder à un sous menu ou appuyer sur le texte dans la zone de message le mot SCHEDULE PROGRAMME par exemple SCHEDULE PROGRAMME Modifiez le programme du thermosta...

Страница 38: ...5 Home accueil S O 72 78 Activé par le contrôleur Z Wave AM Menu Fan Mode Fan Auto Mode Heat Away Home Following Schedule Back Sched On Off Activation du programme du thermostat lorsqu il est inclus dans le réseau Z Wave facultatif Les contrôleurs Z Wave des divers fabricants peuvent ou non prendre en charge la catégorie de thermostat général Z Wave V2 utilisé par le thermostat Z Wave Pro T6 de Ho...

Страница 39: ...contrôleur Z Wave Le thermostat Z Wave Pro T6 de Honeywell peut également être utilisé comme un thermostat programmable lorsqu il n est pas commandé par votre contrôleur Pour chaque journée il est possible de régler des points de consigne de chauffage et de climatisation pour quatre périodes uniques Réveil Absent Maison Nuit depuis MENU SCHEDULE menu programmation Vérifiez si votre professionnel d...

Страница 40: ... pour sélectionner une période de la journée ou un groupe de jours puis sur Select sélectionner sur la période que vous souhaitez modifier 4 Appuyez sur la zone de l heure puis sur ou pour régler l heure de début de la période Appuyez sur Select sélectionner pour confirmer 5 Appuyez sur la zone de la température puis sur ou afin de régler la température souhaitée pour le mode en cours chauffage ou...

Страница 41: ...ns apportées aux paramètres du système deux paramètres de verrouillage de l écran peuvent être appliqués Verrouillage partiel Seule la température peut être modifiée Verrouillage total Aucun accès n est autorisé sans le NIP Paramètres de verrouillage de l écran Back Select Back Select No Yes Back Select Application d un paramètre de verrouillage de l écran 1 Appuyez sur Menu sur l écran d accueil ...

Страница 42: ...isponible si le thermostat est alimenté à 24 V c a Elle ne s active que lorsque personne ne touche au thermostat Lors du réglage des paramètres la luminosité du thermostat est toujours au maximum Réglage de la luminosité du rétroéclairage Back Select Done Cancel Back Select Déverrouillage de l écran 1 Appuyez sur le symbole de verrou sur l écran d accueil du thermostat 2 Lorsque vous êtes invité à...

Страница 43: ... intelligente adaptative Back Select Done Cancel Recovery AM Menu Fan Mode Fan Auto Mode Heat Away Home Sleep Following Schedule Recovery Réglage de l heure et de la date Back Select PM Done Cancel Back Select Réglage de l heure 1 Appuyez sur Menu sur l écran d accueil du thermostat 2 Appuyez sur les flèches ou jusqu à ce que l option CLOCK HORLOGE s affiche puis appuyez sur Select Sélectionner 3 ...

Страница 44: ...ouvez verrouiller l écran du thermostat afin de ne pas modifier accidentellement les paramètres lors de cette opération Pour activer le mode de nettoyage d écran effectuez les étapes ci dessous 1 Appuyez sur Menu sur l écran d accueil du thermostat 2 Appuyez sur les flèches ou jusqu à ce que l option CLEAN SCREEN NETTOYAGE DE L ÉCRAN s affiche puis appuyez sur Select Sélectionner L écran se désact...

Страница 45: ...u système défilent à l écran Affichage de l état de l équipement Back Select Done Done Pour consulter les informations techniques du thermostat effectuez les étapes ci dessous 1 Appuyez sur Menu sur l écran d accueil du thermostat 2 Appuyez sur les flèches ou jusqu à ce que l option DEVICE INFO INFORMATIONS SUR LE DISPOSITIF apparaisse puis appuyez sur Select Sélectionner 3 Appuyez sur les flèches...

Страница 46: ...rer l heure et la date Tous les autres réglages sont stockés en permanence dans la mémoire et ne requièrent aucune alimentation par pile REMARQUES Il est recommandé d utiliser des piles alcalines Lorsque le niveau des piles est très faible le rétroéclairage du thermostat se désactive pour économiser leur énergie Lorsque le niveau des piles est extrêmement faible seules l icône d alerte et l icône ...

Страница 47: ...effectuer consultez le tableau ci dessous Code Alerte Rappel Définition 54 Erreur du capteur d humidité du thermostat Une erreur s est produite dans le capteur du thermostat Veuillez communiquer avec votre détaillant pour remplacer le thermostat 164 Entretien de ther mopompe requis Entretien de thermopompe requis Veuillez communiquer avec le détaillant pour diagnostiquer et corriger le problème de...

Страница 48: ...ostat 252 Perte de l alimen tation secteur Si des piles sont utilisées comme alimentation auxiliaire leur autonomie sera grandement réduite La communication Z Wave doit être désactivée Le mode d alimentation principal peut seulement être changé lorsque le thermostat n est PAS intégré à un réseau Z Wave Pour exclure un thermostat du réseau Z Wave et l inclure ou pour rétablir l alimentation secteur...

Страница 49: ... température intérieure Appuyez sur la touche Mode pour régler le système à Cool climatisation Assurez vous que la température réglée est inférieure à la température intérieure Vérifiez le disjoncteur et réinitialisez le si nécessaire Veillez à ce que l interrupteur du système de chauffage et de climatisation soit en position de marche Assurez vous que la porte de l appareil de chauffage est corre...

Страница 50: ... se limite à réparer ou à remplacer le produit conformément aux modalités susmentionnées HONEYWELL N EST EN AUCUN CAS RESPONSABLE DES PERTES OU DOMMAGES DE QUELQUE NATURE QUE CE SOIT Y COMPRIS LES DOMMAGES INDIRECTS OU ACCESSOIRES DÉCOULANT DIRECTEMENT OU INDIRECTEMENT D UNE VIOLATION QUELCONQUE D UNE GARANTIE EXPRESSE OU TACITE APPLICABLE AU PRÉSENT PRODUIT NI DE TOUTE AUTRE DÉFECTUOSITÉ DU PRÉSE...

Страница 51: ...uivantes ce dispositif ne peut pas causer d interférences dangereuses et ce dispositif ne doit accepter aucune interférence reçue notamment les interférences à l origine d un fonctionnement indésirable RÈGLEMENT D IC RSS GEN Ce dispositif est conforme aux CNR exempts de licence d Industrie Canada Son fonctionnement est soumis aux deux conditions suivantes ce dispositif ne peut pas causer d interfé...

Страница 52: ...x É U 2018 Honeywell International Inc 33 00296EFS 02 M S Rev 03 18 Imprimé aux États Unis Home and Building Technologies Aux États Unis Honeywell International Inc 715 Peachtree Street NE Atlanta GA 30308 http customer honeywell com ...

Страница 53: ...ermostato programable Esta guía del usuario está diseñada para ayudarlo a familiarizarse con el nuevo termostato T6 Pro Z Wave Consulte el índice de la página 2 para buscar por tema Bienvenido Sitio web yourhome honeywell com Teléfono 1 800 468 1502 Redes sociales Twitter HoneywellHome Facebook Honeywell Home Necesita ayuda Comuníquese con nosotros ...

Страница 54: ...neral del menú principal 11 Opciones de programación 12 Configurar una programación 14 Restablecer la programación 15 Configuración para bloquear la pantalla 15 Ajustar el brillo de la luz de fondo 16 Habilitar deshabilitar la función de recuperación inteligente de adaptación 17 Configurar la fecha y la hora 17 Limpiar la pantalla del termostato 18 Elegir Fahrenheit o Celsius 18 Ver el estado del ...

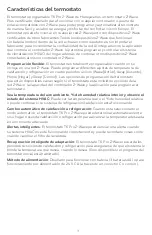
Страница 55: ...de programación del termostato que están disponibles varían según si el termostato está incluido o excluido de la red Z Wave la capacidad del controlador Z Wave y la aplicación para programar el termostato Vea la temperatura del aire ambiente de humedad relativa interior y observe el estado del sistema HVAC Puede ver la temperatura real o el de humedad relativa o puede controlar si su sistema de r...

Страница 56: ...e para mostrar la temperatura interior o el relativo de humedad interior Estado de la conexión a la red Z Wave Muestra el estado de conexión a la red Z Wave Ajustar la temperatura Presione el botón o para configurar la temperatura deseada PM Menu Fan Mode Fan Auto Mode Heat Descripción general del termostato Ajustar la temperatura Para subir o bajar la temperatura deseada presione o en la pantalla...

Страница 57: ...rmanente Anulación de la programación temporal 1 Para configurar la temperatura deseada presione o en la pantalla de inicio del termostato Aparecerá Hold Until Fin del intervalo junto con la hora en que finalizará el intervalo 2 Para cambiar el fin del intervalo presione Hold Until Fin del intervalo y aguarde hasta que la hora comience a parpadear Luego presione o para configurar cuándo desea que ...

Страница 58: ...a Auto Automático Luego presione o para seleccionar los ajustes de temperatura preferidos para el modo que se encuentra activo en el momento calefacción o refrigeración 2 Después presione el área de texto donde se muestra el modo activo para cambiar al modo inactivo 3 Para seleccionar la temperatura deseada en otro modo presione o Luego de 5 segundos de inactividad su configuración se activará y l...

Страница 59: ...Controla la calefacción auxiliar o de emergencia solo se encuentra disponible en los sistemas con bomba de calor Notas Em Heat Calefacción de emergencia solo está disponible si el termostato está configurado para controlar una bomba de calor y un nivel de calefacción auxiliar de emergencia Cuando esté seleccionado el modo automático aparecerá Auto Chg On Cambio a modo automático encendido en la es...

Страница 60: ...CA Protección incorporada para el compresor Configurar el ventilador Para ver los diferentes modos disponibles para el ventilador presione Fan Ventilador en la pantalla de inicio del termostato hasta que aparezca el modo deseado Sus cambios se guardarán automáticamente Modos disponibles para el ventilador On Encendido El ventilador funcionará de forma continua Auto Automático El ventilador funcion...

Страница 61: ...to está excluido de una red Z Wave se ofrece incluirlo También puede verificar el estado revisando el ID del nodo ubicado en MENU DEVICE INFO MENÚ INFORMACIÓN DEL DISPOSITIVO en el termostato Un termostato excluido debe mostrar cero como ID del nodo 000 Al agregar el termostato para una inclusión o quitar para una exclusión de la red Z Wave primero debe iniciarlo en el controlador Z Wave Consulte ...

Страница 62: ...de realizar excluyendo el termostato de la red Z Wave e incluyéndolo nuevamente en modo de alimentación a batería en el que las baterías se utilizarán como fuente principal de alimentación Puede verificar el modo real de alimentación en MENU DEVICE INFO MENÚ INFORMACIÓN DEL DISPOSITIVO del termostato Estado de la conexión a la red Z Wave Wifi is on and connected Wifi is disconnected or wifi is not...

Страница 63: ... para descartar cambios o volver al menú anterior Select Seleccionar Presione para acceder a un submenú Done Listo Presione para confirmar una selección Sugerencia Puede presionar Select Seleccionar para acceder a un submenú o puede presionar el texto del área de mensajes la palabra SCHEDULE PROGRAMACIÓN por ejemplo SCHEDULE PROGRAMACION Edita la programación para el programa del termostato local ...

Страница 64: ... AM Menu Fan Mode Fan Auto Mode Heat Away Home Following Schedule Back Sched On Off Cómo habilitar el programa del termostato si el termostato está incluido en una red Z Wave opcional Es posible que los controladores Z Wave de terceros no tengan compatibilidad con la clase de dispositivo del termostato general V2 Z Wave que se utiliza en el termostato T6 Pro Z Wave de Honeywell Si su controlador n...

Страница 65: ...ave de Honeywell funciona como un termostato totalmente programable siempre que no esté operado por su controlador Puede programar diferentes ajustes de temperatura de calefacción y refrigeración en cuatro períodos únicos Wake Activo Away Ausente Home Hogar y Sleep Dormir desde la opción MENU SCHEDULE MENÚ PROGRAMACIÓN del termostato Asegúrese de que su profesional de calefacción o refrigeración h...

Страница 66: ...Presione las flechas o para seleccionar un periodo en el día o un conjunto de días y luego presione Select Seleccionar en el periodo que desea modificar 4 Presione el área de la hora y luego presione o para ajustar el inicio del periodo Presione Select Seleccionar para confirmar 5 Presione el área de la temperatura y luego presione o para ajustar su temperatura preferida para el modo que se encuen...

Страница 67: ...sistema puede aplicar dos configuraciones de bloqueo de pantalla Bloqueo parcial Solo se puede cambiar la temperatura Bloqueo total No se permite el acceso sin el número PIN Configuración para bloquear la pantalla Back Select Back Select No Yes Back Select Aplicar una configuración de bloqueo de la pantalla 1 Presione Menu Menú en la pantalla de inicio del termostato 2 Presione las flechas o hasta...

Страница 68: ...lo si el termostato recibe alimentación de 24 V CA Esta configuración solo se aplica cuando no se toca el termostato Cuando se ajustan las configuraciones el termostato siempre está en luminosidad completa Ajustar el brillo de la luz de fondo Back Select Done Cancel Back Select Desbloquear la pantalla 1 Presione el símbolo de candado en la pantalla de inicio del termostato 2 Cuando se le solicite ...

Страница 69: ...stato Habilitar deshabilitar la función de recuperación inteligente de adaptación Back Select Done Cancel Recovery AM Menu Fan Mode Fan Auto Mode Heat Away Home Sleep Following Schedule Recovery Configurar la fecha y la hora Back Select PM Done Cancel Back Select Configurar la hora 1 Presione Menu Menú en la pantalla de inicio del termostato 2 Presione las flechas o hasta que vea CLOCK RELOJ y lue...

Страница 70: ...r la pantalla del termostato para evitar que modifique las configuraciones por accidente cuando la limpie Para activar el modo limpiar pantalla siga los siguientes pasos 1 Presione Menu Menú en la pantalla de inicio del termostato 2 Presione las flechas o hasta que vea CLEAN SCREEN LIMPIAR PANTALLA y luego presione Select Seleccionar La pantalla se desactivará durante 30 segundos Podrá ver un cron...

Страница 71: ... sistema en la pantalla Ver el estado del equipo Back Select Done Done Para ver la información técnica de su termostato siga los pasos a continuación 1 Presione Menu Menú en la pantalla de inicio del termostato 2 Presione las flechas o hasta que vea DEVICE INFO INFORMACIÓN DEL DISPOSITIVO y luego presione Select Seleccionar 3 Presione las flechas o para ver información como la siguiente Model Numb...

Страница 72: ...figuraciones se guardan de manera permanente en la memoria y no necesitan energía de la batería NOTAS Al reemplazar las baterías se recomiendan las baterías alcalinas Cuando la energía de la batería es baja la luz de fondo del termostato se desactiva para ahorrar energía de batería Cuando la energía de la batería está muy baja solo se muestran el ícono de alerta y el ícono de la batería y el termo...

Страница 73: ...del termostato detectó un error Comuníquese con el distribuidor para reemplazar el termostato 164 Mantenimiento de la bomba de calor necesario La bomba de calor requiere mantenimiento Comuníquese con el distribuidor para que diagnostique y repare la bomba de calor 170 Error en la memoria interna La memoria del termostato detectó un error Comuníquese con el distribuidor para solicitar asistencia 17...

Страница 74: ...mentación en funcionamiento solo se puede modificar cuando el termostato NO está incluido en la red Z Wave Se debe excluir e incluir el termostato nuevamente en la red Z Wave para modificar el modo de alimentación a LSS ahorro de energía modo dormir o para restaurar la alimentación CA Puede verificar el modo real de alimentación en MENU DEVICE INFO MENÚ INFORMACIÓN DEL DISPOSITIVO del termostato 4...

Страница 75: ...ode Modo para establecer el sistema en Cool Refrigeración Asegúrese de que la temperatura establecida sea menor que la temperatura interior Revise el disyuntor del circuito y restablezca si es necesario Asegúrese de que el interruptor de alimentación del sistema de calefacción y refrigeración se encuentre encendido Asegúrese de que la puerta de la caldera se encuentre cerrada de forma segura Las c...

Страница 76: ...estaba en posesión del consumidor La única responsabilidad de Honeywell será reparar o reemplazar el producto dentro de los términos establecidos más arriba HONEYWELL NO SERÁ RESPONSABLE DE NINGUNA PÉRDIDA O DAÑO DE NINGÚN TIPO INCLUIDOS LOS DAÑOS INCIDENTALES O DERIVADOS QUE RESULTEN DE MANERA DIRECTA O INDIRECTA DEL INCUMPLIMIENTO DE LA GARANTÍA EXPRESA O IMPLÍCITA O DE CUALQUIER OTRA FALLA DE E...

Страница 77: ...o debe causar ninguna interferencia dañina Este dispositivo debe aceptar cualquier interferencia recibida incluida la interferencia que pueda causar un funcionamiento no deseado NORMAS DE IC RSS GEN Este dispositivo cumple con la norma RSSs exenta de licencia de Industry Canada El funcionamiento está sujeto a las siguientes dos condiciones Este dispositivo no debe causar ninguna interferencia Este...

Страница 78: ... en los E U A 2018 Honeywell International Inc 33 00296EFS 02 M S Rev 03 18 Impreso en EE UU Home and Building Technologies En los EE UU Honeywell International Inc 715 Peachtree Street NE Atlanta GA 30308 http customer honeywell com ...

Отзывы: