


LYNX Touch Installation and Setup Guide
- 27 -
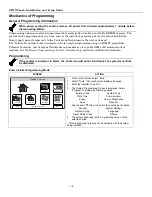
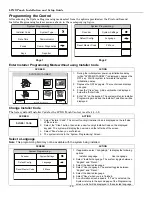
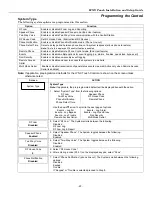
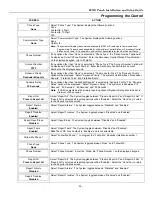
Programming the Control
SCREEN ACTION
Sub ID
6. Select “Sub ID”. Enter the 4-digit Subscriber Account Number (Decimal).
Options
0001-9999
Supervision
24 Hours
7. Select “Supervision”. The system scrolls between the following options:
24
Hours
None
30
Days
Old Alarm Time
10 Minutes
8. Select “Old Alarm Time”. The system scrolls between the following options. Use the
down
T
arrow to scroll to the next page of options.
10 Minutes
15 Minutes
30 Minutes
1 Hour
2 Hours
4 Hours
8 Hours
12 Hours
24
Hours
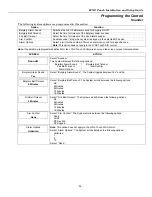
Remote Acc. Comm.
Disabled
9. Select “Remote Acc. Comm”. The system toggles between “Disabled” and
“Enabled”.
Note: This field will not be programmable unless it is enabled when creating the Communications
Module account in AlarmNet.
Multi Mode Comm.
Disabled
10. If “Remote Access Comm.” was enabled in the previous step, the “Multi Mode
Comm.” option is displayed. The system scrolls between the following options.
Disabled
Relay
Reports
Enhanced
Reports
Note: This field will not be programmable unless it is enabled when creating the Communications
Module account in AlarmNet. The Relay Reports option should not be selected when using
TotalConnect 2.1 Service.
11. Use the down
T
arrow to scroll to the next page of options. If IP was selected in
step 2, proceed to step 12. If GSM was selected in step 2, proceed to step 19.
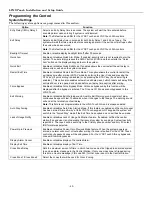
IP Fault Time (min)
00
12. Select “IP Fault Time (min)”. Enter the time delay (in minutes) on the keypad.
Options
00-99
Use DHCP
Yes
13. Select “Use DHCP”. The system toggles between “Yes” and “No”. If “No” is selected
the system displays four additional options. If “Yes” is selected, skip to step 18.
NIC IP Address
255.255.255.255
14. Select “NIC IP Address”. Enter the 4-part address on the displayed keypad.
Subnet Mask
255.255.255.255
15. Select “Subnet Mask”. Enter the 4-part address on the displayed keypad.
Gateway IP Address
255.255.255.255
16. Select “Gateway IP Address”. Enter the 4-part address on the displayed keypad.
DNS Server IP Address
255.255.255.255
17. Select “DNS Server IP Address”. Enter the 4-part address on the displayed keypad.
18. If “IP” was selected in step 2, select “Save” and then select “OK” when the
“Programming Done” screen appears. Proceed to “Diagnostics” section in order to
register the device.
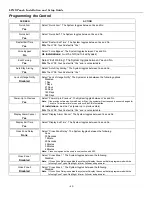
GSM Fault Time (min)
00
19. Select “GSM Fault Time (min)”. Enter the time delay (in minutes) on the keypad.
Options
00-99
GSM Rollover
No
20. If “WiFi and GSM” was selected in step 2, two additional programming fields are
displayed. Select “GSM Rollover”, the system toggles between “Yes” and “No”.
GSM 24 Hour Test
No
19. Select “GSM 24 Hour Test”, the system toggles between “Yes” and “No”.
20. If “GSM” was selected in step 2, select “Save” and then select “OK” when the
“Programming Done” screen appears. Proceed to “Diagnostics” section in order to
register the device.


