background image

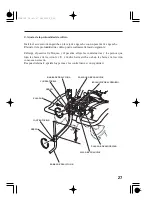
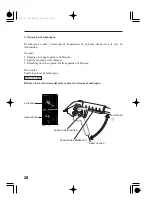
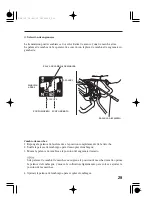
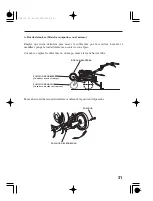
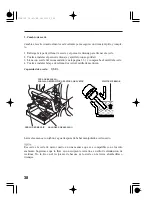
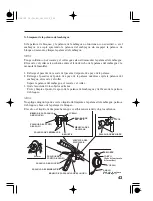
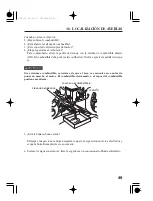
Para asegurar la operación correcta del motor, las bujías deben tener el huelgo apropiado
y estar exentar de acumulaciones.

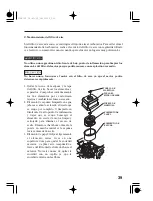
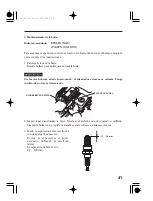
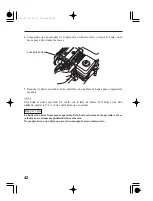
Extraiga la tapa de la bujía.
Emplee la llave para bujías para extraer la bujía.

Inspeccionar visualmente la bujía. Tirarla si el aislador estuviese rajado o astillado.
Limpiar la bujía con un cepillo de alambre si ésta volviese a utilizarse otra vez.

Medir la separación entre electrodos
con una galga de espesores.
Corrija la separación, si f uese
necesario, doblando el electrodo
lateral.
La separación deberá ser de:

1.

2.

3.

Mantenimiento de la bujía

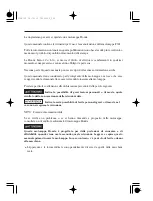
Si el motor hubiese estado f uncionando, el silenciador estará muy caliente. Tenga
cuidado de no tocar el silenciador.

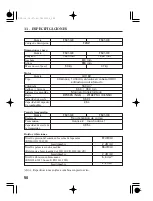
Bujía recomendada:

4.

SOMBRERETE DE BUJÍA

LLAVE DE BUJÍAS

0,7

0,8 mm

41

BPR5ES (NGK)
W16EPR-U (DENSO)

0,7

0,8 mm

11/08/22 15:50:10 35V31610_043

Содержание F501

Страница 1: ...UEL DE L UTILISATEUR BEDIENUNGSANLEITUNG MANUAL DE EXPLICACIONES MANUALE DELL UTENTE 背幅10mm 3QV31620 00X3Q V31 6200 Honda Motor Co Ltd 2011 2000 2011 10 Printed in Japan C N 西 独 仏 英 HC KS K6 伊 F501_EU OM表紙_3QV31620 背幅10mm F501_EU OM表紙_3QV31620 ...

Страница 2: ...da F501 Original instructions Notice originale Originalbetriebsanleitung Manual original Istruzioni originali The e SPEC mark symbolizes environmentally responsible technologies applied to Honda power equipment which contains our wish to preserve nature for generations to come 11 08 22 16 33 27 32V31610_001 ...

Страница 3: ...he type If a problem should arise or if you have any questions about your tiller consult an authorized Honda tiller dealer Gives helpful information Pay special attention to statements preceded by the following words This manual is considered a permanent part of the tiller and it must stay with the tiller if resold No part of this publication may be reproduced without written permission Honda Moto...

Страница 4: ...environment do not dispose of this product battery engine oil etc carelessly by leaving them in the waste Observe the local laws and regulations or consult your authorized Honda dealer for disposal 11 08 22 16 33 42 32V31610_003 ...

Страница 5: ... THE ENGINE 22 Carburetor Modification for High Altitude Operation 25 6 TILLER OPERATION 26 7 STOPPING THE ENGINE 34 8 MAINTENANCE 36 9 TRANSPORTING STORAGE 47 10 TROUBLESHOOTING 49 11 SPECIFICATIONS 50 MAJOR Honda DISTRIBUTOR ADDRESSES Inside back cover CONTENT OUTLINE Inside back cover EC Declaration of Conformity 11 08 22 16 33 45 32V31610_004 ...

Страница 6: ...d may lead to death If you run the tiller in an area that is confined or even partially enclosed area the air you breathe could contain a dangerous amount of exhaust gas Never run your tiller inside a garage house or near open windows or doors Keep your hands and feet away from the tines while engine is running Stop the engine and disengage the tines clutch before inspection or maintenance of tine...

Страница 7: ...ility Keep the tiller in good operating condition Operating a tiller in poor or questionable condition could result in serious injury Be sure the safety covers tine covers fan cover and recoil starter cover are in places Be sure all safety devices are in working order and warning labels are in place These items are installed for your safety Know how to stop the engine and tines quickly in case of ...

Страница 8: ...jury Dress sensibly Loose clothing may get caught in moving parts increasing your risk of injury Wear sturdy full coverage footwear Operating this tiller barefoot or with open toe shoes or sandals increases your risk of injury Allowing anyone to operate this tiller without proper instruction may result in injury Keep your hands and feet away from the tines while the engine is running Keep in mind ...

Страница 9: ...cted especially to the tiller and the tilling activity Replace the worn or damaged parts for safety If the fuel tank has to be drained this should be done outdoors with a cold engine Do not leave containers of vegetable matters in or near a building To reduce the fire hazard keep the tiller especially the engine muffler the gasoline storage area as well free of grass leaves or excessive grease All...

Страница 10: ...ling Fuel vapor or spilled fuel may ignite The engine and exhaust system become very hot during operation and remain hot for a while after stopping Contact with hot engine components can cause burn injuries and can ignite some materials Avoid touching a hot engine or exhaust system Allow the engine to cool before performing maintenance or storing the tiller indoors Tighten all fuel tanks and conta...

Страница 11: ...confined space where dangerous carbon monoxide fumes can collect The maximum safe grade angle shown is for reference purpose only and should be determined according to the type of the tool Before starting the engine check that the tiller is not damaged and in good condition For your safety and safety of others exercise extreme care when using the tiller on up or down hill Do not use the tiller on ...

Страница 12: ... DANGER These labels warn you of potential hazards that can cause serious injury Read the labels and safety notes and precautions described in this manual carefully If a label comes off or becomes hard to read contact your Honda dealer for a replacement 11 08 22 16 35 11 32V31610_011 ...

Страница 13: ...MARK Name and address of manufacturer Description code Engine net power Year of manufacture Frame serial number Machine mass standard specification Name and address of authorized representative 11 08 22 16 35 17 32V31610_012 ...

Страница 14: ...BELT COVER SHIFT LEVER ENGINE SWITCH MUFFLER FUEL TANK CAP ENGINE OIL DRAIN BOLT CLUTCH LEVER THROTTLE LEVER FRONT WHEEL equipped type FRONT GUARD HANDLEBAR FIXING LEVER ENGINE OIL FILLER CAP DIPSTICK 11 08 22 16 35 23 32V31610_013 ...

Страница 15: ...HITCH PIN DRAG BAR A DRAG BAR B HITCH BOX SEDIMENT CUP CARBURETOR DRAIN KNOB AIR CLEANER CHOKE LEVER STARTER GRIP HANDLE GRIP Record the frame serial number in the space below You will need this number when ordering parts Frame serial number 11 08 22 16 35 29 32V31610_014 ...

Страница 16: ...ble operation Perform the following check before operation If you notice any other abnormal symptoms consult with your authorized Honda dealer promptly Does the engine stop securely by operating the engine switch See pages and for stopping procedure Start the engine Is there any abnormal sound from the engine See pages through for starting procedure Is there any wire or cable pinched by the neighb...

Страница 17: ...FILLER CAP DIPSTICK Place the tiller on the level surface and hold the tiller level by placing wooden blocks under the front wheel if equipped and drag bar as shown Insert the dipstick into the oil filler neck but do not screw it in Remove the oil filler cap and wipe the dipstick clean 2 3 1 11 08 22 16 35 50 32V31610_016 ...

Страница 18: ...troke motor oil that meets or exceeds the requirements for API service category SE or later or equivalent Always check the API service label on the oil container to be sure it includes the letters SE or later or equivalent SAE 10W 30 is recommended for general use Other viscosities shown in the chart may be used when the average temperature in your area is within the indicated range 4 11 08 22 16 ...

Страница 19: ...iller cap The oil should be level with the lower edge of the oil filler hole Add recommended oil if the level is low Use 10W 30 4 stroke motor oil that meets or exceeds the requirements for API service classification SE or later or equivalent Always check the API service label on the oil container to be sure it includes the letters SE or later or equivalent 11 08 22 16 36 03 32V31610_018 ...

Страница 20: ...ithout the air cleaner Rapid engine wear will result 8 AIR CLEANER COVER AIR CLEANER ELEMENTS Remove the air cleaner cover Check the air cleaner elements for dirt or obstruction Clean if necessary see page 39 11 08 22 16 36 09 32V31610_019 ...

Страница 21: ...careful not to spill fuel when refueling Spilled fuel or fuel vapor may ignite If any fuel is spilled make sure the area is dry before starting the engine Avoid repeated or prolonged contact with skin or breathing of vapor KEEP OUT OF REACH OF CHILDREN 9 UPPER LIMIT FUEL TANK CAP Check the fuel level and refill the tank if the fuel level is low Use unleaded gasoline with a Research Octane Number o...

Страница 22: ...n 30 days is foreseen drain fuel tank and carburetor see page To slow deterioration keep gasoline in a certified fuel container Use fresh and clean gasoline Do not use gasohol that contains more than 10 ethanol Do not use gasoline containing more than 5 methanol methyl or wood alcohol and that does not also contain co solvents and corrosion inhibitors for methanol Fuel system damage or engine perf...

Страница 23: ...c caught around the clutch lever lock lever and or lock lever arm Check that the lock lever and the clutch lever operate smoothly by pushing the lock lever and squeezing the clutch lever If the lock lever and clutch lever do not operate smoothly or the clutch engages by squeezing the clutch lever without pushing the lock lever disassemble and clean the clutch lever see page 43 11 09 14 13 58 52 32...

Страница 24: ...l a tool or attachment on the tiller follow the instructions furnished with the tool or attachment Ask your Honda dealer for advice if you encouter any problem or difficulty in installing a tool or attachment 11 08 22 16 36 40 32V31610_023 ...

Страница 25: ...tral position to prevent sudden uncontrolled movement when the engine starts CHOKE LEVER DRAIN KNOB FUEL VALVE ON C CL LO OS SE E Turn the fuel valve ON Check for tighteness of drain knob In cold weather and when the engine is cold move the choke lever to the CLOSE position Do not use the choke if the engine is warm or the air temperature is high 1 2 11 08 22 16 36 49 32V31610_024 ...

Страница 26: ... 23 ON ENGINE SWITCH THROTTLE LEVER START Turn the engine switch ON Align the mark on the throttle lever with the mark START position as shown 3 4 11 08 22 16 36 55 32V31610_025 ...

Страница 27: ...l Pull the starter grip lightly until resistance is felt then return the starter grip once Hold the handlebar with your left hand and pull the starter grip briskly in the direction of the arrow as shown Let the engine warm up for several minutes If the choke has been moved to the CLOSE position move it gradually to the OPEN position as the engine warms up 5 6 11 08 22 16 37 02 32V31610_026 ...

Страница 28: ...park plug and cause hard starting Operation at an altitude that differs from that at which this engine was certified for extended periods of time may increase emissions High altitude performance can be improved by specific modifications to the carburetor If you always operate your tiller at altitudes above 1 500 meters 5 000 feet have your servicing dealer perform this car buretor modification Thi...

Страница 29: ...R FIXING LEVER 31 31 To adjust the handlebar height loosen the handlebar fixing lever move the handlebar to a desired position and tighten the lever If the handlebar angle adjustment is needed loosen the handlebar fixing lever move the handlebar to a required position and tighten the lever The handlebar can swing within the sweep of 31 from the center to the right and left each 11 08 22 16 37 17 3...

Страница 30: ...all the hitch attachment in the hitch box with a hitch pin The tilling depth adjustment can be made as follows Remove the lock pin and pin loosen the lock nuts and bolts securing the drag bars A and B and slid the drag bars up or down as necessary After adjustment tighten the bolts and lock nuts securely 11 08 22 16 37 23 32V31610_029 ...

Страница 31: ... US SH H ENGAGED DISENGAGED ENGAGED DISENGAGED The clutch engages and disengages the power from the engine to the transmission Engage Release the clutch lever Disengage Push and hold the lock lever Squeeze the clutch lever The clutch is engaged release the lock lever 1 2 3 11 09 14 13 59 04 32V31610_030 ...

Страница 32: ...ds and one reverse speed The shift lever should be operated in accordance with the attached gear shifting plate Return the throttle lever to the extreme right Release the clutch lever to disengage the clutch Move the shift lever to the desired gear position If the shift lever will not engage the desired gear squeeze the clutch lever and move the tiller slightly to reposition the gears 4 1 2 3 11 0...

Страница 33: ... of the hitch box 5 HITCH BOX HITCH PIN HITCH PIN CLIP Install the hitch attachment in the hitch box with a hitch pin Hitch pin clip snaps into relief in hitch pin to retain pin 11 08 22 16 37 52 32V31610_032 ...

Страница 34: ...sed in the field DOWN POSITION When moved on road Use a front wheel to move the tiller on road Lift the handlebars up and ground the front wheel When the tiller is used in the field move the wheel up Move the front wheel up by replacing the pin 11 08 22 16 37 58 32V31610_033 ...

Страница 35: ... tines have dug to a desired depth that allows easy tiller handling If the tines dig in but the tiller will not move forward ease up on the handlebars and move the handlebars from side to side If the tiller still digs in but will not move forward raise the drag bar up a hole When turning push down on the handlebars to bring the tiller s weight to the rear this will make turning easier 11 08 22 16 ...

Страница 36: ...ediately stop the engine and clean the rotor in a safe place Be sure to wear heavy gloves when cleaning the rotor To prevent damage check the tiller for any signs of damage or other faults each time the tiller is used after it has been operated last Do not use the tiller with a rotor whose diameter is in excess of 325 mm 12 8 in 8 6 8 ATTACHMENT LINE OF ENGINE HORIZONTAL LINE Lower the handle slig...

Страница 37: ... ENGINE SWITCH OFF OFF OFF O OF FF F THROTTLE LEVER D DI IS SE EN NG GA AG GE ED D In an emergency Turn the engine switch OFF Move the throttle lever fully to the right In normal use Release the clutch lever to the DISENGAGED position 1 2 11 08 22 16 38 27 32V31610_036 ...

Страница 38: ... OFF ENGINE SWITCH FUEL VALVE O OF FF F SHIFT LEVER NEUTRAL NEUTRAL Turn the engine switch OFF Turn the fuel valve to the OFF position Set the shift lever in the NEUTRAL position 3 4 5 11 08 22 16 38 34 32V31610_037 ...

Страница 39: ...the table below ITEM Perform at every indicated month or operating hour interval whichever comes first Every 6 months or 100 hrs Every 3 months or 50 hrs 2 REGULAR SERVICE PERIOD 3 Check level Change Check level Check Clean Replace Check Check Check tightness Check First month or 20 hrs Engine oil Transmission oil Air cleaner Tiller outside Clutch lever function Bolts and Nuts tightens Wiring and ...

Страница 40: ...al use log hours of operation to determine proper maintenance intervals Every year or 300 hrs 4 4 Check Clean Check adjust Replace Check level Check adjust Check adjust Check adjust Check adjust Check adjust Clean Clean Check These items should be serviced by your servicing dealer Each use First month or 20 hrs Check that there are no cracks or abnormal wear in the belt and replace it if necessary...

Страница 41: ...ck Wash your hands with soap and water after handling used oil Please dispose of used motor oil in a manner that is compatible with the environment We suggest you take it in a sealed container to your local service station for reclamation Do not throw it in the trash or pour it on the ground Remove the oil filler cap and drain bolt to drain the oil Reinstall the drain bolt and tighten it securely ...

Страница 42: ... water rinse and allow to dry thoroughly Or clean in high flash point solvent and allow to dry Dip the element in clean engine oil and squeeze out all the excess The engine will smoke during initial start up if too much oil is left in the foam Paper element Tap the element lightly several times on a hard surface to remove excess dirt or blow compressed air through the filter from the inside out Ne...

Страница 43: ...in the area 3 SEDIMENT CUP O RING Wash the sediment cup in solvent dry it thoroughly Turn the fuel valve ON and check for leaks Turn the fuel valve to the OFF position and remove the sediment cup and the O ring Place the O ring in the fuel valve and install the sediment cup Tighten the sediment cup securely 11 08 22 16 39 31 32V31610_042 ...

Страница 44: ...be properly gapped and free of deposits Remove the spark plug cap Use the spark plug wrench to remove the spark plug BPR5ES NGK W16EPR U DENSO Visually inspect the spark plug Discard it if the insulator is cracked or chipped Clean the spark plug with a wire brush if it is to be reused Measure the plug gap with a feeler gauge Correct as necessary by bending the side electrode The gap should be 0 7 ...

Страница 45: ...Check that the spark plug washer is in good condition and thread the spark plug in by hand to prevent cross threading After the spark plug is seated tighten with a spark plug wrench to compress the washer After seating it by hand tighten a new spark plug 1 2 turn with the wrench to compress the washer If you are reusing a plug it should only take 1 8 1 4 turn 4 5 11 08 22 16 39 46 32V31610_044 ...

Страница 46: ...r Be aware of the spring and collar coming off when you disassemble the clutch lever The spring and collar are located in between the right side of the clutch lever and the handle bracket Pull off the snap pin from the lever fulcrum pin By holding the clutch lever spring and collar pull out the lever fulcrum pin Detach the clutch lever spring and collar Remove any dirt or foreign objects Wipe off ...

Страница 47: ...ver fulcrum pin to the groove on the side of the handle bracket hole and then set the snap pin in the direction shown in the illustration see page Check the lock lever and clutch lever for smooth operation If the lock lever and clutch lever do not operate smoothly or the clutch engages by squeezing the clutch lever without pushing the lock lever take the tiller to an authorized Honda dealer 4 5 6 ...

Страница 48: ...DJUSTING NUT LOCK NUT FREE PLAY 5 10 mm 0 2 0 4 in Measure the free play at the lever tip Free play If the free play is incorrect loosen the lock nut and turn the adjusting bolt in or out as required 5 10 mm 0 2 0 4 in 11 08 22 16 40 11 32V31610_047 ...

Страница 49: ...0 16 in With the clutch disengaged measure the free play between the handle bracket stopper and lock lever arm stopper Free play If the free play is incorrect loosen the lock nut and turn the adjusting bolt in or out as required After adjustment tighten the lock nut securely 2 0 4 0 mm 0 08 0 16 in 11 09 14 13 59 22 32V31610_048 ...

Страница 50: ...IMENT CUP FUEL VALVE DRAIN KNOB O RING ON Before storing the unit for an extended period Be sure the storage area is free of excessive humidity and dust Drain the fuel Drain the carburetor by loosening the drain knob Drain the gasoline into a suitable container Reinstall the sediment cup and tighten securely Turn the fuel valve ON and drain the gasoline in the fuel tank into a suitable container W...

Страница 51: ... aligns with the hole on the recoil starter see illustration below At this point the intake and exhaust valves are closed and this will help to the engine from internal corrosion Change engine oil Cover tiller with plastic sheet Do not place the tiller with the handlebars on the ground It will cause the oil to enter the cylinder or fuel will spill over 3 4 5 11 08 22 16 40 34 32V31610_050 ...

Страница 52: ...Is gasoline reaching the carburetor To check loosen the drain knob with the fuel valve on Fuel should flow out freely Retighten drain knob When the engine will not start Is the spark plug in good condition Remove and inspect the spark plug Clean readjust gap and dry the spark plug Replace it if necessary If the engine still does not start take the tiller to an authorized Honda dealer 1 2 3 4 5 6 1...

Страница 53: ...to BPR5ES NGK W16EPR U DENSO Model Clutch Transmission Transmission oil capacity Belt tension type Forward 2 reverse 1 0 58 L 0 61 US qt 0 51 lmp qt 2 5 L 0 66 US gal 0 55 lmp gal 0 95 L 1 00 US qt 0 84 lmp qt 81 dB A 2 dB A 96 dB A 2 dB A 5 6 m s 2 2 m s Uncertainty Measured sound power level 50 kg 110 lbs Sound pressure level at operator s ears EN ISO 11200 1995 Uncertainty Vibration level at ha...

Страница 54: ...plication de technologies soucieuses de l environnement à l équipement mécanique Honda dans le but de préserver la nature pour les générations futures MANUEL DE L UTILISATEUR Honda F501 Notice originale 11 08 22 14 56 11 33V31610_001 ...

Страница 55: ...use et il doit accompagner la motobineuse en cas de revente Aucune partie de cette publication ne peut être reproduite sans une autorisation écrite La Honda Motor Co Ltd se réserve le droit d effectuer des modifications à tout moment sans préavis et sans aucune obligation de sa part La motobineuse Honda est connu pour assurer un service sûr et fiable dans des conditions d utilisation conformes aux...

Страница 56: ...nvironnement ne pas jeter ce produit la batterie l huile moteur etc aux ordures Observer la réglementation locale ou consulter son concessionnaire Honda agrée pour s en débarrasser Mise au rebut 1 11 08 22 14 56 26 33V31610_003 ...

Страница 57: ...ication du carburateur pour une utilisation à haute altitude 25 6 UTILISATION DE LA MOTOBINEUSE 26 7 ARRÊT DU MOTEUR 34 8 ENTRETIEN 36 9 TRANSPORT REMISAGE 47 10 DÉPISTAGE DES PANNES 49 11 CARACTÉRISTIQUES 50 ADRESSES DES PRINCIPAUX DISTRIBUTEURS Honda Dos de la couverture arrière CE Déclaration de conformité DESCRIPTION DE TABLE DES MATIERES Dos de la couverture arrière SOMMAIRE 2 11 08 22 14 56 ...

Страница 58: ...ou le remplacement des dents Arrêter le moteur et débrayer les outils rotatifs avant de procéder au contrôle ou à l entretien des dents N approcher ni les mains ni les pieds des dents pendant que le moteur tourne Les outils rotatifs sont tranchants et tournent à très grande vitesse Elles peuvent provoquer des accidents extrêmement graves Ne jamais faire fonctionner le motoculteur dans un garage un...

Страница 59: ...ur et les outils rotatifs en cas d urgence Bien assimiler l utilisation de toutes les commandes S assurer que les carters de sécurité caches des outils rotatifs carter de ventilateur et capot du lanceur soient bien montés en place Ne pas trop remplir le réservoir de carburant et s assurer que le bouchon du réservoir est fermé à fond après avoir fait le plein Refaire le plein dans un endroit bien a...

Страница 60: ... grand risque d accident Marcher ne jamais courir pendant l utilisation En cas de marche arrière pendant l utilisation faire particulièrement attention aux personnes et obstacles situés derrière l opérateur Avant de transporter ou de soulever le motoculteur vérifier que le moteur est arrêté S assurer que l éperon de terrage est en place et correctement réglée Ne pas laisser de personnes ou des ani...

Страница 61: ...pé de robinet d essence toujours fermer le robinet d essence Remplacer les pièces usées ou endommagées par mesure de sécurité Garder les enfants à l intérieur et les surveiller constamment lorsque la motobineuse est utilisé à proximité Les jeunes enfants se déplacent rapidement et sont tout particulièrement attirés par la motobineuse et la motoculture Ne jamais supposer que les enfants resteront o...

Страница 62: ...lammer Le moteur et le système d échappement deviennent très chauds pendant l utilisation et le restent pendant un certain temps après l arrêt Un contact avec des pièces chaudes du moteur peut provoquer des brûlures et enflammer certaines matières Eviter de toucher un moteur ou un système d échappement chaud Laisser le moteur se refroidir avant d effectuer une intervention ou de ranger le motocult...

Страница 63: ...rement espacés plutôt que dans le sens de la pente Etre très prudent lors d un changement de direction sur une pente Ne pas utiliser le motoculteur sur une pente de plus de 10 17 Remplacer le silencieux défectueux Ne pas faire fonctionner le moteur dans un endroit clos ou risquent de s accumuler des émanations dangereuses d oxyde de carbone L angle maximum de pente sur indiqué n a qu un but de réf...

Страница 64: ...ue les notes de sécuri té et de précautions décrites dans ce manuel Si un autocollant se détache ou devient difficile à lire s adresser à un concessionnaire Honda pour le faire remplacer EMPLACEMENT DES AUTOCOLLANTS DE SECURITE 2 ATTENTION ESSENCE LIRE LE MANUEL DU PROPRIETAIRE RISQUE DE BLESSURE ATTENTION GAZ D ECHAPPEMENT 9 11 08 22 14 57 55 33V31610_011 ...

Страница 65: ...CE Nom et adresse du fabricant Code descriptif Puissance nette du moteur Année de fabrication Numero de serir du chassis Nom et adresse du représentant agréé Masse de la machine spécification standard 10 11 08 22 14 58 01 33V31610_012 ...

Страница 66: ...MOTEUR ROUE AVANT Type équipé CONTACTEUR D ARRET MOTEUR LEVIER DES GAZ LEVIER DE FIXATION DE GUIDON BOUCHON DE REMPLISSAGE D ESSENCE PROTECTEUR AVANT LEVIER D EMBRAYAGE LEVIER INVERSEUR CARTER DE COURROIE JAUGE BOUCHON DE REMPLISSAGE D HUILE MOTEUR 11 11 08 22 14 58 06 33V31610_013 ...

Страница 67: ...is ACCESSOIRE D ATTELAGE BARRE D ATTELAGE A BARRE D ATTELAGE B FILTRE A AIR LEVIER DE STARTER POIGNEE BOUGIE D ALLUMAGE POIGNEE DE DEMARREUR GOUPILLE D ATTELAGE BOITE D ATTELAGE BOUCHON DE REMPLISSAGE D HUILE DE BOITE DE VITESSES BOUTON DE VIDANGE DE CARBURATEUR COUPELLE DE DECANTATION ROBINET D ESSENCE 12 11 08 22 14 58 12 33V31610_014 ...

Страница 68: ...isation Effectuer les vérifications suivantes avant l utilisation N y a t il pas de matières inflammables poussière paille etc autour du moteur N y a t il pas de fuites de carburant ou d huile moteur 24 22 34 35 CONTRÔLES AVANT L UTILISATION 4 Placer le motoculteur sur une surface horizontale et ferme puis le maintenir horizontalement c est à dire avec les dents rotatives la roue avant s il en est...

Страница 69: ...igure Introduire la jauge dans le col de remplissage mais ne pas la visser Enlever le bouchon de remplissage d huile et essuyer proprement la tige de jauge 1 2 3 Huile moteur L utilisation du moteur avec une quantité d huile insuffisante entraînera des domma ges sérieux au moteur 6 BOUCHON DE REMPLISSAGE JAUGE A HUILE LIMITE SUPERIEURE ORIFICE DE REMPLISSAGE D HUILE 14 11 08 22 14 58 35 33V31610_0...

Страница 70: ...I sur le bidon d huile pour s assurer qu elle porte bien la mention SE ou ultérieure ou équivalente Une huile SAE 10W 30 est recommandée pour l utilisation générale Les autres viscosités indiquées dans le tableau peuvent être utilisées lorsque la température moyenne du lieu d utilisation se trouve dans la plage indiquée 4 Huile recommandée L emploi d huile non détergente ou d huile moteur à 2 temp...

Страница 71: ... équivalente dont il est certifié qu elle satisfait ou dépasse les prescriptions des constructeurs d automobiles américains pour la classe de service API SE ou ultérieure ou équivalente Les huiles moteur de classe SE portent l indication de cette désignation sur le bidon Huile d engrenage de boîte de vitesse Huile recommandée 7 LIMITE SUPERIEURE ORIFICE DE REMPLISSAGE D HUILE BOUCHON DE REMPLISSAG...

Страница 72: ...r ne sont pas sales ou colmatés Les nettoyer si nécessaire voir page 39 Filtre à air Ne jamais faire tourner le moteur sans filtre à air Sinon une usure rapide du moteur pourrait en résulter 8 COUVERCLE DE FILTRE A AIR ELEMENTS DE FILTRE A AIR 17 11 08 22 14 58 54 33V31610_019 ...

Страница 73: ...voir Les éclaboussures ou les vapeurs d essence risqueraient de prendre feu Avant de mettre le moteur en marche s assurer que l essence renversée a séché et que les vapeurs sont dissipées Ne pas faire déborder le carburant du réservoir Le niveau du carburant ne doit pas atteindre le col de remplissage Après le plein de carburant s assurer que le bouchon du réservoir soit parfaitement refermé Faire...

Страница 74: ...ylique ou alcool de bois ou une essence contenant du méthanol à moins qu elle ne contienne également des cosolvants et des inhibiteurs de corrosion pour méthanol Les dommages du système d alimentation en carburant ou les problèmes de performances du moteur résultant de l utilisation d une essence contenant plus d alcool que ce qui est recommandé ne sont pas couverts par la garantie Avant de se rav...

Страница 75: ...er de verrouillage et en serrant le levier d embrayage Si le levier de verrouillage et le levier d embrayage ne fonctionnent pas en douceur ou si l embrayage s engage en serrant le levier d embrayage sans pousser le levier de verrouillage démonter et nettoyer le levier d embrayage voir page 43 Fonctionnement du levier d embrayage vérification 10 LEVIER DE BLOCAGE LEVIER D EMBRAYAGE E EN NF FO ON N...

Страница 76: ...e motoculteur suivre les instructions fournies avec l outil ou l accessoire Demander conseil au revendeur Honda en cas de problème ou de difficulté à installer un outil ou un accessoire Outils et accessoires 11 21 11 08 22 14 59 27 33V31610_023 ...

Страница 77: ...jà chaud ou si la température d air ambiante est élevée 1 2 Embrayer en tirant le levier d embrayage vers l intérieur puis débrayer en libérant le levier S asurer que l embrayage est désengagé et que le levier de sélection se trouve au point mort afin d éviter un mouvement incontrôlé lors du démarrage du moteur MISE EN MARCHE DU MOTEUR 5 ROBINET D ESSENCE MARCHE LEVIER DE STARTER FERME BOUTON DE V...

Страница 78: ...nterrupteur du moteur sur ON Aligner le repère du levier des gaz sur le repère position DEMARRAGE comme sur la figure 3 4 DEMARRAGE MARCHE CONTACTEUR D ARRET MOTEUR LEVIER DES GAZ 23 11 08 22 14 59 40 33V31610_025 ...

Страница 79: ...er le moteur s échauffer pendant quelques minutes Si le starter se trouve sur la position CLOSE le déplacer progressivement sur la position OPEN à mesure que le moteur s échauffe 5 6 Ne pas laisser la poignée de lancement du démarreur revenir brutalement contre le moteur La ramener lentement pour éviter d endommager le démarreur LEVIER DE STARTER OUVERT POIGNEE DE DEMARREUR D Di ir re ec ct ti io ...

Страница 80: ...fera aux normes antipollution pendant toute sa durée de service si les modifications du carburateur pour une utilisation en haute altitude ont été effectuées Même avec un carburateur modifié la puissance du moteur diminuera d environ 3 5 pour une augmentation d altitude de 300 mètres Si le carburateur n est pas modifié l effet de l altitude sur la puissance sera encore plus important Modification ...

Страница 81: ...le mancheron vers une position requise et serrer le levier Le mancheron peut basculer dans un balayage de 31 à partir du centre la droite et la gauche chacum Avant d ajuster le guidon placer le cultivateur sur un sol ferme et nivelé pour éviter que le guidon ne s affaisse accidentellement Réglage de la position des mancherons 1 UTILISATION DE LA MOTOBINEUSE 6 LEVIER DE FIXATION DE GUIDON LEVIER DE...

Страница 82: ...écrous et boulons fixant les barres de réglage de profondeur A et B et faire glisser les barres de réglage de profondeur vers le haut ou le bas Après le réglage resserrer les boulons et contre écrous à fond Réglage de la profondeur de travail 2 GOUPILLE D ATTELAGE ACCESSOIRE D ATTELAGE CONTRE ECROU BOULON GOUPILLE CONTRE ECROU BOULON BARRE D ATTELAGE B BOITE D ATTELAGE BARRE D ATTELAGE A GOUPILLE ...

Страница 83: ...inuellement sur le levier de verrouillage Serrer le levier d embrayage L embrayage est engagé relâcher le levier de verrouillage 1 2 3 Fonctionnement de l embrayage Réduire le régime du moteur avant d actionner l embrayage 3 LEVIER D EMBRAYAGE LEVIER DE BLOCAGE EMBRAYE DEBRAYE EMBRAYE DEBRAYE E EN NF FO ON NC CE ER R 28 11 09 14 14 01 05 33V31610_030 ...

Страница 84: ...oite Relâcher le levier d embrayage pour désengager l embrayage Déplacer le levier de changement de vitesse à la position désirée Si le levier de sélection ne peut être engagé sur la vitesse désirée enfoncer le levier d embrayage et déplacer légèrement la machine afin de repositionner les vitesses 4 1 2 3 Sélection de rapport Passage des vitesses 4 A AV VA AN NT T 2 2 PLAQUE DE SELECTION AVANT 1 L...

Страница 85: ...ide d une goupille d attelage La goupille d attelage se verrouille d un coup dans son logement pour mieux être rete nue en place Utilisation du boîtier de remorquage 5 BOITE D ATTELAGE GOUPILLE D ATTELAGE CLIP DE CLAVETTE D ATTELAGE 30 11 08 22 15 00 37 33V31610_032 ...

Страница 86: ...ol Lorsque le motoculteur est utilisé dans un champ relever la roue Relever la roue avant en repositionnant la clavette Roue avant Type équipé 6 ROUE AVANT GOUPILLE POSITION RELEVEE Pour utilisation dans les champs POSITION ABAISSEE Pour déplacement sur la route GOUPILLE DE VERROUILLAGE 31 11 08 22 15 00 44 33V31610_033 ...

Страница 87: ...re de manouvrer le cultivateur aisément Pour virer exercer une poussée sur le guidon vers le bas afin de ramener le centre de gravité du cultivateur vers l arrière cela facilitera ainsi la manouvre Si les dents de fourche s enfoncent de trop et que le cultivateur ne peut plus se mouvoir soulager la poussée sur le guidon et bouger le guidon d un bord et de l autre Si le cultivateur ne peut toujours...

Страница 88: ... des vêtements appropriés Le port de vêtements amples pouvant se prendre dans les pièces rotatives accroit les risques d accident Ne jamais utiliser la motobineuse la nuit Lorque de la boue des cailloux etc sont pris dans les outils rotatifs arrêter immêdiatement le moteur et nettoyer les outils rotatifs dans un endroit sûr Porter des gants épais pour nettoyer les outils rotatifs Pour éviter des d...

Страница 89: ...mplètement à droite En cas d usage normal Relâcher le levier d embrayage pour le ramener sur la position de DEBRAYAGE 1 2 ARRÊT DU MOTEUR 7 CONTACTEUR D ARRET MOTEUR ARRET DEBRAYE LEVIER DES GAZ A AR RR RE ET T ARRET A AR RR RE ET T DEBRAYE LEVIER D EMBRAYAGE 34 11 08 22 15 01 13 33V31610_036 ...

Страница 90: ...robinet de carburant sur la position fermé Placer le levier de sélection sur la position NEUTRAL 3 4 5 LEVIER INVERSEUR POINT MORT POINT MORT ARRET ARRET ARRET ARRET CONTACTEUR D ARRET MOTEUR A AR RR RE ET T ROBINET D ESSENCE 35 11 08 22 15 01 20 33V31610_037 ...

Страница 91: ... intervalles de contrôle et de remplacement varient en fonction des conditions d utilisation Remplacer plus tôt en cas de dommage En cas d utilisation dans des endroits poussiéreux effectuer l entretien toutes les 10 heures d utilisation ou chaque jour Pour une utilisation commerciale consigner le nombre d heures de service afin de déterminer la périodicité d entretien appropriée Tous les ans ou 3...

Страница 92: ...er le niveau Vérifier régler Vérifier régler Vérifier régler Vérifier régler Vérifier régler Nettoyer Nettoyer Vérifier Chaque utilisation Après remisage DESCRIPTION S assurer que la courroie n est pas fendillée ou anormalement usée et la remplacer si nécessaire L entretien de ces points doit être confié au concessionnaire Pour une utilisation commerciale consigner le nombre d heures de service af...

Страница 93: ...rée Ne pas la jeter dans une poubelle ni la verser au sol Retirer le bouchon de remplissage d huile et le boulon de vidange pour vidanger l huile Reposer le boulon de vidange et le serrer à fond Faire l appoint d huile recommandée voir page et vérifier le niveau d huile Reposer le bouchon de dispositif de remplissage jauge de niveau d huile 1 2 3 4 15 Renouvellement de l huile Contenance en huile ...

Страница 94: ...s ou passer un jet d air comprimé dans le filtre en procédant de l intérieur vers l extérieur Ne jamais tenter d éliminer les salissures à la brosse Le brossage risquerait de forcer les salissures dans les fibres Remplacer l élément en papier s il est encrassé excessivement Déposer l écrou à oreilles et le couvercle du filtre à air Retirer les éléments et les séparer Vérifier attentivement si les ...

Страница 95: ...iment et le joint torique Placer le joint torique dans le robinet de carburant et reposer la coupelle de décantation Serrer la coupelle de décantation à fond Nettoyage de la coupelle de décantation L essence étant extrêmement inflammable et explosive dans certaines conditions éviter de fumer ou d autoriser des flammes ou étincelles aux alentours 3 JOINT TORIQUE COUPELLE DE DECANTATION 40 11 08 22 ...

Страница 96: ...ée ou ébréchée Nettoyer la bougie d allumage avec une brosse métallique s il s agit de la réutiliser Mesurer l entrefer avec une jauge d épaisseur Le corriger si besoin en incurvant l électrode latérale L entrefer doit être égal à 1 2 3 Entretien de la bougie d allumage Si le moteur vient de fonctionner le silencieux est très chaud Faire attention à ne pas toucher le silencieux Bougie d allumage r...

Страница 97: ...on siège serrer une bougie d allumage neuve de 1 2 tour à l aide d une clé pour comprimer la rondelle S il s agit de remonter une bougie usagée 1 8 à 1 4 de tour suffira 4 5 La bougie d allumage doit être bien serrée Une bougie mal serrée risque de devenir très chaude ce qui peut entraîner une détérioration du moteur Ne jamais utiliser une bougie d allumage ayant une étendue calorifique inappropri...

Страница 98: ... le levier d embrayage le ressort et l entretoise Enlever toute saleté ou substance étrangère Essuyer et nettoyer le pivot du levier d embrayage et le bras de levier de verrouillage Ne pas mettre d huile ou de liquide de nettoyage sur le levier d embrayage le levier de verrouillage et le bras de levier de verrouillage L huile ou les liquides de nettoyage attirent la saleté et les substances étrang...

Страница 99: ...sur le côté de l orifice du support de guidon puis positionner l agrafe dans le sens indiqué sur l illustration voir page S assurer que le levier de verrouillage et le levier d embrayage fonctionnent en douceur Si le levier de verrouillage et le levier d embrayage ne fonctionnent pas en douceur ou si l embrayage s engage en serrant le levier d embrayage sans pousser le levier de verrouillage porte...

Страница 100: ...est incorrect desserrer le contre écrou et tourner le boulon de réglage dans un sens ou dans l autre selon besoin Garde Réglage du câble de commande des gaz 6 LEVIER DES GAZ GARDE 5 10 mm ECROU DE REGLAGE CONTRE ECROU 45 5 10 mm 11 08 22 15 02 58 33V31610_047 ...

Страница 101: ...ecte desserrer le contre écrou et agir sur le boulon de réglage dans l un ou l autre sens Après le réglage resserrer à fond le contre écrou Garde Réglage du câble d embrayage 7 CONTRE ECROU BOULON DE REGLAGE BUTEE DU SUPPORT DE GUIDON 2 0 4 0 mm BUTEE DU BRAS DE LEVIER DE VERROUILLAGE E EN NF FO ON NC CE ER R 46 2 0 4 0 mm 11 09 14 14 01 23 33V31610_048 ...

Страница 102: ...e carburant Avant de remiser l appareil pendant une période prolongée 1 2 a b c d Lors du transport du motoculteur tourner le robinet d essence vers la position OFF et garder le motoculteur de niveau pour éviter de renverser de l essence Les vapeurs d essence ou de l essence renversée peuvent s allumer L essence étant extrêmement inflammable et explosive dans certaines conditions évi ter de fumer ...

Страница 103: ...ssion et d échappement sont alors fermées ce qui aide à protéger le moteur contre la corrosion interne Changer l huile moteur Recouvrir le motoculteur d une bâche en plastique Ne pas placer le cultivateur avec le guidon sur le sol Cela causerait une pénétration d hui le dans le cylindre ou une dispersion du carburant 3 4 5 Aligner l encoche de la poulie de lanceur sur l orifice au dessus du lanceu...

Страница 104: ... bougie est elle en bon état Retirer la bougie et la contrôler Nettoyer la bougie régler l écartement de ses électrodes et la sécher La remplacer si nécessaire Si le moteur ne démarre toujours pas amener le motoculteur à un revendeur Honda agréé 1 2 3 4 5 6 Si du carburant a été renversé s assurer que la zone est sèche avant de mettre le moteur en marche Du carburant renversé ou des vapeurs de car...

Страница 105: ...Niveau de pression acoustique aux oreilles de l opérateur EN ISO 11200 1995 Incertitude Niveau de vibrations main bras EN12096 1997 Annexe D EN1033 1995 Incertitude Dimensions et poids Moteur Bruit et vibrations Transmission CARACTÉRISTIQUES 11 50 FZAZ 1 600 mm 1 385 mm 610 mm 980 mm 47 kg GX160 2 2 m s 5 6 m s 2 dB A 96 dB A 2 dB A 81 dB A 0 95 L marche arrière 1 Type de tension de courroie 2 5 L...

Страница 106: ...triebsanleitung Die Marke e SPEC symbolisiert umweltbewusste Technologien die in Honda Power Equipment zum Ausdruck kommen Produkte im Zeichen unseres Bestrebens der Erhaltung der Natur für zukünftige Generationen 11 08 22 15 24 16 34V31610_001 ...

Страница 107: ...Produktstand der zum Zeitpunkt des Druckes erhältlich war In diesem Handbuch werden Betrieb und Wartung der Motorhacke F501 beschrieben Die Abbildung kann je nach Typ unterschiedlich sein Wenn irgendwelche Probleme auftreten oder wenn Sie hinsichtlich der Ackerfräse Fragen haben wenden Sie sich bitte an Ihren Honda Händler Gibt nützliche Informationen Achten Sie auf die Erklärungen die den folgend...

Страница 108: ...ieses Produkt Batterien Motoröl usw nicht einfach in den Müll gegeben werden Beachten Sie die örtlichen Gesetze und Vorschriften oder setzen Sie sich bezüglich Entsorgung mit Ihrem Honda Vertragshändler in Verbindung 11 08 22 15 24 29 34V31610_003 ...

Страница 109: ...EN DES MOTORS 22 Vergasermodifikation für Betrieb in großer Höhenlage 25 6 BENUTZUNG DER ACKERFRÄSE 26 7 ABSTELLEN DES MOTORS 34 8 WARTUNG 36 9 TRANSPORT LAGERUNG 47 10 STÖRUNGSBESEITIGUNG 49 11 TECHNISCHE DATEN 50 ADRESSEN DER HAUPT Honda VERTEILER Innenseite des hinteren Umschlags EU Konformitätserklärung INHALTSÜBERSICHT Innenseite des hinteren Umschlags 11 08 22 15 24 33 34V31610_004 ...

Страница 110: ...genommen wird Während die Maschine in Betrieb ist Ihre Hände und Füße von den Rotationszinken fernhalten Die Rotationszinken sind scharfkantig und drehen sich mit holder Geschwindigkeit Zufälliger Kontakt kann zu schweren Verletzungen führen Die Motorhacke darf auf keinen Fall in einer Garage in einem Haus oder in der Nähe geöffneter Fenster und Türen betrieben werden Wenn Sie die Motorhacke in ei...

Страница 111: ...peln anheben kann Lernen Sie wie man den Motor und den Zinkenmechanismus im Falle einer Notsituation schnell abstellt Machen Sie sich mit der Funktion aller Bedienungselemente vertraut Sicherstellen dass die Schutzabdeckungen Zinkenabdeckungen Gebläseabdeckung sowie Seilzugstarterabdeckung an den vorgesehenen Stellen angebracht sind Sich vergewissern dass alle Sicherheitsvorrichtungen funktioniere...

Страница 112: ... erhöht das Unfallrisiko Feste hohe Arbeitsschuhe tragen Die Ackerfräse darf auf keinen Fall barfuß in offenen Schuhen oder Sandalen betrieben werden da dies die Verletzungsgefahr erhöht Die Benutzung der Ackerfräse durch Personen die mit der Bedienung nicht vertraut sind kann Verletzungen zur Folge haben Achten Sie bei laufendem Motor stets darauf dass sich Hände und Füße in sicherem Abstand von ...

Страница 113: ...von Grasresten Blättern und überschüssigem Fett freigehalten werden Vor dem Abstellen der Ackerfräse in einem geschlossenen Raum den Motor abkühlen lassen Die Ackerfräse niemals mit gefülltem Tank im Innern eines Gebäudes abstellen da sich die entweichenden Kraftstoffdämpfe durch eine offene Flamme Funkenbildung oder eine Wärmequelle entzünden können Achten Sie bei allen Schrauben Muttern und ande...

Страница 114: ...as Nachfüllen des Kraftstoffs muss in einem gut belüfteten Bereich bei abgestelltem Motor erfolgen Vor dem Anlassen des Motors muss Kraftstoff nachgefüllt werden Während der Motor läuft oder heiß ist darf niemals der Tankdeckel abgenommen oder Kraftstoff nachgefüllt werden Vor dem Auftanken den Motor abkühlen lassen Kraftstoffdämpfe oder verschütteter Kraftstoff können sich entzünden Motor und Sch...

Страница 115: ...en Die Motorhacke nicht an einem Hang mit über 10 17 einsetzen Bei einer Richtungsänderung an einem Abhang sehr vorsichtig vorgehen Es empfiehlt sich einen Hang in horizontaler Richtung in Reihen gleichen Abstands und nicht von oben nach unten zu bearbeiten Bei Arbeiten mit der Ackerfräse an einem Abhang den Kraftstofftank nur halb füllen um ein Auslaufen des Kraftstoffs zu vermeiden Der max siche...

Страница 116: ...EISE Diese Aufkleber warnen vor potentiellen ernsten Unfallgefahren Lesen Sie deshalb die Warnaufkleber sowie die in dieser Anleitung aufgeführten Vorsichtsmaßnahmen vorsichtig durch Wenn ein Aufkleber abfällt oder nur noch schwer lesbar ist können Ersatzaufkleber von Ihrem Honda Händler bezogen werden 11 08 22 15 25 58 34V31610_011 ...

Страница 117: ...izierung CE MARK Name und Adresse des Herstellers Gruppencode Motor Nettoleistung Herstellungsjahr Rahmenseriennummer Name und Adresse des bevollmächtigten Vertreters Maschinenmasse Standardausführung 11 08 22 15 26 04 34V31610_012 ...

Страница 118: ...ZÜNDSCHALTER TANKDECKEL MOTORÖLABLASSSCHRAUBE KUPPLUNGSHEBEL VORDERSCHUTZ LENKSTANGENFIXIERHEBEL VORDERRAD Typ mit entsprechender Ausstattung GASHEBEL AUSPUFFTOPF RIEMENABDECKUNG MOTORÖLEINFÜLLVERSCHLUSS MESSSTAB 11 08 22 15 26 09 34V31610_013 ...

Страница 119: ...SSERGRIFF ANHÄNGERKUPPLUNG GETRIEBEÖLEINFÜLLDECKEL VERGASERABLASSKNOPF FILTERBECHER KRAFTSTOFFHAHN ZUGSTANGE B Tragen Sie bitte die Rahmenseriennummer an der dafür vorgesehenen Stelle unten ein Sie benötigen diese Nummer zur Bestellung von Teilen Rahmennummer 11 08 22 15 26 16 34V31610_014 ...

Страница 120: ...dere ungewöhnliche Symptome feststellen wenden Sie sich bitte unverzüglich an Ihren Honda Händler Läßt sich der Motor mit dem Motorschalter einwandfrei stoppen Bezüglich Stoppverfahren siehe Seiten bis Den Motor starten Gibt der Motor anormale Geräusche ab Bezüglich Startverfahren siehe Seiten bis Ist irgendein Kabel oder Seilzug durch angrenzende Teile eingeklemmt Ist die Isolierung eines Kabels ...

Страница 121: ...EINFÜLLÖFFNUNG Die Motorhacke auf ebenem Untergrund waagerecht stellen indem Holzblöcke unter Vorderrad bei entsprechender Ausstattung und Führungsstange gesetzt werden wie gezeigt Den Ölmessstab in den Öleinfüllstutzen einführen aber nicht einschrauben Den Tankdeckel losdrehen und den Ölmessstab abwischen 1 2 3 11 08 22 15 26 38 34V31610_016 ...

Страница 122: ...rungen für API Serviceklasse SE oder höher bzw gleichwertig erfüllt oder überschreitet Prüfen Sie stets das API Service Etikett am Ölbehälter um sicherzugehen dass es die Buchstaben SE oder die einer höheren Klasse bzw entsprechende enthält SAE 10W 30 empfiehlt sich für allgemeinen Gebrauch Andere in der Tabelle angegebene Viskositäten können verwendet werden wenn die durchschnittliche Temperatur ...

Страница 123: ...rkante der Öleinfüllöffnung befinden Bei niedrigem Ölstand empfohlenes Öl nachfüllen SAE 10W 30 Honda Viertaktöl oder ein Motoröl gleichwertiger Qualität mit hoher Detergentwirkung das die Anforderungen der Automobilhersteller der Vereinigten Staaten für API Serviceklasse SE oder höher bzw gleichwertig bestätigtermaßen erfüllt bzw überschreitet Ein Motoröl der Klasse SE ist auf dem Behälter entspr...

Страница 124: ...werden Ein schneller Motorverschleiß ist die Folge 8 LUFTFILTERDECKEL LUFTFILTEREINSÄTZE Den Luftfilterdeckel abnehmen Die Luftfiltereinsätze auf Verschmutzung und Verstopfung kontrollieren Erforderlichenfalls reinigen siehe Seite 39 11 08 22 15 26 58 34V31610_019 ...

Страница 125: ...Kraftstoff können sich entzünden Falls Benzin verschüttet wurde unbedingt sicherstellen dass dieser Bereich vor dem Starten des Motors vollkommen trocken ist und dass sich die Benzindämpfe verflüchtigt haben Wiederholten bzw längeren Hautkontakt bzw das Einatmen von Kraftstoffdämpfen vermeiden AUS DER REICHWEITE VON KINDERN FERNHALTEN 9 TANKDECKEL OBERER PEGEL Die Benzinpegel überprüfen und den Ta...

Страница 126: ...ol Methyl oder Holzalkohol enthält und auch kein Benzin mit Methanolgehalt das nicht Kosolventen und Korrosionsinhibitoren für Methanol beinhaltet Falls Sie sich für die Verwendung von alkoholhaltigem Benzin Gasohol entscheiden vergewissern Sie sich dass seine Oktanzahl mindestens so hoch ist wie die für bleifreies Benzin empfohlene Es gibt zwei Arten von Gasohol Die eine enthält Äthanol und die a...

Страница 127: ...und oder Verriegelungshebelarm verklemmt haben Sicherstellen dass sich Verriegelungshebel und Kupplungshebel ruckfrei betätigen lassen indem der Verriegelungshebel gedrückt und der Kupplungshebel gezogen wird Wenn der Verriegelungshebel und der Kupplungshebel nicht richtig funktionieren oder wenn die Kupplung bei Ziehen des Kupplungshebels einrückt ohne dass der Verriegelungshebel gedrückt ist den...

Страница 128: ...ungsanleitung zur Hand genommen werden welche mit dem Werkzeug oder dem Zusatzgerät mitgeliefert wurde Sollten sich beim Einbau von Werkzeug oder Zusatzgerät irgendwelche Probleme irgendwelche Probleme oder Schwierigkeiten ergeben sprechen Sie bitte mit ihrem Honda Fachhändler 11 08 22 15 27 29 34V31610_023 ...

Страница 129: ...rollierte Bewegungen beim Anspringen des Motors zu vermeiden ANLASSEN DES MOTORS 5 ABLASSSCHRAUBE KRAFTSTOFFHAHN EIN GESCHLOSSEN CHOKEHEBEL Den Kraftstoffhahn auf ON Ein drehen Auf Dichtigkeit des Ablassknopfes überprüfen Bei kaltem Wetter bzw bei kaltem Motor ist der Choke Hebel in die Chose Position zu schieben Der Choke darf bei heißem Motor und hoher Außentemperatur nicht verwendet werden 1 2 ...

Страница 130: ... 23 START EIN ZÜNDSCHALTER GASHEBEL Den Motorschalter auf ON stellen Die Markierung am Drosselhebel auf die Markierung START Position wie gezeigt ausrichten 3 4 11 08 22 15 27 44 34V31610_025 ...

Страница 131: ...riff leicht ziehen bis Widerstand zu spüren ist und ihn dann einmal zurückgehen lassen Den Lenkholm mit der linken Hand festhalten und den Startgriff kräftig in Pfeilrichtung durchziehen wie gezeigt Den Motor einige Minuten lang warmlaufen lassen Wenn der Choke auf CLOSE gestellt worden ist ihn allmählich in die Stellung OPEN bringen während der Motor warmläuft 5 6 11 08 22 15 27 50 34V31610_026 ...

Страница 132: ...kerze und zu Startproblemen Längerer Betrieb in einer Höhenlage die nicht in den Bereich fällt für den dieser Motor als geeignet befunden worden ist kann erhöhte Emissionswerte zur Folge haben Selbst bei Vergasermodifikation nimmt die Motorleistung pro 300 m Höhenzunahme um etwa 3 5 ab Ohne Vergasermodifikation ist die Auswirkung der Höhenlage auf die Motorleistung noch größer Die Motorleistung be...

Страница 133: ...ENFIXIERHEBEL 31 31 Um die Lenkerhöhe einzustellen den Lenker Feststellhebel lockern den Lenker auf die geeignete Position einstellen dann den Feststellhebel wieder festziehen Wenn eine Einstellung des Lenkerwinkels erforderlich wird den Lenker Feststellhebel lockern und den Lenker in die erforderliche Position bringen Der Lenker kann von der Mitte aus je um 31 nach links und rechts ausschwingen 1...

Страница 134: ...häuse einstecken und mit dem Zughakenbolzen befestigen Die Einstellung der Ackertiefe kann die wie folgt vorgenommen werden Sicherungsstift und Bolzen abnehmen die Sicherungsmuttern sowie die Befestigungsschrauben der Führungsstangen A und B lösen dann die Führungsstangen bedarfsgemäß nach oben oder unten verschieben Nach der Einstellung die Schrauben und Sicherungsmuttern gut festziehen 11 08 22 ...

Страница 135: ...CKT D DR RÜ ÜC CK KE EN N EINGERÜCKT Die Kupplung stellt die Kraftübertragung vom Motor zum Getriebe her und unterbricht diese Einrücken Den Kupplungshebel loslassen Ausrücken Den Verriegelungshebel drücken und gedrückt halten Den Kupplungshebel ziehen Die Kupplung ist eingerückt den Verriegelungshebel loslassen 1 2 3 11 09 14 14 04 11 34V31610_030 ...

Страница 136: ...ang geschaltet werden Der Schalthebel muss gemäß dem nachfolgend dargestellten Schaltmuster betätigt werden Den Gashebel ganz nach rechts ziehen Den Kupplungshebel loslassen um die Kupplung auszurücken Den Schalthebel auf die gewünschte Getriebeposition einstellen Wenn sich der Schalthebel in der gewünschten Position nicht arretieren lässt den Kupplungshebel anziehen und die Ackerfräse etwas beweg...

Страница 137: ...einrichtung 5 ANHÄNGERKUPPLUNG ZUGHAKEN ANHÄNGEBOLZENKLAMMER Das Zusatzgerät mit dem Bolzen in der Anhängerkupplung befestigen Die Bolzenklammer schnappt in den Bolzen ein um ihn festzuhalten 11 08 22 15 28 38 34V31610_032 ...

Страница 138: ...Ackern VORDERRAD ARRETIERSTIFT STIFT Für das Fahren auf Straßen das Vorderrad benutzen Die Lenkstange aufwärts halten um das Vorderrad aufsetzen zu lassen Wenn die Motorhacke im Feld verwendet wird das Rad hochstellen Das Vorderrad durch Bolzenwechsel hochstellen 11 08 22 15 28 45 34V31610_033 ...

Страница 139: ...eingraben und eine leichtere Handhabung der Ackerfräse erreicht wird Wenn sich die Fräsenzinken eingraben die Ackerfräse sich jedoch nicht weiterbewegt ist der Lenker etwas anzuheben und von einer zur anderen Seite zu bewegen Wenn sich die Fräsenzinken immer noch eingraben und sich die Fräse nicht nach vorne bewegt ist die Zugstange um ein Loch höher zu setzen Beim Wenden der Ackerfräse ist am Len...

Страница 140: ...ellen und die Zinken an einem sicheren Ort reinigen Beim Reinigen der Rotationszinken unbedingt dicke Schutzhandschuhe tragen Die Ackerfräse niemals bei Dunkelheit betreiben Festes Schuhwerk tragen Das Betreiben der Ackerfräse ohne Schuhe bzw offenen Schuhen oder Sandalen erhöht das Verletzungsrisiko Die Erlaubnis zum Betreiben der Ackerfräse für Personen ohne Schulung kann zu Verletzungen führen ...

Страница 141: ... AUSGERÜCKT AUSGERÜCKT GASHEBEL A AU US S A AU US S KUPPLUNGSHEBEL Im Notfall Den Motorschalter ausschalten Den Gashebel ganz nach rechts bewegen Bei normaler Benutzung Den Kupplungshebel auf DISENGAGED ausrücken 1 2 11 08 22 15 29 13 34V31610_036 ...

Страница 142: ...US ZÜNDSCHALTER AUS SCHALTHEBEL LEERLAUF LEERLAUF AUS AUS KRAFTSTOFFHAHN Den Motorschalter ausschalten Den Kraftstoffhahn auf OFF drehen Den Schalthebel auf NEUTRAL stellen 3 4 5 11 08 22 15 29 20 34V31610_037 ...

Страница 143: ...enen Monats oder Betriebsstundenintervall warten je nachdem was zuerst eintrifft NORMALE WARTUNGSPERIODE 3 GEGENSTAND Motoröl Getriebeöl Luftfilter Motorhacken Außenfläche Kupplungshebelfunktion Festigkeit von Schrauben und Muttern Kabel und Seilzüge 2 Prüf und Wechselintervall hängen von den Gebrauchsbedingungen ab Im Zweifelsfalle frühzeitig wechseln Bei Einsatz in staubigen Gebieten alle 10 Bet...

Страница 144: ...iten sollten von Ihrem Wartungshändler ausgeführt werden Sicherstellen dass der Riemen keine Risse und keinen ungewöhnlichen Verschleiß aufweist Den Riemen erforderlichenfalls auswechseln 4 5 4 5 4 4 4 3 4 5 Alle 500 Stunden 4 Alle 2 Jahre Nötigenfalls ersetzen 4 Überprüfen Reinigen Überprüfen einstellen Auswechseln Füllstand kontrollieren Überprüfen einstellen Überprüfen einstellen Überprüfen ein...

Страница 145: ... bei der Beseitigung des Altöls die entsprechenden Umweltschutzbestimmungen Wir empfehlen das Öl in einem verschlossenen Behälter zu einer Altöl Sammelstelle zu bringen Das gebrauchte Motoröl nicht in den Abfall werfen oder in die Kanalisation den Abfluss oder auf den Boden gießen Nach dem Umgang mit Altöl die Hände mit Wasser und Seife waschen Den Öleinfüllverschluss abnehmen und die Ablassschrau...

Страница 146: ...ter mit Pressluft von innen her ausblasen Niemals versuchen den Schmutz abzubürsten da er dadurch nur noch tiefer in das Filtermaterial gedrückt wird Sollte der Papiereinsatz übermäßig verschmutzt sein muss dieser ersetzt werden D i e F l ü g e l m u t t e r n u n d d e n Luftfilterdeckel entfernen Die Einsätze herausnehmen und trennen Beide Einsätze sorgfältig auf Löcher oder Risse überprüfen und...

Страница 147: ... O RING FILTERBECHER Den Ablagerungsbecher in Lösungsmittel waschen und dann gründlich trocknen lassen Den Kraftstoffhahn auf ON drehen und auf Undichtigkeiten überprüfen Den Kraftstoffhahn auf OFF drehen dann den Abschneidebecher und den O Ring entfernen Den O Ring in den Kraftstoffhahn einsetzen und den Ablagerungsbecher anbringen Den Ablagerungsbecher fest anziehen 11 08 22 15 30 16 34V31610_04...

Страница 148: ... von Ablagerungen sein W16EPR U DENSO BPR5ES NGK Zum Entfernen der Zündkerze muss der Zündkerzenschlüssel benutzt werden Den Zündkerzenstecker abziehen Die Zündkerze visuell überprüfen Wenn der Isolator gerissen oder abgesplittert ist muss die Zündkerze ersetzt werden Wenn die Zündkerze erneut verwendet werden soll diese mit einer Drahtbürste reinigen 0 7 0 8 mm Den Elektrodenabstand mit einer Füh...

Страница 149: ... Danach die Zündkerze von Hand eindrehen um ein Überdrehen des Gewindes zu vermeiden Nachdem die Zündkerze aufsitzt mit einem Kerzenschlüssel festziehen um die Dichtscheibe zusammenzudrücken Nachdem die Zündkerze handfest festgezogen wurde ist diese mit einem Zündkerzenschlüssel um eine weitere 1 2 Drehung festzuziehen damit die Dichtscheibe zusammengedrückt wird Wenn die Zündkerze wiederverwendet...

Страница 150: ...pplungshebel zerlegen und reinigen Öl oder Reinigungsflüssigkeit zieht Schmutz und Fremdkörper an Kupplungshebel Verriegelungshebel und Verriegelungshebelarm nicht mit Öl oder Reinigungsflüssigkeit behandeln Jeglichen Schmutz und Fremdkörper beseitigen Die Gelenkfläche von Kupplungshebel und Verriegelungshebelarm abwischen und reinigen Kupplungshebel Feder sowie Hülse festhalten und den Hebelgelen...

Страница 151: ...söffnung ausrichten und dann den Sicherungsstift in der in der Abbildung gezeigten Ausrichtung anbringen siehe Seite Verriegelungshebel und Kupplungshebel auf ruckfreie Betätigung kontrollieren Wenn der Verriegelungshebel und der Kupplungshebel nicht richtig funktionieren oder wenn die Kupplung bei Ziehen des Kupplungshebels einrückt ohne dass der Verriegelungshebel gedrückt ist lassen Sie die Mot...

Страница 152: ... mm SICHERUNGSMUTTER EINSTELLMUTTER Messen Sie das freie Spiel an der Hebelspitze Wenn das Kupplungsspiel falsch ist die Sicherungsmutter lockern und die Einstellschraube je nach Wunsch heraus oder hineindrehen Spiel 5 10 mm 11 08 22 15 30 57 34V31610_047 ...

Страница 153: ... i a u s g e r ü c k t e r K u p p l u n g d a s S p i e l z w i s c h e n d e m Lenkerhalterungsanschlag und dem Verriegelungshebelarmanschlag messen Wenn das Spiel nicht richtig ist die Gegenmutter lösen und die Einstellmutter je nach Bedarf hinein oder herausdrehen Nach der Einstellung die Gegenmutter fest anziehen Spiel 2 0 4 0 mm 11 09 14 14 04 29 34V31610_048 ...

Страница 154: ...ING FILTERBECHER Den Vergaser entleeren indem der Ablassknopf gelöst wird Das Benzin in einen geeigneten Behälter ablassen Den Ablagerungsbecher wieder anbringen und festziehen Den Kraftstoffhahn aufdrehen auf ON stellen und das Benzin vom Kraftstofftank in einen geeigneten Behälter ablassen Bei zugedrehtem Kraftstoffhahn in Stellung OFF den Kraftstoffablagerungsbecher abnehmen und entleeren Den K...

Страница 155: ...g an der Startzugvorrichtung ausgerichtet ist siehe Abbildung unten Nun sind die Ventile für Ein und Auslass geschlossen wodurch das Innere des Motors besser gegen Korrosion geschützt ist Das Motoröl wechseln Die Motorhacke mit einer Kunststoffplane abdecken Die Ackerfräse darf nicht mit dem Lenker auf den Boden abgesenkt werden Dabei fließt Öl in den Zylinder oder der Kraftstoff fließt über 3 4 5...

Страница 156: ...lter aktiviert Wird dem Vergaser Kraftstoff zugeführt Zur Überprüfung die Ablassschraube lockern während der Kraftstoffhahn geöffnet ist Danach die Ablassschraube wieder festziehen Bei Startversagen des Motors Wenn der Motor immer noch nicht anspringt ist die Ackerfräse zu einem autorisierten Honda Händler zu bringen Die Zündkerze herausdrehen und überprüfen Zündkerze reinigen und trocknen Elektro...

Страница 157: ...Einzylinder OHV Gebläsekühlung GX160 Vorwärts 2 50 kg F501 GE F501 GE F501 HE F501 HE F501 HE F501 GE Modell Länge Breite Höhe Trockengewicht Gewicht Modell Gruppencode Unsicherheit Gemessener Schallleistungspegel Modell Kupplung Getriebe Getriebeöl Füllmenge Modell Typ Hubraum Bohrung Hub Zündanlage Zündkerze Olfüllmenge Kraftstofftank Fassungsvermögen Schalldruckpegel am Ohr des Betreibers EN IS...

Страница 158: ...s responsables con el medio ambiente aplicadas al equipo motorizado Honda que contiene nuestro deseo de conservar la naturaleza para las generaciones del futuro MANUAL DE EXPLICACIONES Honda F501 Manual original 11 08 22 15 43 54 35V31610_001 ...

Страница 159: ...ermanente de la cultivadora y debe permanecer con ella en el momento de su venta Ninguna parte de este manual puede reproducirse sin permiso por escrito Honda Motor Co Ltd se reserva el derecho ha realizar cambios sin previo aviso y sin incurrir por ello en ninguna obligación La cultivadora Honda está diseñada para ofrecer un servicio seguro y confiable si se opera de acuerdo con las instrucciones...

Страница 160: ... la batería el aceite de motor etc usados en un lugar de recolección de la basura Observe las leyes y regulaciones de su localidad o consulte a un concesionario Honda autorizado cuando deba tirar tales partes Eliminación 1 11 08 22 15 44 07 35V31610_003 ...

Страница 161: ...ción del carburador para funcionar a gran altitud 25 6 OPERACIÓN DE LA CULTIVADORA 26 7 PARADA DEL MOTOR 34 8 MANTENIMIENTO 36 9 TRANSPORTE ALMACENAMIENTO 47 10 LOCALIZACIÓN DE AVERÍAS 49 11 ESPECIFICACIONES 50 DIRECCIONES DE LOS PRINCIPALES CONCESIONARIOS Honda Dentro de cubierta trasera DESCRIPCIÓN GENERAL DEL CONTENIDO DE LA Declaración de Conformidad CE Dentro de cubierta trasera ÍNDICE 2 11 0...

Страница 162: ...res cerrados o incluso en lugares parcialmente cerrados es posible que el aire que usted respire contenga una cantidad peligrosa de gases de escape No ponga nunca en marcha la cultivadora dentro de un garaje de una casa ni cerca de puertas o ventanas abiertas Las púas rotativas están afiladas y giran a alta velocidental puede causar daños graves Mantenga las manos y los pies apartados de las púas ...

Страница 163: ...ndiciones puede ocasionar serios daños personales Asegúrese de que todos los dispositivos de seguridad funcionen perfectamente y que las etiquetas de advertencia estén en su lugar Estos ítemes se instalan para su seguridad La gasolina es muy inflamable y es explosiva bajo ciertas condiciones No fume ni acerque fuego ni chispas al lugar en el que se reposte la cultivadora o en el que guarde la gaso...

Страница 164: ...sibilidad sea mala porque correrá un riesgo muy grande de accidentes Durante la operación ande y no corra nunca Cuando retroceda durante la operación preste especial atención a la gente y a los obstáculos que pudieran haber detrás del operador Antes de transportar y de elevar la segadora asegúrese de que el motor esté parado Emplee la segadora para el proposito para el que se ha hecho es decir cul...

Страница 165: ... necesario drenar el depósito de combustible deberá hacerlo en un lugar al aire libre con el motor frío No deje recipientes de materias vegetales dentro ni cerca de un edificio Para reducir el peligro de incendios mantenga la segadora especialmente el motor silenciador y tambien lugar de almacenaje de la gasolina exentos de hierva hojas o grasa excesiva Deje que se enfríe el motor antes de guardar...

Страница 166: ... oepración y permanecen calientes durante un rato después de parar El contacto con los componentes calientes del motor puede causar daños de quemaduras y puede encender ciertos materiales No toque el motor ni el sistema de escape estando calientes Permita que se enfríe el motor antes de efectuar el mantenimiento o de guardar la cultivadora en interiores Si se ha derramado combustible no intente ar...

Страница 167: ...los de espacios iguales en lugar de hacerlo hacia rriba y abajo Tenga mucho cuidado al cambiar la dirección de la cultivadora en una cuesta No emplee la cultivadora en una cuesta de más de 10 17 Reemplace el silenciador defectuoso No opere el motor en un lugar cerrado donde puedan acumularse los peligrosos gases de monóxido de carbono El ángulo máximo de grados de seguridad mostrado es sólo como r...

Страница 168: ... y precauciones descritas en este ma nual Si se despega una etiqueta o resulta difícil de leer póngase en contacto con su concesionario de Honda para el reemplazo UBICACIÓN DE LAS ETIQUETAS DE SEGURIDAD 2 PRECAUCIÓN DE COMBUSTIBLE LEA EL MANUAL DEL PROPIETARIO PELIGRO DE CORTE PRECAUCIÓN DE GASES DE ESCAPE 9 11 08 22 15 45 35 35V31610_011 ...

Страница 169: ... y dirección del fabricante Código de descripción Potencia neta del motor Año de fabricación Nombre y domicilio del representante autorizado Masa de la máquina especificación estándar Número de serie del bastidor 10 11 08 22 15 45 40 35V31610_012 ...

Страница 170: ...UEDA DELANTERA Tipo equipado PALANCA DEL ACELERADOR PALANCA DE FIJACIÓN DEL MANILLAR SILENCIADOR TAPA DEL DEPOSITO DE COMBUSTIBLE PROTECTOR DELANTERO PALANCA DE CAMBIO TAPA DE LA CORREA PALANCA DEL EMBRAGUE TAPA DE RELLENO DE ACEITE DE MOTOR VARILLA DE MEDICIÓN 11 11 08 22 15 45 45 35V31610_013 ...

Страница 171: ...CHE DE ACCESORIO PASADOR DE ENGANCHE BARRA DE TRACCION A BARRA DE TRACCION B EMPUNADURA DEL MANILLAR FILTRO DE AIRE EMPUÑADURA DEL MOTOR DE ARRANQUE PALANCA DEL ESTRANGULADOR CAJA DE ENGANCHE TAPON DEL ORIFICIO DE LLENADO DE ACEITE DE LA TRANSMISION TAPA DE SEDIMENTOS PERILLA DE DRENAJE DEL CARBURADOR VÁLVULA DE COMBUSTIBLE 12 11 08 22 15 45 52 35V31610_014 ...

Страница 172: ...les para la operación segura y fiable Antes de la operación efectúe la comprobación siguiente Hay algún material inflamable polvo paja etc en torno al motor Hay fugas de combustible y de aceite de motor 22 24 34 35 ANTES DE PONER EN MARCHA EL MOTOR 4 Ponga la cultivadora sobre una superficie firme y nivelada y mantenga nivelada la cultivadora es decir con las púas rotativas rueda delantera si está...

Страница 173: ...illa indicadora en el cuello de orificio de llenado pero no la enrosque Extraiga la tapa de relleno de aceite y frote la varilla de medicion para limpiarla 1 2 3 Aceite de motor Si se hace funcionar el motor sin suficiente aceite se pueden causar serios daños al mismo 6 CUELLO DEL ORIFICIO DE LLENADO DE ACEITE LÍMITE SUPERIOR TAPA DE RELLENO VARILLA DE MEDICIÓN DEL NIVEL DE ACEITE 14 11 08 22 15 4...

Страница 174: ...rvicio API del recipiente de aceite para asegurarse que incluye las letras SE o posterior o equivalente Se recomienda el SAE 10W 30 para aplicaciones generales Las otras viscosidades mostradas en la gráfica pueden utilizarse cuando la temperatura media de su zona está dentro del margen indicado 4 Aceite recomendado El empleo de aceite no detergente o de aceite de motor de 2 tiempos acortará la vid...

Страница 175: ...imera calidad y altamente detergente certificado como que cumple o excede los requisitos de los fabricantes de automóviles de EE UU para la categoría de servicio API SE o posterior o equivalente El aceite de motor perteneciente a la categoría SE muestra esta designación en el envase Aceite de engranajes de la transmision Aceite recomendado 7 ORIFICIO DE LLENADO DE ACEITE TAPON DEL ORIFICIO DE LLEN...

Страница 176: ... los elementos del filtro de aire Límpielos si es necesario vea la página 39 Filtro de aire No hacer nunca funcionar el motor sin el filtro de aire ya que el motor podría deteriorarse rápidamente 8 TAPA DEL FILTRO DE AIRE ELEMENTOS DEL FILTRO DE AIRE 17 11 08 22 15 46 34 35V31610_019 ...

Страница 177: ... DEL ALCANCE DE LOS NINOS Repostar en un lugar bien ventilado estando el motor parado No fumar ni permitir llamas ni chispas en el lugar donde se repuesta el motor o donde se guarda la gasolina No llene excesivamente el deposito de combustible no debe haber combustible en el cuello de relleno Despues de repostar asegurese de que la tapa del deposito es te segura y correctamente cerrada Tenga cuida...

Страница 178: ...no contiene cosolventes e inhibidores contra la corrosión para metanol Los daños en el sistema de combustible o los problemas de rendimiento del motor causados por la utilización de gasolina que contenga más cantidad de alcohol que la recomendada no están cubiertos por la garantía Antes de adquirir gasolina de una gasolinera desconocida compruebe si la gasolina contiene alcohol y en caso de conten...

Страница 179: ...ando la palanca de bloqueo y apretando la palanca del embrague Si la palanca de bloqueo y la palanca del embrague no funcionan con suavidad o si el embrague se acopla apretando la palanca del embrague sin empujar la palanca de bloqueo desmonte y limpie la palanca del embrague vea la página 43 Operación de la palanca del embrague comprobación 10 BRAZO DE LA PALANCA DE BLOQUEO E EM MP PU UJ JA AR R ...

Страница 180: ... instrucciones incorporadas con la herramienta o accesorio Solicite a su concesionario Honda que le aconseje en caso de encontrar algún problema o dificultad en la instalación de una herramienta o accesorio Herramientas y accesorios 11 21 11 08 22 15 47 06 35V31610_023 ...

Страница 181: ...embrague se acopla tirando de la palanca del embrague hacia dentro y se desacopla soltando la palanca Cerciorarse de que el embrague esté desacoplado y de que la palanca de cambio de marchas esté en la posición neutra punto muerto para evitar que se produzcan movimientos incontrolados repentinos al poner en marcha el motor PUESTA EN MARCHA DEL MOTOR 5 TIRADOR DE DRENAJE CONEXIÓN PALANCA DEL ESTRAN...

Страница 182: ...lanca del acelerador con la marca posición START como se muestra Poner el interruptor del motor en la posición de encendido ON 3 4 PALANCA DEL ACELERADOR INTERRUPTOR DEL MOTOR ARRANQUE CONEXIÓN 23 11 08 22 15 47 20 35V31610_025 ...

Страница 183: ...e caliente el motor durante algunos minutos Si se ha movido el estrangulador a la posición CERRADO muévalo gradualmente a la posición ABIERTO a medida que se vaya calentando el motor 5 6 No dejar que la empuñadura del motor vuelva violentamente a su lugar original Dejar que vuelva lentamente para evitar dañar el arrancador ABRIR PALANCA DEL ESTRANGULADOR EMPUÑADURA DEL MOTOR DE ARRANQUE D Di ir re...

Страница 184: ...cape durante toda su vida de servicio cuando se opere a gran altitud con las modificaciones del carburador para grandes altitudes Incluso con la modificación del carburador la potencia del motor se reducirá aproximadamente el 3 5 por cada 300 m de incremento de la altitud El efecto de la altitud en la potencia será mayor si no se han efectuado las modificaciones en el carburador Modificación del c...

Страница 185: ...anillar a la posición requerida y apriete la palanca El manillar puede inclinarse dentro de un recorrido de 31 desde el centro a la derecha y a la izquera Antes de ajustar el manillar ponga la segadora sobre un piso firme y nivelado para evitar que se caiga por accidente la esteva Ajuste de la posición del manillar 1 OPERACIÓN DE LA CULTIVADORA 6 PALANCA DE FIJACIÓN DEL MANILLAR PALANCA DE FIJACIÓ...

Страница 186: ...os pernos que fijan las barras de tracción A y B y deslice hacia arriba o abajo las barras de tracción como sea necesario Después del ajuste apriete los pernos y las contratuercas con seguridad Ajuste de la profundidad de cultivo 2 CONTRATUERCA PASADOR DE ENGANCHE ENGANCHE DE ACCESORIO PASADOR PERNO CONTRATUERCA PERNO BARRA DE TRACCION B CAJA DE ENGANCHE PASADOR DE SEGURIDAD BARRA DE TRACCION A 27...

Страница 187: ...y retenga la palanca de bloqueo Apriete la palanca del embrague El embrague está acoplado suelte la palanca de bloqueo 1 2 3 Operación del embrague Reduzca las revoluciones del motor antes de accionar el embrague 3 PALANCA DE BLOQUEO ACOPLADO DESACOPLADO ACOPLADO DESACOPLADO PALANCA DEL EMBRAGUE E EM MP PU UJ JA AR R 28 11 09 14 14 06 50 35V31610_030 ...

Страница 188: ...elte la palanca del embrague para desacoplar el embrague Mueva la palanca de cambios a la posicion del engranaje deseado Si la palanca de cambio de marchas no engrana la posición de marcha deseada oprima la palanca del embrague y mueva la cultivadora ligeramente para volver a ajustar la posición de las marchas 4 1 2 3 Selección de engranajes Cambio de marchas 4 PUNTO MUERTO PALANCA DE CAMBIO PLACA...

Страница 189: ...con un pasador de enganche El retenedor del pasador de enganche se acopla en el pasador de enganche para retener el pasador Uso de la caja de remolque 5 CAJA DE ENGANCHE PASADOR DE ENGANCHE RETENEDOR DEL PASADOR DEL ENGANCHE 30 11 08 22 15 48 16 35V31610_032 ...

Страница 190: ...mplea la cultivadora en el campo mueva la rueda hacia arriba Mueva hacia arriba la rueda delantera cambiando la posición del pasador Rueda delantera Modelos equipados con el mismo 6 PASADOR DE SEGURIDAD RUEDA DELANTERA PASADOR POSICIÓN DE ARRIBA Cuando se usa en el campo POSICIÓN DE ABAJO Cuando es movida en el camino 31 11 08 22 15 48 23 35V31610_033 ...

Страница 191: ...eada que permita manipular con facilidad la segadora Si las púas penetran pero la segadora no se mueve hacia delante no empuje tanto el manillar y muévalo de un lado al otro Si la segadora todavía está penetrando la tierra pero no se mueve hacia delante levante un orificio la barra de tracción Para girar empuje el manillar para poner el peso de la segadora hacia atrás de este modo se podrá girar c...

Страница 192: ...tes cuando limpie el rotor Para evitar daños compruebe si hay algún signo de daños u averías en la segadora antes de usarla y después de haberla utilizado No emplee la cultivadora con un rotor cuyo diámetro sea mayor de 325 mm Si opera la segadora en cuestas es posible que vuelque la segadora Si deja que alguien opere la segadora sin las instrucciones adecuadas puede dar como resultado en daños Pó...

Страница 193: ...erecha Para la utilización normal Suelte la palanca del embrague para dejarla en la posición DESACOPLADO 1 2 PARADA DEL MOTOR 7 INTERRUPTOR DEL MOTOR DESCONEXIÓN DESACOPLADO DESACOPLADO PALANCA DEL ACELERADOR D DE ES SC CO ON NE EX XI IÓ ÓN N DESCONEXIÓN D DE ES SC CO ON NE EX XI IÓ ÓN N PALANCA DEL EMBRAGUE 34 11 08 22 15 48 54 35V31610_036 ...

Страница 194: ...sicion OFF Ponga la palanca de cambios en la posición de PUNTO MUERTO 3 4 5 PUNTO MUERTO DESCONEXIÓN DESCONEXIÓN INTERRUPTOR DEL MOTOR PUNTO MUERTO PALANCA DE CAMBIO DESCONEXIÓN D DE ES SC CO ON NE EX XI IÓ ÓN N VÁLVULA DE COMBUSTIBLE D DE ES SC CO ON NE EX XI IÓ ÓN N 35 11 08 22 15 49 03 35V31610_037 ...

Страница 195: ...00 horas El tiempo de comprobación y el tiempo de cambio varían según la condición de utilización Efectúe el cambio un poco antes cuando haya daños Efectúe el servicio cada 10 horas de funcionamiento o cada día cuando se emplee en lugares polvorientos Para aplicaciones comerciales registre las horas de funcionamiento para determinar los intervalos apropiados para el mantenimiento 1 1 2 3 MANTENIMI...

Страница 196: ...ropiados para el mantenimiento Cada año o 300 horas 4 4 Comprobar Limpiar Comprobar ajustar Reemplazar Comprobar el nivel Comprobar ajustar Comprobar ajustar Comprobar ajustar Comprobar ajustar Comprobar ajustar Limpiar Limpiar Comprobar El servicio de estos elementos deberá realizarlo su concesionario de servicio Cada utilización Compruebe que no haya grietas ni desgaste anormal en la correa y re...

Страница 197: ... que sea compatible con el medio ambiente Sugerimos que lo lleve en un recipiente cerrado a su sitio de eliminación de residuos No lo tire en el recipiente de basura ni lo vierta en la tierra alcantarillas o drenajes Extraiga la tapa de relleno de aceite y el perno de drenaje para drenar el aceite Vuelva a instalar el perno de drenaje y apriételo con seguridad 1 2 3 4 15 Cambio de aceite Capacidad...

Страница 198: ...e los dos elementos por si estuviesen rajados y cambiarlos si fuese necesario Elemento de espuma Limpiarlo en agua jabonosa caliente aclararlo y dejarlo que se seque por completo O limpiarlo en disolvente de alto punto de inflamación y dejar que se seque Sumergir el elemento en aceite de motor limpio y estrujarlo para eliminar el exceso de aceite El motor echará humo durante la puesta en marcha in...

Страница 199: ...aza de sedimentos y la jun ta torica Ponga la junta tórica en la válvula de combustible e instale la taza de sedimentos Apriete con seguridad la taza de sedimentos Limpieza de la taza de sedimentos La gasolina es altamente inflamable y explosiva bajo ciertas condiciones No fume ni permita la presencia de fuego ni chispas en el área 3 JUNTA TÓRICA TAPA DE SEDIMENTOS 40 11 08 22 15 50 00 35V31610_04...

Страница 200: ... un cepillo de alambre si ésta volviese a utilizarse otra vez Medir la separación entre electrodos con una galga de espesores Corrija la separación si fuese necesario doblando el electrodo lateral La separación deberá ser de 1 2 3 Mantenimiento de la bujía Si el motor hubiese estado funcionando el silenciador estará muy caliente Tenga cuidado de no tocar el silenciador Bujía recomendada 4 SOMBRERE...

Страница 201: ...arandela Si la bujía es nueva apretarla 1 2 vuelta con la llave de bujías Si la bujía ya ha sido utilizada apretarla 1 8 1 4 de vuelta hasta que se asiente 4 5 La bujía debe estar firmemente apretada Si la bujía estuviese mal apretada ésta se calentará excesivamente pudiendo dañar el motor No emplee nunca una bujía que sea de un margen térmico inadecuado LLAVE DE BUJÍAS 42 11 08 22 15 50 17 35V316...

Страница 202: ...sorte y el collar Quite la suciedad y los objetos extraños Frote y limpie el punto de apoyo de la palanca del embrague y del brazo de la palanca de bloqueo El aceite o el líquido de limpieza harán que se adhieran suciedad y objetos extraños No aplique ningún tipo de aceite o líquido de limpieza a la palanca del embrague palanca de bloqueo y brazo de la palanca de bloqueo 1 2 3 Limpieza de la palan...

Страница 203: ...a ranura del lado del orificio de la ménsula del manillar y luego coloque el pasador de resorte en la dirección indicada en la ilustración vea la página Compruebe que la palanca de bloqueo y la palanca del embrague funcionen con suavidad Si la palanca de bloqueo y la palanca del embrague no funcionan con suavidad o si el embrague se acopla apretando la palanca del embrague sin empujar la palanca d...

Страница 204: ...re es incorrecto afloje la contratuerca y gire el perno de ajuste hacia dentro o afuera como sea necesario Juego libre Ajuste del cable del acelerador 6 PALANCA DEL ACELERADOR JUEGO LIBRE 5 10 mm TUERCA DE AJUSTE CONTRATUERCA 45 5 10 mm 11 08 22 15 50 42 35V31610_047 ...

Страница 205: ...a contratuerca y gire el perno de ajuste hacia adentro o hacia afuera lo requerido Después de finalizado el ajuste apriete fimemente la contratuerca Juego libre Ajuste del cable del embrague 7 CONTRATUERCA PERNO DE AJUSTE 2 0 4 0 mm TOPE DEL BRAZO DE LA PALANCA DE BLOQUEO TOPE DEL BRAZO DE LA PALANCA DEL EMBRAGUE E EM MP PU UJ JA AR R 46 2 0 4 0 mm 11 09 14 14 07 08 35V31610_048 ...

Страница 206: ...la del combustible en la posición OFF extraiga y vacíe la taza de sedimentos de combustible 1 2 a b c d Cuando transporte la segadora gire la válvula de combustible a la posición de CIERRE y mantenga la segadora nivelada para evitar derrames de combustible El vapor del combustible o el combustible derramado pueden encenderse La gasolina es altamente inflamable y explosiva bajo ciertas condiciones ...

Страница 207: ...dmisión y de escape están cerradas lo que ayuda a proteger el motor contra corrosión interna Cambio del aceite del motor Cubra la cultivadora con una lámina de plástico No ponga la segadora con el manillar sobre el suelo El aceite entraria en el cilindro o podria derramarse el combustible 3 4 5 Alinee la muesca de la polea del arrancador con el orificio de la parte superior del arrancador de retro...

Страница 208: ...or sigue sin arrancar lleve la segadora a un concesionario Honda autorizado Extraiga e inspeccione la bujía Límpiela reajuste la separación entre los electrodos y seque la bujía Reemplácela si es necesario Está la bujía en buen estado 1 2 3 4 5 6 Si se derrama combustible cerciórese de que el área se encuentre seca antes de poner en marcha el motor El combustible derramado o el vapor del combustib...

Страница 209: ...200 1995 Incertidumbre Nivel de vibración en brazo mano EN12096 1997 Anexo D EN1033 1995 Incertidumbre Especificaciones sujetas a cambios sin previo aviso Dimensiones y peso Motor Ruido y vibraciones Tren de transmisión ESPECIFICACIONES 11 50 FZAZ 1 600 mm 1 385 mm 610 mm 980 mm 47 kg GX160 2 2 m s 5 6 m s 2 dB A 96 dB A 2 dB A 81 dB A 0 95 L marcha atrás 1 Avance 2 Tipo de tensión de correa 2 5 L...

Страница 210: ...zza le tecnologie responsabili applicate dalla Honda sui propri prodotti Power col desiderio di conservare la natura per le generazioni a venire MANUALE DELL UTENTE Honda F501 Istruzioni originali 11 08 22 16 09 53 3LV31610_001 ...

Страница 211: ... parte integrante della motozappa e nel caso che essa venga rivenduta il manuale deve essere rivenduto insieme alla motozappa Nessuna parte di questo manuale può essere riprodotta senza autorizzazione scritta La Honda Motor Co Ltd si riserva il diritto di effettuare cambiamenti in qualsiasi momento senza preavviso e senza alcun obbligo da parte sua Questa motozappa Honda è progettata per delle pre...

Страница 212: ...sto prodotto la batteria l olio motore ecc depositandoli tra i rifiuti comuni Osservare quanto stabilito dalle leggi e normative locali in materia di smaltimento oppure rivolgersi al proprio concessionario Honda autorizzato Smaltimento 1 11 08 22 16 10 06 3LV31610_003 ...

Страница 213: ...l carburatore per funzionamento ad alta altitudine 25 6 FUNZIONAMENTO DELLA MOTOZAPPA 26 7 ARRESTO DEL MOTORE 34 8 MANUTENZIONE 36 9 TRASPORTO RIMESSAGGIO 47 10 DIAGNOSTICA 49 11 DATI TECNICI 50 INDIRIZZI DEI PRINCIPALI DISTRIBUTORI Honda Sul retro della copertinaver DESCRIZIONE DEL CONTENUTO DELLA Dichiarazione CE di Conformità Sul retro della copertinaver INDICE 2 11 08 22 16 10 10 3LV31610_004 ...

Страница 214: ...si aziona la motozappa in un ambiente chiuso anche solo parzialmente l aria che si respira potrebbe contenere una quantità pericolosa di gas di scarico Non azionare mai la motozappa all interno di un garage una casa o nei pressi di finestre o porte aperte I denti rotanti sono affilati e ruotano ad alta velocità Un contatto accidentale può causare serie lesioni Tenere mani e piedi lontani dai denti...

Страница 215: ... caso di emergenza Capire l uso di tutti i comandi Accertarsi che i coperchi di sicurezza coperchi dei rebbi coperchio del ventilatore e coperchio dell avviatore autoavvolgente siano al loro posto Non riempire troppo il serbatoio del carburante e verificare che il tappo del serbatoio sia stato ben chiuso al termine del rifornimento Fare rifornimento di benzina in un area ben ventilata e col motore...

Страница 216: ...e rigido Se si lascia usare la motozappa a chi non ne conosce bene il funzionamento c è pericolo di ferite Indossare scarpe robuste Se si usa la motozappa a piedi nudi con scarpe che lasciano le dita scoperte o con sandali c è pericolo di ferite Vestirsi in modo accurato Vestiti larghi potrebbero rimanere intrappolati nelle parti in movimento aumentando il rischio di ferite Stare sempre alI erta S...

Страница 217: ...lla macchina è indispensabile provvedere alla manutenzione periodica Fermare il motore nei casi seguenti Tutte le volte che si deve lasciare la macchina per coltivare incustodita Prima di un rifornimento di carburante Per fermare il motore spostare la leva dell acceleratore sulla posizione LOW quindi impostare su OFF l interruttore del motore Se il motore è dotato di valvola del carburante non man...

Страница 218: ...benzina o la benzina versata potrebbero incendiarsi Il motore e l impianto di scarico diventano molto caldi durante il funzionamento e rimangono a lungo caldi dopo che si spento il motore Il contatto con le parti calde del motore può causare bruciature o infiammare alcuni materiali Evitare di toccare il motore caldo o l impianto di scarico Lasciare raffreddare il motore prima di effettuare la manu...

Страница 219: ...dersi In caso di zappatura su pendii riempire il serbatoio a metà onde evitare fuoriuscite di benzina Zappare il pendio di traverso ad intervalli regolari e non su e giù Fare molta attenzione cambiando direzione su un pendio Non usare la motozappa su un pendio di oltre 10 17 L angolo massimo di inclinazione indicato è solo orientativo e deve essere determinato a seconda dell attrezzo utilizzato Pr...

Страница 220: ...ioni di sicurezza riportate in questo manuale Se una etichetta venissa rimossa oppure se divenisse difficile da leggere contattare il proprio rivenditore Honda per ottenerne una nuova POSIZIONE ETICHETTE SICUREZZA 2 AVVERTENZA CARBURANTE ATTENZIONE SCARICO PERICOLO TAGLIO LEGGERE IL MANUALE D USO E MANUTENZIONE 9 11 08 22 16 11 34 3LV31610_011 ...

Страница 221: ...Nome e indirizzo del produttore Codice descrittivo Potenza netta del motore Anno di fabbricazione Numero di serie telaio Nome e indirizzo del rappresentante autorizzato Massa della macchina specifica standard 10 11 08 22 16 11 39 3LV31610_012 ...

Страница 222: ... MOTORE LEVA FRIZIONE RUOTA ANTERIORE tipo equipaggiato LEVA ACCELERATORE LEVA DI FISSAGGIO DEL MANUBRIO MARMITTA TAPPO SERBATOIO CARBURANTE PROTEZIONE ANTERIORE LEVA DEL CAMBIO COPERCHIO CINGHIA TAPPO RIFORNIMENTO ASTINA LIVELLO OLIO MOTORE 11 11 08 22 16 11 44 3LV31610_013 ...

Страница 223: ... pezzi Numero di serie del telaio CANDELA PERNO D ATTACCO BARRA FRANGIZOLLE A BARRA FRANGIZOLLE B COPPA SEDIMENTI FILTRO ARIA MANOPOLA MANUBRIO IMPUGNATURA DI AVVIAMENTO LEVA ARIA ATTACCO SCATOLA DI ATTACCO TAPPO DI RIEMPIMENTO OLIO MOTORE POMELLO DI SCARICO DEL CARBURATORE VALVOLA CARBURANTE 12 11 08 22 16 11 50 3LV31610_014 ...

Страница 224: ... motore si arresta completamente azionando l interruttore del motore vedere la procedura di arresto da pagina a Avviare il motore Il motore produce rumori anomali vedere la procedura di avviamento da pagina a 22 24 34 35 CONTROLLO PRIMA DELL USO 4 Collocare la motozappa su una superficie solida e livellata e mantenere la motozappa vale a dire i rebbi rotatori la ruota anteriore se in dotazione e l...

Страница 225: ... Inserire l astina di livello olio nel bocchettone di riempimento olio senza avvitarla Rimuovere il tappo dell olio e pulire l astina indicatrice del livello 1 2 3 Olio motore Se si fa funzionare il motore con olio insufficiente si possono provocare serie danni al motore 6 TAPPO RIFORNIMENTO ASTINA LIVELLO OLIO COLLO TRAVASO OLIO LIMITE SUPERIORE 14 11 08 22 16 12 12 3LV31610_016 ...

Страница 226: ...rientra nella gamma indicata Usare olio per motori a 4 tempi che sia almeno conforme ai requisiti per la categoria API SE o successive o equivalenti Verificare sempre l etichetta API sul recipiente dell olio per assicurarsi che contenga le lettere SE o delle categorie successive o equivalenti 4 Olio consigliato L uso di olio non detergente o di olio per motori a 2 tempi abbrevia la durata del moto...

Страница 227: ... motori a 4 tempi che sia almeno conforme ai requisiti per la categoria API SE o successive o equivalenti Verificare sempre l etichetta API sul recipiente dell olio per assicurarsi che contenga le lettere SE o delle categorie successive o equivalenti Olio degli ingranaggi della trasmissione Olio consigliato 7 TAPPO DI RIEMPIMENTO OLIO MOTORE FORD DI RIEMPIMENTO OLIO LIMITE SUPERIORE BORDO INFERIOR...

Страница 228: ...iltranti non siano sporchi o ostruiti Eventualmente pulire vedere pagina 39 Filtro dell aria Non azionare mai il motore senza filtro dell aria Si provocherebbe una rapida usura del motore 8 COPERCHIO FILTRO ARIA ELEMENTI DEL FILTRO DELL ARIA 17 11 08 22 16 12 32 3LV31610_019 ...

Страница 229: ...enere fiamme e scintille lontane da dove si fa rifornimento o si tiene la benzina Non riempire troppo il serbatoio del carburante non ci deve essere carburante nel bocchettone di rabbocco Dopo avere eseguito il rifornimento accertarsi che il tap po del serbatoio sia chiuso correttamente e saldamente Fare attenzione a non versare benzina durante il rifornimento La benzina versata o i suoi vapori po...

Страница 230: ...tanolo Non usare benzine contenenti oltre il 5 di metanolo alcol metilico o alcol di legno e che non contengono anche dei cosolventi e degli anticorrosivi specifici per metanolo Per evitare ciò seguire scrupolosamente le seguenti raccomandazioni Usare soltanto la benzina specificata vedere pagina Utilizzare benzina fresca e pulita Per rallentare il deterioramento mantenere la benzina in un recipie...

Страница 231: ...nte pigiando la leva di blocco e premendo la leva della frizione Se la leva di blocco e la leva della frizione non funzionano regolarmente o se la frizione si innesta premendo la leva della frizione senza pigiare la leva di blocco smontare e pulire la leva della frizione vedere a pagina 43 Funzionamento della leva della frizione controllo 10 BRACCIO DELLA LEVA DI BLOCCO LEVA DI BLOCCO S SP PI IN N...

Страница 232: ...rio sul coltivatore seguire le istruzioni ad essi allegate Se si incontrassero dei problemi nell installazione dell attrezzo o dell accessorio consultare il proprio rivenditore Honda Attrezzi ed accessori 11 21 11 08 22 16 13 05 3LV31610_023 ...

Страница 233: ...e il motore è caldo o se la temperatura dell aria è elevata 1 2 La frizione si innesta tirando la leva relativa e si disinnesta rilasciando la leva Quando si avvia il motore verificare che la frizione sia staccata e la leva del cambio sia disinnestata per evitare movimenti e sobbalzi improvvisi ed incontrollati AVVIAMENTO DEL MOTORE 5 MANOPOLA SCARICO ACCESA VALVOLA CARBURANTE LEVA ARIA C CH HI IU...

Страница 234: ... sulla leva dell acceleratore al segno posizione di avviamento START come mostrato Girare su ON il comando di accensione del motore 3 4 ACCESA INTERRUTTORE MOTORE START LEVA ACCELERATORE 23 11 08 22 16 13 19 3LV31610_025 ...

Страница 235: ... mano a mano che il motore si scalda Tenere il manubrio con la mano sinistra e tirare energicamente la maniglia di avviamento nella direzione della freccia come mostrato 5 6 Non lasciare che l impugnatura dell avviatore scatti indietro urtando contro il motore Farla tornare delicatamente per evitare di dan neggiare il dispositivo d avviamento LEVA ARIA APERTO IMPUGNATURA DI AVVIAMENTO D Di ir re e...

Страница 236: ...appositamente modificato sarà conforme a tutti gli standard sulle emissioni per tutta la vita utile Anche con le modifiche al carburatore la potenza del motore diminuirà di circa il 3 5 per ogni 300 metri di altitudine L effetto dell altitudine sulla potenza sarà maggiore in assenza di modifiche al carburatore Modifica del carburatore per funzionamento ad alta altitudine Quando il carburatore è st...

Страница 237: ...brio sulla posizione richiesta e ristringere la leva Il manubrio può essere spostato di 31 dalla posizione centrale verso destra e verso sinistra Prima di regolare il manubrio posizionare la motozappa su un terreno solido e pianeggiante per prevenire un eventuale crollo del manubrio Regolazione della posizione del maubrio 1 FUNZIONAMENTO DELLA MOTOZAPPA 6 LEVA DI FISSAGGIO DEL MANUBRIO LEVA DI FIS...

Страница 238: ...il perno allentare i controdadi che fissano le barre di trazione A e B e farle scorrere in alto o in basso come necessario Una volta effettuata la regolazione serrare saldamente i bulloni e i controdadi Regolazione della profondità di zappatura 2 PERNO D ATTACCO PERNO CONTRODADO SCATOLA DI ATTACCO BARRA FRANGIZOLLE B PERNO DI BLOCCO BARRA FRANGIZOLLE A ATTACCO CONTRODADO BULLONE BULLONE 27 11 08 2...

Страница 239: ...e frizione La frizione è innestata rilasciare la leva di blocco Disinnestare Rilasciare la leva della frizione 1 2 3 Funzionamento della frizione Ridurre il numero di giri del motore prima di azionare la frizione 3 LEVA DI BLOCCO INNESTATA DISINNESTATA DISINNESTATA S SP PI IN NG GE ER RE E LEVA FRIZIONE INNESTATA 28 11 09 14 14 08 04 3LV31610_030 ...

Страница 240: ... sull estrema destra Rilasciare la leva della frizione per disinnestarla Spostare la leva del cambio nella posizione della marcia desiderata Se la leva del cambio non innesta la marcia desiderata premere la leva della frizione e spostare leggermente la motozappa per riposizionare gli ingranaggi 4 1 2 3 Cambio di marcia Uso del cambio 4 FOLLE AVANTI 1 PIASTRA CAMBIO MARCE LEVA DEL CAMBIO A AV VA AN...

Страница 241: ...alloggiamento con il perno d attacco Il fer mo del perno d attacco scatta nella gola del perno d attacco per fermarlo Uso della scatola di aggancio 5 SCATOLA DI ATTACCO PERNO D ATTACCO FERMAGLIO DEL PERNO DELL ATTACCO 30 11 08 22 16 14 15 3LV31610_032 ...

Страница 242: ...rreno Quando la motozappa viene usata nei campi sollevare la ruota Sollevare la ruota anteriore rimettendo a posto il perno Ruota anteriore modello che ne è dotato 6 RUOTA ANTERIORE POSIZIONE SUPERIORE quando usata nei campi POSIZIONE INFERIORE quando spostata su strada PERNO PERNO DI BLOCCO 31 11 08 22 16 14 20 3LV31610_033 ...

Страница 243: ...a profondità desiderata in modo da con sentire di manovrare facilmente la motozappa Quando si deve virare premere verso il basso i manubri per spostare il peso della mo tozappa verso il retro in questo modo sarà più semplice la virata Se i rebbi scavano ma la motozappa non si muove in avanti stringere i manubri e spostarli da un lato all altro Se la motozappa scava ancora ma non si sposta in avant...

Страница 244: ...nto dello stesso L uso del coltivatore da parte di persone non sufficientemene addestrate puo causare lesioni Indossare calzature protettive L uso del coltivatore a piedi nudi o con scarpe aperte o sandali aumenta i rischi di lesioni Non utilizzare il coltivatore di notte Spostare il coltivatore almenno in due persone quando lo si trasporta senza utilizzare un carrello Quando il rotore è intasato ...

Страница 245: ... leva dell acceleratore completamente a destra In caso di uso normale Rilasciare la leva della frizione in posizione DISENGAGED disinserita 1 2 ARRESTO DEL MOTORE 7 INTERRUTTORE MOTORE OFF OFF OFF LEVA FRIZIONE DISINNESTATA DISINNESTATA LEVA ACCELERATORE O OF FF F 34 11 08 22 16 14 49 3LV31610_036 ...

Страница 246: ... di spegnimento Ruotare la valvola del carburante sulla posizione OFF Collocare la leva del cambio sulla posizione di FOLLE 3 4 5 LEVA DEL CAMBIO FOLLE FOLLE OFF OFF INTERRUTTORE MOTORE OFF OFF VALVOLA CARBURANTE OFF 35 11 08 22 16 14 58 3LV31610_037 ...

Страница 247: ... Ogni anno o 300 ore Controllare i tempi i tempi di sostituzione variano in funzione delle condizioni d uso Sostituire un po prima se si notano danni Effettuare la manutenzione ogni 10 ore di funzionamento oppure ogni giorno se si utilizza in zone polverose Nel caso di uso commerciale annotare le ore di funzionamento per stabilire gli intervalli di manutenzione 1 1 2 3 Per manutenzione o riparazio...

Страница 248: ...ore 4 4 Controllare Pulire Controllare registrare Sostituire Controllare il livello Controllare registrare Controllare registrare Controllare registrare Controllare registrare Controllare registrare Pulire Pulire Controllare PERIODO DI MANUTENZIONE REGOLARE 3 ELEMENTO Gli interventi su questi elementi devono essere effettuati dal proprio concessionario Controllare che la cinghia non presenti incri...

Страница 249: ...ettarlo nella spazzatura e non rovesciarlo per terra o in uno scario Rifornire il serbatoio di olio indicato in specifiche vedere a pagina e controllare il livello Togliere il tappo di rifornimento dell olio e il bullone di scarico per far defluire l olio Reinstallare il bullone di scarico e serrarlo saldamente 1 2 3 4 15 Cambio dell olio Capacità olio 1 RONDELLA DI TENUTA TAPPO RIFORNIMENTO ASTIN...

Страница 250: ...cesso oppure soffiare aria compressa attraverso il filtro dall interno all esterno Non tentare mai di spazzare via lo sporco spazzandolo si spingerebbe lo sporco dentro le fibre so stituire l elemento di carta se è eccessiva mente sporco Svitare il dado alettato e togliere il coperchio del filtro dell aria Togliere gli elementi interni e separarli Controllare accuratamente che entrambi gli element...

Страница 251: ... rimuovere la coppa del sedimento e l anello di tenuta toroidale Collocare l anello ad O sul rubinetto del carburante e installare il pozzetto del filtro Serrare saldamente il pozzetto del filtro Pulizia della coppa di sedimento In certe condizioni la benzina è estremamente infiammabile è esplosiva Non fumare e proibire fiamme o scintille nella zona 3 ANELLO AD O COPPA SEDIMENTI 40 11 08 22 16 15 ...

Страница 252: ... scheggiato Nel caso la si debba riutilizzare pulire la candela con una spazzola metallica Misurare lo spazio del tappo con uno spessimetro Se necessario correggerlo piegando l elettrodo di lato Lo spazio dovrebbe essere 1 2 3 Manutenzione della candela Se il motore stava girando la marmitta è molto calda Fare attenzione a non toccarla Candela raccomandata 4 PIPETTA CANDELA CHIAVE PER CANDELE 0 7 ...

Страница 253: ...posizionata a mano serrare la nuova candela di 1 2 giro con la chiave per comprimere la rondella Se si sta riutilizzando una candela vecchia si dovrebbe impiegare solo 1 8 1 4 di giro 4 5 Una candela allentata pùo riscaldarsi a sufficienza da danneggiare il motore Stringendo eccessiramente è possibile danneggiare i filetti Assolutamente non usare una candela con valori limite di riscaldamento non ...

Страница 254: ... frizione la molla e il collare Eliminare la sporcizia e rimuovere i corpi estranei Pulire il fulcro della leva della frizione e il braccio della leva di blocco strofinandoli Non applicare olio o liquido detergente sulla leva della frizione la leva di blocco e il braccio della leva di blocco L olio o il liquido detergente attireranno sporcizia e corpi estranei 1 2 3 Pulizia della leva della frizio...

Страница 255: ...latura sul lato del foro della staffa del manubrio e quindi posizionare il perno di sicurezza come mostrato nell illustrazione vedere a pagina Controllare che la leva di blocco e la leva della frizione funzionino regolarmente Se la leva di blocco e la leva della frizione non funzionano regolarmente o se la frizione si innesta premendo la leva della frizione senza pigiare la leva di blocco portare ...

Страница 256: ...lentare il controdado e ruotare il bullone di regolazione in un senso o nell altro a seconda delle necessità Gioco consentito Regolazione del cavo dell acceleratore 6 LEVA ACCELERATORE GIOCO CONSENTITO 5 10 mm DADO REGISTRO CONTRODADO 45 5 10 mm 11 08 22 16 16 32 3LV31610_047 ...

Страница 257: ...te il controdado e girate il dado di registro sino ad ottenere il gioco corretto Dopo la regolazione stringete bene il controdado Gioco consentito Regolazione del cavo della frizione 7 CONTRODADO BULLONE DI REGISTRO 2 0 4 0 mm S SP PI IN NG GE ER RE E FERMO DELLA STAFFA DEL MANUBRIO FERMO DEL BRACCIO DELLA LEVA DI BLOCCO 46 2 0 4 0 mm 11 09 14 14 08 23 3LV31610_048 ...

Страница 258: ...va di umidità e sporcizia in eccesso Prima di immagazzinare l unità per un periodo di tempo piuttosto lungo 1 2 a b c d Per trasportare la motozappa spostare la valvola del carburante su OFF e tenere la motozappa a livello per evitare la fuoriuscita del carburante I vapori del carburante o il carburante versato potrebbero incendiarsi In certe condizioni la benzina è infiammabile ed esplosiva Non f...

Страница 259: ...arico sono chiuse e questo contribuirà a proteggere il motore dalla corrosione interna Cambiare l olio motore Coprire la motozappa con un foglio di plastica Non posizionare la motozappa con i manubri sul terreno In questo modo si fa entrare l o lio nel cilindro oppure si può provocare una fuoriuscita di carburante 3 4 5 Allineare la tacca sulla puleggia di avviamento con il foro sulla parte superi...

Страница 260: ...La candela è in buone condizioni Rimuovere ed ispezionare la candela Pulire regolare il varco e quindi asciugare la candela Se necessario sostituirla Se il motore continua a non partire portire la motozappa da un concessionario Honda autorizzato 1 2 3 4 5 6 Se fuoriesce del carburante accertarsi che l area sia asciutta prima di avviare il motore Il carburante fuoriuscito o i vapori del carburante ...

Страница 261: ...1995 Incertezza Livello di vibrazioni al sistema mano braccio EN12096 1997 Allegato D EN1033 1995 Incertezza Le specifiche sono soggette a cambi senza preavviso Dimensioni e peso Motore Rumore e vibrazioni Trasmissione DATI TECNICI 11 50 FZAZ 1 600 mm 1 385 mm 610 mm 980 mm 47 kg GX160 4 tempi 1 cilindro OHV valvole in testa raffreddato ad aria forzata 2 2 m s 5 6 m s 2 dB A 96 dB A 2 dB A 81 dB A...

Страница 262: ...ti Honda al seguente indirizzo o numero telefonico ADRESSES DES PRINCIPAUX DISTRIBUTEURS Honda DIRECCIONES DE LOS PRINCIPALES CONCESIONARIOS Honda INDIRIZZI DEI PRINCIPALI DISTRIBUTORI Honda MAJOR Honda DISTRIBUTOR ADDRESSES ADRESSEN DER HAUPT Honda VERTEILER For further information please contact Honda Customer Information Centre at the following address or telephone number Weitere Informationen ...

Страница 263: ...92 Fax 359 2 93 30 814 http www kirov net honda kirov net Jelkovecka Cesta 5 10360 Sesvete Zagreb Tel 385 1 2002053 Fax 385 1 2020754 http www hongoldonia hr jure hongoldonia hr 162 Yiannos Kranidiotis Avenue 2235 Latsia Nicosia Tel 357 22 715 300 Fax 357 22 715 400 U Zavodiste 251 8 15900 Prague 5 Velka Chuchle Tel 420 2 838 70 850 Fax 420 2 667 111 45 http www honda stroje cz Tårnfalkevej 16 265...

Страница 264: ...r honda eu com New Street in San Gwakkin Road Mriehel Bypass Mriehel QRM17 Tel 356 21 498 561 Fax 356 21 480 150 Afd Power Equipment Capronilaan 1 1119 NN Schiphol Rijk Tel 31 20 7070000 Fax 31 20 7070001 http www honda nl P O Box 454 1401 Ski Tel 47 64 86 05 00 Fax 47 64 86 05 49 http www berema no berema berema no ul Wroclawska 25 01 493 Warszawa Tel 48 22 861 43 01 Fax 48 22 861 43 02 http www ...

Страница 265: ...ligono Industrial Congost Av Ramon Ciurans n 2 08530 La Garriga Barcelona Tel 34 93 860 50 25 Fax 34 93 871 81 80 http www hondaencasa com Carretera General del Sur KM 8 8 38107 Santa Cruz de Tenerife Tel 34 922 620 617 Fax 34 922 618 042 http www aucasa com ventas aucasa com taller aucasa com Box 50583 Västkustvägen 17 20215 Malmö Tel 46 0 40 600 23 00 Fax 46 0 40 600 23 19 http www honda se hpes...

Страница 266: ...elevant provisions of Directive 2006 42 EC on machinery Directive 2004 108 EC on electromagnetic compatibility 2 Description of the machinery a Generic denomination Motor hoe b Function preparing the soil c Commercial name d Type e Serial number 1 1 3 Manufacturer Honda Motor Co Ltd 2 1 1 Minamiaoyama Minato ku Tokyo JAPAN 4 Authorized representative Honda Motor Europe Ltd Aalst Office Wijngaardve...

Страница 267: ... IFØLGE MASKINDIREKTIV 2006 42 EF EMC DIREKTIV 2004 108 EF 2 BESKRIVELSE AF PRODUKTET a FÆLLESBETEGNELSE Minifræser b ANVENDELSE Jordbearbejdning c HANDELSBETEGNELSE d TYPE e SERIENUMMER 3 PRODUCENT 4 AUTORISERET REPRÆSENTANT 5 REFERENCE TIL HARMONISEREDE STANDARDER 6 ANDRE STANDARDER ELLER SPEFIFIKATIONER 7 DIREKTIV OM STØJEMISSION FRA MASKINER TIL UDENDØRS BRUG a MÅLT LYDEFFEKTNIVEAU b GARANTERE...

Страница 268: ...de 1 O abaixo assinado Piet Renneboog declara deste modo em nome do mandatário que o máquina abaixo descrito cumpre todas as estipulações relevantes da Directiva 2006 42 CE de máquina Directiva 2004 108 CE de compatibilidade electromagnética 2 Descrição da máquina a Denominação genérica Motoenxada b Função preparar o solo c Marca d Tipo e Número de série 3 Fabricante 4 Mandatário 5 Referência a no...

Страница 269: ... b Zajamčena jačina zvuka c Parametar buke d Postupak za ocjenu sukladnosti e Obaviješteno tijelo 8 U 9 Datum ka avlja im Lietuvių kalba Lithuanian EB atitikties deklaracija 1 Įgaliotojo atstovo vardu pasirašęs Piet Renneboog patvirtina kad žemiau aprašyta mašina atitinka visas išvardintų direktyvų nuostatas Mechanizmų direktyva 2006 42 EB Elektromagnetinio suderinamumo direktyva 2004 108 EB 2 Pri...

Страница 270: ...UEL DE L UTILISATEUR BEDIENUNGSANLEITUNG MANUAL DE EXPLICACIONES MANUALE DELL UTENTE 背幅10mm 3QV31620 00X3Q V31 6200 Honda Motor Co Ltd 2011 2000 2011 10 Printed in Japan C N 西 独 仏 英 HC KS K6 伊 F501_EU OM表紙_3QV31620 背幅10mm F501_EU OM表紙_3QV31620 ...

Отзывы: