background image

Shop Manual News

GENERATOR

News No.

Issue Date

P/P-388

Mar. 2014

1

Honda Motor Co., Ltd.

Service Publication Office

Power Equipment

SOME PARTS OF CHANGES

CHANGE LOCATION

The changed instructions are shown in 

 .

Applicable Information

Publication No.

Applicable Page

EU10i

62Z4000

8-9, 8-10

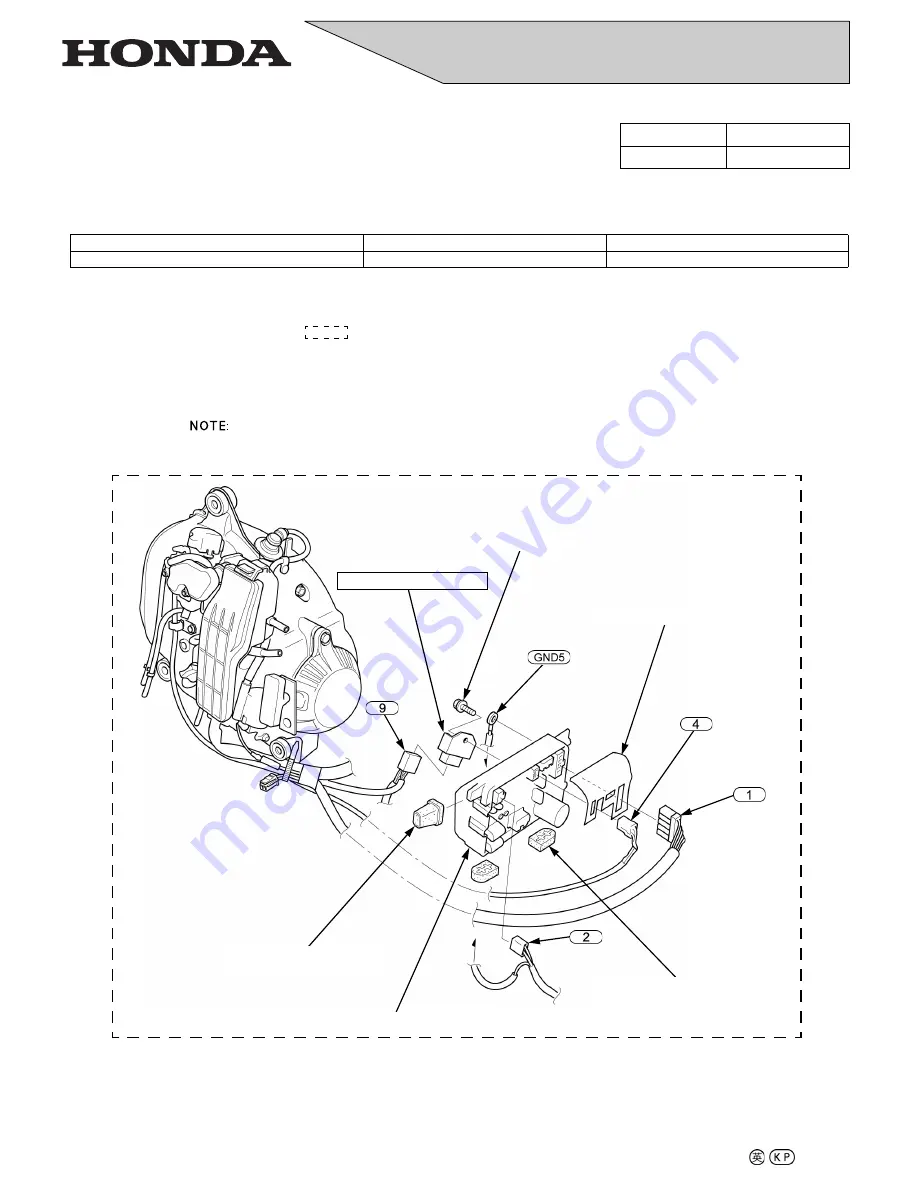
INVERTER UNIT REMOVAL/INSTALLATION

Remove the fuel tank (page 6-3).

 • When installing, route the wire harness properly (page 2-8).

INSPECTION: page 8-9

RECTIFIER

INVERTER MOUNTING 
RUBBER B

INVERTER UNIT

INVERTER MOUNTING 
RUBBER A (2)

WATER PROOF SEAT

BOLT (6 x 12 mm)


2014.03

Содержание EU10iT1

Страница 1: ...hanged instructions are shown in Applicable Information Publication No Applicable Page EU10i 62Z4000 8 9 8 10 INVERTER UNIT REMOVAL INSTALLATION Remove the fuel tank page 6 3 When installing route the wire harness properly page 2 8 INSPECTION page 8 9 RECTIFIER INVERTER MOUNTING RUBBER B INVERTER UNIT INVERTER MOUNTING RUBBER A 2 WATER PROOF SEAT BOLT 6 x 12 mm 2014 03 ...

Страница 2: ...m 20 lbf ft BOLT 6 x 16 mm COOLING FAN COOLING FAN BOSS ROTOR STARTER PULLEY GENERATOR WIRE HARNESS WOODRUFF KEY Threads and seating surface REMOVAL INSTALLATION Do not remove the generator wire harness unless it is replaced REMOVAL page 8 11 INSTALLATION page 8 12 INSTALLATION After installing the rotor be sure that the key is set properly ...

Страница 3: ...aring appropriate clothing and using safety equipment When performing any service task be especially careful of the following Read all of the instructions before you begin and make sure you have the tools the replacement or repair parts and the skills required to perform the tasks safely and completely Protect your eyes by using proper safety glasses goggles or face shields anytime you hammer dril...

Страница 4: ...INTENANCE 3 TROUBLESHOOTING 4 COVER 5 FUEL SYSTEM 6 GOVERNOR SYSTEM 7 GENERATOR CHARGING SYSTEM 8 IGNITION SYSTEM 9 STARTING SYSTEM 10 OTHER ELECTRICAL 11 MUFFLER 12 GENERATOR ENGINE REMOVAL INSTALLATION 13 ROCKER ARM CAMSHAFT 14 CYLINDER BLOCK 15 WIRING DIAGRAM 16 INDEX ...

Страница 5: ... is not practical or possible to warn you about all the hazards associated with servicing these products You must use your own good judgement Honda Motor Co Ltd SERVICE PUBLICATION OFFICE Date of Issue August 2013 You will find important safety information in a variety of forms including Safety Labels on the product Safety Messages preceded by a safety alert symbol and one of three signal words DA...

Страница 6: ...hole Use only metric tools when servicing this unit Metric bolts nuts and screws are not interchangeable with non metric fasteners The use of incorrect tools and fasteners will damage the unit SYMBOLS The symbols used throughout this manual show specific service procedures If supplementary information is required pertaining to these symbols it will be explained specifically in the text without the...

Страница 7: ...VR Digital Automatic Voltage Regulator EBT Engine Block Temperature ECT Engine Coolant Temperature ECM Engine Control Module EMT Exhaust Manifold Temperature EOP Engine Oil Pressure EX Exhaust F Front or Forward GND Ground HO2S Heated Oxygen sensor IAB Intake Air Bypass IAC Idle Air Control IAT Intake Air Temperature I D Inside diameter IG or IGN Ignition IN Intake INJ Injection L Left MAP Manifol...

Страница 8: ...1 1 1 dummytext 1 SPECIFICATIONS SERIAL NUMBER LOCATION 1 2 SPECIFICATIONS 1 2 PERFORMANCE CURVE 1 5 DIMENSIONAL DRAWINGS 1 7 ...

Страница 9: ...weight 15 0 kg 33 1 lbs Model GXH50T Description code GCBWT Type 4 stroke overhead valve single cylinder Displacement 49 4 cm3 3 01 cu in Bore x stroke 41 8 x 36 0 mm 1 65 x 1 42 in Compression ratio 8 0 0 5 1 Cooling system Forced air Ignition system Full transistor Ignition timing B T D C 30 2 Spark plug LR4C E NGK Carburetor Float type Horizontal butterfly valve type Air cleaner Semi dry type G...

Страница 10: ...ated current 7 5 A 4 1 A 3 9 A DC Rated voltage 12 V Rated current 8 A Power factor 1 0 cosθ Frequency regulation DC AC conversion Inverter type Model EU10iT1 Description code CL G B F W GW1 RH U Type EAAT Generator type Multi electrode field rotation type Generator structure Self ventilation drip proof type Excitation Self excitation Voltage regulation system PWM Pulse width modulation Phase Sing...

Страница 11: ...el consumption 0 65 Liter 0 172 US gal 0 143 Imp gal Hr Max operating hours at rated load 3 2 Hr Guaranteed sound power level LWA LWA 86 dB A Model EU10iT1 Type CL G B F W GW1 RH U Voltagevariation rate Momentary 10 max Average 6 max Average time 3 sec max Voltage stability within 1 Frequency variation rate Momentary 1 max Average 1 max Average time 1 sec max Frequency stability within 0 1 Hz Insu...

Страница 12: ...pending on ambient temperature and humidity The output voltage will be higher than usual when the generator is still cold immediately after the engine starts AC EXTERNAL CHARACTERISTIC CURVE LL0 LL1 LT LB TYPES SS0 SS1 SK1 SB RR0 RR1 TYPES 120 110 AC 130 0 100 OUTPUT VOLTAGE V LOAD CURRENT A 2 4 6 8 10 230 220 AC 240 0 OUTPUT VOLTAGE V LOAD CURRENT A 1 4 3 5 210 2 ...

Страница 13: ...HARACTERISTIC CURVE With Eco Throttle OFF This DC output characteristic was measured under the condition with capacitors 100 000 μF were connected in parallel 240 AC 250 0 OUTPUT VOLTAGE V LOAD CURRENT A 1 4 3 5 230 220 2 DC 30 0 V 2 4 6 8 10 12 18 24 OUTPUT VOLTAGE V LOAD CURRENT A ...

Страница 14: ...1 7 dummyhead dummyhead SPECIFICATIONS DIMENSIONAL DRAWINGS 242 9 5 Except GW1 TYPE 451 17 8 379 15 0 Unit mm in GW1 TYPE 456 18 0 ...

Страница 15: ...MEMO dummyhead dummyhead ...

Страница 16: ...2 1 2 dummytext 2 SERVICE INFORMATION MAINTENANCE STANDARDS 2 2 TORQUE VALUES 2 3 LUBRICATION SEAL POINT 2 5 TOOLS 2 6 HOW TO READ CONNECTOR DRAWINGS 2 7 CABLE HARNESS ROUTING 2 8 TUBE ROUTING 2 17 ...

Страница 17: ...957 Piston pin Pin O D 9 994 10 000 0 3935 0 3937 9 950 0 3917 Piston pin to piston pin bore clearance 0 002 0 024 0 0001 0 0009 0 100 0 0039 Piston rings Ring side clearance Top 0 015 0 050 0 0006 0 0020 0 12 0 005 Second 0 015 0 050 0 0006 0 0020 0 12 0 005 Ring end gap Top 0 150 0 300 0 0059 0 0118 0 600 0 0236 Second 0 150 0 300 0 0059 0 0118 0 600 0 0236 Oil side rail 0 20 0 70 0 008 0 028 1 ...

Страница 18: ...nal I D 4 005 4 025 0 1577 0 1585 4 050 0 1594 Rocker arm roller O D 3 990 4 000 0 1571 0 1575 3 950 0 1555 Spark plug Gap 0 6 0 7 0 024 0 028 Ignition coil Resistance Primary side 0 7 1 1 Ω Secondary side 12 21 kΩ Spark plug cap resistance 7 5 12 5 kΩ Ignition pulse generator Air gap at rotor 0 4 0 6 0 016 0 023 Resistance 28 36 Ω Carburetor Main jet 58 Float height 12 0 0 47 Pilot screw opening ...

Страница 19: ... protector screw M5 x 0 8 2 3 0 23 1 7 Control panel screw M5 x 0 8 2 3 0 23 1 7 Front cover screw M5 x 0 8 2 3 0 23 1 7 Ground screw M5 x 0 8 2 3 0 23 1 7 Shroud screw M4 x 0 7 0 9 0 09 0 7 Engine stop switch self tapping screw M3 0 18 0 018 0 1 Carburetor drain screw M6 x 1 0 1 5 0 15 1 1 Recoil starter bolt M5 x 0 8 4 8 0 49 3 5 Ignition pulse generator bolt M5 x 0 8 6 0 0 6 4 4 Item Thread Dia...

Страница 20: ...h journal cam lobes and decompressor area Valve lifter journal and slipper surface Rocker arm journal and pivot Valve stem sliding surface and stem end Valve spring entire surface Rotor nut threads and seating surface Connecting rod bolt threads and seating surface Governor weight holder gear teeth Each bearing rotating area Multi purpose grease Each O ring entire surface Insulator oil level switc...

Страница 21: ...ad dummyhead SERVICE INFORMATION TOOLS Attachment 24 x 26 mm 07746 0010700 Pilot 17 mm 07746 0040400 Driver 07749 0010000 Flywheel puller 07935 8050004 Cleaning brush 07998 VA20100 Float level gauge 07401 0010000 ...

Страница 22: ...male connectors Both the male and female connectors are shown by viewing them from the terminal side Male connectors have male terminals and female connectors have female terminals VIEWING DIRECTION VIEWING DIRECTION TERMINAL No The system drawing shows the No 9 terminal of the connector TERMINAL ARRANGEMENT The connector drawing shows the terminal arrangement of the connector with the lock of the...

Страница 23: ...P SWITCH WIRE GROMMET INSTALLATION Install in the cutout in the fan cover securely with the slit facing the fan cover THROTTLE CONTROL MOTOR WIRE HARNESS CLIP THROTTLE CONTROL MOTOR WIRE INSTALLATION After installing the motor cover set against the clamp of the throttle control motor base securely CLAMP AIR INTAKE JOINT 4P CONNECTOR GENERATOR WIRE HARNESS SIDE ENGINE STOP SWITCH SIDE WIRE SIDE Ter...

Страница 24: ... groove of the fan cover Secure with cable clip Route inside the boss Rout under the stud bolt INSTALLATION Route the switch wire so it does not interfere with the engine stop switch plate INSTALLATION Install onto the fan cover mounting stud bolt with the washer INSTALLATION Route the wire harness so it does not contact with the engine bed edge and clamp it at white tape position HIGH TENSION WIR...

Страница 25: ...RE HARNESS CONTROL PANEL WIRE HARNESS SIDE GENERATOR WIRE HARNESS SIDE CONTROL PANEL WIRE HARNESS SIDE 10P CONNECTOR CONTROL PANEL WIRE HARNESS Install the generator wire harness as shown Except LT LL0 LL1 types Install the ground wire as close to the back of the control panel as possible 30 LT LL0 LL1 types only Except LT LL0 LL1 types ...

Страница 26: ...RNESS CONTROL PANEL WIRE HARNESS SIDE GENERATOR WIRE HARNESS SIDE Install the generator wire harness as shown Install the ground wire as close to the back of the control panel as possible CONTROL PANEL WIRE HARNESS SIDE 10P CONNECTOR 30 CONTROL PANEL WIRE HARNESS SB LB TYPES G GW1 CL RG SK1 TYPES F W TYPES B TYPE ...

Страница 27: ... Bu Bu Terminal number Wire color R W Y Bl R R R Y Terminal number Wire color R R Bl R W R RH PRO RR1 TYPE Y G Y G Terminal number Wire color Bl 5 4 3 2 1 10 9 8 7 6 Bu Bl Bu G R G Y G Bl R W 3 2 1 Terminal number Wire color G Bl Bu Bu Terminal number Wire color G R W Y Bl R R R Y G Terminal number Wire color R R Bl R G W R LT LL0 LL1 TYPES RH RR0 RR1 TYPES Y G ...

Страница 28: ...color Bl Bu Bu Terminal number Wire color R W Y Bl R R R Y G Terminal number Wire color R R Bl R G W R G Terminal number Wire color Bl 5 4 3 2 1 10 9 8 7 6 Bu Bl Bu G R Y G Bl R W 3 2 1 Terminal number Wire color Bl Bu Bu Terminal number Wire color R R Bl R W R U TYPE LB TYPE Y G Y G G Terminal number Wire color R W Y Bl R R R Y Y G Wire color Y G Y G ...

Страница 29: ... Y Terminal number Wire color R R Bl R W R RH PRO RR1 TYPE Terminal number Wire color Bl 5 4 3 2 1 10 9 8 7 6 Bu Bl Bu G R Y G Bl R W 3 2 1 Terminal number Wire color Bl Bu Bu Terminal number Wire color R R Bl R W R SB TYPE SS0 SS1 SK1 TYPES G Y G Y G Terminal number Wire color R W Y Bl R R R Y Y G Y G Wire color Y G SS0 SS1 TYPES Bl R W R R R Y G Terminal number Wire color SK1 TYPE G Y G G G G ...

Страница 30: ... Wire color Bl 5 4 3 2 1 10 9 8 7 6 Bu Bl Bu G R Y G Bl R W 3 2 1 Terminal number Wire color Bl Bu Bu Terminal number Wire color R R Bl R W R G GW1 CL RG B F W TYPES Y G Y G Terminal number Wire color R W Y Bl R R R Y Y G Y G Y G B TYPE F W TYPES G GW1 CL RG TYPES Terminal number Wire color Bl R W R R R Y G Y G ...

Страница 31: ...5P CONNECTOR GENERATOR WIRE HARNESS GENERATOR WIRE HARNESS SIDE GENERATOR WIRE HARNESS SIDE CONTROL PANEL WIRE HARNESS SIDE THROTTLE CONTROL MOTOR WIRE SIDE Except SS0 SS1 SK1 SB TYPES Terminal number Wire color Terminal number Wire color Terminal number Wire color Terminal number Wire color Terminal number Wire color G W R R Y 5 4 3 2 1 2 1 8 7 6 G R R W R R G Bl R 5 4 3 2 1 Bu P Gr W 4 3 2 1 4 3...

Страница 32: ... DIAPHRAGM TUBE INSTALLATION Insert the tube to the base of the joint securely FUEL TUBE PUMP TO CARBURETOR STOPPER BREATHER TUBE INSTALLATION Insert the beveled end of the tube until it contacts the stopper INSTALLATION Pass through the hole in the fan cover FUEL TUBE PUMP TO CARBURETOR INSTALLATION Pass through the hole in the fan cover DRAIN TUBE INSTALLATION Set in the groove in the cover secu...

Страница 33: ...MEMO dummyhead dummyhead ...

Страница 34: ...3 2 ENGINE OIL LEVEL CHECK 3 3 AIR CLEANER CHECK CLEANING 3 4 SPARK PLUG CHECK ADJUSTMENT REPLACEMENT 3 5 SPARK ARRESTER CLEANING 3 6 VALVE CLEARANCE CHECK ADJUSTMENT 3 6 COMBUSTION CHAMBER CLEANING 3 7 FUEL TANK AND FILTER CLEANING 3 7 FUEL TUBE INSPECTION 3 8 ...

Страница 35: ...r interval whichever comes first REGULAR SERVICE PERIOD 2 Refer to page Each use First month or 10 hrs Every 3 months or 50 hrs Every 6 months or 100 hrs Every 2 year or 300 hrs Engine oil Check level 3 3 Change 3 3 Air cleaner Check 3 4 Clean 1 Spark plug Check adjust 3 5 Replace Spark arrester Optional parts Clean 3 6 Valve clearance Check adjust 3 6 Combustion chamber Clean After every 300 hrs ...

Страница 36: ... is compatible with the environment We suggest you take used oil in a sealed container to your local recycling center or service station for reclamation Do not throw it in the trash pour it into the ground or pour it down a drain SAE 10W 30 is recommended for general use Other viscosities shown in the chart may be used when the average temperature in your area is within the recommended range Fill ...

Страница 37: ...ngine to smoke at startup Do not twist to squeeze oil from the air cleaner element Twisting the element can damage it Install the air cleaner element in the air cleaner case Install the air cleaner cover Align the lower alignment part of the air cleaner cover and lock the locking tab at the top of the air cleaner cover Be sure that there is no clearance between seal A 1 and B 2 Replace the cover s...

Страница 38: ...ure the plug gap with a wire type feeler gauge If the measurement is out of the specification adjust by bending the side electrode Install the spark plug finger tight to seat the washer and then tighten it to the specified torque A loose spark plug can become very hot and can damage the engine Overtightening can damage the threads in the cylinder head Connect the spark plug cap securely Install th...

Страница 39: ...d align with the corner 3 of the pulser coil bracket and both the intake and exhaust valves should close Insert a feeler gauge 1 between the rocker arm 2 and valve stem 3 to measure the valve clearance If adjustment is necessary proceed as follows 1 Loosen the lock nut 4 and turn the adjusting screw to obtain the specified valve clearance 2 Hold the adjusting screw and tighten the lock nut to the ...

Страница 40: ...mber FUEL TANK AND FILTER CLEANING Drain the fuel from the fuel tank 1 and carburetor Remove the side cover page 5 3 Disconnect the fuel tube 2 from the fuel tank and remove the fuel filter 3 Clean the fuel filter and fuel tank with non flammable solvent and allow it to dry thoroughly Check the screen of the fuel filter for contamination or damage Replace if necessary Install the fuel filter into ...

Страница 41: ...the fuel tube is not interfering with the neighboring parts Replace the fuel tube if there is damage fuel leakage or corrosion page 5 5 Install the removed parts in the reverse order of removal Gasoline is highly flammable and explosive You can be burned or seriously injured when handling fuel Keep heat sparks and flame away Wipe up spills immediately Handle fuel only outdoors 1 ...

Страница 42: ...dummytext 4 TROUBLESHOOTING BEFORE TROUBLESHOOTING 4 2 HARD STARTING 4 2 ENGINE STARTS BUT THEN STALLS 4 3 ENGINE SPEED DOES NOT INCREASE OR STABILIZE 4 4 ENGINE OIL LEVEL IS LOW BUT ENGINE DOES NOT STOP 4 5 ...

Страница 43: ...excessive carbon has accumulated in the combustion chamber page 3 7 Normal High compression Check that the valve clearance is correct page 3 6 Check that the cylinder head is correctly tightened Check for worn or damaged valves or valve seats page 15 6 Check for worn piston rings piston or cylinder page 15 8 Low compression Install the spark plug securely and start the engine according to the star...

Страница 44: ...proper seal If the carburetor is loose tighten the nut securely Replace the O ring and or gasket Normal Abnormal Abnormal Perform the cylinder compression check page 14 6 Check to see whether excessive carbon has accumulated in the combustion chamber page 3 7 High compression Check that the valve clearance is correct page 3 6 Check that the cylinder head is correctly tightened Check for worn or da...

Страница 45: ... Inspect the carburetor for loose installation and improper seal If the carburetor is loose tighten the nut securely Replace the O ring and or gasket Normal Abnormal Perform the cylinder compression check page 14 6 Check to see whether excessive carbon has accumulated in the combustion chamber page 3 7 Normal High compression Low compression Check that the valve clearance is correct page 3 6 Check...

Страница 46: ...ontrol panel Remove the maintenance cover page 5 2 Disconnect the wire connector that connects the generator wire harness and control panel wire harness Check for continuity between the wire connector of the generator wire harness side and ground Lights No light Perform the spark test page 9 6 Replace the ignition control module if necessary page 8 7 No continuity Continuity Inspect the oil level ...

Страница 47: ...MEMO dummyhead dummyhead ...

Страница 48: ...mytext 5 COVER MAINTENANCE COVER REMOVAL INSTALLATION 5 2 FRONT COVER REMOVAL INSTALLATION 5 2 MUFFLER PROTECTOR REMOVAL INSTALLATION 5 2 SIDE COVER REMOVAL INSTALLATION 5 3 L SIDE COVER DISASSEMBLY ASSEMBLY 5 5 ...

Страница 49: ...ont cover 2 Installation is in the reverse order of removal MUFFLER PROTECTOR REMOVAL INSTALLATION Remove the following Four screws 5 16 mm 1 Muffler protector 2 Rubber seal 3 Installation is in the reverse order of removal Be sure that the rubber seal is set on the protector securely Set the rubber seal on the protector by aligning the projection 4 with the groove 5 as shown TORQUE 2 3 N m 0 23 k...

Страница 50: ...ing fuel Keep heat sparks and flame away Wipe up spills immediately Handle fuel only outdoors R SIDE COVER SCREW 6 x 20 mm 2 SCREW 6 x 100 mm 2 SIDE COVER SEAL B SIDE COVER SEAL A INSULATOR COLLAR A SCREW 5 x 10 mm RUBBER FOOT 4 SCREW 6 x 10 mm 4 L SIDE COVER DISASSEMBLY ASSEMBLY page 5 5 CIRCLIP 10 mm REMOVAL INSTALLATION Remove the circlip by lifting up the neck seal WASHER 6 mm 2 INSULATOR COLL...

Страница 51: ...osition of the L side cover Take care not to allow the washers to come off Install the two insulator the collars A 6 and insulator collar B 7 securely Check to see whether the cover seal A 1 and cover seal B 2 are securely set in the groove in the R side cover Install the R side cover on the L side cover and check the following R tank mounting rubber 3 is set in the groove and over the bosses 4 of...

Страница 52: ...5 x 20 mm 1 4 N m 0 14 kgf m 1 0 lbf ft ENGINE STOP SWITCH PLATE L SIDE COVER SCREW 4 x 19 mm ENGINE SWITCH KNOB INSPECTION page 11 4 FUEL VALVE FUEL PUMP WASHER 5 mm 2 INSPECTION page 3 8 FUEL TUBE TANK TO PUMP INSPECTION page 3 8 Do not remove the pump unless it is replaced Replace the fuel pump if foreign material or water has accumulated in the tank FUEL TUBE TANK TO VALVE TUBE CLIP B8 TUBE CL...

Страница 53: ...MEMO dummyhead dummyhead ...

Страница 54: ...L SYSTEM TOOL 6 2 FUEL TANK DISASSEMBLY ASSEMBLY 6 3 AIR CLEANER REMOVAL INSTALLATION 6 4 CARBURETOR REMOVAL INSTALLATION 6 5 CARBURETOR DISASSEMBLY ASSEMBLY 6 6 FLOAT LEVEL HEIGHT INSPECTION 6 7 PILOT SCREW REPLACEMENT 6 7 ...

Страница 55: ...6 2 dummyhead dummyhead FUEL SYSTEM FUEL SYSTEM TOOL Float level gauge 07401 0010000 ...

Страница 56: ...ION Clean the filter with water and neutral detergent and allow it to dry before installation INNER CAP SPRING WASHER 6 mm LOCK PIN 6 mm R MOUNTING RUBBER INSTALLATION Do not confuse the right and left rubbers TUBE CLIP C11 FUEL FILTER INSPECTION page 3 7 L MOUNTING RUBBER FUEL TANK INSPECTION page 3 7 NECK SEAL INSTALLATION Align the grooves in the seal with the bosses on the tank TANK STRAINER I...

Страница 57: ...he maintenance cover page 5 2 1 Push No clearance 2 INSTALLATION Install firmly into the tabs 1 of the air cleaner case COVER SEAL B INSTALLATION Be sure that there is no clearance between seals A 1 and B 2 1 AIR CLEANER COVER COVER SEAL A AIR CLEANER ELEMENT AIR CLEANER RUBBER ...

Страница 58: ...TOR INSTALLATION page 13 3 OVERFLOW AIR VENT TUBE FUEL TUBE BREATHER TUBE THROTTLE CONTROL MOTOR COVER COLLAR 2 NUT 5 mm 2 AIR INTAKE JOINT INSTALLATION Note the installation direction shown and install properly Do not reuse AIR INTAKE JOINT GASKET INSTALLATION Install the carburetor with the throttle valve at the full open position DISASSEMBLY ASSEMBLY page 6 6 CARBURETOR INSTALLATION Note the in...

Страница 59: ...efore installation ASSEMBLY Install the float chamber to the carburetor body at an angle as shown FLOAT CHAMBER INSTALLATION page 6 7 THROTTLE STOP SCREW LIMITER CAP FLOAT INSTALLATION Check for smooth movement after installation 1 INSTALLATION page 6 7 PILOT SCREW MAIN JET ASSEMBLY Before installing clean thoroughly with low pressure compressed air UPPER SIDE INSTALLATION Clean internal passages ...

Страница 60: ...t valve and recheck the height PILOT SCREW REPLACEMENT Only remove the pilot screw 1 and limiter cap 2 when necessary for repair or for cleaning stubborn deposits from the pilot circuit passages Removal of the limiter cap requires breaking the pilot screw A new pilot screw and limiter cap must be installed When the limiter cap has been broken off remove the broken pilot screw Place the spring on t...

Страница 61: ...nt to the inside of the limiter cap 1 and then install the cap so its stop 2 prevents the pilot screw from being turned counterclockwise Be careful to avoid turning the pilot screw while installing the limiter cap The pilot screw must stay at its required setting 2 1 ...

Страница 62: ...7 1 7 dummytext 7 GOVERNOR SYSTEM THROTTLE CONTROL SYSTEM TROUBLESHOOTING 7 2 THROTTLE CONTROL MOTOR REMOVAL INSTALLATION 7 4 Eco Throttle SWITCH INSPECTION 7 5 THROTTLE CONTROL MOTOR INSPECTION 7 5 ...

Страница 63: ...place it if necessary Normal Abnormal Check for open or short in the wire harness and check for loose or disconnected terminals in the connectors Faulty inverter unit Replace the inverter unit page 8 9 Normal Check the AC output Perform GENERATOR TROUBLESHOOTING page 8 3 Repair the wire harness or replace it if necessary Faulty throttle control motor Replace the throttle control motor page 7 4 Nor...

Страница 64: ...e the throttle control motor page 7 4 Check the AC output Perform GENERATOR TROUBLESHOOTING page 8 3 Normal Abnormal Inspect the throttle control motor page 7 5 Normal Abnormal Check the Eco Throttle switch page 7 5 Replace the Eco Throttle switch page 8 7 Abnormal Check for open or short in the wire harness and check for loose or disconnected terminals in the connectors Repair the wire harness or...

Страница 65: ...handling fuel Keep heat sparks and flame away Handle fuel only outdoors Wipe up spills immediately INSTALLATION Set the spring 1 on the pin of the link lever 2 and set the link lever on the throttle lever 3 LINK LEVER SPRING REMOVAL Take care not to lose the spring during removal SCREW 4 x 10 mm 2 SCREW 3 x 8 mm 2 THROTTLE CONTROL MOTOR INSPECTION page 7 5 THROTTLE CONTROL MOTOR BASE 1 2 3 LINK LE...

Страница 66: ...tle switch terminals There must be no continuity with the switch turned ON and continuity with the switch turned OFF THROTTLE CONTROL MOTOR INSPECTION Remove the carburetor page 6 5 Measure the resistance between the throttle control motor connector terminals If the resistance is outside the specification replace the throttle control motor page 7 4 Terminal Standard resistance 2 4 50 70 Ω 3 5 2 3 ...

Страница 67: ...MEMO dummyhead dummyhead ...

Страница 68: ...M TOOL 8 2 GENERATOR TROUBLESHOOTING 8 3 CONTROL PANEL REMOVAL INSTALLATION 8 6 CONTROL PANEL DISASSEMBLY ASSEMBLY 8 7 INVERTER UNIT REMOVAL INSTALLATION 8 9 RECTIFIER INSPECTION 8 9 GENERATOR REMOVAL INSTALLATION 8 10 GENERATOR INSPECTION 8 13 ...

Страница 69: ...8 2 dummyhead dummyhead GENERATOR CHARGING SYSTEM GENERATOR CHARGING SYSTEM TOOL Flywheel puller 07935 8050004 ...

Страница 70: ...HROTTLE CONTROL SYSTEM TROUBLESHOOTING page 7 2 No voltage Low voltage Remove the stator page 8 10 Check the harness between the inverter unit and stator for an open or short circuit If it is normal replace the stator Replace the rotor page 8 10 Normal Replace the inverter unit page 8 9 Gr P Remove the control panel page 8 6 Disconnect the generator 5P connector from the inverter unit Pull the rec...

Страница 71: ...he inverter unit and stator for an open or short circuit If it is normal replace the stator Low voltage Normal Normal Replace the inverter unit page 8 9 Pull the recoil starter and measure the sub winding AC voltage Terminal number 4 5 Voltage 1 0 2 0 VAC Low voltage Replace the rotor page 8 10 W Bu R Remove the control panel page 8 6 Disconnect the generator 5P connector from the inverter unit Pu...

Страница 72: ...and check the DC receptacle page 8 8 Replace the DC receptacle page 8 7 Normal Abnormal Check the rectifier page 8 9 Replace the rectifier page 8 9 Normal Abnormal Check the DC winding resistance page 8 14 Normal Abnormal Repair or replace the generator wire harness between the rectifier and DC receptacle Br Br Remove the stator page 8 10 Check the harness between the rectifier and stator for an o...

Страница 73: ...alent tool into the groove and pull out the wire INSTALLATION Connect the terminal as shown REMOVAL Install a small screwdriver or equivalent tool into the groove and pull out the wire INSTALLATION Connect the terminal as shown AC OUTPUT TERMINAL SCREW 5 x 20 mm 2 2 3 N m 0 23 kgf m 1 7 lbf ft DC OUTPUT TERMINAL SCREW 5 x 8 mm CONTROL PANEL COVER DISASSEMBLY ASSEMBLY page 8 7 CONTROL PANEL Bl R W ...

Страница 74: ...MBLY Connect to the Eco Throttle switch 10P CONNECTOR SCREW 5 x 12 mm INSPECTION page 9 8 IGNITION CONTROL MODULE Eco Throttle SWITCH INSPECTION page 8 8 DC RECEPTACLE COMPOSITE SOCKET Except SK1 SS0 RR0 RH LL0 LT TYPES SCREW 4 x 6 mm 2 CONTROL PANEL INSPECTION page 8 8 AC RECEPTACLE INSPECTION page 8 8 1 ASSEMBLY Connect to the ignition control module U TYPE F B W G GW1 CL RG SK1 TYPES SB LB TYPE...

Страница 75: ...types There must be continuity between the ground terminal of the receptacle and the receptacle installation fitting DC RECEPTACLE INSPECTION Connect both terminals of the receptacle with a jumper wire to short There must be continuity between the lead wire terminals with the circuit protector ON COMPOSITE SOCKET INSPECTION EXCEPT SK1 SS0 RR0 RH LL0 LT TYPES There must be continuity between the ou...

Страница 76: ...ifier page 8 9 Check for continuity between the terminals according to the table below The polarity is reversed on some testers Read the tester manufacturer s instructions INSPECTION page 8 9 RECTIFIER INVERTER MOUNTING RUBBER B INVERTER UNIT INVERTER MOUNTING RUBBER A 2 WATER PROOF SEAT BOLT 6 x 12 mm Tester probe 1 2 3 4 Tester probe 1 2 Continuity Continuity Continuity 3 Continuity 4 Continuity...

Страница 77: ...T 10 mm 27 5 N m 2 8 kgf m 20 lbf ft BOLT 6 x 16 mm COOLING FAN COOLING FAN BOSS ROTOR STARTER PULLEY GENERATOR WIRE HARNESS WOODRUFF KEY Threads and seating surface REMOVAL INSTALLATION Do not remove the generator wire harness unless it is replaced REMOVAL page 8 11 INSTALLATION page 8 12 INSTALLATION After installing the rotor be sure that the key is set properly ...

Страница 78: ...may be damaged Hold the rotor 1 with a commercially available strap wrench 2 Remove the following parts Bolt 6 x 16 mm 3 Washer 6 mm 4 Starter pulley 5 Two bolts 6 x 16 mm 6 Cooling fan boss 7 Cooling fan 8 Remove the nut 10 mm 1 Remove the rotor 1 using the special tool 2 1 7 5 3 4 6 8 1 TOOL FLYWHEEL PULLER 2 07935 8050004 1 2 ...

Страница 79: ... the rotor with a commercially available strap wrench 2 Apply a light coat of engine oil to the threads and seating surface of the rotor nut 10 mm 3 and tighten it to the specified torque Install the cooling fan 1 and cooling fan boss 2 and tighten the two bolts 6 x 16 mm 3 Align the locking tab of the starter pulley 1 with the groove in the cooling fan boss 2 and install the pulley Install the wa...

Страница 80: ...ING Remove the control panel page 8 6 Disconnect the generator wire harness 5P connector from the inverter unit Measure the resistance between the terminals of the connector according to the table below EXCITER WINDING Remove the control panel page 8 6 Measure the resistance between the terminals of the connector according to the table below Terminal number Resistance 1 2 1 4 2 1 Ω 1 3 1 4 2 1 Ω 2...

Страница 81: ...d dummyhead GENERATOR CHARGING SYSTEM DC WINDING Remove the inverter unit page 8 9 Measure the resistance between the terminals of the connector according to the table below Terminal number Resistance 3 4 0 1 0 2 Ω ...

Страница 82: ...M IGNITION SYSTEM TROUBLESHOOTING 9 2 IGNITION COIL IGNITION PULSE GENERATOR FAN COVER REMOVAL INSTALLATION 9 4 SPARK TEST 9 6 IGNITION PULSE GENERATOR INSPECTION 9 6 IGNITION COIL INSPECTION 9 6 IGNITION CONTROL MODULE INSPECTION 9 8 ...

Страница 83: ...r unit page 8 9 Replace the oil level switch page 11 3 Normal Abnormal Check the engine stop switch page 11 4 Replace the engine stop switch page 5 5 Normal Abnormal Check the ignition pulse generator air gap page 9 5 Adjust the ignition pulse generator air gap page 9 5 Normal Abnormal Check the ignition pulse generator page 9 6 Replace the ignition pulse generator page 9 4 Normal Abnormal Check t...

Страница 84: ...rk test again page 9 6 From page 9 2 CONTROL WIRE HARNESS GENERATOR WIRE HARNESS IGNITION COIL GROUND WIRE Check the ignition coil page 9 6 Replace the ignition coil page 9 4 Normal Normal Abnormal Check the ignition control module page 9 8 Replace the ignition control module page 8 7 Normal Abnormal Replace or repair the wire harness Abnormal G Bl Y Bu G Bl Bu Bl Bu G Y Bl Bu ...

Страница 85: ... 1 in the position shown and secure with the ignition pulse generator 2 After installation adjust the ignition pulse generator to rotor clearance page 9 5 STUD BOLT B COLLAR SCREW 6 x 20 mm 2 0 8 N m 0 08 kgf m 4 4 lbf ft SPARK PLUG CAP STUD BOLT A 2 5 9 N m 0 6 kgf m 4 4 lbf ft CABLE CLAMP A FAN COVER IGNITION PULSE GENERATOR HARNESS BAND A GENERATOR WIRE HARNESS SCREW 6 x 20 mm 2 1 8 N m 0 18 kg...

Страница 86: ... the ignition pulse generator 2 and the rotor projection 3 If the air gap is out of specification loosen the bolts 5 x 12 mm 4 and push the ignition pulse generator firmly toward the rotor and tighten the bolts to the specified torque FAN COVER REFLECTOR SET COLLAR 3 FAN COVER COLLAR 3 IGNITION PULSE GENERATOR AIR GAP 0 4 0 6 mm 0 016 0 023 in TORQUE 6 0 N m 0 6 kgf m 4 4 lbf ft 0 4 0 6 mm 0 016 0...

Страница 87: ... sparks jump across the electrodes IGNITION PULSE GENERATOR INSPECTION Remove the ignition pulse generator page 9 4 Measure the resistance between the terminals A and B shown If measured resistance is out of specification replace the ignition pulse generator IGNITION COIL INSPECTION PRIMARY SIDE Remove the ignition coil page 9 4 Measure the resistance of the primary coil by attaching one ohmmeter ...

Страница 88: ...other to the ignition coil ground terminal If measured resistance is out of specification replace the ignition coil SPARK PLUG CAP Remove the spark plug cap 1 Measure the resistance of the spark plug cap by attaching one ohmmeter probe as shown If measured resistance is out of specification replace the spark plug cap RESISTANCE 12 21 kΩ RESISTANCE 7 5 12 5 kΩ 1 ...

Страница 89: ... If it is normal replace the ignition control module Bl Bu Bu Y G Bl Terminal number Circuit Test and result 1 Primary coil Measure the resistance to engine ground Resistance 0 7 1 1 Ω 3 Oil level switch Check for continuity to engine ground There should be no continuity with correct oil level 4 Ignition pulse generator Measure the resistance to engine ground Resistance 28 36 Ω 5 Ground Check for ...

Страница 90: ...10 1 10 dummytext 10 STARTING SYSTEM RECOIL STARTER REMOVAL INSTALLATION 10 2 RECOIL STARTER DISASSEMBLY ASSEMBLY 10 3 RECOIL STARTER INSPECTION 10 6 ...

Страница 91: ...10 2 dummyhead dummyhead STARTING SYSTEM STARTING SYSTEM RECOIL STARTER REMOVAL INSTALLATION Remove the inverter unit page 8 9 BOLT 5 x 10 mm 3 RECOIL STARTER 4 8 N m 0 49 kgf m 3 5 lbf ft ...

Страница 92: ...age 10 2 Wear gloves and eye protection During disassembly take care not to allow the return spring to come out from the spring cover RECOIL STARTER SPRING RECOIL STARTER ROPE STARTER ROPE GUIDE SWINGARM COLLAR FRICTION SPRING STARTER REEL ROPE GROMMET SET SCREW SWINGARM 2 RECOIL STARTER CASE STARTER GRIP GRIP COVER ...

Страница 93: ...r spring 2 in the groove 3 in the starter reel 4 Apply grease to the groove 1 of the recoil starter case 2 and inner end 3 of the recoil starter spring 4 Align the hook at the inner end of the recoil starter spring with the groove in the case so that the hook sets in the groove and install the reel 5 in the case Wear gloves and eye protection During disassembly take care not to allow the return sp...

Страница 94: ...proximately 3 turns in the direction of the arrows to preload the spring Make sure that the rope grommet 1 is in place Pass the rope 2 through the grommet starter rope guide 3 starter grip 4 and grip cover 5 Make an overhand knot at the rope end Install the swingarms 1 into the collar 2 as shown 1 3 2 15 20 mm 0 6 0 8 in 5 4 3 1 2 1 1 2 ...

Страница 95: ... reel Install the set screw 6 and tighten it Install the grip cover 7 into the starter grip 8 RECOIL STARTER INSPECTION RECOIL STARTER OPERATION Remove the recoil starter page 10 2 Pull the starter grip 1 several times and check that the swingarms 2 operate properly STARTER PULLEY Remove the recoil starter page 10 2 Inspect the starter pulley 1 for deformation and the swing arm contacting areas fo...

Страница 96: ...11 1 11 dummytext 11 OTHER ELECTRICAL COMPONENT LOCATION 11 2 OIL LEVEL SWITCH REMOVAL INSTALLATION 11 3 OIL LEVEL SWITCH INSPECTION 11 4 ENGINE STOP SWITCH INSPECTION 11 4 ...

Страница 97: ...11 2 dummyhead dummyhead OTHER ELECTRICAL OTHER ELECTRICAL COMPONENT LOCATION ENGINE STOP SWITCH OIL LEVEL SWITCH ...

Страница 98: ...head dummyhead OTHER ELECTRICAL OIL LEVEL SWITCH REMOVAL INSTALLATION Remove the shroud page 13 3 GENERATOR WIRE HARNESS O RING 34 6 x 2 5 mm BOLT 5 x 14 mm 3 OIL LEVEL SWITCH INSPECTION page 11 4 Entire surface ...

Страница 99: ...wires with the switch set right side up Suspend the switch in a container filled with oil and check the float operation The switch is normal if there is continuity between the wires initially and no continuity when the switch is immersed in the oil ENGINE STOP SWITCH INSPECTION Remove the maintenance cover page 5 2 Disconnect the engine stop switch 2P connector Check the continuity between the ter...

Страница 100: ...12 1 12 dummytext 12 MUFFLER MUFFLER REMOVAL INSTALLATION 12 2 ...

Страница 101: ...e muffler while it is hot Allow it to cool before proceeding BOLT 6 x 40 mm 2 MUFFLER MUFFLER GASKET BOLT 6 x 45 mm INSTALLATION Remove the carbon deposits by lightly tapping the outer flange with a plastic hammer before installation Be careful not the damage the muffler seal part 1 If the muffler seal part is damaged replace the muffler Check the exhaust manifold mating surface 2 SPARK ARRESTER O...

Страница 102: ...13 1 13 dummytext 13 GENERATOR ENGINE REMOVAL INSTALLATION GENERATOR ENGINE REMOVAL INSTALLATION 13 2 SHROUD REMOVAL INSTALLATION 13 3 ...

Страница 103: ...STALLATION GENERATOR ENGINE REMOVAL INSTALLATION Remove the inverter unit page 8 9 WASHER 4 GENERATOR WIRE HARNESS BOLT 6 x 16 mm 3 ENGINE BED INSULATOR 4 ENGINE BED INSULATOR COLLAR A 2 BOLT 5 x 8 mm 2 3 N m 0 23 kgf m 17 lbf ft INSTALLATION When installing route the wire properly page 2 8 ...

Страница 104: ...hown and install properly Do not reuse INSULATOR GASKET HARNESS CLIP BRACKET BOLT 5 x 10 mm INSULATOR COLLAR D SCREW 4 x 6 mm 3 0 9 N m 0 09 kgf m 0 7 lbf ft R SHROUD L SHROUD BOLT 5 x 10 mm 4 WASHER 2 CARBURETOR INSULATOR DIAPHRAGM TUBE SHROUD SEAL A SHROUD SEAL B SHROUD INSULATOR 2 HARNESS CLIP INSTALLATION Apply a bead Φ1 0 mm Φ0 04 in 1 of liquid sealant Threebond 1207B or equivalent to the br...

Страница 105: ...D REMOVAL INSTALLATION Remove the muffler page 12 2 Remove the two bolts 5 x 20 mm 1 exhaust manifold 2 and gasket 3 Remove the carbon deposits inside of the exhaust manifold Install a new gasket and exhaust manifold then install and tighten the two bolts 5 x 20 mm securely 3 1 2 ...

Страница 106: ...OVAL INSTALLATION 14 2 ROCKER ARM PUSH ROD INSPECTION 14 3 CRANKCASE SIDE COVER CAMSHAFT VALVE LIFTER REMOVAL INSTALLATION 14 5 CYLINDER COMPRESSION CHECK 14 6 CRANKCASE SIDE COVER CAMSHAFT VALVE LIFTER CYLINDER BLOCK INSPECTION 14 7 AIR INTAKE JOINT STUD BOLT REPLACEMENT 14 9 ...

Страница 107: ...SCREW 2 VALVE ADJUSTER LOCK NUT 2 5 5 N m 0 56 kgf m 4 1 lbf ft ROCKER ARM 2 INSTALLATION Tighten the bolts in a crisscross pattern in 2 or 3 steps BOLT 5 x 12 mm 4 5 9 N m 0 6 kgf m 4 4 lbf ft CYLINDER BLOCK HEAD COVER SPARK PLUG 11 8 N m 1 2 kgf m 9 lbf ft REMOVAL When removing the head cover pry off slowly at each corner of the cover INSTALLATION page 14 3 INSTALLATION Check both ends of the pu...

Страница 108: ... application of the liquid sealant Wait for 20 minutes after assembly Do not add oil or start the engine during this period ROCKER ARM PUSH ROD INSPECTION ROCKER ARM JOURNAL I D Measure the rocker arm journal I D If the measurement is more than the service limit replace the rocker arm ROCKER ARM ROLLER O D Measure the rocker arm roller O D If the measurement is less than the service limit replace ...

Страница 109: ...m roller journal I D If the measurement is more than the service limit replace the cylinder block PUSH ROD RUNOUT Check both ends of the push rod for wear Check the push rod for straightness If necessary replace the push rod STANDARD 4 000 4 018 mm 0 1575 0 1582 in SERVICE LIMIT 4 050 mm 0 1594 in ...

Страница 110: ...n the groove in the shaft CAMSHAFT ROLLER CAMSHAFT DOWEL PIN 6 x 10 mm 2 VALVE LIFTER 2 WASHER 4 2 x 13 mm INSTALLATION page 14 6 Do not drop the camshaft INSPECTION page 14 8 INSPECTION page 14 8 Gear teeth GOVERNOR WEIGHT HOLDER Journal and slipper surface Entire surface VALVE LIFTER ROLLER Entire surface Gear teeth journal cam lobes and decompressor area REMOVAL Insert a screwdriver or equivale...

Страница 111: ...e cover within 3 minutes after application of the liquid sealant Install the six bolts 5 x 23 mm and tighten them in a crisscross pattern in 2 or 3 steps to the specified torque Wait for 20 minutes after assembly Do not add oil or start the engine during this period CYLINDER COMPRESSION CHECK Start the engine and warm up to normal operating temperature Turn off the engine stop switch Remove the sp...

Страница 112: ...CYLINDER BLOCK SIDE Measure the camshaft roller journal I D of the cylinder block If the measurement is more than the service limit replace the cylinder block CAMSHAFT SIDE Measure the camshaft roller journal I D of the camshaft If the measurement is more than the service limit replace the camshaft STANDARD 5 000 5 018 mm 0 1968 0 1976 in SERVICE LIMIT 5 050 mm 0 1988 in STANDARD 5 000 5 018 mm 0 ...

Страница 113: ...oller journal I D of the crankcase side cover If the measurement is more than the service limit replace the crankcase side cover CYLINDER BLOCK SIDE Measure the valve lifter roller journal I D of the cylinder block If the measurement is more than the service limit replace the cylinder block STANDARD 4 990 5 000 mm 0 1965 0 1969 in SERVICE LIMIT 4 950 mm 0 1949 in STANDARD 27 772 28 172 mm 1 0934 1...

Страница 114: ...limit replace the valve lifter roller AIR INTAKE JOINT STUD BOLT REPLACEMENT Remove the stud bolts 1 from the cylinder block 2 Thread two nuts onto the air intake joint stud bolt and tighten them together then use a wrench to turn the stud bolt out Install and tighten the new stud bolts so that they are specified length STANDARD 5 005 5 025 mm 0 1970 0 2012 in SERVICE LIMIT 5 050 mm 0 1988 in STAN...

Страница 115: ...MEMO dummyhead dummyhead ...

Страница 116: ...L CASE CRANKSHAFT PISTON REMOVAL INSTALLATION 15 3 VALVE VALVE SPRING REMOVAL INSTALLATION 15 6 PISTON CONNECTING ROD DISASSEMBLY ASSEMBLY 15 7 CYLINDER BLOCK PISTON CONNECTING ROD CRANKSHAFT VALVE INSPECTION 15 8 CRANKSHAFT OIL SEAL REPLACEMENT 15 14 ...

Страница 117: ...15 2 dummyhead dummyhead CYLINDER BLOCK CYLINDER BLOCK TOOLS Attachment 24 x 26 mm 07746 0010700 Pilot 17 mm 07746 0040400 Driver 07749 0010000 ...

Страница 118: ...P CYLINDER BLOCK DOWEL PIN 6 x 15 mm 2 CONNECTING ROD BOLT 2 5 9 N m 0 6 kgf m 4 4 lbf ft OIL CASE FLANGE BOLT 5 x 23 mm 8 7 3 N m 0 74 kgf m 5 4 lbf ft OIL DIPPER 1 PISTON CONNECTING ROD ASSEMBLY STOPPER PLATE BREATHER VALVE OIL CHECK RUBBER INSTALLATION page 15 5 INSTALLATION page 15 4 INSTALLATION page 15 4 Oil seal lips Piston outer surface and connecting rod big end inner surface Cylinder inn...

Страница 119: ...d to install the oil case install by turning the crankshaft a little Take care not to damage the oil seal lip Install the bolts and tighten them to the specified torque in the numbered sequence Wait for 20 minutes after assembly Do not add oil or start the engine during this period BREATHER VALVE INSTALLATION Clean the breather valve 1 stopper plate 2 and the valve installation section of the cyli...

Страница 120: ...dummyhead dummyhead CYLINDER BLOCK CONNECTING ROD CAP INSTALLATION Install by aligning the alignment marks 1 on the connecting rod big end and the cap Install with the oil dipper 2 facing the rotor side 2 1 ...

Страница 121: ... Check the valve head for damage Do not interchange with the intake valve The exhaust valve is smaller than the intake valve VALVE STEM SEAL IN side only EXHAUST VALVE REMOVAL Push down and slide the valve spring retainer 1 to the side so that the valve stem 2 slips through the hole at the side of the valve spring retainer INSTALLATION Install the valve spring retainer while holding the valve with...

Страница 122: ...he piston pin bore Space the side rail end gaps 10 mm 0 4 in to the right or left from the spacer end gap MARK TOP SECOND RING 120 120 120 TOP RING CHROME FACE SECOND RING OIL RING COMBINATION RING MARK PISTON PIN 10 mm 0 4 in PISTON PIN CLIP 2 ASSEMBLY Install by setting one end of the piston pin clip 1 in the groove of the piston pin bore holding the other end with needle nose pliers and rotatin...

Страница 123: ...ce limit replace the piston CYLINDER SLEEVE I D Measure and record the cylinder sleeve I D at three levels in both the X axis perpendicular to crankshaft and the Y axis parallel to crankshaft Take the maximum reading to determine cylinder wear If the measurement is more than the service limit replace the cylinder block 1 Except GW1 TYPE STANDARD 41 770 41 790 mm 1 6445 1 6453 in SERVICE LIMIT 41 7...

Страница 124: ...mine piston pin O D If the measurement is less than the service limit replace the piston pin PISTON PIN TO PISTON PIN BORE CLEARANCE Subtract the piston pin O D from the piston pin bore I D to obtain the piston pin to piston pin bore clearance If the calculated clearance is more than the service limit replace the piston pin and recheck the clearance If the clearance is still more than the service ...

Страница 125: ... set PISTON RING END GAP Before inspection check whether the cylinder sleeve I D is within the specification page 15 8 Insert each piston ring into the bottom of the cylinder sleeve squarely using the piston Measure each piston ring 1 end gap using a feeler gauge If any measurement is more than the service limit replace the piston rings top second oil as a set STANDARD Top 0 015 0 050 mm 0 0006 0 ...

Страница 126: ...If the measurement is more than the service limit replace the connecting rod CONNECTING ROD BIG END I D Apply oil to the connecting rod bolts 1 threads and seating surface Set the connecting rod cap 2 to the connecting rod 3 and tighten the connecting rod bolts to the specified torque Measure the connecting rod big end I D If the measurement is more than the service limit replace the connecting ro...

Страница 127: ...n place Remove the connecting rod and measure the compressed width of the plastigauge 1 using the scale printed on the bag 2 of the plastigauge If the clearance is more than the service limit inspect the connecting rod big end I D and the crankpin O D If necessary replace the part that is not within the service limit and reinspect the clearance VALVE GUIDE I D Measure and record each valve guide I...

Страница 128: ...and cylinder block as a set VALVE SPRING FREE LENGTH Measure the free length of the valve spring If the measured length is less than the service limit replace the valve spring CRANKSHAFT BEARING Turn the inner race of the bearing 1 with your finger and check for play Replace the crankshaft if it is noisy or has excessive play STANDARD IN 3 970 3 985 mm 0 1563 0 1569 in EX 3 935 3 950 mm 0 1549 0 1...

Страница 129: ...FT OIL SEAL REPLACEMENT Remove the oil seal 1 Drive a new oil seal into the cylinder block using the special tools as shown TOOLS Driver 2 07749 0010000 Attachment 24 x 26 mm 3 07746 0010700 Pilot 17 mm 4 07746 0040400 3 1 2 0 7 1 7 mm 0 03 0 06 in 4 ...

Страница 130: ...16 1 16 dummytext 16 WIRING DIAGRAM HOW TO READ A WIRING DIAGRAM RELATED INFORMATION 16 2 WIRING DIAGRAM 16 3 ...

Страница 131: ...NE STOP SWITCH 30A 20A DC RECEPTACLE Bl Black Br Brown Y Yellow O Orange Bu Blue Lb Light blue G Green Lg Light green R Red P Pink W White Gr Gray SYMBOL OF TERMINAL It shows the shape of each terminal to identify whether it is a male or female terminal TERMINAL No CONNECTOR TERMINAL No Every connector and terminal has a number to help the users find the location and shape of the connector and the...

Страница 132: ...INDICATOR OUTPUT INDICATOR SPARK PLUG ENGINE GROUND IGNITION COIL IGNITION PULSE GENERATOR THROTTLE CONTROL MOTOR ENGINE BLOCK DC WINDING INVERTER UNIT INVERTER BLOCK DC RECEPTACLE AC RECEPTACLE PARALLEL OPERATION TERMINALS GROUND TERMINAL FRAME GROUND ENGINE STOP SWITCH IGNITION CONTROL MODULE Eco Throttle SWITCH FRAME BLOCK RECTIFIER LL1 type only GENERATOR BLOCK CONTROL PANEL BLOCK ON OFF ECO T...

Страница 133: ... PLUG ENGINE GROUND IGNITION COIL IGNITION PULSE GENERATOR THROTTLE CONTROL MOTOR ENGINE BLOCK DC WINDING INVERTER UNIT INVERTER BLOCK DC RECEPTACLE AC RECEPTACLE AC RECEPTACLE PARALLEL OPERATION TERMINALS GROUND TERMINAL FRAME GROUND PARALLEL OPERATION TERMINALS GROUND TERMINAL FRAME GROUND ENGINE STOP SWITCH IGNITION CONTROL MODULE Eco Throttle SWITCH FRAME BLOCK RECTIFIER RR1 type only U type R...

Страница 134: ...AD INDICATOR OUTPUT INDICATOR SPARK PLUG ENGINE GROUND IGNITION COIL IGNITION PULSE GENERATOR THROTTLE CONTROL MOTOR ENGINE BLOCK DC WINDING INVERTER UNIT INVERTER BLOCK DC RECEPTACLE AC RECEPTACLE AC RECEPTACLE PARALLEL OPERATION TERMINALS GROUND TERMINAL FRAME GROUND ENGINE STOP SWITCH IGNITION CONTROL MODULE Eco Throttle SWITCH FRAME BLOCK RECTIFIER G GW1 CL RG type GENERATOR BLOCK CONTROL PANE...

Страница 135: ...INDICATOR OUTPUT INDICATOR SPARK PLUG ENGINE GROUND IGNITION COIL IGNITION PULSE GENERATOR THROTTLE CONTROL MOTOR ENGINE BLOCK DC WINDING INVERTER UNIT INVERTER BLOCK DC RECEPTACLE AC RECEPTACLE PARALLEL OPERATION TERMINALS GROUND TERMINAL ENGINE STOP SWITCH IGNITION CONTROL MODULE Eco Throttle SWITCH FRAME BLOCK RECTIFIER GENERATOR BLOCK CONTROL PANEL BLOCK ON OFF ECO THROTTLE SWITCH Bl Black Y Y...

Страница 136: ...VERLOAD INDICATOR OUTPUT INDICATOR SPARK PLUG ENGINE GROUND IGNITION COIL IGNITION PULSE GENERATOR THROTTLE CONTROL MOTOR ENGINE BLOCK DC WINDING INVERTER UNIT INVERTER BLOCK DC RECEPTACLE AC RECEPTACLE PARALLEL OPERATION TERMINALS GROUND TERMINAL ENGINE STOP SWITCH IGNITION CONTROL MODULE Eco Throttle SWITCH FRAME BLOCK RECTIFIER GENERATOR BLOCK CONTROL PANEL BLOCK ON OFF ECO THROTTLE SWITCH Bl B...

Страница 137: ...ICATOR SPARK PLUG ENGINE GROUND IGNITION COIL IGNITION PULSE GENERATOR THROTTLE CONTROL MOTOR ENGINE BLOCK DC WINDING INVERTER UNIT INVERTER BLOCK DC RECEPTACLE AC RECEPTACLE AC RECEPTACLE PARALLEL OPERATION TERMINALS GROUND TERMINAL FRAME GROUND GROUND TERMINAL FRAME GROUND ENGINE STOP SWITCH IGNITION CONTROL MODULE Eco Throttle SWITCH FRAME BLOCK RECTIFIER SS1 type only SK1 type SS0 SS1 type GEN...

Страница 138: ... IGNITION CONTROL MODULE INSPECTION 9 8 IGNITION PULSE GENERATOR INSPECTION 9 6 INVERTER UNIT REMOVAL INSTALLATION 8 9 L L SIDE COVER DISASSEMBLY ASSEMBLY 5 5 LUBRICATION SEAL POINT 2 5 M MAINTENANCE COVER REMOVAL INSTALLATION 5 2 MAINTENANCE SCHEDULE 3 2 MAINTENANCE STANDARDS 2 2 MUFFLER PROTECTOR REMOVAL INSTALLATION 5 2 MUFFLER REMOVAL INSTALLATION 12 2 O OIL CASE CRANKSHAFT PISTON REMOVAL INST...

Отзывы: