background image


20 Oyamazuka, Oiwa-cho, Toyohashi, Aichi Japan, 

PC441-3193 

Tel: 81-532-41-2512, Fax: 81-532-41-4441


Содержание HE-51C

Страница 1: ......

Страница 2: ...rong operation Do not reproduce a part or all of contents described on this manual without our approval Please understand that the unit may differ from contents described on this manual partially due...

Страница 3: ...nside hull installation 8 4 2 4 Installation in the fish reserve 9 4 2 5 Installation on the transom 10 4 2 6 Installation on transducer Thru Hull 10 4 3 Installation of water temp sensor option 11 4...

Страница 4: ...MENU 2 22 Expansion Rate 22 Scale Line 23 Depth Marker 23 Water Temp Graph 23 Water Temp Alarm 24 Depth Alarm 24 Battery Alarm 25 Temp unit 25 Depth Unit 25 Water Temp Correction 26 Auto Range Max De...

Страница 5: ...marine disaster Please be sure to use the official marine charts for navigation judgment Do not operate the unit when you operate the boat It causes to marine disaster Please be sure to operate it af...

Страница 6: ...in cables it causes to the accident Do not put the heavy objects on cables or do not bend cables excessively Do not disassemble or modify cables It causes to firing electric shock or injuring Do not u...

Страница 7: ...s lacked or there exists pixel light always It is not trouble Please understand it in advance When he engine starts to run voltage of battery varies heavily It may affect to the unit Put the power swi...

Страница 8: ...time when image is sent by one line to the left ultrasonic wave is transmitted right edge of screen in different colors 4 2 How to distinguish the fish school Importance is comparison between display...

Страница 9: ...the reflection becomes weak and bottom image becomes thin and the second reflection becomes hard to appear 2nd reflection Second reflection Ultrasonic wave transmitted from transducer is reflected fr...

Страница 10: ...sure to install correctly according to below procedure Install the display unit with front protect cover referring to below figure Rubber Ring Washer Main unit Clamping Knob Bracket Mushroom Tapping S...

Страница 11: ...e Ultrasonic wave transmitted from transducer is obstructed by air bubble and it results to worse display of fish school and sea bottom Please select the place where transducer is kept in sea water wh...

Страница 12: ...install But when ultrasonic wave goes through bottom it is losing power Thus it is not suited for detecting the deep water 8 Transducer Hull Transom Cover Screw Transducer Resin Case Bottom of less t...

Страница 13: ...lue it correctly again Please take care not to hurt the transmitted side of transducer Please fix the transducer for example with weight not to slip contact until resin is thickened It takes approx 24...

Страница 14: ...gap with putty When you install the transducer above the hull of stern air bubble attach transducer s surface easily and you can not get any echo at high speed Transom Bracket Standard Component of T...

Страница 15: ...shock Installation of transom water temp sensor TC02ES Installation of water temp sensor Fix water temp sensor unit TC01C TC01G with 2 screws at the place where body of boat is always in water Fix TC0...

Страница 16: ...er with square holes of unit and fit the cover Please confirm if two locks fit correctly Press two locks firmly until small sound to lock comes out and close the cover Press positions indicated by arr...

Страница 17: ...se dry cell batteries are used it turns to Battery Indicator Page 14 Power ON key Page 14 Power OFF key Page 14 Auto Range Page 19 Water Temp Depth Page 21 Color Bar Page 21 Sweep Speed Page 18 Menu k...

Страница 18: ...u want all 7 1 Basic Operation 7 1 1 Power ON OFF 7 1 2 To adjust the depth 7 Operation of unit 1Each time when you press key depth 14 display range decreases Each time when you press key depth displa...

Страница 19: ...Normal display B L Bottom contour is indicated as a straight line and expansion view of certain area from it s contour is shown 15 AUTO EXP The bottom is enlarged and shown Even if the depth varies th...

Страница 20: ...ss key for more than 2 seconds on normal image 2Whole of screen lights in white 3It returns to normal image pressing any key You can select language Please proceed to select 1 When you press key for a...

Страница 21: ...y for more than 2 seconds Menu is finished pressing key more 7 2 To set functions on menu Cross key Menu key 7 2 1 To use menu 17 3When menu 1 is shown you select item with of cross key Selected item...

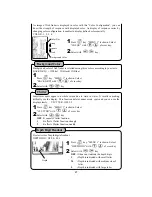
Страница 22: ...ranks of sweeping speed can be selected on menu Ratio of sweeping speed vs sounding rates at each set value is shown on below table At S setting sweeping speed is high 3000 times min at maximum It en...

Страница 23: ...third reflection M Sensitivity medium It helps you to watch the display as general fish finder H Sensitivity increased It helps you find the small fish 1 Sensitivity is automatically adjusted so that...

Страница 24: ...r non indication of fish mark FISH MARK OFF ON FISH MARK A Mode 2 Press key MENU 1 is shown Select A MODE with of cross key Select with key OFF It does not indicate A Mode ON It indicates A Mode 1 It...

Страница 25: ...round Color Background Color Clutter Press key MENU 1 is shown Select CLUTTER with of cross key Select with key OFF It cancels Clutter function 1 It effects Clutter function strongly 2 It effects Clut...

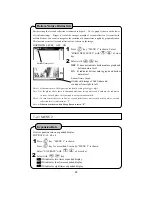
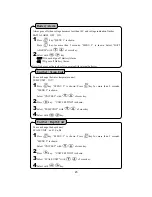
Страница 26: ...not indicate bottom nature graph and bottom nature level ON It indicates bottom nature graph and bottom nature level 1 Besides strength of second reflection is indicated in digits 0 20 it s graph is s...

Страница 27: ...ter Temp Graph Press key MENU 1 is shown Press key for more than 2 seconds MENU 2 is shown Select DEPTH MARKER with of cross key Select with key OFF It does not indicate DEPTH MARKER ON It indicates D...

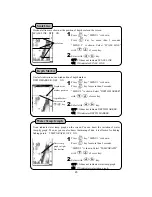
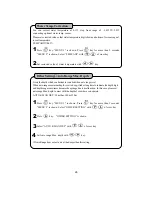
Страница 28: ...TEMP SET 2 Select TEMP SET 1 or TEMP SET 2 with of cross key Set Water Temp with key 5 4 2 3 Alarm goes off within or out of two set values DEPTH SET 1 DEPTH SET 2 ALARM SET OFF IN RANGE OUT RANGE DEP...

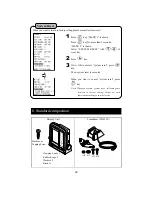
Страница 29: ...N Battery Alarm 2 3 4 key Select with of cross key Select TEMP UNIT with key UNIT SETTING is shown Press of cross key Select UNIT SET with Press key MENU 1 is shown Press key for more than 2 seconds M...

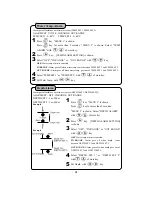
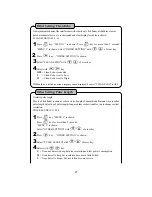
Страница 30: ...ottom is searched when auto range is set When auto range maximum depth is set to deep it takes long time to indicate the depth digit and depth range sometimes becomes deep range due to malfunction In...

Страница 31: ...s noise is shown CLEAN ECHO OFF L H Other Setting Clean Echo 2 3 4 It selects pulse length Theory of fish finder is same as echo in water Length of transmitted ultrasonic wave is called pulse length S...

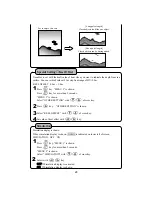
Страница 32: ...th key 1 It enables to set with the draft value of boat when you want to indicate the depth from sea surface You can set draft value at 0 1m step from range of 0 5 0m KEEL OFFSET 0 0m 5 0m Special Set...

Страница 33: ...is shown Select SYSTEM RESET with of cross key Press key If it is OK to execute system reset press key Then system reset is executed When you want to cancel system reset press key 1 System Reset 2 3 W...

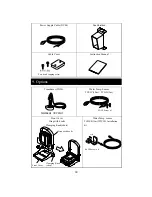
Страница 34: ...tapping screw Transducer TD26 Water Temp Sensor TC01C 10m TC01G 5m Front Cover Strap with hooks Clamping Knob short Water Temp sensor TC02ES 15m TCT01 Installation kit Clamping Knob short Front Cover...

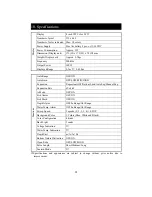
Страница 35: ...n Expansion OFF Bottom Lock Auto Exp Manual Exp Expansion Rate x2 x4 x8 A Mode OFF ON Fish Alarm OFF ON Fish Mark OFF ON Depth Alarm OFF In Range Out Range Water Temp Alarm OFF In Range Out Range Swee...

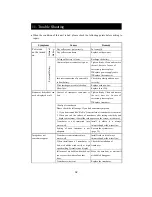
Страница 36: ...place Replace transducer Faulty of transducer Please check the followings If you find abnormal symptoms 1 If you hear sound like Bo Bo from surface of transducer it is normal 2 When you rub the surfac...

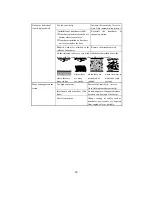
Страница 37: ...low described place the image with low sensitivity may be shown But it is not trouble Bottom or fish school is not displayed well where there are many sludge where there are many sea weeds where there...

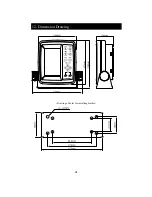
Страница 38: ...12 Dimension Drawing Drawing of holes for installing bracket 34...

Страница 39: ...20 Oyamazuka Oiwa cho Toyohashi Aichi Japan PC441 3193 Tel 81 532 41 2512 Fax 81 532 41 4441...

Отзывы: