background image

7

 Adres producenta/ Adresse des Herstellers/ Manufacturer’s Address/ Адрес производителя 

GTV Poland Sp. z o.o. Sp. k., ul. Przejazdowa 21, 05-800 Pruszków www.hoegert.com

tions for the device usage and understand the risks involved. Children may only use this device if they are over 8 years old and under 

the supervision of a person responsible for their safety or if they have received instructions for use of this device and understand the 

risks involved. Children cannot play with this device.

SAFETY INFORMATION

The HT1E606 digital multimeter is designed according to the IEC61010-1 400 V (CATIII) directive and contamination level 2. To ensure 

proper and safe use of the meter, read the manual carefully.

•  Do not measure a voltage that exceeds the measuring range specified for this meter.

•  Despite the internal protective circuit for the resistance measurement field, do NOT add 100 V or more to the input terminal in the 

resistance measurement field.

•  Check that the probes are connected correctly.

•  Avoid using the meter in direct sunlight or extremely high temperatures, if possible.

•  Avoid the risk of electric shock when measuring voltages exceeding 30 V AC or 60 V DC.

•  Switch off the power supply and disconnect it from the circuit before the current measurement.

•  Pay attention to polarity when replacing batteries.
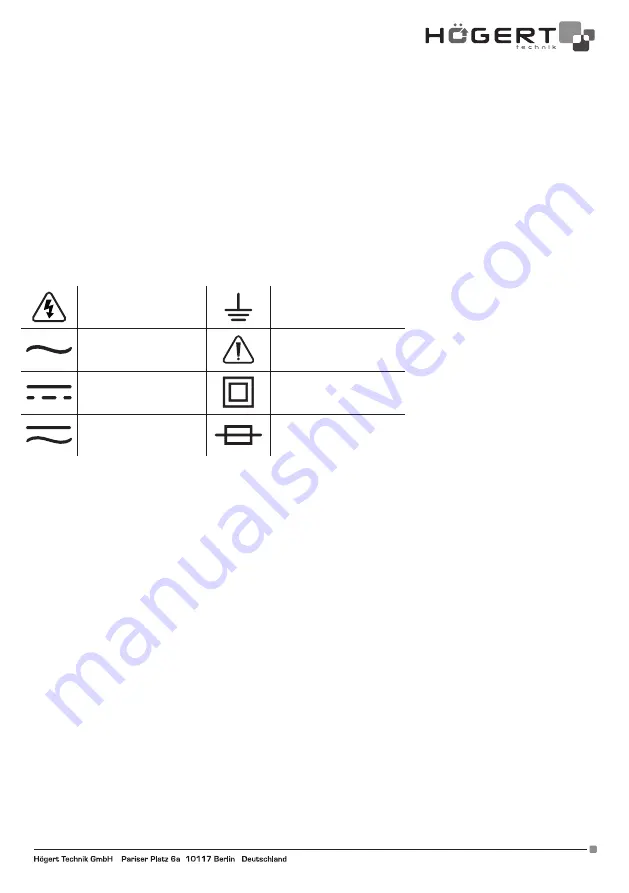
ELECTRICAL SYMBOLS:

High voltage can occur. .

Ground

Alternating Current AC

Important safety  

information.

Direct Current DC 

Double insulation

Direct or alternating 

current DC/AC

Fuse

3. DESCRIPTION AND FUNCTIONS

1. ON / OFF - turn the device on / off;

2. SELECT - Press the „SELECT” button to switch the function and unit of measurement;

3.  HOLD / BL – HOLD to stop the reading during the measurement, you can press the „HOLD” button, and then the measurement 

reading will be locked on the display. Press the „HOLD” button again, the read pause status will be released. Hold this button down 

for about 2 seconds to turn on the backlight (BL - Back LIght), which turns off automatically after 15 seconds; you can turn it off by 

pressing the button again.

4. MEASUREMENTS

4.1. Inductive measurement NCV

1. Turn the function knob to the NCV position.

2. Then grasp the instrument and bring the front of the instrument closer to the test piece.

3. The built-in buzzer will beep when the internal sensor detects AC nearby. The stronger the current, the faster the buzzing and the 

central LED will flash.

4.2. Voltage measurement U DC/AC (> 1V)

1. The device will display the value when measuring current above 1V;

2.  Turn the function knob to the desired position. When measuring direct voltage, select the appropriate range marked  V, and when 

measuring alternating voltage   V.

3. Insert the end of the red test lead into the terminal marked „VΩ”, insert the end of the black test lead into the „COM” terminal;

4. Put the ends of the test leads to the measured elements,

5. Read the measurements on the display.

4.3. Current measurement I DC/AC

1.  Insert the end of the red test lead into the terminal marked „mA”, insert the end of the black test lead into the clack „COM” terminal;

2.  Turn the function knob to the desired position. When measuring direct voltage, select the appropriate range marked  V, and when 

measuring alternating voltage   V.

3. Put the ends of the test leads to the measured element,

4. Read the intensity value on the display.

Содержание HT1E606

Страница 1: ...go a do 2000V pomiaru bezdotykowego NCV oraz temperatury z du ym ekranem LCD pokazuj cym 4000 znak w Miernik jest wyposa ony w obw d zabezpieczaj cy przed przeci eniem kt ry mo e by u ywany do pomiaru...

Страница 2: ...ie wysokich temperaturach o ile to mo liwe Unikaj ryzyka pora enia pr dem podczas pomiaru napi przekraczaj cych 30 V AC lub 60 V DC Przed pomiarem pr du nale y wy czy zasilacz i od czy go od obwodu pr...

Страница 3: ...akresie oznaczonym F 3 Przy o y ko c wki przewod w pomiarowych do mierzonego elementu 4 Odczyta na wy wietlaczu warto pojemno ci 4 6 POMIAR CZ STOTLIWO CI HZ 1 Wetkn ko c wk czerwonego przewodu pomiar...

Страница 4: ...iomu baterii Auto wy czenie 5 2 SPECYFIKACJA ELEKTRYCZNA 1 Test ci g o ci i indukcyjny Test ci g o ci NCV 2 Napi cie U DC AC Funkcja Zakres Rozdzielczo Dok adno Max Napi cie UDC V 400mV 100uV 0 5 5d 2...

Страница 5: ...0 C 1 C 1 8d 1 5 15d 1000 C 400 C 1000 C 1 C 6 KONSERWACJA 6 1 Wymiana baterii Je li symbol pojawia si na wy wietlaczu LCD podczas u ytkowania miernika nale y wymieni bateri aby zapobiec nieprawid o w...

Страница 6: ...racters The meter is equipped with an overload protection circuit that can be used to measure DC and AC voltage AC and DC current resistance capacity frequency live wires battery voltage non contact N...

Страница 7: ...ice on off 2 SELECT Press the SELECT button to switch the function and unit of measurement 3 HOLD BL HOLD to stop the reading during the measurement you can press the HOLD button and then the measurem...

Страница 8: ...nd of the black test lead into the COM terminal 2 Turn the function knob to the position marked Hz 3 Put the ends of the test leads to the measured element 4 Read the frequency value on the display 4...

Страница 9: ...n Accuracy Max UDC voltage V 400mV 100uV 0 5 5d 2000V 4V 1mV 40V 10mV 0 8 5d 400V 100mV 2000V 1V 2 0 5d UAC voltage V 400mV 100uV 0 5 5d 2000V 4V 1mV 40V 10mV 0 8 5d 400V 100mV 2000V 1V 2 0 5d 3 Volta...

Страница 10: ...ANCE 6 1 Battery replacement If the symbol appears on the LCD while using the meter replace the battery to prevent incorrect reading of measurements 1 Disconnect the test wires Turn off the power 2 Us...

Страница 11: ...NCV und Temperaturmessung mit einem gro en LCD Display mit 4000 Zeichen Das Messger t ist mit einem Stromkreis zum Schutz vor berlastung ausgestattet das zur Messung von Gleich und Wechselspan nung W...

Страница 12: ...iten Schalten Sie vor der Strommessung das Netzteil aus und trennen Sie es vor der Messung vom Stromkreis Achten Sie w hrend des Batteriewechsels auf die Polarit t Elektrische Symbole Hochspannung m g...

Страница 13: ...ennzeichneten Bereichs 3 Legen Sie die Enden der Messleitungen an das gemessene Element an 4 Lesen Sie den Wert der Kapazit t auf dem Display ab 4 6 Messung der Frequenz Hz 1 F hren Sie die Spitze der...

Страница 14: ...5 2 ELEKTRISCHE SPEZIFIKATION 1 Kontinuit ts und induktiver Test Kontinuit tstest NCV 2 Spannung U DC AC Funktion Bereich Aufl sung Genauigkeit Max Spannung UDC V 400mV 100uV 0 5 5d 2000V 4V 1mV 40V 1...

Страница 15: ...das Symbol auf dem LCD Display erscheint wenn das Messger t in Betrieb ist wechseln Sie die Batterie aus um falsche Messwerte zu vermeiden 1 Testleitungen trennen Stromversorgung abschalten 2 Mithilfe...

Страница 16: ...tellers Manufacturer s Address GTV Poland Sp z o o Sp k ul Przejazdowa 21 05 800 Pruszk w www hoegert com RU HT1E606 1 2 3 4 4 1 NC 4 2 U DC AC 4 3 I DC AC 4 4 4 5 4 6 4 7 4 8 4 9 NPN PNP 5 5 1 5 2 6...

Страница 17: ...GTV Poland Sp z o o Sp k ul Przejazdowa 21 05 800 Pruszk w www hoegert com E 8 HT1E606 HT1E605 IEC61010 1 400 CATIII 2 100 30 60 C AC DC DC 3 1 ON OFF 2 SELECT SELECT 3 HOLD BL HOLD HOLD HOLD HOLD 2...

Страница 18: ...Poland Sp z o o Sp k ul Przejazdowa 21 05 800 Pruszk w www hoegert com 4 3 I DC AC 1 mA COM 2 A A 3 4 4 4 1 OL 2 COM 3 4 4 5 F 1 COM 2 F 3 4 4 6 1 COM 2 3 4 4 7 TEMP 1 C COM 2 TEMP 3 4 4 8 1 COM 2 3 4...

Страница 19: ...ta Hold ABS 3 s 5 2 1 1 NCV 2 U DC AC UDC 400mV 100uV 0 5 5d 2000V 4V 1mV 40V 10mV 0 8 5d 400V 100mV 2000V 1V 2 0 5d UAC 400mV 100uV 0 5 5d 2000V 4V 1mV 40V 10mV 0 8 5d 400V 100mV 2000V 1V 2 0 5d 3 I...

Страница 20: ...m 4 R 400 0 1 1 0 5d 400M 4K 1 40K 10 1 0 5d 400K 100 4M 1K 40M 10K 1 2 8d 400M 100K 4 10d 5 F 40nF 10pF 4 0 5d 400uF 400nF 100pF 4uF 1nF 40uF 10nF 400uF 100nF 6 Cz stotliwo Hz 4kHz 1Hz 1 5 8d 4MHz 40...

Страница 21: ...n grand affichage LCD affichant 4000 caract res Le mesureur est quip d un circuit de protection contre les surcharges qui peut tre utilis pour mesurer la tension CA et CC le courant CA et CC la r sist...

Страница 22: ...les piles SYMBOLES LECTRIQUES Tension dangereuse Mise la terre CA courant alternatif Avertissement CC courant continu Double isolation CA ou CC Fusible 3 DESCRIPTION ET FONCTIONS 1 ON OFF allumer tei...

Страница 23: ...Approchez les extr mit s des c bles de mesure l l ment mesur 4 Lire la valeur de fr quence sur l affichage 4 7 Mesure de Temp rature TEMP 1 Le dispositif est quip d un c ble suppl mentaire destin la...

Страница 24: ...uV 0 5 5d 2000V 4V 1mV 40V 10mV 0 8 5d 400V 100mV 2000V 1V 2 0 5d Tension UAC V 400mV 100uV 0 5 5d 2000V 4V 1mV 40V 10mV 0 8 5d 400V 100mV 2000V 1V 2 0 5d 3 Tension I CC CA Fonction tendue R solution...

Страница 25: ...t sur l affichage LCD pendant l utilisation du mesureur il faut remplacer la pile pour pr venir une lecture incorrecte des mesures 1 D connectez les c bles de test Coupez le courant 2 Utilisez un tour...

Отзывы: