background image

40

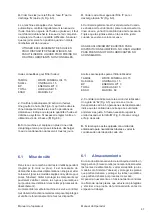
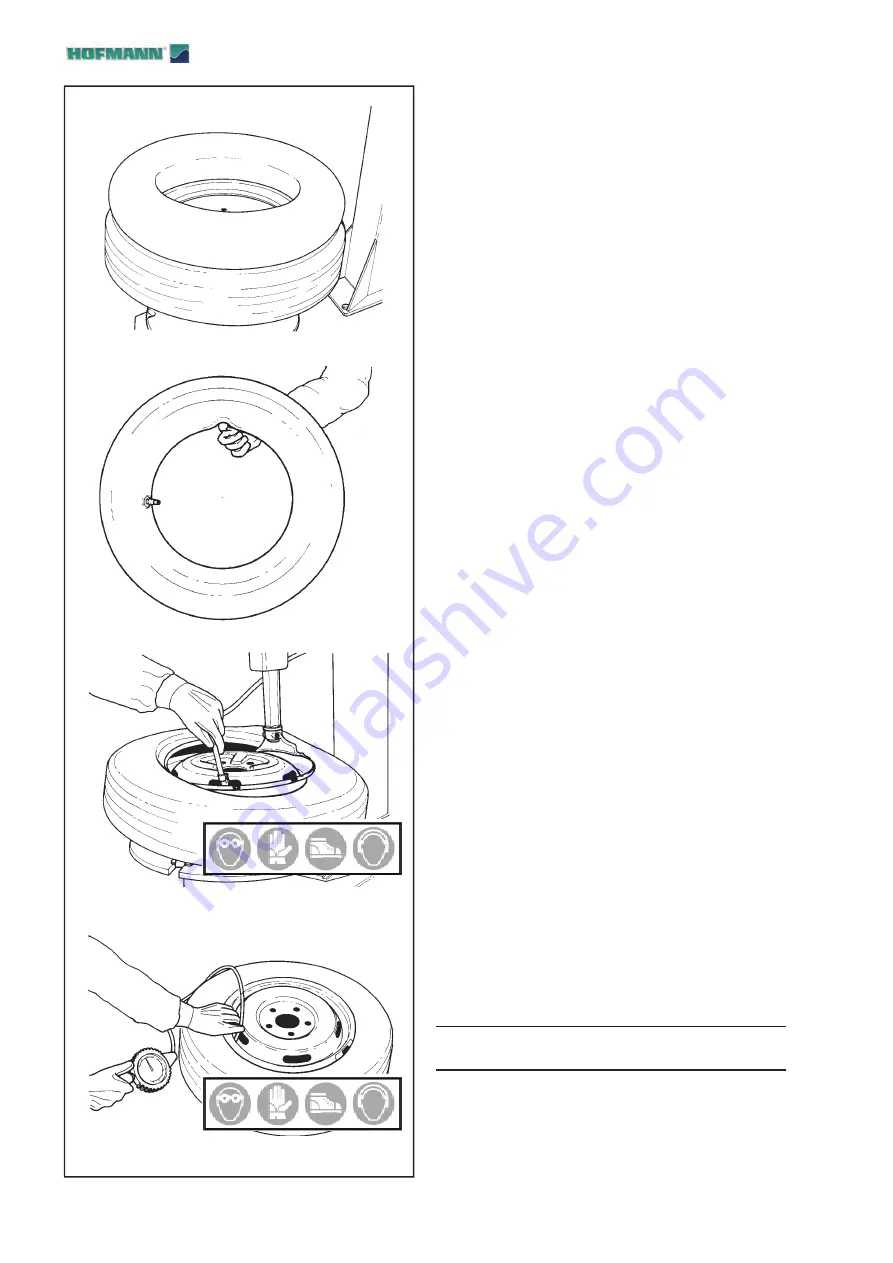
5.5-1

5.5-2

5.5-3

5.6-1

Operator Manual

5.4 

Demounting tube-type tires

To demount the tire operate as described for
tubeless tires in section 5.1.A through section 5.1

In this case the valve cannot be replaced because it 
is part of the tube.

BE CAREFUL NOT TO DAMAGE THE TUBE 
DURING THE BEAD-BREAKING OPERATION. 
THE VALVE SHOULD BE OPPOSITE TO THE 
BLADE OF THE BEAD BREAKER.

To demount the first bead, place the valve at 3
o’clock position.

DO NOT CATCH THE TUBE WITH THE BEAD
LIFTING TOOL, WHEN LIFTING THE BEAD ON
THE MOUNTING FINGER.

After demounting the first bead remove the tube 
before demounting the second bead, as described in 
section 5.1.

5.5 

Mounting tube-type tires

Proceed as described in section 5.2. Do NOT
lubricate the tube. Talc can be used to assist with
the tube positioning.

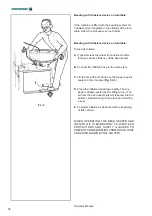
Mount the valve core and place the tube onto the
tire to confirm that the tube is of the correct size
(Fig. 5.5-1).

Inflate the tube slightly: if held with the index
finger it should bend a little (Fig. 5.5-2).

Mount the first bead as described in section 5.2.
Put the tube inside the tire and secure the valve
with the chuck of the inflating hose (Fig. 5.5-
3). Mount the top bead following the directions
above.

5.6 

Inflating tube-type tires

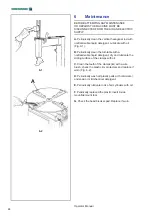
To inflate the tire unlock the rim and start inflating 
while pressing the valve towards the inside. This 
is necessary to avoid air pockets forming between  
tube and tire (Fig. 5.6-1).
Ensure that the tire is correctly centered on the rim.

STOP THE COMPRESSED AIR AS SOON AS THE 
BEADS GRIP THE RIM WELL.

Place the wheel in a type approved cage to fi nish

infl ating and completely settle the beads in their
seats on the rim.

Содержание Monty 1270 Smart

Страница 1: ...monty 1270 smart Operation manual Mode d emploi Manual de Operador Semiautomatic Tire Changer Démonte pneus semiAutomatique Desmontador Semi Automático de Neumáticos ...

Страница 2: ...mer med alla bestämmelser tillhörande följande direktiv TUR a aŠ da belirtilen yönetmeliklere ili kin tüm hükümlere uygundur HUN megfelel a következŒ irányelvekbe foglalt valamennyi rendelkezésnek RUS Ž Ž ENG The anager of theTechnical Of ce is authorised to compile a technical lea et in compliance with appendi VII letterA of the œŸ œCE directive FRA Le Responsable du Bureau Technique est autorisé...

Страница 3: ... Quick Start Sécurité et Démarrage Rapide EAZ0089G86A ENG FRA DEU OM Sicherheit und schneller Start Безопасность и быстрый запуск EAZ0089G88A RU SIGLA DESCRIZIONE CODICE LINGUA SIGLA DESCRIÇÃO CÓDIGO IDIOMA SIGLA DESCRIPCIÓN CÓDIGO IDIOMA Manuale Operatore OM Manual de Operador ZEEWH764A05 ITA SPA POR Manual do Operador Libretto Ricambi ENG FRA DEU SP Lista de peças TEEWH764A3 RU tabla de repuesto...

Страница 4: ...ing the tires Page 28 5 1 2 1Tool positioning Page 28 5 1 3 Tool Head Angular adjustment Page 30 5 2 Mounting tubeless tyres Page 32 5 3 Beading the tires Page 34 5 3 1 Safety Precautions Page 34 5 4 Demounting tube type tires Page 40 5 5 Mounting tube type tires Page 40 5 6 Inflating tube type tires Page 40 5 7 Mounting and demounting Motorcycle tires Page 42 6 Maintenance Page 44 6 1 Storage Page...

Страница 5: ...tion de l Opérateur Página 63 ÍNDICE Señales de Seguridad Página 7 1 Seguridad Página 11 1 1 Tipografía Página 15 1 2 Datos de marcación Página 15 2 Especificaciones Página 17 2 1 Condiciones Página 17 3 Introducción Página 19 3 1 Accessorios de serie Página 21 3 2 Accesorios a pedido Página 21 4 Disposición Página 21 4 1 Mandos Página 23 5 Montaje y desmontaje precauciones generales Página 27 5 1 ...

Страница 6: ...rical shock Do not operate equipment with a damaged power cord or if the equipment has been dropped or damaged until it has been examined by a qualified service person If an extension cord is necessary a cord with a current rating equal to or greater than that of the equipment should be used Cords rated for less current than the equipment can overheat Unplug equipment from electrical outlet when no...

Страница 7: ...r l unité avant toute intervention de service Le contact avec des hautes tensions peut causer la mort des dommages graves IMPORTANT CONSERVER LES PRÉSENTES INSTRUCTIONS Manual do Operador Interpretação dos Sinais de Segurança ATTENÇÃO INTERVENHA DE MANEIRA QUE OS SINIS DE SEGURANÇA ENCONTREM SE SEMPRE BEM VISÍVEIS NAS POSIÇÕES PRÉ ESTABELECIDAS PELO FABRICANTE Para o eventual restabelecimento util...

Страница 8: ...ces Do not use tools other than those supplied with tire changer Do not use unapproved accessories Do not bypass any safety features Use proper tire lubricant to prevent tire binding Contact with moving parts could cause injury EAL0408G78A Personal protection devices warning All the devices listed on the plate must be used to operate the equipment Wear the devices indicated before operating the eq...

Страница 9: ...provoquer des dommages POUR UTILISER L APPAREIL L OPERATEUR DOIT PARFAITEMENT CONNAITRE LE SENS DE TOUS LES PICTOGRAMMES APPOSES IMPORTANT CONSERVER LES PRÉSENTES INSTRUCTIONS Manual do Operador EAL0408G43A EAL0413G17A Risco de esmagamento Adquirir familiaridade com todos os comandos antes de proceder com as operações Manter se à distância do braço para extrair os talões quando estiver sendo usado...

Страница 10: ...HINE IS A VIOLATION OF THE SAFETY REGULATIONS THE USE OF THIS DEVICE IS ALLOWED ONLY IN LOCATIONS WITH NO EXPLOSION OR FIRE HAZARD THE INSTALLATION SHALL BE CARRIED OUT ONLY BY QUALIFIED PERSONNEL AND WITHIN THE SCOPE OF THE INSTRUCTIONS PROVIDED IN THIS MANUAL THIS DEVICE IS DESIGNED TO ACCEPT ORIGI NAL SPARE PARTS AND ACCESSORIES ONLY CHECK FOR POSSIBLE DANGEROUS CONDI TIONS DURING THE OPERATION...

Страница 11: ...E JAUNE VERT DOIT ÊTRE BRANCHÉ AU CÂBLE DE TERRE DE L INSTALLATION DE DISTRIBUTION Manual do Operador 1 Seguridad Todos los operadores deberán comprender las precauciones de seguridad y respetarlas EL OPERADOR DEBE ENCONTRARSE CERCA DE LA MÁQUINA EN UNA POSICIÓN DE TRABAJO CORRECTA LADO UNIDAD DE MANDO A SÓLO EL OPERADOR PUEDE OCUPAR LA ZONA DE TRABAJO EL USO DE LA MÁQUINA ESTÁ PERMITIDO SÓLO AL P...

Страница 12: ...OID DANGEROUS ENVIRONMENTS DON T USE PNEUMATIC OR ELECTRICAL EQUIPMENT IN DAMP OR WET LOCATIONS OR EXPOSE THEM TO RAIN KEEP THE WORK AREA WELL LIGHTED ALL ELECTRICAL CONNECTIONS MUST BE PERFORMED BY A LICENSED TECHNICIAN ALL SERVICE MUST BE PERFORMED BY AN AUTHORIZED SERVICE TECHNICIAN SAFETY DEVICES This machine has several protectors made of plastic to prevent compression or crushing hazards The...

Страница 13: ...d un surgonflage du pneu LE CARTER DE SÉCURITÉ ET LES DISPOSITIFS DE SÉCURITÉ DOIVENT ÊTREACTIFS ET DOIVENT FONCTIONNER CORRECTEMENT Manual do Operador ANTES DE REALIZAR CUALQUIER OPERACIÓN DE MANTENIMIENTO O REPARACIÓN HAY QUE DESCONECTARLAMÁQUINADELAREDDESUMINISTRO ELÉCTRICO Y DE LALINEADEAIRE COMPRIMIDO NO USAR NUNCA CORBATAS CADENAS U OTROS ACCESORIOS SEMEJANTES AL REALIZAR OPERA CIONES DE USO ...

Страница 14: ... must be taken by the operator before being able to go to the next step in the sequence A dotted line around the number of the figure indicates that this is a duplicate from a previous section TOPIC F n see the Chapter number The topic indicated is explained in full in the charter specifier 1 2 Label of the constructor A marking label attached to the machine shows the following data Fig 1 2 1 a Name...

Страница 15: ...n d Modèle e Numéro de série f Poids g Caractéristiques électriques volt ph Hz kW et A h Pression air comprimé i Emission acoustique Manual do Operador 1 1 Tipografía Este manual contiene estilos de texto para llamar su atención especial Nota Sugerencia o explicación PRECAUCIÓN SIGNIFICA QUE LA ACCIÓN SIGUIENTE PUEDE CAUSAR DAÑO A LA UNIDAD U OBJETOS ACOPLADOS AVISO SIGNIFICA QUE LA ACCIÓN SIGUIEN...

Страница 16: ...olonged storage conditions must never be outside Temperature range 0 50 C Humidity range 10 90 without condensation 2 Specifications Electric air tire changer for car light commercial vehicle and motorcycle tires designed for one piece rims Weight 381lbs 173 Kg Weight Tubeless System Version 459 lbs 208 Kg Air pressure required 110 170psi 8 12 bar Bead breaker force 2700 lbf 12 kN 3 Phase Electric ...

Страница 17: ...amiento prolongado jamás se deberán sobrepasar las condiciones Nivel de Temperatura 0 50 C Nivel de Humedad 10 90 no condensado 2 Spécifications Démonte pneus électro pneuma tique pour roues de voiture de fourgon et de moto avec pneus montés sur jantes à base creuse Poids 381lbs 173 Kg Poids Version Tubeless System 459 lbs 208 Kg Pression air comprimé 110 170psi 8 12 bar Force détalonneur 2700 lbf ...

Страница 18: ...or automatically demounting mounting and beading car and motorcycle tIres mounted on one piece rims with the following specifications Maximun tIre diam 39 1016 mm Maximum tIre width 12 305 mm This device must be used in the application for which it is specifically designed Any other use shall be considered as improper and thus not unreasonable The manufacturer shall not be considered liable for po...

Страница 19: ...9 Annexes DECLARATION CE Le document original figurant dans le Liste des pièces détachées Manual do Operador 3 Introducción Felicitaciones por haber comprado el desmontador de neumáticos Construido para el empleo de profesionales que trabajan intensamente este desmontador de ruedas es de uso sencillo seguro y fiable Con un mínimo de mantenimiento y de cuidado este desmontador de neumáticos le durará...

Страница 20: ...n only 14 Bead seater inflator pedal 15 Air Jet 3 1 Accessories A series of accessories are usually available for the machine All accessories are indicated on the website http service snapon equipment net After accessing the website proceed as follows Figure 3 1 Select Accessory Plan 1 Select the reference brand in the field Brands 2 Select the Type of product Tyre changers in the field Product line...

Страница 21: ...hine désiré dans la liste Taper SEARCH 5 pour afficher la liste des accessoires disponibles Manual do Operador 4 Disposición Consultar Figura 4 1 Descripción funcional de la unidad 1 Barra vertical 2 Brazo oscilante 3 Manivela de regulación 4 Palanca de bloqueo 5 Herramienta 6 Columna 7 Autocentrante 8 Garra 9 Brazo destalonador 10 Paleta destalonadora 11 Soportes destalonadores 12 Caja porta lubr...

Страница 22: ...se the pedal the bead breaker blade will retract C Press down and hold WITH RIGHT FOOT the first pedal from the right the turntable turns clockwise Lift the pedal and the turntable turns counter clockwise DANGER OF LEG TRAPPING D The lock handle enable the mount demount tool to be locked in the working position Lower the lock handle to unlock Fig 4 1 2 the vertical slide lift the handle to lock Fi...

Страница 23: ... ET DES LUNETTES DE PROTECTION POUR ÉVITER LA CONTAMINATION PAR LA POUSSIÈRE ET LES IMPURITÉS SOULEVÉES PAR LE JET D AIR Manual do Operador 4 1 Mandos Antes de trabajar con la máquina hay que estar bien seguro de que se ha comprendido bien la posición y las funciones de los mandos Fig 4 1 1 A Apretar y soltar CON EL PIE IZQUIERDO el primer pedal de la izquierda las garras del autocentrante se muev...

Страница 24: ...he key on the Tubeless Beading Nozzle 3 then press the pedal all the way down decisively 1 a high pressure air jet exits the Tubeless Beading device 4 Note Air simultaneously continues to exit the hose connected to the tire WARNING ONCE BEADING IS COMPLETE IMMEDIATELY STOP INTRODUCING AIR WHEN OPERATING THE BEADING DEVICE IT IS MANDATORY TO WEAR EAR PROTECTORS AND SAFETY GLASSES TO PREVENT CONTAMI...

Страница 25: ...OIRE LE JET D AIR POUVANT PROJETER IMPURETES ET POUSSIERES DANGER D EXPLOSION DU PNEU Manual do Operador Sólo para el modelo Tubeless Consultar Figura 4 1 4 4 1 5 F1 Apretar hasta la mitad el pedal de hinchado 1 del extremo del tubo de hinchado sale aire 2 ATENCIÓN MANTENER BIEN FIRME LABOQUILLA DE ENTALONADO TUBELESS F2 Pulse la tecla presente en la Boquilla de Entalonado Tubeless 3 Fig 4 1 5 pre...

Страница 26: ...REMOVING ALL WHEEL WEIGHTS INCLUDING TAPE WEIGHTS INSIDE THE RIM B THE TIRE MUST BE CLEAN AND DRY WITH NO DAMAGE TO THE BEAD AND THE CASING C REPLACE THE RUBBER VALVE STEM WITH A NEW ONE OR REPLACE THE O RING IF THE VALVE STEM IS MADE OF METAL D LUBRICATION IS NECESSARY FOR CORRECT MOUNTING OF THE TIRE AND PROPER CENTERING USE ONLY AN APPROVED LUBRICANT FOR TIRES E MAKE SURE THE TIRE IS THE CORREC...

Страница 27: ...POUR PNEUS E VÉRIFIER SI LE PNEU EST DE LA JUSTE DIMENSION POUR LA JANTE Manual do Operador 5 Montaje y desmontaje precauciones generales ATENCIÓN ANTES DE MONTAR EL NEUMÁTICO EN UNA LLANTA RESPETAR LAS SIGUIENTES INDICACIONES A LA LLANTA DEBE ESTAR LIMPIA Y EN BUEN ESTADO SI FUERA NECESARIO LIMPIARLA DESPUÉS DE HABER QUITADO TODOS LOS CONTRAPESOS COMPRENDIDOS LOS PESOS ADHESIVOS QUE SE HUBIERAN A...

Страница 28: ...position retract clamps to clamp the wheel from the inside and expand clamps to clamp from the outside When clamping small wheels 14 or smaller from the outside set the clamps at diameter nearly equal to the rim diameter before placing the wheel on the clamps This will avoid the risk of pinching the tire WARNING TO MINIMIZE THE RISK OF SCRATCHING ALLOY RIMS THESE SHOULD BE CLAMPED FROM THE OUTSIDE...

Страница 29: ...rès de 1 5 mm celà est nécessaire pour éviter des dommages à la jante Fig 5 1 4 Manual do Operador 5 1 Desmontaje de neumáticos tubeless Quitar todos los contrapesos de los bordes de la llanta Quitar la válvula y desinflar la rueda Fig 5 1 1 Destalonar el lado exterior comenzando desde una posición diametralmente opuesta a la válvula Lubricar el talón y la llanta con un lubricante específico Destalo...

Страница 30: ...ble clockwise and at the same time push down on the tire sidewall to move the bead into the drop center of the rim Fig 5 1 6 Repeat the process for removing the lower bead With left hand lift the bead in position diametrically opposite the tool to keep it in the drop center Fig 5 1 7 Move the swing arm aside and remove the tire 5 1 3 Tool Head Angular adjustment Fig 5 1 8 The tool is adjusted at t...

Страница 31: ...n angulaire souhaitée 5Serrer la vis inférieur 1 au couple de 35 Nm Manual do Operador Nota una vez que la herramienta de montaje desmontaje ha sido ubicada correctamente las ruedas iguales pueden ser desmontadas sin tener que regular de nuevo la herramienta Nota el encaje de plastico dentro de la herramienta de montaje desmontaje tiene que ser sustituido periodicamente cada máquina lleva algunas ...

Страница 32: ...SING APPROVED LUBRICANT ONLY Lock the rim on the turntable and rotate it to have the valve in 5 o clock position Place the tire to be mounted on the rim Swing the mounting arm forward so that the mount demount tool is in the working position Engage the lower bead OVER the mounting wing and UNDER the mounting finger of the mounting tool Turn the wheel clockwise and push the tire down into the drop ...

Страница 33: ... pneus taille baisse utiliser l étau de montage MX en option Fig 5 2 4 Manual do Operador 5 2 Montaje de neumáticos tubeless en llantas acanaladas Lubricar toda la superficie de la llanta Fig 5 2 1 Lubricar los dos talones del neumático dentro y fuera con un lubricante para neumáticos Fig 5 2 2 SI FUERA NECESARIO RESPETAR LA DIRECCION DE ROTACION DEL NEUMATICO ALGUNOS NEUMATICOS TIENEN UN PUNTO DE ...

Страница 34: ...EADING THE TIRE AND PRESSURE MUST BE MONITORED FREQUENTLY TO AVOID EXCESSIVE PRESSURE BEFORE BEADING CHECK THE CONDITION OF TIRE AND RIM CHECK FOR CORRECT SEALING BETWEEN THE VALVE AND THE FITTING AT THE END OF THE AIR HOSE AN AIR LEAK CAN GIVE INCORRECT PRESSURE READINGS AND CREATE SAFETY HAZARDS CHECK THATTHE READING ON THE PRESSURE GAUGE IS ZERO WHEN IT IS NOT IN USE THE COMPLETE SEATING THE BE...

Страница 35: ... TALONSDANSLESLOGEMENTSDELAJANTEDANSUNTELCAS N ESTPASGARANTIEETPEUTREPRESENTERUNDANGERPOUR LES OCCUPANTS DU VEHICULE Manual do Operador 5 3 Entalonado de los neumáticos Por Entalonado se entiende una adherencia inicial de los talones del neumático a la llanta tal que permita continuar con la operación de inflado y sucesivo asentamiento de los mismos en sus alojamientos en la llanta 5 3 1 Precaucion...

Страница 36: ... bounce it while introducing air with the pedal control or with the nozzle Figura 5 3 2 Beading with the GP device The machine can be provided with a GP device necessary for bead seating of tubeless tires Connect the compressed air hose to the valve 1 Figure 5 3 1 Position the GP device beading nozzle between tire and rim pointing the air jet inside the tire 2 Figure 5 3 1 Quickly press the beadin...

Страница 37: ...ERES Manual do Operador Entalonado de Neumáticos Tubeless Realizar el entalonado con la rueda bloqueada sobre el desmontador de ruedas Asegúrese de que ambos talones y toda la llanta estén esmeradamente lubricados Enrosque el inserto válvula Conecte el tubo del aire comprimido a la válvula 1 Figura 5 3 1 Accione el mando del aire comprimido para garantizar el asentamiento de los talones DETENGAELM...

Страница 38: ...ect the inflation hose to the valve stem C Lift the tire with both hands so that upper bead is sealed to the rim edge Fig 5 3 3 D Press the inflation pedal down swiftly The top bead is already sealed by the lifting motion The air from the bead seater jets will rebound into the bottom sidewall driving it into place and creating a seal E Complete inflation as described at the beginning of this secti...

Страница 39: ...TES DE PROTECTION POUR ÉVITER LA CONTAMINATION PAR LA POUSSIÈRE ET LES IMPURITÉS SOULEVÉES PAR LE JET D AIR Manual do Operador Entalonado con dispositivo para neumáticos sin cámara de aire en autocentrador Si la máquina incorpora un sistema de entalonado para neumáticos sin cámara de aire en las guías de deslizamiento del plato autocentrador realizar la secuencia de operaciones siguiente Actuar de...

Страница 40: ...OT lubricate the tube Talc can be used to assist with the tube positioning Mount the valve core and place the tube onto the tire to confirm that the tube is of the correct size Fig 5 5 1 Inflate the tube slightly if held with the index finger it should bend a little Fig 5 5 2 Mount the first bead as described in section 5 2 Put the tube inside the tire and secure the valve with the chuck of the in...

Страница 41: ...jante Manual do Operador 5 4 Desmontaje de neumáticos con camara de aire Para el desmontaje trabajar de acuerdo con lo indicado para los neumáticos tubeless en 5 1 En este caso la válvula no puede ser substituida ya que forma una sola pieza con la cámara de aire NO DAÑAR LA CAMERA DE AIRE DURANTE LA OPERACION DE DESTALONADO LA VALVULA TIENE QUE ESTAR EN LA POSICION DIAMETRALMENTE OPUESTA A LA PALE...

Страница 42: ...ary to utilize the optional motorcycle adaptors 1 and the Motorcycle bead breaker blade 2 The bead breaking mounting and demounting technique is the same as per car tires MOTORCYCLE RIMS MUST ALWAYS BE CLAMPED FROM THE OUTSIDE AIR PRESSURE TO THE TIRE CHANGER MUST NOT EXCED 140 PSI 10 BAR WHEN CLAMPING MOTORCYCLE RIMS ...

Страница 43: ...A PRESSION DE L AIR DANS LA MACHINE NE DOIT PAS DÉPASSER LES 140 PSI 10 BAR QUAND ON BLOQUE LES JANTES MOTO Manual do Operador 5 7 Montaje y Desmontaje de neumáticos de Motos Para trabajar con neumáticos de motos es necesario montar los adaptadores especiales 1 en las garras del autocentrante Paleta destalonador moto 2 La técnica de destalonado de montaje y desmontaje es la misma que para los neum...

Страница 44: ... the turntable with a nonflammable liquid detergent dry and lubricate the sliding surface of the clamps with oil C Clean the teeth of the clamps A with a wire brush check the plastic rim protectors and replace if worn Fig 6 2 D Periodically wash all plastic parts with cold water and soap or mild chemical detergent E Periodically lubricate rods of air cylinders with oil F Peridically replaced the p...

Страница 45: ...util de montage démontage G Contrôler les supports du détalonneur s ils sont détériorés les remplacer Manual do Operador 6 Mantenimiento ANTES DE COMENZAR CUALQUIER OPERACION DE MANTENIMIENTO FIJARSE QUE LA MÁQUINA ESTE DESCONECTADA DE LA LINEA ELECTRICA Y DE LA LINEA DE AIRE COMPRIMIDO A Limpiar periódicamente la barra hexagonal vertical con detergente líquido no inflamable Lubricar con aceite Fig...

Страница 46: ...the lubricator efficiency One oil drop G Fig 6 3 every 4 5 operations of the bead breaker indicates that the correct amount of oil is being dispersed in the system If necessary adjust the oil flow with screw R Fig 6 3 K If the machine is also equipped with a beading unit for tubeless tires drain condensation from the tank daily 6 1 Storage In case the machine is not to be used for a long period of...

Страница 47: ...cessus de dessèchement Au moment de remettre la machine en service contrôler tout d abord le fonctionnement des composants protégés et vérifier le fonctionnement de tous les dispositifs Manual do Operador H Vaciar cada dia el agua del filtro F por el descargo rápido S Fig 6 3 I Controlar regularmente el nivel del aceite Cuando se añade aceite al lubricador primero desconectar la línea de aire y añad...

Страница 48: ...No electric power Check that the electric plug is correctly fitted to the socket and that the electric power is on 2 Switch or motor short circuited Check that the electrical requirements of the machine are the same as the supply Call the authorized service center for assistance The switch pedal does not return to neutral position 1 Switch spring is broken Lift the pedal to neutral position Discon...

Страница 49: ... Nettoyer la vanne Vérifier la pression de l air dans le réseau d alimentation 2 Joints cylindre détériorés Appeler un centre de service après vente autorisé Manual do Operador 7 Resolución de problemas Si ocurre algún problema en el desmontador proceda en el siguiente orden para resolverlo 1 Recuerde los últimos pasos dados Ha trabajado de acuerdo con el manual Funcionaba la unidad tal y como se d...

Страница 50: ...able 3 Low air pressure Check air pressure 4 Jaw teeth worn out Check jaws condition Call the authorized service center for assistance Machine damages rims 1 Plastic insert in mount de mount tool worn out Replace the plastic insert in the mount demount tool 2 Plastic protector in jaws worn out Replace plastic protector in jaws ...

Страница 51: ... protection en plastique de la tête 2 Protection mors détériorée Substituer la protection des mors Manual do Operador No aprieta las llantas 1 Garras sucias Limpiar las garras 2 Autocentrador sucio Limpiar el autocentrante 3 Poca presión Controlar la presión del aire en la línea de alimentación 4 Garras desgastadas Controlar las condiciones de las garras Llamar al centro de asistencia autorizado p...

Страница 52: ... power supply cable close to where it comes out of the machine 2 DO NOT dispose of the equipment as urban waste and recycle it by taking the materials to suitable recycling centres 3 Contact the reseller for the closest authorised recycling centres for the disposal or for the collection of old equipment when purchasing new equipment 4 Stick to the standards for correct waste management to prevent ...

Страница 53: ...veuillez noter que la configuration exacte peut différer dans votre pays Se reporter au bon de commande pour de plus amples renseignements Manual do Operador 8 ELIMINACIÓN DE LA UNIDAD Para el desguace del aparato al final de su vida útil póngase en contacto con el revendedor para que le haga una oferta o para conocer las normas aplicables en materia de eliminación de la unidad Este símbolo indica l...

Страница 54: ...54 B L A N K P A G E ...

Страница 55: ...55 Annexe Instructions pour l Installation Appendix Installation Instructions Anexo Instrucciones Instalación ...

Страница 56: ...horized persons and of objects which may create possible hazards The machine shall be installed on a horizontal floor preferably even Do not install the machine on a sinking or irregular floor If the machine is installed on a raised floor the floor must have a capacity of at least 110lbsxsqft 5000 N m o 500 kg m The machine must be secured to the floor through the holes provided in the cabinet Exp...

Страница 57: ...rrer avec une clé dynamométrique étalonnée à 51 ftxlb 70 Nm Manual do Operador i Requisitos de Instalación LA INSTALACIÓN TIENE QUE SER EFECTUADA POR PERSONAL CALIFICADO EN EL TOTAL RESPETO DE LAS INSTRUCCIONES DADAS EN ESTE MANUAL Instalar la máquina en un sitio cubierto y seco La instalación de la máquina necesita un espacio útil de 87 x106 220x270cm Fig i 1 Fijarse que desde su posición de mand...

Страница 58: ...After removing the carton check for any visible damage to the machine and its components In case of doubt call qualified personnel for assistance The packing materials plastic bags polystyrene nails screws wood etc must be properly disposed of Place the above mentioned materials into a trash container and dispose per local regulations ALWAYS WEAR GLOVES WHEN UNCRATING THE MACHINE TO PREVENT SCRATC...

Страница 59: ... des cordages métalliques pour l élingage Utiliser des courroies de 3000 mm 10 de longueur et de Kg 500 1100 lbs de portée Manual do Operador ii Transporte Desembalaje Dislocación Transporte La máquina se entrega embalada en una caja de cartón de resistencia adecuada Esta caja a su vez está colocada en un pallet de transporte Para el transporte de la máquina embalada hay que emplear un medio adecu...

Страница 60: ...lation must be verified by a licensed electrician before connecting the tire changer Note The yellow green wire in the cable is the earth wire Never connect the earth wire to a live terminal Check that the power supply has an automatic circuit breaker with a differential circuit rated at 30 mA The electric motor operates in a wide voltage range plus or minus 10 and frequency range 50 Hz and has a ...

Страница 61: ...emandé de 8 bar 110 psi la force de blocage de l autocentreur et la force du détalonneur peuvent être insuffisantes pour certains pneus Manual do Operador iii Procedimiento de Instalación Conexión eléctrica LA INSTALACIÓN TIENE QUE SER EFECTUADA POR PERSONAL CALIFICADO EN EL TOTAL RESPETO DE LAS INSTRUCCIONES DADAS EN ESTE MANUAL Controlar que las características eléctricas indicadas en la placa d...

Страница 62: ... follows Connect the machine to the air supply max pressure of 12 bar 170 psi with a rubber hose rated for the pressure with an inside diameter of 6 mm 1 4 Fig iii 1 To install any accessory on request follow the instructions enclosed with it In case of installation of an air filter and lubricator check correct functioning iv Testing procedures Pneumatic hose connection check When first setting the...

Страница 63: ...ual do Operador Si la presión del aire es menor que el mínimo necesario de 8 bar 110 psi la fuerza de bloqueo del autocentrante y la fuerza del destalonador pueden resultar insuficientes para algunas ruedas Si la presión supera los 12 bar 170 psi es obligatorio instalar un regulador de presión antes de la toma de aire de la máquina Se aconseja colocar un filtro en la línea de aire comprimido para r...

Страница 64: ... consequential damages in connection with furnishings performance or use of this material Snap on Equipment SrL Manufacturing Facility Via Per Carpi 33 42015 Correggio RE Italy Technical alterations reserved This document contains proprietary information which is protected by copyright and patents All rights are reserved No part of this document may be photocopied reproduced or translated without ...

Отзывы: