background image

180 


2  

3  

SW 13  

4  

5  

6  

523  

1  

736  

190  

2  

49 
 

Installation of the machine   

2.  Installation of the machine  

When  choosing the  site,  Health  and Safety at Work  regula-
tions and the  regulations on  working  environment  should be 
taken into account.   

The wheel balancer can be installed on  any firm and  level  

ground. For the weight and space requirement of  the  machines 

refer to § 15., Technical data. For installation on an  upper floor, 

observe permissible load capacity of the floor.  

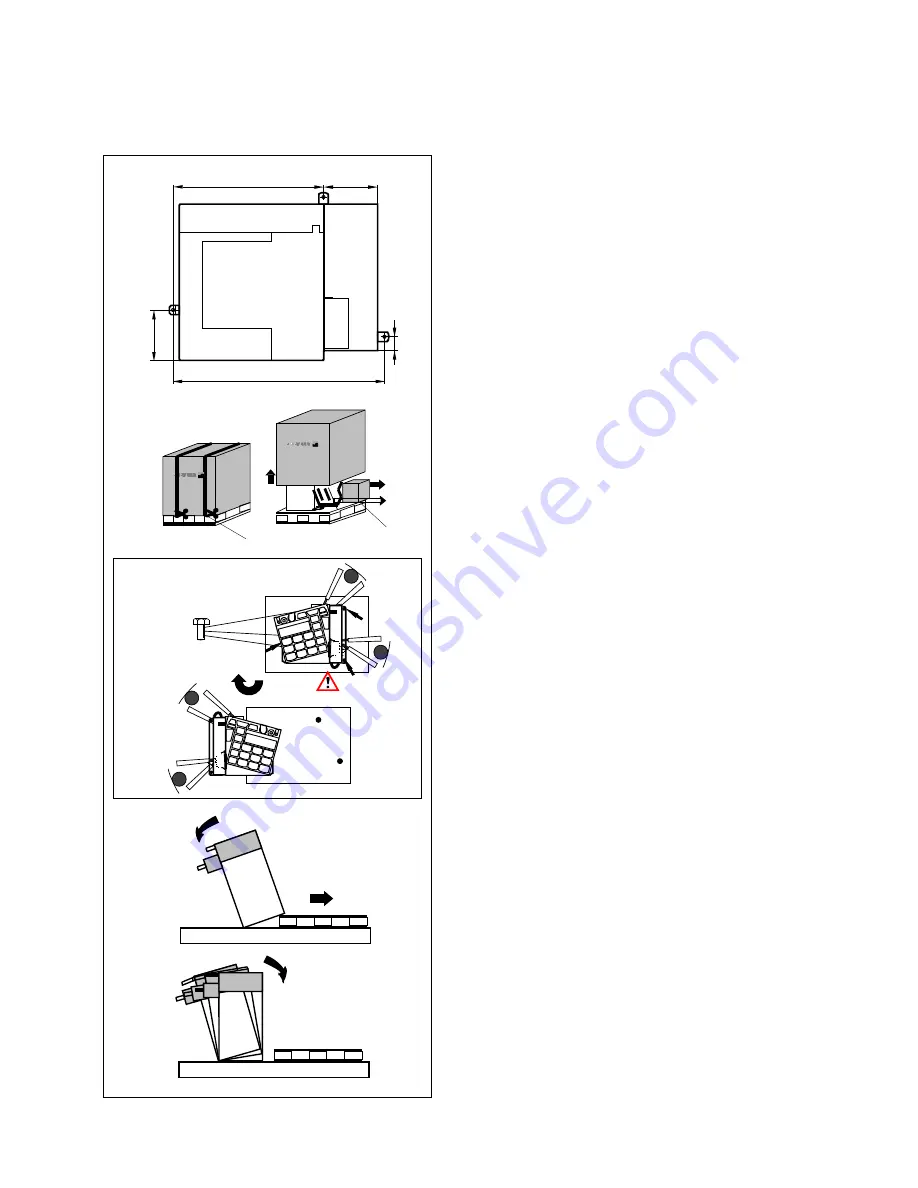
It is recommended, though not absolutely necessary, that the  

machine be secured to the floor. For this purpose three holes  

(Fig. 2)

 are provided in the base of the machine by which the  

latter is fixed on the floor with 3/8 ” anchor bolts. Fig. 2 shows  

the center-to-center distance of the holes. Make sure that the  
machine has a stable position, i.e. that it is supported on 

three


seatings. If not,  ensure  three-point contact  on  ground by  

inserting appropriate spacers between the floor and machine  

base.  

For ease of transport the wheel balancer is disassembled 
into  the following units and provided with special packing (on  
pallets):  
- Machine  
- Wheel guard  

2.1 Unpacking the machine  

The machine should be unpacked by two persons.  

Note  

When unpacking the machine make sure that the pedal fitted  

on the machine base and the whole pedal assembly  is not  
damaged.  

  Cut the strips of the packing (

Fig. 3, item 1)

, lift off the  

packing, and set aside the wheel guard and the small  

parts packed in the separate small box (

Fig. 3, item 2)

.  

  Unscrew the three hexagon screws (use a 1/2 ” wrench  

to) which hold the machine on the pallet 

(Fig. 4,  ar-

row)

.  

  Lift the machine by tube of the vibratory system and  

wheel guard arbor and turn around by 180 degrees on  
the pallet

 (Fig. 4)

.  

  Then lower one side of  the machine laterally  on the  

floor 

(Fig. 5)

.  

  Remove the pallet from underneath the machine and  

gently lower the entire machine onto the floor

 (Fig. 6)

.  

2.2 Resiting the machine  

If the machine is transported on site, gently tilt it, taking it by  

weight box and wheel guard arbor, and push it gently on  suit

-

able lifting or mobile industrial handling equipment (e. g.  forklift 
truck, platform truck).   

Note  

When lifting the machine bear in mind the centre of gravity of  
the machine and avoid oscillating movements.   

 Operation manual geodyna 2600 EEWB703D


5


Содержание geodyna 2600

Страница 1: ...2800 2600 geodyna 2600 Operation manual Car wheel balancer Form ZEEWB703D ...

Страница 2: ...ial features were used in this manual to facilitate reading and understanding of pictures and written instructions signals the operator where to act Safety rules are highlighted in grey Arrow showing where to look 1 2 Scope of application The off the vehicle wheel balancer is designed for static and or dynamic balancing of car and light truck wheels weighing up to 150 lbs and having an overall dia...

Страница 3: ...e noted that working with technical equipment may involve an unforeseeable acceptable risk Therefore the operator should eliminate such dangers in advance by proper and wise behavior The following special points should be observed Use technical equipment for its specified scope of application only Always use suitable and proper equipment and tools Follow the instructions notes and technical data o...

Страница 4: ...standstill Amounts and locations of unbalance are read out separately for each correction plane Main shaft lock The machines have a pedal operated main shaft lock which is used to retain the wheel in the correction position so that the balance weights can be fitted This lock is designed only to facilitate orientation of the wheel and must not be used for braking the main shaft Store wheel profiles...

Страница 5: ...owing units and provided with special packing on pallets Machine Wheel guard 2 1 Unpacking the machine The machine should be unpacked by two persons Note When unpacking the machine make sure that the pedal fitted on the machine base and the whole pedal assembly is not damaged Cut the strips of the packing Fig 3 item 1 lift off the packing and set aside the wheel guard and the small parts packed in...

Страница 6: ... of op eration The measuring run is started by closing the wheel guard code C13 The wheel is braked on lifting the wheel guard during a measuring run code C5 These modes of operation can be changed either permanent ly or only as long as the machine is switched on by means of codes see 10 Changing modes of operation 3 Electrical connection Electrical standard equipment and drive motor of the wheel ...

Страница 7: ... an optimisation program LED PRO MATCH lights In the Pro Match program OP program enter valve position 5 CLEAR RESTORE CLEAR key pressed briefly Setting the factory adjusted modes of operation All settings are deleted and the display returns to standard RESTORE key pressed for 3 seconds Restores all modes the way they were before clear was pressed 6 CALIBRATE CODE CALIBRATE key pressed briefly Set...

Страница 8: ...t or change the number of spokes When the key is pressed without rotating the wheel the current setting is entered OPERATOR Recalls and stores wheel profiles RCL Keep the key pressed on bottom RCL recall comes up in the left hand section of the display and 1 comes up in the right hand section for the first wheel profile to be stored Keep the key pressed on bottom and rotate the wheel Profiles 2 th...

Страница 9: ...ed press and hold the FINE key and then press the function key for balanc ing mode ALU ALU The unbalance readings switch over to those for standard balancing mode and the rela tive rim symbol appears In the OP and Un programs the FINE key serves as change over key INT pressed on bottom Switches to the patch balance mode All wheel data must have been entered In addition the height to width ratio sp...

Страница 10: ...ofiles Note Error codes are read out in both digital displays Fig 13 Status LEDs 1 ALU Any ALU balance mode is selected 2 FINE FINE key is pressed cancels supression of small imbalances Display changes to normal resolution as soon as key is released 3 INT Patch Balance is selected All special functions including FINE are inactive and cannot be selected 4 PRO MATCH is selected 5 0 Compensation run ...

Страница 11: ...lve has been placed perpendicular to the main shaft and the PRO MATCH key is pressed the LED is turned off 4 SAPE symbol As the distance lever is moved the first bar and grad ually the remaining bar segments light up reaching the correction position the segment furthest to the right lights up and the speaker beeps The symbol lights up when the weight fitting position is first entered and later rel...

Страница 12: ...on indicator of right correction plane 6 Indicates when correction position in the right correction plane has been reached 7 Distance machine left correction plane lights whenever distance key is pressed or gauge arm for distance and rim diameter is moved 8 START flashes when the START key is to be pressed during pro match and operator calibration Fig 16 Pedal of main shaft lock The main shaft is ...

Страница 13: ...onic unit is factory adjusted to the following modes of operation which are available after turning on car wheel with nominal dimensions in inches width 6 5 and diameter 15 0 entry of rim data in inches display of amount of unbalance in 1 4 ounce increments suppression of minor unbalance readings limit set to 1 4 ounce automatic braking of wheel when guard is opened during the measuring run compen...

Страница 14: ...e E145 Fig 24 The contents of both permanent memories are different but both contain valid data Fatal error codes The self test program has detected an error and displays an alphanumeric code consisting of six digits and or letters Note The displayed error codes refer only to the internal line voltage of the machine C10 800 Fig 25 Line voltage too low Balancing is feasible if the motor can drive t...

Страница 15: ...erforming a compensation run All clamping and centring means are balanced in our works to within a certain tolerance To compensate for any residual unbalance that might be left in the clamping means it is recommended that an electrical compensation run be performed also see 10 Changing modes of operation This mode cannot be transferred into the permanent memory This mode of operation is retained u...

Страница 16: ...ing car and light truck wheels Fig 29 Cone adapter to clamp center bore located wheels 1 Cone 2 Rim 3 Clamping head with clamping nut Fig 30 Universal clamping adapter for clamping stud hole located wheels or wheels with closed rim 1 Rim with center bore center bore location 2 Closed rim ...

Страница 17: ...tered by pressing and holding the relative function key Fig 31 item 2 and rotating the wheel until the desired value is read out On releasing the function key the input is retained until another input is made The distance between left correction plane machine and the rim diameter are usually entered using the integrated gauge arm but may also be entered by pressing and holding the relative functio...

Страница 18: ...n the digital displays when the Alu key is pressed reading e g Alu 1 Press and hold the Alu key Fig 33 item 1 and rotate the wheel to set the desired balancing mode weight fitting positions Fig 33 Release the Alu key as soon as the desired mode is read out Fig 33 Rim symbols showing weight position nor Standard balancing mode where hammer on weights are attached to the rim flanges Alu 1 Fitting of...

Страница 19: ...ata for the first wheel It will remain stored until new entries are made 7 2 1 Determination and input of rim width Use the optional rim width callipers Fig 35 Fig 34 Input of rim width To enter the rim width press and hold the function key Fig 34 item 1 Rotate the wheel while the key is pressed in order to set the value for the rim width on the display and then release the key Operation manual ge...

Страница 20: ...adhesive weight attached in the rim the correc tion planes for the adhesive weights are determined automatically by the machine Alu 2P Adhesive weights adhesive weight on bead seat hidden adhesive weight attached in the rim the correction planes for the adhesive weights can be determined exactly Alu 3 Hammer on weight on left rim flange adhesive weight attached in hidden position in the rim the co...

Страница 21: ...as shown in Fig 37 and hold in that position An audible signal confirms that distance and rim diameter have been stored automatically Re place the gauge arm in its home position Upon operation of the key the distance and the diameter can be read out once again Manual input of distance rim machine If automatic determination of the distance rim machine is not possible error code E92 the distance can...

Страница 22: ... Holding the key pressed rotate the wheel until mode Alu 2P is shown Fig 40a the left weight symbol is displayed as long as the key is pressed Release the Alu key as soon as the desired balancing mode is read out Recommendation Clamp an adhesive weight in the weight holder of the gauge with the cover film of the weight being in top position prior to scanning the correction dimensions To determine ...

Страница 23: ... the gauge and remove the protective tape from the weight Pull the gauge arm towards application position AP1 The display shows the dimension for the first distance which decreases as the gauge is approached At 0 1 an audible signal is given to show that AP1 has been reached Press the pedal of the main shaft lock to hold the wheel in this position Swing the gauge arm out towards the rim and press ...

Страница 24: ...elease the Alu key as soon as the desired balancing mode is read out Recommendation Clamp an adhesive weight in the weight holder of the gauge with the cover film of the weight being in top position prior to scanning the correction dimensions To determine the gauge application position AP1 pull the gauge arm for distance and diameter out of the cabinet apply the gauge on the rim in the center of t...

Страница 25: ...e from the weight Pull the gauge arm towards application position AP2 The display shows the dimension for the first distance which decreases as the gauge is approached At 0 1 an audible signal is given to show that AP2 has been reached Press the pedal of the main shaft lock to hold the wheel in this position Swing the gauge arm out towards the rim and press the weight firmly against the rim using ...

Страница 26: ...tion The following values are stored Wheel dimensions Values measured with the gauge arm Weight positions Positions for relocation Press and hold OPERATOR key on bottom RCL comes up in the left hand section of the display and 1 comes up in the right hand section for the first wheel profile to be stored Keep the key pressed on bottom and rotate the wheel Profiles 2 through 4 are read out in the rig...

Страница 27: ...d 8 1 Measurement Start the measuring run Index the wheel into correction position following the direction indicated Fig 47 item 1 On reaching the respective correction position only the two arrow heads are visible Fig 48 item 2 In this position attach a balance weight in the correc tion position at the top of the rim at 12 00 o clock Fig 48 item 3 For correct fitting of the balance weights see Fi...

Страница 28: ...ap proached to the rim there are no data for re locating the cor rection plane see 11 Error codes This means that either an error was made in applying the gauge arm or the adhesive weight cannot be fitted on the rim using the gauge In this case refer to 8 2 3 If necessary index the wheel to the exact correction position in the left correction plane On reaching the correction position only the two ...

Страница 29: ...a check run On completion of the check run when the wheel is perfectly balanced both digital displays show 0 and the OK indicators come up Fig 52 Note If both amount readings are 0 but there is no OK reading dynamic unbalances below the tolerance limit suppression preset to 1 4 ounce add to a static unbalance above the tolerance limit These residual unbalances are read out upon operation of the FI...

Страница 30: ...rts Fig 54 1 With small static unbalance fit the balance weight either in the outer or inner correction plane Fig 54 2 and 54 3 Note Figures 54 1 54 3 illustrate how hammer on weights can be fitted When adhesive weights are used or both types are mixed For balancing modes Alu 2 and Alu 3 fit a balance weight in hidden position inside the rim in this case the correction diameter for static unbalanc...

Страница 31: ... The operating steps for the hidden spoke placement mode are described and illustrated below 9 1 How to proceed Hidden spoke placement is activated automatically in Alu 2 Alu 2P and Alu 3 Alu 3P balancing modes 9 2 Choice of balancing mode choice of hidden spoke placement mode and input of wheel data Press and hold the ALU key or the ALU key Fig 56 item 1 and rotate the wheel to set balancing mode...

Страница 32: ...The small arrow on the left hand side in Fig 61 indicates the shortest way to index the position of the other adhesive weight Index the wheel to the exact position for correction in the first correction position and hold the wheel in this posi tion with the main shaft lock Clean the wheel before attaching the adhesive weights Attach a weight in the position in the example 15 g Fig 61 The divided a...

Страница 33: ... set the desired state e g 1 in the display For some codes a given value can be set Release the FINE key when the desired code or value is read out Press the CODE key to acknowledge the input and to return to the basic reading Fig 64 or abort by press ing STOP Quit the C code or abort and return to normal working mode Press the STOP key Having completed the input of mode of operation it will remai...

Страница 34: ... to standard RESTORE key pressed for 3 seconds Restores all modes the way they were before clear was pressed provided they were stored previously Code C1 Fig 66 Selecting the resolution of unbalance readings in 1 or 5 g or 0 05 or 0 25 oz increments 0 5 g 0 25 oz increments 1 1 g 0 05 oz increments The selected mode of operation can be transferred to the permanent memory Code C2 Fig 67 Selecting s...

Страница 35: ...tion can be transferred to the permanent memory Code C4 Fig 69 Electrical compensation of residual unbalance in the wheel adapter Measurement with increased precision this mode cannot be transferred into the permanent memory Compensation has to be cancelled and carried out once again when the wheel adapter is exchanged Resetting the status to 0 cancels the compensation of adapter unbalance The com...

Страница 36: ... of audible signals Scale of volume 0 to 100 low high factory adjusted to 50 Example set volume to 60 The volume is not changed before the CODE key is pressed for quitting the mode The selected mode of operation can be transferred to the permanent memory Code C8 Fig 73 Selecting the limit threshold value for suppression of minor unbalance readings in grammes or ounces The unit gms or oz depends on...

Страница 37: ...ent memory not possible for code C4 Code C12 Fig 75 Readings of numbers of measuring runs Example 222 123 measuring runs so far performed By press ing the FINE key an turning the wheel the following counters can be displayed 1 Total number of measuring runs 2 Number of measuring runs where balance quality was considered OK 3 Number of Pro Matches performed 4 Number of measuring runs in service mod...

Страница 38: ... out in the right hand display The stored wheel profile e g 3 is entered once the key is released The following information is available if applicable Nominal wheel dimensions Values measured with the gauge arm Weight positions Positions for relocation See also C18 Code C18 Fig 78 Store wheel profile If a wheel profile is to be stored keep on pressing the OPERATOR key after the RCL readings have c...

Страница 39: ...e error memory so that they can be called up and reported by the operator of the wheel balancer e g for remote diagnosis of malfunctions The most recent error code is written to memory location 1 and the previous error codes are shifted to the higher memory locations Select one of the 10 malfunction code messages Press the PRO MATCH key to display the memory location left and number of incidents r...

Страница 40: ... 83 Gauge arm for distance and rim diameter is not in home position E5 Fig 84 Range of electrical compensation exceeded wheel adapter has unacceptable unbalance Press STOP key Check wheel adapter repeat compensation run E6 Fig 85 The calibration weight was not attached for readjustment Press STOP key Repeat readjustment E7 Fig 86 With this wheel type it is not possible to choose a balancing mode E...

Страница 41: ...rocedure E15 Fig 89 Readjustment is out of range During readjustment values were determined which exceed or fall below the adjustment value Press the CODE key to transfer the corrective terms into the permanent memory Call for the service technician to readjust the machine E16 Fig 90 During the first readjustment run by the operator the calibra tion weight was attached by mistake Unscrew the calib...

Страница 42: ...rations Make sure the machine is on a solid floor and repeat the measuring run again E88 Fig 93 The rotating speed of the main shaft exceeds the limit E89 Fig 94 A key is stuck at power on Find and release the key or call service E92 Fig 95 Gauge arm defective Call service As long as the gauge arm is defective enter by press ing the distance key and rotating the wheel 7 2 3 ...

Страница 43: ...t H3 Fig 99 Pro Match not recommanded H20 Fig 100 Correction plane cannot be re located with the gauge arm Measure the correction plane and switch to dynamic unbalance reading H21 Fig 101 The indexed position is not the one for the correction plane in which the adhesive weight is to be fitted with the gauge arm Index the correct position for this correction plane prior to attaching the adhesive we...

Страница 44: ...ted max 10 times or aborted by pressing the STOP key H90 Fig 104 The wheel was accelerated too slowly or decelerated too slowly after a measuring run If the main shaft does not reach the required speed check whether the shaft with mounted wheel can not rotate freely or whether the weight of the wheel is excessive In this case Make sure that the shaft with mounted wheel can rotate freely Turn the w...

Страница 45: ...e lost Bring the line voltage to within a range of 115 120 V AC 300 801 or C10 801 Fig 107 Line voltage too high Damage to the electronic unit of the machine is likely Turn off machine immediately Damage is not covered under warranty 300 804 or C10 804 Fig 108 Line voltage too high Damage to the electronic unit of the machine is likely Turn off machine immediately Damage is not covered under warra...

Страница 46: ...d 12 2 General instructions for the Pro Match weight minimisation programs It may be necessary to interrupt the Pro Match minimisation program by pressing the STOP key The electronic unit will store the current program step the rim dimensions and all measurements taken so far To continue with the Pro Match minimisation program press the OP and CODE keys in succession The program then continues at ...

Страница 47: ...lock after the tire has been displaced on the rim Rotate the tire so that the valve stem is set at 12 00 o clock Depress the PRO MATCH key Fig 110 item 1 to enter the valve position Reading OP 2 Fig 112 comes up An incorrect valve position input can be corrected by repeating this step Weight minimisation If no Pro Match but only weight minimisation i e without compensation with the rim only is des...

Страница 48: ...cer Readjust such that the valve is set at 12 00 o clock Press the PRO MATCH key to enter the valve position Reading OP 4 Fig 114 comes up Press the START key The measuring run is carried out After the measuring run two readings are possible OP 5 H 1 see Fig 115 Further Pro Match is not recommended but possible OP 5 reference mark see Fig 116 Continue with the Pro Match program Reading OP 5 H 1 Fi...

Страница 49: ... run four readings are possible OP 7 see Fig 118 Proceed with the OP program It is recommended that the tire be turned over on the rim OP 7 see Fig 119 Proceed with the OP program It is recommended that the tire be readjusted on the rim H 0 see Fig 120 Optimum condition has been achieved and cannot be improved H 2 see Fig 121 Wheel running conditions cannot be improved However it is possible to re...

Страница 50: ...as been carried out correctly following the above sequence of operations the balancer will return to the balancing mode selected before Pro Match and read out the dynamic unbalance still left in the wheel Fig 118 Balance the wheel according to the readings Reading of error code E9 If E9 is read out at least one error was made with respect to the sequence of operations when performing Pro Match see...

Страница 51: ...es up Press the START key check run If the Pro Match run has been carried out correctly following the above sequence of operations the balancer will return to the balancing mode selected before Pro Match and read out the dynamic unbalance still left in the wheel Fig 119 Balance the wheel according to the readings Reading of error code E9 If E9 is read out at least one error was made with respect t...

Страница 52: ... been achieved and cannot be improved Reading H 2 Fig 121 Wheel running conditions cannot be improved However it is possible to achieve weight minimisation Choice 1 Continue with weight minimisation Press the FINE key to continue in the program As a result readings are Un 7 Fig 127 or Un 7 Fig 128 Choice 2 Abort Pro Match Press the STOP key to leave the Pro Match program and return to the balancin...

Страница 53: ... measuring run two readings are possible Un 5 H 1 see Fig 124 Further minimisation is not recommended but possible Un 5 reference mark see Fig 125 Continue with the Un program Reading Un 5 H 1 Fig 124 If Un 5 H 1 is read out further minimisation is not recommen ded In this case the measured data does not exceed one ounce However it is possible to continue minimisation to achieve an improvement if ...

Страница 54: ...00 o clock Press the PRO MATCH key to enter the valve position Reading Un 6 Fig 126 comes up Press the START key The second measuring run of the tire rim assembly is started After the measuring run three readings are possible Un 7 see Fig 127 Proceed with the Un program It is recommended that the tire be turned over on the rim Un 7 see Fig 128 Proceed with the Un program It is recommended that the...

Страница 55: ...ve sequence of operations the balancer will return to the balancing mode selected before minimisation and read out the dynamic unbalance still left in the wheel Fig 127 Balance the wheel according to the readings Reading of error code E9 If E9 is read out at least one error was made with respect to the sequence of operations when performing minimisation see 11 Error codes Abort the minimisation pr...

Страница 56: ...s been carried out correctly following the above sequence of operations the balancer will return to the balancing mode selected before minimisation and read out the dynamic unbalance still left in the wheel Fig 128 Balance the wheel according to the readings Reading of error code E9 If E9 is read out at least one error was made with respect to the sequence of operations when performing minimisatio...

Страница 57: ...no wheel or other clamping means is clamped on the machine Press and hold the CODE key Fig 130 item 1 The basic reading C is read out Fig 131 Release the CODE key Reading 1 and START are read out Fig 132 Close the optional wheel guard and press the START key to carry out a readjustment run On completion of the first run reading 2 and START are read out Fig 133 Screw the calibration weight into the...

Страница 58: ...eight of machine with wheel guard open 72 8 inches Weight of machine 220 lbs Power supply 115 120 V 50 60 Hz Motor rating 0 12 kW Balancing speed 225 rpm 50 Hz Mea suring time 3 s Max unbalance reading 14 oz Resolution of amount reading 1 5 g or 0 05 0 25 oz Resolution of position reading 0 7 deg Working tem perature 0 45 C Relative humidity 5 95 at 40 C Noise level 70 dB A Working range Distance ...

Страница 59: ...Operation manual geodyna 2600 EEWB703D 59 16 Electrical diagram ...

Страница 60: ...D Hofmann USA 309 Exchange Ave Conway AR 72032 Ph 800 251 4500 Fax 501 450 2085 Hofmann Canada 6500 Millcreek Dr Mississauga Ontario L5N4G4 Ph 800 267 2185 Fax 905 821 2073 ZEEWB703D 12 14 10 wdcullum copyright 2010 Snap on Equipment Services All rights ...

Отзывы:

Похожие инструкции для geodyna 2600