RXW
Temperature/RH
Sensor
(RXW
‐
THC
‐
B
‐
xxx)
Manual
1
‐
800
‐
LOGGERS
2
www.onsetcomp.com
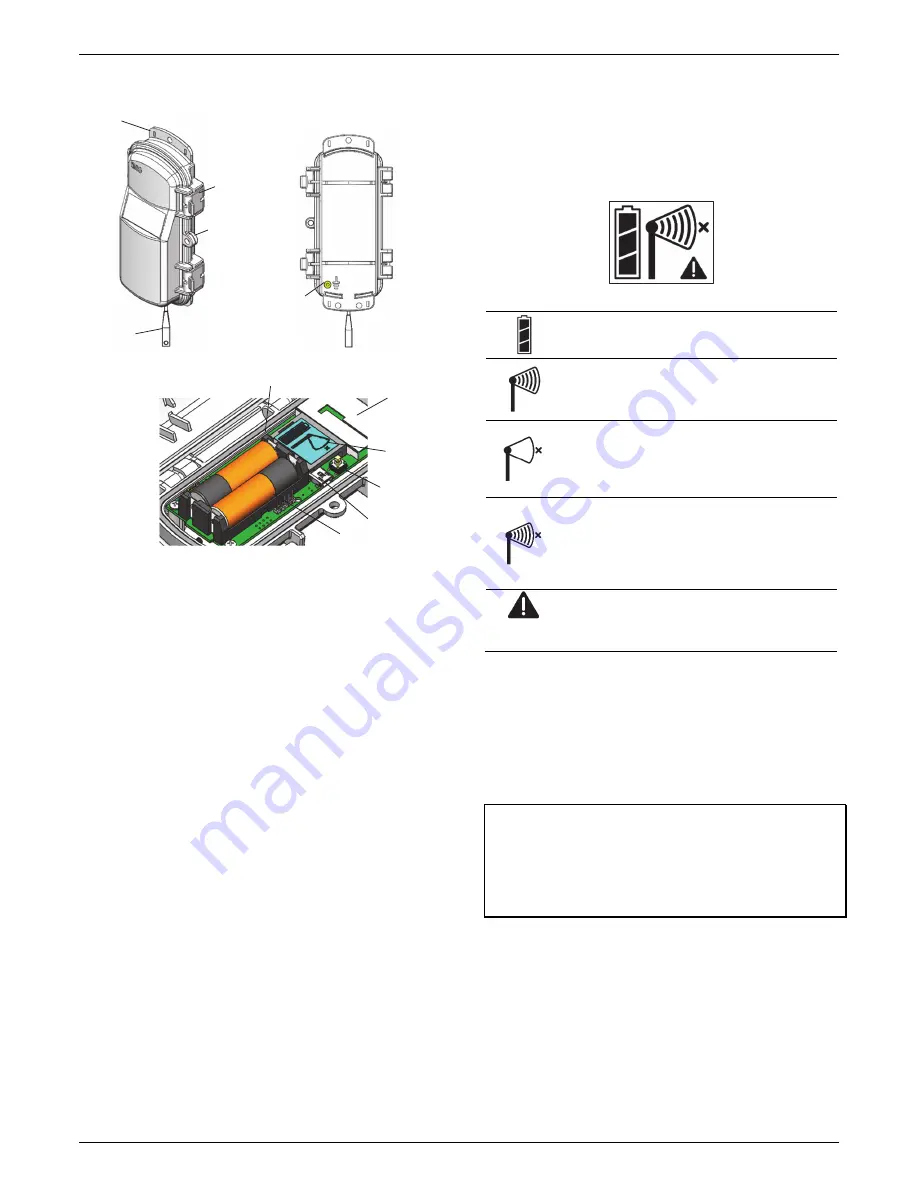
Mote
Components
and
Operation
Sensor
Mote
Closed,
Front
Sensor
Mote
Closed,
Back
Sensor
Mote
Opened
Mounting
Tab:
Use
the
tabs
at
the
top
and
bottom
of
the
mote
to
mount
it
(see
Deploying
and
Mounting
).
Sensor:
This
is
the
temperature/RH
sensor
connected
to
the
mote.
Eyelet:
Use
this
eyelet
to
attach
a
3/16
inch
padlock
to
the
mote
for
security.
Latch:
Use
the
two
latches
to
open
and
close
the
mote
door.
Ground
Wire
Port:
Use
this
port
to
connect
a
ground
wire
(see
Deploying
and
Mounting
).
Antenna:
This
is
the
built
‐
in
antenna
for
the
radio
communications
across
the
wireless
network.
LEDs:
There
are
two
LEDs
to
the
left
of
the
LCD
screen.
The
green
LED
blinks
during
the
process
of
joining
a
network,
blinking
quickly
while
the
mote
searches
for
a
network
and
then
slowly
as
the
mote
registers
with
the
network.
Once
the
network
registration
process
is
complete,
the
blue
LED
blinks
at
4
seconds
to
indicate
normal
operation.
If
the
mote
is
not
currently
part
of
a
network,
the
blue
LED
will
be
off.
If
the
blue
LED
is
on
and
not
blinking,
there
is
a
problem
with
the
mote.
Contact
Onset
Technical
Support.
Battery
Holder:
The
location
where
the
batteries
are
installed
as
shown
(see
Battery
Information
).
USB
Port:
Use
this
port
to
connect
to
the
mote
to
a
computer
via
USB
cable
if
you
need
to
update
the
firmware
(see
Updating
Mote
Firmware
).
Button:
Push
this
button
for
1
second
to
illuminate
the
LCD
or
3
seconds
for
the
mote
to
search
for
a
wireless
sensor
network
to
join
(see
Adding
the
Mote
to
the
HOBOnet
Wireless
Sensor
Network
).
LCD
Screen:
The
mote
is
equipped
with
an
LCD
screen
that
displays
details
about
the
current
status.
This
example
shows
all
symbols
illuminated
on
the
LCD
screen
followed
by
definitions
of
each
symbol
in
the
table.
LCD
Symbol
Description
The
battery
indicator
shows
the
approximate
battery
charge
remaining.
This
is
a
signal
strength
indicator.
The
more
bars,
the
stronger
the
signal
between
motes.
If
there
is
no
x
icon
next
to
the
signal
strength
indicator,
then
the
mote
is
part
of
a
HOBOnet
Wireless
Sensor
Network.
An
empty
signal
strength
icon
plus
the
x
icon
indicates
that
the
mote
is
not
currently
part
of
a
network.
See
Adding
the
Mote
to
the
HOBOnet
Wireless
Sensor
Network
for
details
on
how
to
add
a
mote
to
the
network.
When
the
mote
is
in
the
process
of
joining
a
network,
the
signal
strength
icon
will
blink
and
then
the
bars
in
the
icon
will
cycle
from
left
to
right.
The
x
icon
will
blink
during
the
last
step
in
the
network
registration
process
(see
Adding
the
Mote
to
the
HOBOnet
Wireless
Sensor
Network
for
details).
This
indicates
a
problem
with
the
sensor
itself
(the
mote
is
operational).
Check
the
sensor
and
make
any
adjustments
to
it
as
needed.
Contact
Onset
Technical
Support
if
the
problem
persists.
Adding
the
Mote
to
the
HOBOnet
Wireless
Sensor
Network
The
mote
must
join
a
HOBOnet
Wireless
Sensor
Network
before
it
can
begin
measuring
temperature
and
RH
and
transmitting
data.
This
requires
accessing
the
station
and
the
mote
at
the
same
time
so
it
is
recommended
that
you
complete
these
steps
before
deploying
the
mote.
Important:
If
you
are
setting
up
a
new
station,
follow
the
instructions
in
the
station
quick
start
before
setting
up
this
mote
(go
to
www.onsetcomp.com/manuals/24500
‐
rx2105
‐
and
‐
rx2106
‐
manual
for
RX2105
and
RX2106
stations
or
www.onsetcomp.com/manuals/rx3000
‐
qsg
for
RX3000
stations).
To
add
a
mote
to
the
network:
1.
If
the
LCD
is
blank
on
the
station,
press
any
button
to
wake
it
up.
2.
Press
the
Select
button
once
(which
shows
the
number
of
smart
sensors
installed)
and
then
press
it
again
to
switch
to
Button
Latch
USB
Port
Battery
Holder
LCD
Screen
Mounting
Tab
Antenna
LEDs
Eyelet
Ground
Wire
Port
Sensor