


Содержание OP GT Lite
Страница 1: ...OP GT Lite Manual v0 1 October 12th 2020 ...
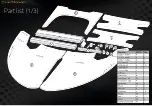
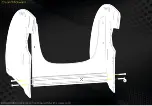
Страница 4: ...Part list 1 3 ...
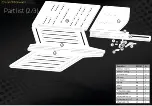
Страница 5: ...Part list 2 3 ...
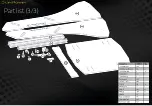
Страница 6: ...Part list 3 3 ...
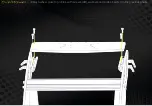
Страница 7: ...Mount the reinforcement board AJ to 3060 profile F with M8 slides E and screws AC ...
Страница 8: ...Attach 3060 profile F to front board M with screws AD ...
Страница 9: ...Connect the reinforcement board AJ to front boards with screws W washers BK and slides D ...
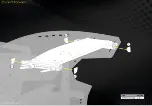
Страница 10: ...Attach levers X to side boards with washers Y and sliders E ...
Страница 11: ...Attach profiles A to slides and put levers to the lowest position ...
Страница 12: ...Insert slides E to profiles ...
Страница 13: ...Attach wheel plate to profiles with screws AB washers and slides inserted in the previous phase ...
Страница 14: ...Insert endcaps C ...
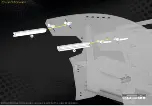
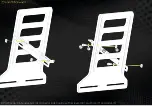
Страница 15: ...Attach pedal plate adapters AF to pedal side boards with screws AR washers Y and slides E ...
Страница 16: ...Attach pedal plate LC with screws AB and slides E ...
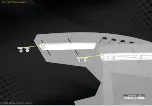
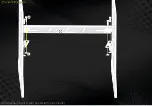
Страница 17: ...Attach pedal rack to frontal assembly with screws 4xAY and slides 4xE ...
Страница 18: ...Attach catches BH with screws BI ...
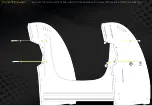
Страница 20: ...Attach backboard to 3060 profiles ...
Страница 21: ...Prepare 3030 corner brackets ...
Страница 22: ...Attach corner brackets to 3030 profiles using the slides Observe the orientation of the brackets from above ...
Страница 23: ...Attach the 3030 profiles to 3060 profiles with corner brackets ...
Страница 24: ...Insert slides to 3060 profile top slot ...
Страница 25: ...Mount the HPL seat base with screws and slides inserted in the previous phase ...
Страница 26: ...Attach screws and slides with washers to side board slots ...
Страница 27: ...Attach latches to side boards ...
Страница 28: ...Attach seat base to side boards ...
Страница 29: ...Loosen the side board screws and attach seat base to frontal assembly ...
Страница 30: ...Tighten the side board screws ...
Страница 33: ...Attach screws AB to side boards with slides E Use washers Y to front slot ...
Страница 34: ...Attach profiles B to the slides and tighten the screws ...
Страница 35: ...Insert slides E to profiles top slots ...
Страница 36: ...Attach Calf board J to slides inside profiles with screws AB ...
Страница 37: ...Insert end caps C ...
Страница 38: ...Insert Calf cushion K on top of calf board ...


