ENGLISH
fra
N
ç
a
IS
DEUTSCH
ES
p
a
Ñ
o
L
5
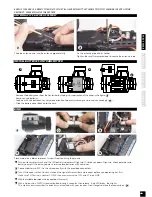
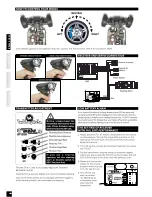
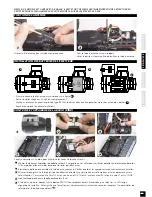
even if this car is a ready to run kit, you still have some little things to do to familiari ze with your
product. please follow these steps.
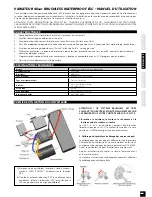
Slide the antenna wire into the antenna pipe carefully.
Fix the antenna pipe into its holder.
Tighten the small screw provided to secure the antenna tube.
Place model on a block to prevent wheels from touching the ground.
A
Turn on transmitter switch and the LED battery indicator will light up. If it blinks or doesn’t light up, check polarities and
battery power. If the battery power is low, replace batteries with new ones.
B
Connect battery to ESC. Fix the wire correctly with the provided connectors.
C
Turn ON receiver switch. You must check the signal of transmitter and receiver before you operating it at first.
Make sure TH Trim is on neutral, TH D/R is on maximum value (10), and ST in on NOR.
D
With the suitable tool, open the receiver box (2 screws).
E
With a tip, push on SWITCH receiver button during 3 seconds, then release : Red LED blinks, then lights.
This means your transmitter is correctly synchronized with your receiver. Don’t forget to close the receiver box (
F
)
bINd
A
B
C
A
B
D
F
E
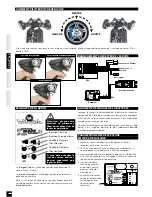
INSTALL bATTeRIeS ON TRANSMITTeR
A
B
C
- Remove the battery cover from the transmitter by sliding it in the direction of the arrow in the figure
B
.
- Remove used batteries.
- Load new AA size batteries. Pay very close attention to polarity markings and reinsert accordingly (
C
).
- Slide the battery cover back onto the case.
ANTeNNA pIpe & wIRe ASSeMbLy


