Hobbico Hobbistar 60 MKII Скачать руководство пользователя страница 1

90-DAY LIMITED WARRANTY

If you, as the original owner of this model, discover defects in parts and workmanship within 90 days of purchase, Hobbico will repair or replace
it – at the option of our authorized U.S. repair facility, Hobby Services – without charge. Our liability does not include the cost of shipping to us.
However, Hobby Services will pay shipping expenses to return your model to you. You must provide proof of purchase, such as your original
purchase invoice or receipt, for your model’s warranty to be honored. This warranty does not apply to damage or defects caused by misuse or
improper assembly, service or shipment. Modifications, alterations or repair by anyone other than Hobby Services voids this warranty. We are
sorry, but we cannot be responsible for crash damage and/or resulting loss of kits, engines, accessories, etc.

Your Hobbistar .60 MKII ARF must be returned directly to Hobby Services for warranty work. The address is: Hobby Services, Attn: Service
Department, 1610 Interstate Drive, Champaign, IL 61822-1067. Phone: (217) 398-0007. 
Please follow the instructions below when returning
your model. This will help our experienced technicians to repair and return it as quickly as possible.

1. ALWAYS return your entire system, including airplane and radio.
2. Disconnect the receiver battery switch harness and make sure that the transmitter is turned off. Disconnect all batteries and drain all fuel.
3. Include a list of all items returned and a THOROUGH, written explanation of the problem and service needed. If you expect the repair to be

covered under warranty, also include your proof of purchase.

4. Include your full return address and a phone number where you can be reached during the day.

If your model is past the 90 day warranty period or is excluded from warranty coverage, you can still receive repair service through Hobby Services
at a nominal cost. Repair charges and postage may be prepaid or billed COD. Additional postage charges will be applied for non-warranty returns.
All repairs shipped outside the United States must be prepaid in U.S. funds only. All pictures, descriptions and specifications found in this
instruction manual and on the product package are subject to change without notice. Hobbico maintains no responsibility for inadvertent errors.

ASSEMBLY INSTRUCTIONS

© Copyright 2001

HCAZ3083 for HCAA2101  V1.0

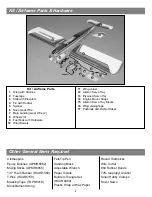
Wingspan: 71" [1,803mm]
Wing area: 887.5" [57.24 sq. dm.]
Weight: 7 lbs [3,630g]
Wing loading: 18 oz/sq ft [55 g/sq. cm]
Length: 55" [1,397mm]
Radio: 4-ch (four servos)
Engine: .61 two-stroke, .91 four-stroke

[10cc 2-stroke, 15cc 4-stroke]

Содержание Hobbistar 60 MKII

Страница 1: ...as quickly as possible 1 ALWAYS return your entire system including airplane and radio 2 Disconnect the receiver battery switch harness and make sure that the transmitter is turned off Disconnect all...

Страница 2: ...ow to Purchase Missing pieces Contact Hobby Services see warranty front page Plans Construction Plans Plans are not available for ARF models Manual Instructions Contact Hobby Services see warranty fro...

Страница 3: ...ng Joiner 12 Aileron Servo Tray 13 Plywood Servo Tray 14 Engine Mount Straps 15 Aileron Servo Tray Blocks 16 Wing Joining Tape 17 Pushrods and Pushrod Tubes 14 17 Clothespins Epoxy Brushes GPMR8062 Mi...

Страница 4: ...the location of the throttle servo and throttle pushrod exit on the firewall so plan ahead Radio Equipment In selecting a radio system for your Hobbistar 60 MKII you ll need at least a 4 channel radi...

Страница 5: ...ns Before you fly 1 Make sure that no other fliers are using your radio frequency 2 Your radio transmitter must be the FIRST thing you turn ON and the LAST thing you turn OFF 3 Double check all contro...

Страница 6: ...eral amount of 30 minute epoxy to the joiner and the wing ribs Put the wing joiner into the joiner box in the wing and push the two wing halves together and allow the glue to cure 4 Use masking tape t...

Страница 7: ...to accommodate most servos If it is not deep enough for your particular brand of servos glue the servo tray to the two 1 4 6mm balsa blocks included in the kit and then glue the blocks to the wing wi...

Страница 8: ...the fuselage Do not glue it in place 6 Apply a piece of masking tape across the top of the fuselage at the back of the wing saddle Mark the center of the fuselage on the tape Insert a T pin on the cen...

Страница 9: ...r in relation to the wing The distance from the top of the stab to the bottom of the wing should be the same If each end of the stabilizer is not equal in distance from the wing lightly sand one side...

Страница 10: ...selage bottom The hole needs to be drilled at a 30 angle Cut one of the white tubes to 11 and rough it up with 240 grit sandpaper Insert the tube into the fuselage so that the end of the tube is even...

Страница 11: ...m screws All three wheels should turn freely If not trim the inside of the wheel slightly 1 Locate the two metal engine mount straps 2 Put your engine onto the engine mount Note Depending on your engi...

Страница 12: ...ssembly into the fuel tank and tighten the stopper screw 7 Install the tank into the fuel tank compartment Apply a bead of silicone sealant around the fuel tank cap when installing the tank into the f...

Страница 13: ...here the holes need to be drilled Note When installing the control horns the centerline of the control horn holes must be the same as the center line of the hinge joint as shown in the above sketch Dr...

Страница 14: ...included with your radio system 5 Plug the switch into the receiver and the receiver battery Plug the servos into the receiver consult your radio instruction manual for proper installation if you are...

Страница 15: ...on the transmitter and receiver Set the throttle to full open Install the pushrod into the other screw lock pushrod connector then open the carburetor on your engine to full open Connect the throttle...

Страница 16: ...recommended by the engine manufacturer along with the spinner By moving the position of the clevis at the control horn toward the outermost hole you will decrease the amount of throw of the control su...

Страница 17: ...anced will be unstable and possibly unflyable 1 The balance point C G is located 3 1 2 89mm back from the leading edge of the wing Balance your Hobbistar 60 using a Great Planes C G Machine Airplane B...

Страница 18: ...ing servo horn screws clevises servo cords and extensions Follow the battery charging procedures in your radio instruction manual You should always charge your transmitter and receiver batteries the n...

Страница 19: ...ed room or garage Get help from an experienced pilot when learning to operate engines Use safety glasses when starting or running engines Do not run the engine in an area of loose gravel or sand the p...

Страница 20: ...vator stick on your radio Maintain a gentle climbing attitude until the plane is approximately 75 feet high then begin a turn away from the pit area Once airborne you will find that the plane is a ver...

Страница 21: ...model is statically trimmed It s only a starting point so don t be surprised if you wind up changing it all One other critical feature is that the ailerons must have their hinge gap sealed If shoving...

Страница 22: ...on problem while a loss of heading on the way back down is most likely a rudder situation Note that the Yaw test is the same looping sequences Here however we are altering rudder and ailerons instead...

Страница 23: ...de loops D Yaws right on insides and left on outside loops E Yaws left in insides and right on outside loops A Wings are level and plane falls to either side randomly B Falls off to left in loops Wors...

Страница 24: ...d Date __________________ Where Purchased ___________________ Date Construction Started _____________ Date Construction Finished __________ Finished Weight ____________________ Date of First Flight __...

Отзывы: